Advanced Tag Management
Manage Your Tags
While most of your tags will come from your Ewon Flexy, you might wish to create internal tags. An internal tag will get its value from the initial value property or from an Expression.
Modifying Tags:
Tags are managed at the Controller level of your machine or template.
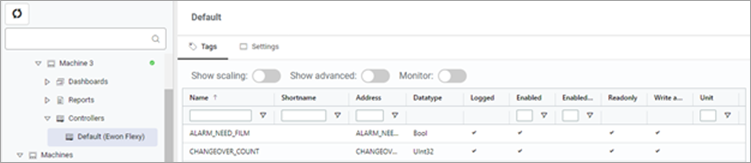
To add, delete, or modify tags, navigate to the Configuration menu.
Expand your Machine or Template menu to find your Controller.
Select the Tags screen.
Select the Edit menu to use the Add Tag or Delete Selected Tags commands and to make the tag fields editable.

Tag Parameters:
Standard Parameters
The standard tag parameters displayed on the tag screen include:
Parameter
Description
Name
Name of tag. Used to identify tags in widgets
Short Name
Short name that will be displayed in some widgets
Address
Tag name on the Ewon Flexy
Data Type
Data type of tag in Ewon Flexy
Logged
If tag is stored in the database and historical data can be shown in widgets and reports
Enabled
Checked if the tag is read from the Ewon Flexy
Enabled Condition
A condition that is evaluated to determine if the Flexy tag should be read
Read only
Default checked. Uncheck this field if you will update this tag's value through an expression
Write authentication
Uncheck this field if you will update this tag's value through an expression
Unit
Unit of value. Will be displayed in some widgets
Number of decimals
Number of decimal places to display in widgets
Description
Description of tag
Scaling Parameters
Use the Scaling fields to adjust how the tag values from the Ewon Flexy are scaled.
Note
The offset gain value affects the values with the following formula: Value = Offset + (Gain * ReadValue)
Note
You can also add maximum and minimum value limits:
CalculatedGain = Abs(ScaledMax - ScaledMin) / Abs(Max-Min)
ScaledValue = ReadValue * CalculatedGain * Gain
Value = ScaledValue + ScaledMin + Offset
Toggle the Scaling switch to display or hide the scaling parameters.
Parameter
Description
Min
Minimum value for the read tag value
Max
Maximum value for the read tag value
Scaled min
Minimum value after scaling
Scaled max
Maximum value after scaling
Gain
Gain multiplied with the read tag value. Default value is 1
Offset
Offset added to the read tag value. Default value is 0
Advanced Parameters
Toggle the Advanced switch to display or hide the advanced parameters.
Parameter
Description
Deadband
Used to identify if a value has changed. Options: None, Absolute, or Percent
Deadband value
Amount of change to trigger a new value change event
External ID
Internal tag ID from the Ewon Flexy. Empty for internal tags
Aggregate length
The time frame used for aggregated data. It can be used for visualizing data in the trend widget and for calculations.
Initial value
Initial value for internal tags. Empty for tags from the Ewon Flexy
Expressionable
Used to indicate if a tag can be used in an expression. Default unchecked.
Must be checked for a tag that will used in an expression OR updated by an expression
Expression
Click to bring up the expression editor
Monitoring Tags:
Users with sufficient access rights can also use the Monitor option to see current tag values and their update times.
Toggle the Monitor switch to display or hide the monitoring fields.
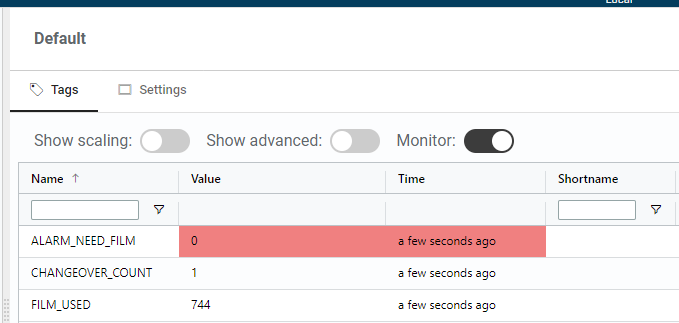
Notice
The Time field indicates the time when the data visualization extension read the value from the Ewon Flexy.
It does not indicate the time the value was read from the PLC.
Create Expressions
Expressions are calculations that are applied to a tag value.
By using expressions, you can make a tag more meaningful to a user or combine the information from one tag with that of another.
You can either create a new internal tag if you want to store the calculated data or add it to an existing tag if you don't want to store the original value.
Create an Expression:
To create a new Expression, navigate to the Configuration page.
Expand your Machine or Template menu to find your Controller.
Select the Tags screen.

Toggle Show Advanced.
Mark the tags that you will reference in an expression as Expressionable.
Note
The tag that will hold the result of the expression needs to have the Read Only parameters and the Write Authentication parameters unchecked.
It will also need to be marked as Expressionable.
Click on the Expression field to bring up the expression editor.
Once the expression is built, use the Test Expression button to check that it works as expected.
Click the Save button to save your Expression.
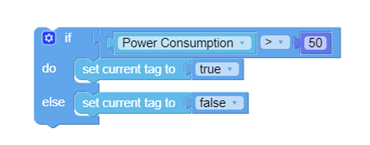
Examples:
Sum of Two Tags
You can modify the If/Else conditions if you click on the Settings button.

Is Running Based on Power Consumption
Configure Alarms and Events
While you can configure Alarms and Alarm Notifications on your Ewon Flexy, those events might not be the ones you want the users of the data visualization extension to see. You can create separate events within the extension.
Events can be divided into two categories:
Alarm Events
Alarm events appear in the Alarm widget of the dashboard.
Service Events
Service events appear in the Service Log widget of the dashboard. They are entered manually.
Events can be generated automatically based on the value of a tag from your Ewon Flexy or they can be entered manually.
Event Management:
To configure an Event, navigate to the Configuration menu.
Select your Machine or Template to configure.
Select the Alarms & Events tab.
Select the Edit menu.

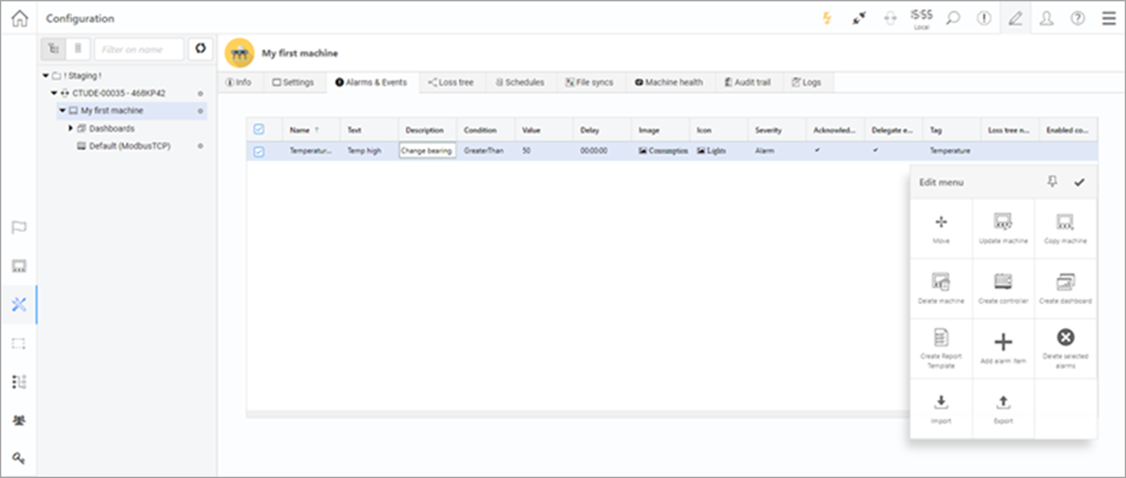
From here, you can add, modify or delete selected Events.
The Event parameters include:
Parameter
Description
Type
Type of event. Possible values include Alarm and Service
Name
Name of the event. Used to identify event in widgets
Text
Text of event item displayed in widget
Description
Text of event item displayed in alarm or service detail widget
Condition
Trigger condition. Possible values include GreaterThan, LessThan, EqualTo,NotEqualTo, Unchanged
Not used for manually entered alarms
Value
Trigger value
Delay
If Condition is Unchanged, the delay is the amount of time since the tag was last changed before an event is triggered
For other conditions, it is the amount of time the condition must be true before the event is triggered
Image
Image shown in event detail widget
Icon
Icon shown in event list widget
Severity
Severity of the event. Possible values: Alarm, Debug, Event, Information, Warning
Acknowledge enabled
Checked if event needs to be acknowledged before it is moved to the history list
Tag
Tag to evaluate for this event condition. Leave this field blank for manually entered events
Enabled condition
A tag that enables/disables the event
Service Events:
Service Events are selected by the user from a list of Service Types.
To configure an Event, navigate to the Configuration menu.
Select your Machine or Template to configure.
Select the Service tab.
Click on the Edit menu.

To add a type, click the Add Type button. A new type will be added.

Click on each field to configure the event.
Note
Service Events can also be configured in the Service Log widget from the dashboard Configuration page.
Note
If you wish to delete a service type, click on the Delete icon next to the Service Type.
The Service Type parameters include:
Parameter | Description |
|---|---|
Icon | Icon shown in the service log widget |
Name | Name of service type displayed in widget |
Text | Text of service type displayed in widget |
Description | Description of service type displayed in widget |