Mitsubishi Electric
You can use the Ewon device to access remotely a Mitsubishi® PLC.
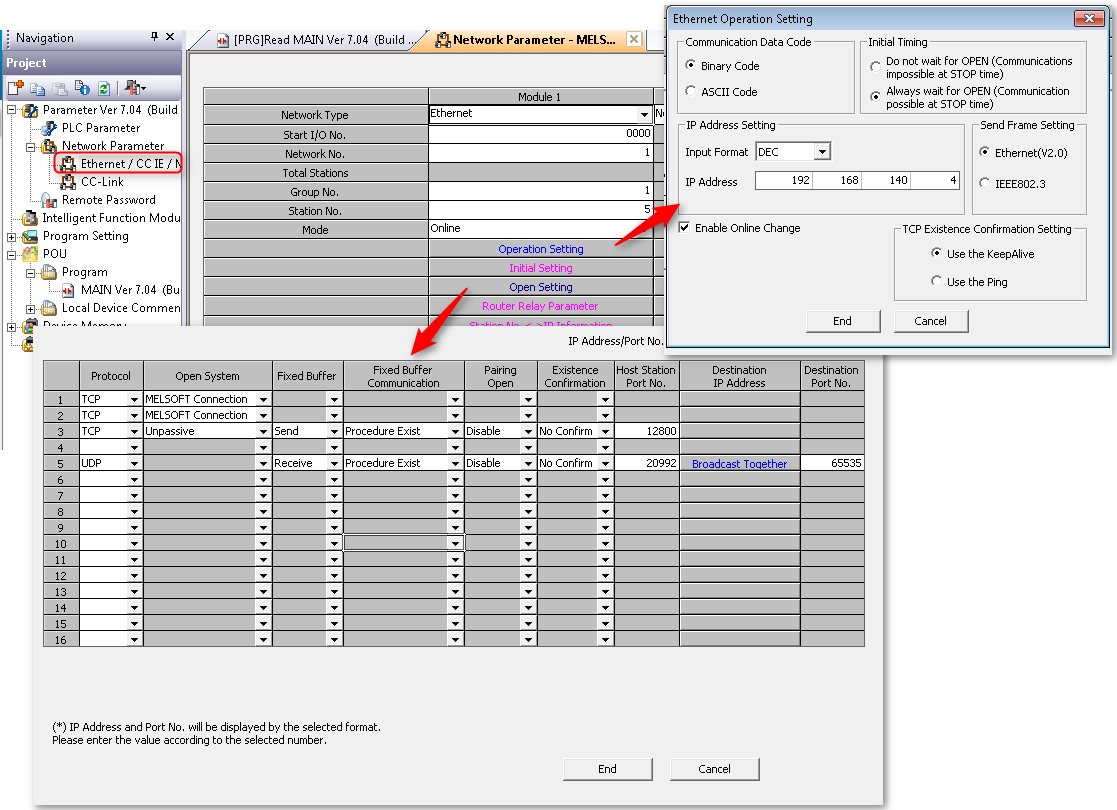
Prior to the in-depth PLC configuration, the right-sided picture shows the network parameter configuration of the GX Works Mitsubishi software.
Different simplified configurations are explained depending on the model of the PLC.
Q series with QJ71E71 extension card
QCPU series
FX series with FX3U-ENET extension card
FX3GE series
FX5U series
You can find a more detailed explanation of how to remote access a Mitsubishi® PLC in the Resources section below.
PLC tagged as Q series with the QJ71E71 extension card
The QJ71E71 extension card provides an additional Ethernet port which is used to configure the GX Works software, provided by Mitsubishi.
The summary of the configuration process is shown in the picture.

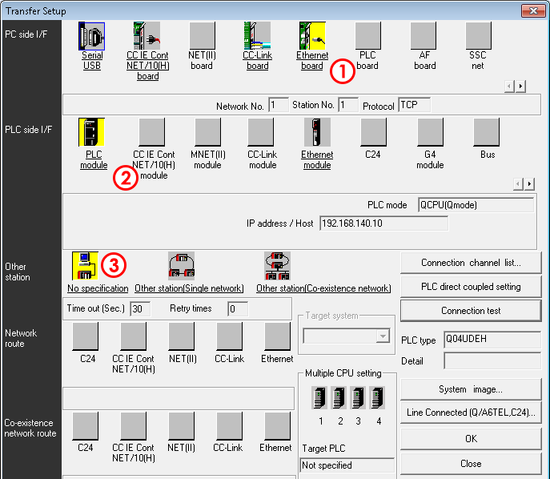
Step 1
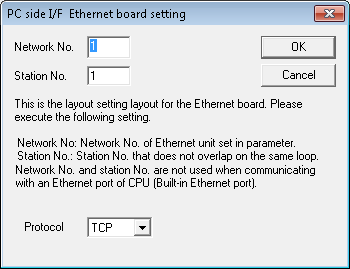
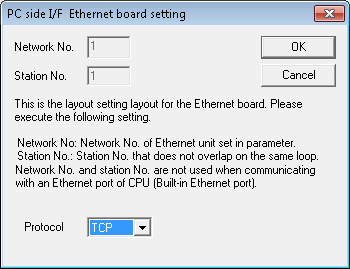
In the Transfer Setup window, select Ethernet board in the PC side I/F row of the Transfer Setup frame.
It may happen that on some interfaces of old software versions, you are asked to define a station number.
This would be the definition of the station number which corresponds to the station number of the PC.
This one must be different from the PLC’s station number.Hit the OK button.
Step #2
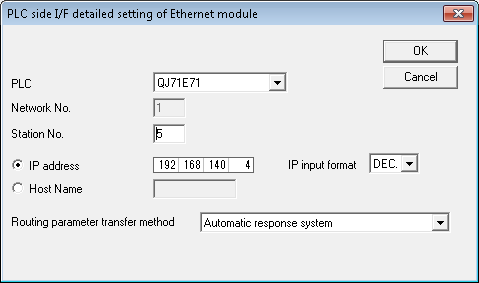
Click Ethernet module in the PLC side I/F row.
Give the IP address and the station number of the PLC.
Remember to differentiate the station number (between the PC and the PLC).Hit the OK button.
Step #3
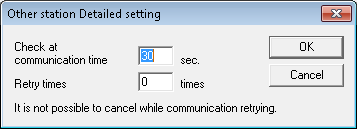
Click on Other station (single network) in the Other station row.
Set the communication time checker. Hit the OK button.
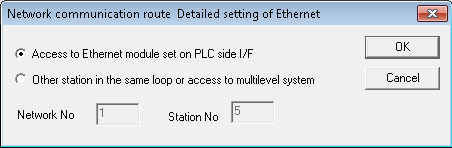
Step #4
Select Ethernet in the Network route section.
Check the option Access to Ethernet module set on PLC side I/F.
Hit the OK button.
Step #5
You are done with the configuration of the software.
Perform a test connection to make sure everything is working as it should.
PLC tagged as FX series with a FX3U-ENET extension card
The FX3U-ENET extension card provides an additional Ethernet port which is used to configure the GX Works software, provided by Mitsubishi.
Step #1
In the Transfer Setup window, select Ethernet board in the PC side I/F row. It may happen that on some interfaces of old software versions, you are asked to define a station number.
This would be the the station number of the PC that has to be different from the PLC station number.
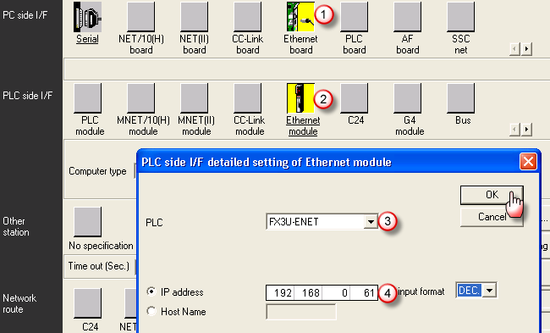
Step #2
Select Ethernet module in the PLC side I/F row.
Step #3
Select your FX3U-ENET extension card.
Step #4
Put the IP address of the PLC.
Step #5
You are done configuring the software. Perform a test connection to make sure everything is working as it should.
PLC tagged with the FX3GE series
The FX3GE series provides an embedded Ethernet port which is used to configure the GX Works software, provided by Mitsubishi.
The summary of the configuration process is shown in the picture.
Step #1
In the Transfer Setup window, select Ethernet board in the PC side I/F row.
It may happen that on some interfaces of old software versions, you are asked to define a station number.
This would be the definition of the station number which corresponds to the station number of the PC.
This one must be different from the PLC’s station number. Hit OK to come back to the main window.
Step #2
Select PLC module in the PLC side I/F row.
Check the Connection via HUB box and provide the IP address of your PLC.
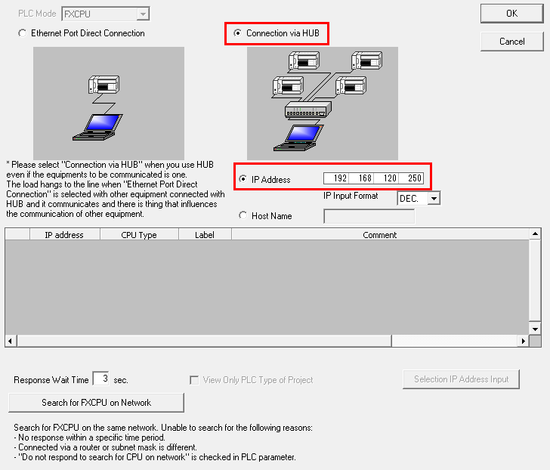
Step #3
Click No Specification from the Other Station Setting row.
You're done with the configuration of the software.Perform a test connection to make sure everything is working as it should.
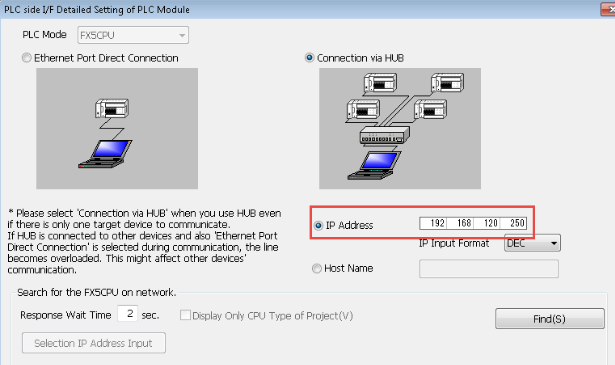
PLC tagged as iQ-F series with the FX5U series
The FX5U provides an embedded Ethernet port which is used to configure the GX Works software, provided by Mitsubishi.
The summary of the configuration process is shown in the picture.
Step #1
In the Transfer Setup window, select Ethernet board in the PC side I/F row.
It may happen that on some interfaces of old software versions, you are asked to define a station number.
This would be the definition of the station number which corresponds to the station number of the PC.
This one must be different from the PLC’s station number.
Hit OK to come back to the main window.

Step #2
Select PLC Module in the PLC side I/F row.
Check the Connection via HUB and provide the IP address of the PLC.
Step #3
Configuration is done. Perform a test connection to make sure everything is working as it should.
Tip
Find more out more in our document Remote Access for Mitsubishi PLC(s).