Ewons
The Ewons window contains two different sections:
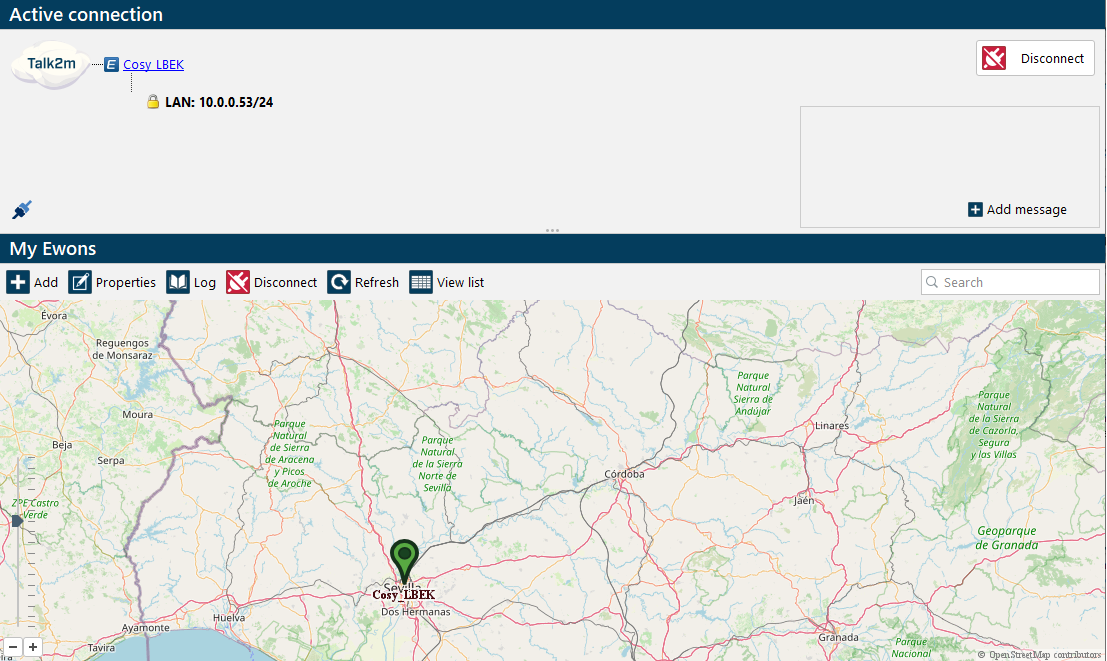
Active connection
My Ewons
Active Connection:

The active connection section displays information about the Ewon you are currently connected to.
For detailed information on the active connection section, refer to the Connect to an Ewon section.
My Ewons:
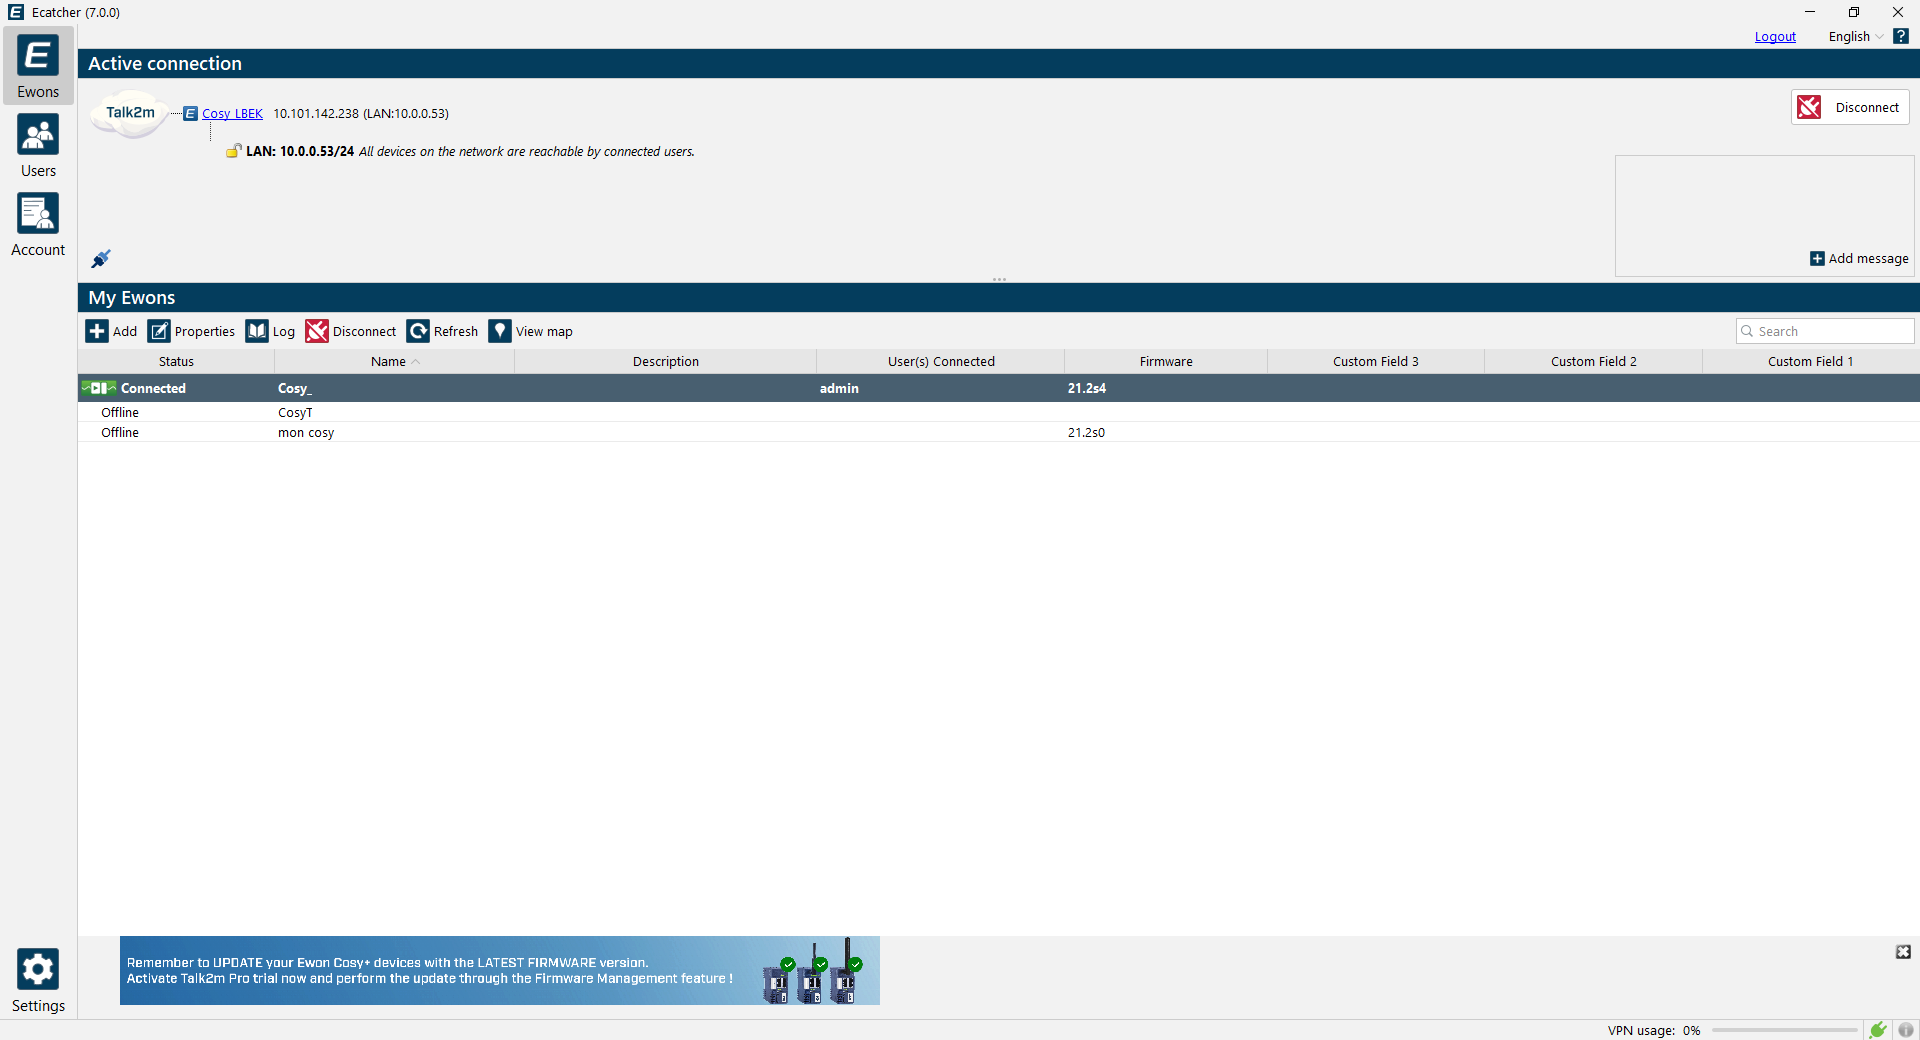
The My Ewons section lists all the Ewons you have access to.
Two types of view are offered:
The List view (default view)
The Map View
To ease the search for a specific Ewon, a search box is available on the right side of the My Ewons toolbar. The search tool will look inside each displayed column to find a match with the search term.
It is possible to customize the way the information is displayed inside the Ewon list (Ewon List customization)
The status column of the Ewon List indicates the status of each Ewon.
Icon | Status | Definition |
|---|---|---|
N/A | Offline | Ewon is currently disconnected from Talk2m. |
 | Offline | Ewon is currently disconnected from Talk2m. A wake-up SMS can be sent to trigger the Ewon connection. |
 | Online | Ewon is currently connected to Talk2m. A connection to this Ewon is possible. |
 | Online | Ewon is currently connected to Talk2m. A connection to this Ewon is possible. The Ewon uses a triggered connection. You should send this Ewon offline if you do not need to connect to it anymore. |
 | Connected | You are currently connected to this Ewon. |
 | Pending | This Ewon has been added by the auto-registration feature via an SD Card and is waiting for approval before being added to the Talk2m account. |
 | Certificate Notification | Your Ewon must update its VPN certificates to connect to Talk2m. To update such certificates, you must locally rerun the Talk2m wizard. |
Send a Wake-up SMS to the Ewon:
If your Ewon uses a triggered Internet connection (a non-permanent cellular connection), then before starting the remote connection you'll first need to trigger the Internet connection of the Ewon. This can be done by sending a Wake-up SMS to the Ewon.
To send out the SMS:
Select the Ewon inside the Ewon list and right click the selected line.
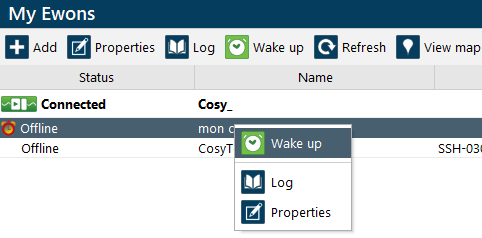
Click on the Wake up button to send the SMS to the Ewon.
Send the Ewon offline:
If your Ewon uses a triggered Internet connection (a non-permanent cellular connection), then you should disconnect the Ewon from the server once your intervention is over.
To send the Ewon offline:
Select the Ewon inside the Ewon list and right click the selected line.
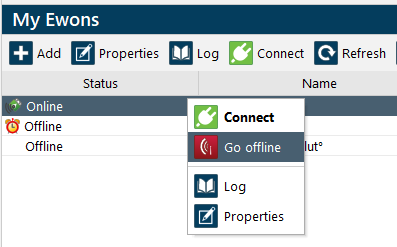
Click on the Go Offline button to send an order to the Ewon to close its Internet (modem) connection.
Approve a pending Ewon:

When using the Talk2m autoregistration feature, the Ewon that was imported is marked as Pending.
Click on the Approve button to completely integrate it in the account.
Two choices are available :
Approve this Ewon
Replace an existing Ewon
For more information about the approval procedure, please refer to the Approve an Ewon section
Connect to an Ewon
Connect to an Ewon:
Select an online Ewon inside your Ewon list and double-click on the line or click on the Connect menu button.
The progress of the connection is displayed inside the Active Connection section located above the Ewon list.

Tip
You can click on the Cancel button to stop the connection process.
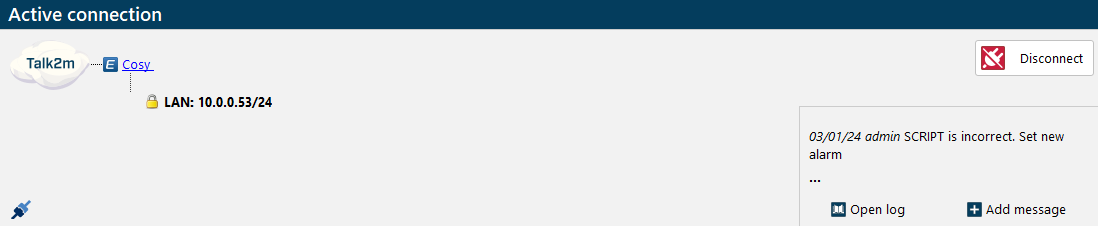
Once the connection to the Ewon has been established, the Ewon will be displayed inside the Active Connection section:

In the first line, the Ewon's name, Ewon's VPN IP address and its LAN IP address are displayed.
Clicking on the Ewon name will open the Ewon web pages using its VPN IP address.
The sub-lines under the Ewon's name represent the Gateway and LAN devices if they have been declared for this Ewon.
The padlocks indicate which firewall level is applied for this Ewon (see Device & Firewall).
To disconnect from the Ewon, click on the Disconnect button.
The Logbook is useful to register messages for future uses or others users about what you have done to the Ewon or the devices connected to it. See the section Logbook for more details.
If the Auto-reconnect feature is enabled, Ecatcher will automatically try to reconnect to the Ewon in case the connection drops.
USB Connection:
If a USB key is plugged into your Ewon device, you will be able to connect to it.
To do so, click on the Connect link near the name if the USB device.
When you want to terminate the connection, just click Disconnect.
USB device disconnected

USB device connected

For more information, please refer to our KB-0239 USB over IP.
Logbook:
A Logbook aims at logging everything you think useful that concerns the Ewon you are connected to.
Via this Logbook, you can leave a message or a trace of what you have done while you were connected to the Ewon.
This can be the actions you performed on the Ewon or the devices connected to it, a reminder of what needs to be done the next time, a remark for a specific user, etc.
More information about this logbook can be found in the Log section.
Ewon List customization
By default, Ecatcher displays 6 columns:
Status,
Name,
Firmware,
Custom Fields #1,
Custom Fields #2,
Custom Fields #3.
You can customize the way the information is displayed inside the Ewon list:
Columns can be moved by drag and drop:

Columns to be displayed can be selected:
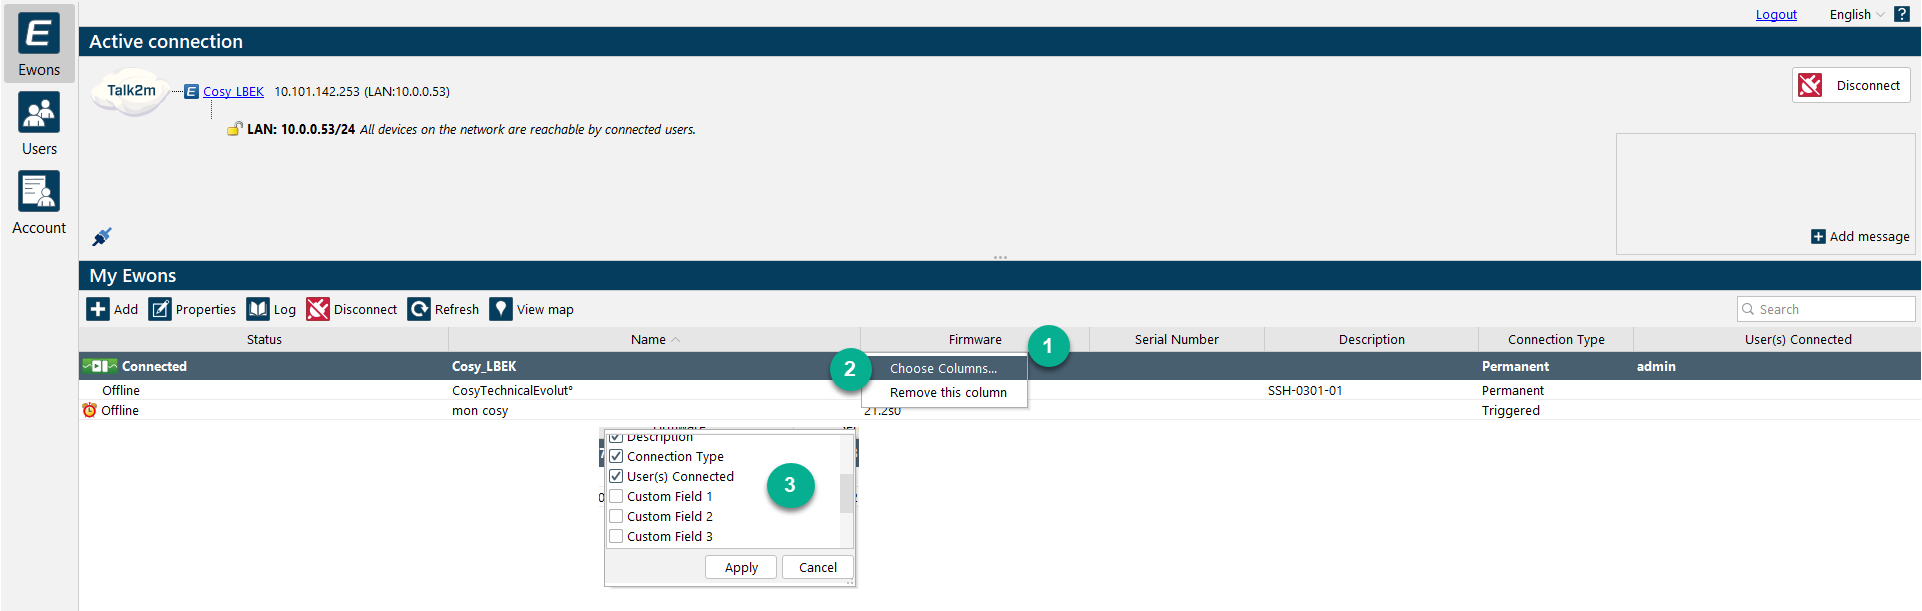
Right click on any column header. A pop-up window opens.
In this pop-up select Choose Columns.... Another pop-up window opens.
In this new pop-up, check or uncheck the relevant columns headers.
Elements that can be selected:
All
Status
Name
Description
User(s) Connected
Custom Field #1
Custom Field #2
Custom Field #3
VPN IP
Connection Type
LAN IP
LAN network mask
Serial number
Phone number
Date of status
Firmware
Click Apply.
The column width can be adjusted by clicking between two columns and holding the left mouse button while dragging:

The list can be filtered to show only the devices you want to see.
To do so, use the search bar to look for the desired Ewon:
Add an Ewon
To add an Ewon click on the Add button on the top of the Ewon list window.

Inside the first page of the wizard specify:
Ewon Name:
Enter a name to identify the remote connection to this Ewon.
Description:
(Optional) Enter additional text to provide more information about this Ewon or the equipment connected to it.
Connection Type:
Permanent: If your Ewon is connected to the Internet through a wired, WiFi, or always on modem connection
Triggered (cellular): If your Ewon is not connected permanently to the Talk2m server and you want to trigger the Internet connection of the Ewon using a Wake-Up SMS.
If you select the Triggered type, then you'll also need to encode the phone number of the Ewon.
Important
Encode the phone number with the country prefix.
On the second page of the wizard you can specify the custom fields linked to this Ewon. These fields are optional.
Each Ewon has 3 custom fields which allows recording additional information related to the Ewon.
Click on the Create button to finish the Add Ewon wizard.
Ecatcher automatically displays the Talk2m Connectivity settings linked to the Ewon you just created.
The Talk2m Connectivity window allows you to select which method should be used to configure the VPN connection of the Ewon:
Copy the Internet and VPN configuration parameters for the Ewon on a USB or SD card.
Copy the Activation Key that will be passed in the Talk2m / VPN wizard of your Ewon.
Copy the Name of the Ewon.
Send an sms to automatically configure the VPN settings of your Ewon. (Only for Ewon with a cellular modem and set for a triggered connection.).
Properties
To display the Properties page of an Ewon:
Select the Ewon inside the Ewon list
Click on the Properties button on top of the Ewon list window:

The Ewon Properties page is composed of different sections:
General Information:
Shows the general description of the Ewon like its Name, Description, Custom fields and Serial Number.
Click on the Modify... button to change these settings.
Notice
The Ewon serial number is encoded automatically during the Talk2m wizard execution on the Ewon itself.
The serial number cannot be changed inside Ecatcher.
Geolocation:
Shows where your Ewon is located. More information in the Ewon Geolocation section
VPN Information:
Shows the VPN status and other useful VPN information of this Ewon.
For example: OFFLINE since 29/11/13 15:45:50 , its VPN IP was 10.237.153.103
It also indicates the connection type configured for this Ewon:
- Permanent connection
- Triggered GPRS/EDGE/3G connection
- Triggered PSTN connection
Click on the Modify... button to change the connection type and/or the associated phone number.
LAN & Firewall:
Displays the Ewon LAN IP address and lists the encoded LAN devices for this Ewon.
Notice
The Ewon LAN IP address is encoded automatically during Talk2m wizard execution on the Ewon itself.
If you need to modify this IP address for some reasons, click on the Modify LAN subnet... button.
Click on the Configure LAN Devices & Firewall... button to display the Device & Firewall settings.
Clicking on the Show advanced settings... will display further sections:
Access & Security:
This section lists the different users who have access to this Ewon. It also specifies the type of access the user has on the Ewon.
Example: admin, Tom Sawyer [TSR], John Smith [jsh] and 2 other user(s) can modify and connect to this Ewon.
Tip
To see the other users which have the same access rights, hover your mouse on the info icon at the end of the text.
A list will show up displaying all users having the same type of access on this Ewon:

Caution
You'll only be able to see the users belonging to the user groups to which you were granted the access rights (not included in free and light plans).
Log in as a user with Administrator rights to display all allowed users with access or modification rights for this Ewon.
Devices & Firewall
The Device and Firewall window allows you to declare the devices that are connected to the Ewon and to define the firewall settings applied to those devices. See LAN device section.
The path to the Device & Firewall configuration window is :
Select the Ewon from the list.
Click on Properties.
Go to Configure LAN Devices & Firewall...
Notice
More firewall options are available with a Talk2m light or pro account.
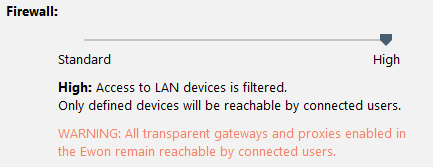
You can modify the Firewall Security Level by moving the Firewall slider displayed at the bottom of the Device & Firewall window:
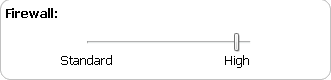
Firewall levels:
A Talk2m free+ account features 2 different firewall levels.
Level
Description
Standard
No firewall is applied on the Talk2m server.
The connected users have access to all devices on the LAN, to the Ewon gateway and to the Ewon itself.
High
The Talk2m firewall is applied on the LAN-Devices. Only the declared LAN devices are accessible on specified ports.
The Ewon itself and its gateways remains unfirewalled, so accessible by connected users
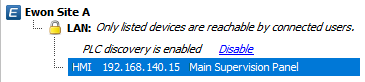
Padlock Firewall Level representation:

The padlocks reflect the Firewall Settings applied on the Gateway and LAN level.
A closed padlock signifies that the access is firewalled. Only declared devices, ports and/ or gateways are accessible.
An open padlock indicates that no firewall is applied.
The padlock will also be displayed inside the Active Connection window of Ecatcher, so the user can directly see which firewall settings are applied on this Ewon.
LAN Device
Defining the accessible LAN devices behind an Ewon is necessary for limiting access to the LAN network (machine network) and for making devices visible in M2web.
To add a LAN device to an Ewon:
Select the Ewon in the Ewon's list and click on Properties.
In the LAN & Firewall section, click on Configure LAN devices & Firewall.... The Devices & Firewall window opens:
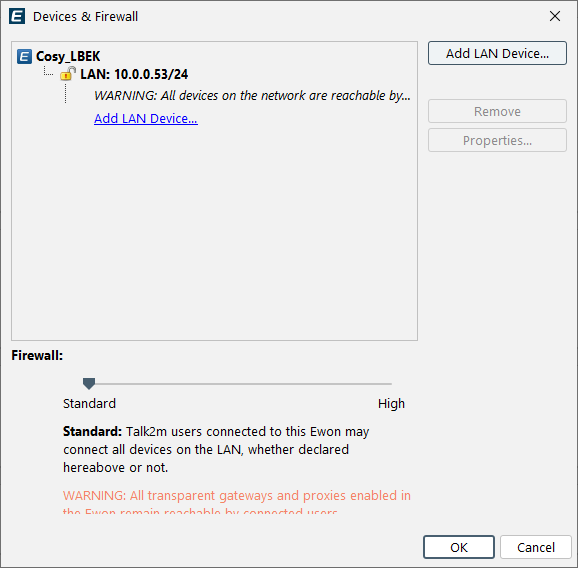
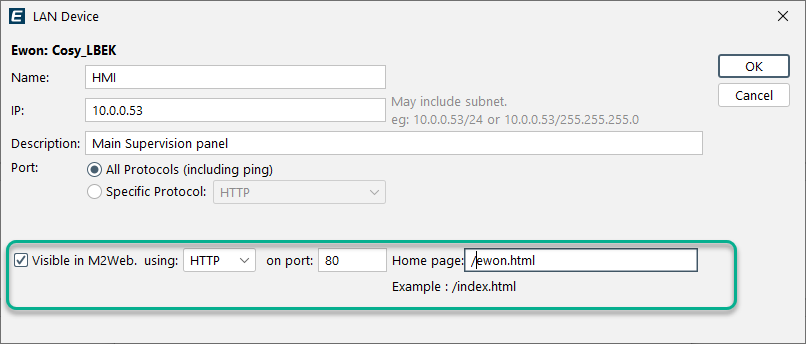
Click on Add LAN device... to open the LAN Device settings.
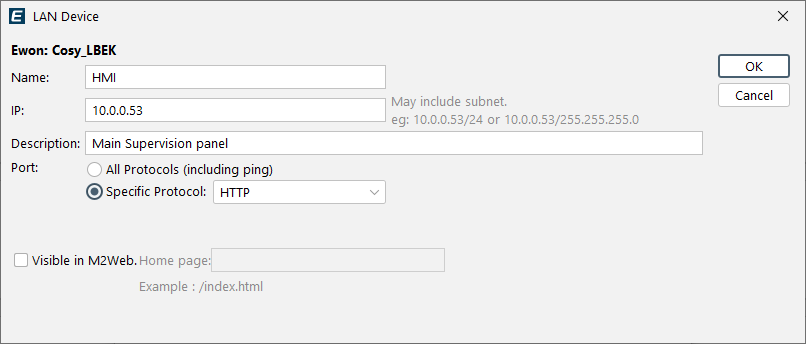
Give a name to your LAN device, specify its IP address and optionally write a description.
For the Port field select All Protocols if they are all open or Specific-Protocol if a specific port must remain open.
Notice
To limit the access to a specific protocol, select the protocol you want to allow on the device inside the Specific Protocol list.
For example, ISO TCP (Siemens) or EIP (Rockwell).
You can also define custom ports using following syntax:
T405 => TCP port 405
U9600 => UDP port 9600
T443,U1194 => TCP port 443 & UDP port 1194
In the option Visible in M2web; you can define whether the device will be visible or not using M2web access.
Depending on the configuration, the Visible in M2web will ask for details about:
- The protocol to use for this device (4 options: HTTP, HTTPS, VNC or RDP)
- The home page or URL that will be used when clicking on the device's name in M2web. The URL can contain anchors and/or arguments. This field is optional.
Notice
On a Talk2m Pro account you can also restrict the access to a specific user group.
On a free+ account this restriction is not available. All declared users of the account will have access to the device.
When the information is encoded, the Firewall slider is automatically shifted to position High since it is the position required to activate the firewall protection at the LAN side.
The new LAN device appears with a closed padlock under the structure of the relevant Ewon:
The firewall level can be manually moved back to Standard if you do not want to activate the firewall protection.
PLC Discovery:
The LAN Device section is also the place to configure the PLC Discovery.
The PLC discovery feature allows PLC connection software to automatically detect devices on the Ewon's LAN network when you are connected to the Ewon through Ecatcher.
Notice
This feature is available on the Ewon beginning with firmware v12.
By default, the PLC Discovery feature is activated in Ecatcher.
When the firewall is set on Standard, the feature will not be displayed.
If it is set to any other firewall level than Standard, a new line will appear underneath the LAN heading and will allow you to disable it.
Tip
For more information about the PLC Discovery on the Ewon, please refer to the AUG-070: PLC Discovery through Talk2m.
Ewon Geolocation
The Ewons linked to a Talk2m account can be represented on a map.

Multiple actions can be performed:
Zoom in/out: The tools in the lower left corner allows to decrease or increase the view of the map.
Change the location: Right-click somewhere on the map to indicate a the new location of the selected Ewon.
Notice
If the Ewon has already been relocated, right-click and choose Reset to default location to fall back to initial position (calculated by Talk2m service).
Note
Depending on the type of connection (Ethernet, WiFi or cellular), the accuracy of the location may vary.
For more information about the geolocation feature of the Ewon, please refer to View Map section.
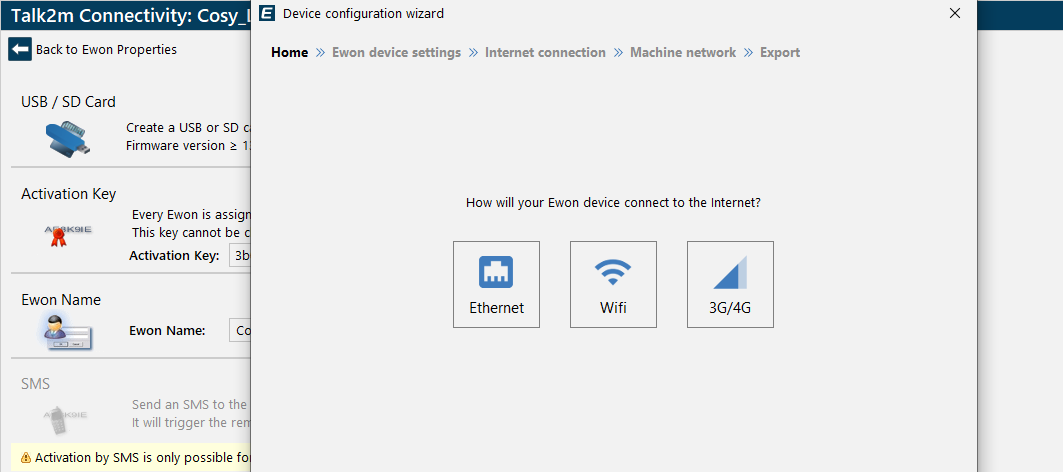
Talk2m Connectivity

Click on the Talk2m Connectivity button on the top of the Ewon Properties page to display the information required to connect the Ewon to the Talk2m server.
In the Talk2m Connectivity window, you can select the VPN connection configuration method.

USB / SD Card:
This method copies the communication parameters responsible for the configuration of your Ewon on a USB key or SD card.
By clicking the Launch Setup Wizard, Ecatcher starts a step-by-step configuration wizard where you can set the configuration parameters that will be copied to your Ewon from your USB key or SD card..
In the first wizard window, you can modifiy the properties of Ewon Ewon® Cosy+ devices (ONLY) (such as the Ewon's name or NTP settings) and change the Ewon's password.
Ewon & Flexy can skip that step and start with Ewon Internet configuration. At the end of the wizard, you can select where to save the file with all the parameters.
The USB key or SD card must then be inserted in your Ewon to apply the configuration.
Tip
For more details on how to use the SD card / USB drive with the Ewon, please refer to the AUG-0062-00: Easy Commissioning via SD Card & USB Drive.
Activation Key:
By copying the activation key directly in the Talk2m VPN wizard on the Ewon itself, the Ewon creates automatically the link to Talk2m.
Ewon Name:
The name plus valid Talk2m user credentials can be used as an alternative to the activation key in the Talk2m VPN wizard on the Ewon itself.
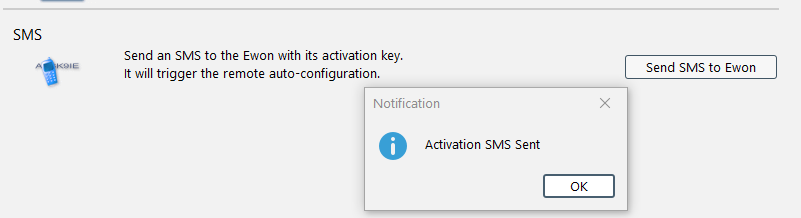
SMS:
You can choose this method only if your Ewon is equipped with a cellular modem and if it is set as a triggered device.
This method sends an sms to your Ewon with all the configuration needed to link the Ewon to Talk2m.
Duplicate
The Duplicate button on the top of the Ewon properties menu lets you make a copy of the displayed Ewon.

To duplicate an Ewon:
Click on the Duplicate button. A pop-up window appears.
Enter the name for the new Ewon and click OK.
The newly created Ewon will have exactly the same configuration settings including:
- Description
- Custom fields
- LAN devices and firewall settings
- User access rights
- Ewon pools
To change the configuration settings of this new created Ewon, select it inside the Ewon List and click on the Properties button.
Delete
The Delete button on the top of the Ewon properties menu lets you delete this Ewon out of your Talk2m account.

A pop-up will ask you to confirm the deletion of this Ewon.
Notice
If you only want to block temporarily the access to this Ewon, and you'll need to reactivate it later, then use the Disable Ewon feature instead.
Disable
The Disable button on the top of the Ewon properties menu lets you temporarily block connects to this Ewon without deleting it.

If the Ewon is currently online, a confirmation pop-up appears.
When an Ewon is disabled, the Ewon properties background becomes dark gray and the Disable button changes to an Enable button.
To enable this Ewon again, click on the Enable button.

Notice
Inside the Ewon List, the disabled Ewon will be displayed in gray and in italic. No connection will be possible to this Ewon (i.e. windmill).
Logs
To display the logs of an Ewon:
Select the Ewon inside the Ewon list
Click on the Log button on the top of the Ewon list window.

A new window will open, showing all of the monitored events of the selected Ewon(s) in a chronological order.
In this view, you can see:
The date and time stamp of the action
Who performed an action on the Ewon (i.e. USR34975 = User ID / DEV67498 = Device ID)
What's the Ewon doing by itself (i.e. DEV67498:[vpn4] Ewon Status Online)
The status of the Ewon (Online, Establishing, Offline)
Notice
You can also select multiple Ewons to display the log of the selected group of Ewons.
Beneath the title Log, you will see buttons for different action:
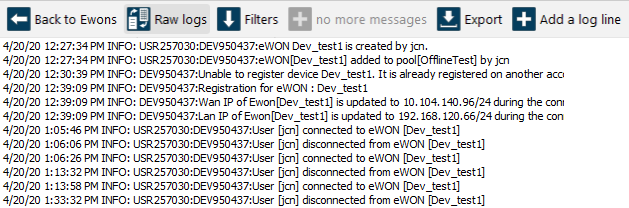
Raw logs:
This view doesn't offer any customization. You will just be able to see the plain text information retrieved from Talk2m.
The information will always be presented in the same way:
First you will see the day the event occurred.
Then the time.
Then the event itself (connection/disconnection of a user, wake up of an Ewon...).
Detailed Logs:
This view allows you to sort your events on different parameters.
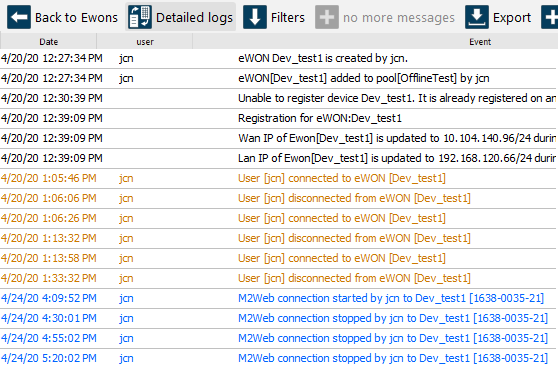
Right-click on the column title you will be able to:
Apply or remove a filter to show the result only for several values.
Choose which columns you want to see or hide in your log.
Filters:
By checking or unchecking the boxes of the filtering possibilities, you can specify which type of information you want to display in the logs frame.
Load Older Messages:
Ecatcher doesn't load the full log of the Ewon device.
If you want to see older message than the ones proposed, click on this button. Ecatcher will then fetch more logs.
If there isn't any log to be retrieved, the icon will switch to No more messages.
Export:
It is possible to export the logs in a .csv file format to your computer.
Add a Log Line:
This is linked to the Logbook section.
This makes it possible to add a custom entry to the log for a specific Ewon device regardless it is online or offline.
Logbook
A Logbook aims at logging everything you think useful that concerns the Ewon you are connected to.
Via this Logbook, you can leave a message or trace of what you have done while you were connected to the Ewon.
It includes the actions you performed on the Ewon or the devices connected to it, a reminder of what needs to be done the next time, a remark for a specific user, etc.
Only the summarized messages are shown in the Active Connection frame whereas the Log section (in the Account tab or from a specific Ewon device) will display the whole message.
Use the Open Log link to see the detailed version of the messages.
Adding a message can be done:
By clicking the Add message button.
When disconnecting from the Ewon or the account. You will be prompted to leave a message. This method appears at least once and can be disabled later.
Even if the device is offline, an entry can be added into the logs of the device.
This can be done by clicking the Add a Log Line from the Log frame of a specific Ewon.
Note
For free+ accounts all users can see all logs.
Action
The Action button on the top of the Ewon list depends on the status of the selected Ewon.

If the selected Ewon is online, then the action button will allow establishing the connection to the Ewon:

If you are currently connected to the selected Ewon, then the action button will offer the possibility to disconnect from this Ewon:

If the selected Ewon is offline and is configured as a triggered connection type, then the action button will allow sending a Wake-up SMS to the Ewon:

Refresh
The Refresh button on the top of the Ewon list retrieves the latest configuration of the Ewon list for your account..

For example, if another user of your Talk2m account added a new Ewon while you were using Ecatcher, you will need to push the Refresh button to retrieve this new information.
View Map
The View Map button on the top of the Ewon list changes the display mode for the Ewons.

By clicking on the View Map button, a map displaying the location of the Ewons available in the account will show up.
The Ewon you are currently connected to will be slightly different from the others: bigger and with a dot inside.
- The green arrows represent the Ewons that are currently online.
- The grey ones, the ones offline.
Several actions can be done:
Zoom in or out:
The tools in the lower left corner allows to de- or increase the view of the map.
Connect to an Ewon:
By double left-clicking on a green arrow, a connection is triggered to this Ewon.
Display the settings:
By right-clicking on an arrow, you can connect (or disconnect) to an online Ewon, send a wake up SMS if it is in triggered mode, read its log, or go inside its properties.
Change the location:
When selecting an Ewon (even one that is offline) and right-clicking somewhere on the map, the possibility to indicate the new location of the selected Ewon is available.
Mail and SMS relay
The Talk2m Email/SMS Relay helps you send emails and SMS text messages from any Ewon connected to Talk2m, and is available for all Talk2m accounts.
All you need in order to use the Talk2m relay is:
a valid Talk2m account
a SMTP server address in the Ewon settings that links to "relay.talk2m.com" (even if you only want to send SMS)
Tip
If you need explanations on how to configure the SMTP server address and how to send emails and SMS message, please refer to our SSH-0046-00 - Email and Text Messages (SMS) relay using Talk2m on the support website.
The Benefits of such process:
It is not necessary to know the SMTP-server of the local Internet connection which enables you to use the same settings in all your Ewons.
No need to have an Ewon with wireless modem to send out text messages (SMS)
For Ewons having a wireless modem, the action of sending out an SMS does not interrupt the Internet connection.
It allows sending emails and SMS through a Proxy server
There is no risk that the access to the SMTP server is blocked by the local Internet connection
You have a greater security due to the VPN encryption
You will find more information about the Mail and SMS relay on our support website.