i4designer Security settings tutorials
These tutorials will guide you through managing your i4designer projects and applying a set of security settings. Check these easy step-based tutorials here.
The i4designer software allows the user to apply security to their projects as follows:
by means of the Security components
User login
User information
User authorizations list
by means of the Security properties:
System authorization (for i4scada project platforms) and Permissions (for i4connected project platforms)
Tip
For more details about the i4scada User manager System authorizations, please also read this article.
For more details about the i4connected Permissions, please also read this article.
Project authorization (for i4scada project platforms) and Roles (for i4connected project platforms)
Tip
For more details about the i4scada user Manager Project authorizations, please also read this article.
For more details about the i4connected Roles, please also read this article.
Security access behavior
The upcoming tutorials will not only guide you through the basic steps required to apply security to your projects but will also explain the interaction between the security components and the security properties.
Setting up a project using i4scada Studio security
If you are an i4scada user and you are trying to reuse some of the Studio settings when building an i4designer project, please check out this step-based tutorial.
Using the advantages provided by the i4designer User login component and the security properties of other components, we will design an i4scada platform project, capable to extract its security from a predefined i4scada Studio database.
Note
For this tutorial we will use the i4scada Demo Project, having the following User Management settings:
"Admin", a Full rights User, being part of:
"Administration" Project authorization
having all the available System authorizations assigned.
"Guest" a Limited rights User, being part of:
"Guest" Project authorization
having only a few System authorizations assigned, allowing the user to log in and have operator rights.
The upcoming sections describe two of the most common outcomes when using the i4designer security settings.
Log in as an Admin user (Full rights)
The first tutorial will demonstrate the options provided by the security components and settings in order to allow a complete project visualization only to those users having the necessary permissions set.
Log into the i4designer application.
Using the Control Center Project management panel, open your i4scada Platform project.
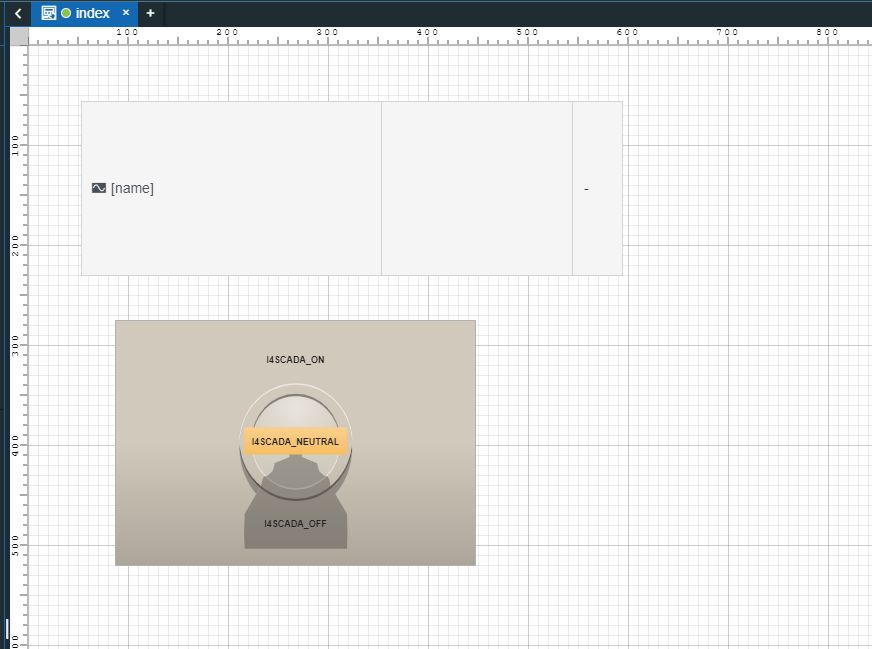
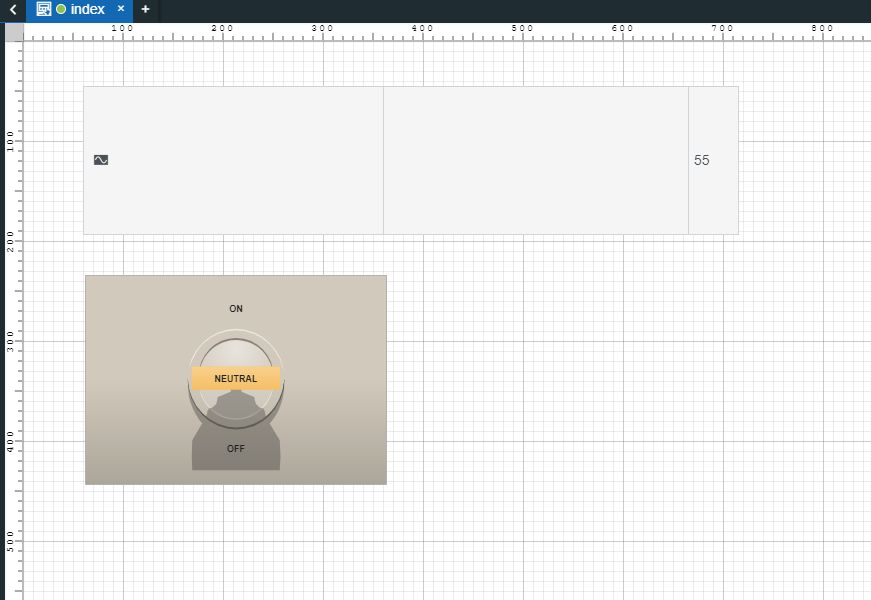
Open the i4designer Toolbox panel and add the following components to your project:
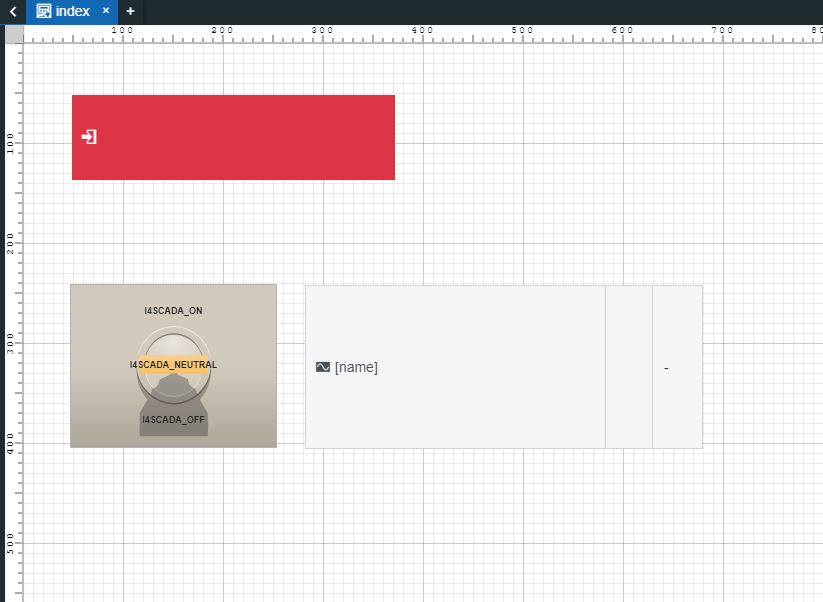
the User login component
the Signal control component
the Switch 3 States component
Note
We will leave the User login component, with its default settings, but you can organize further changes at any point.
Double click the Signal control component on the design area to open the Properties panel.
Go to the Security properties of the component and organize the following settings:
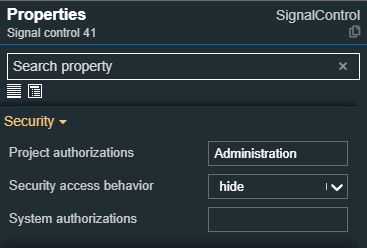
Add to the Project authorization property the "Administration" value.
Set the Security access behavior to "Hide".
Make sure that your changes are saved, by following up the page visual cue.
Double click the Switch 3 States component on the design area to open the Properties panel.
Go to the Security properties of the component and organize the following settings:
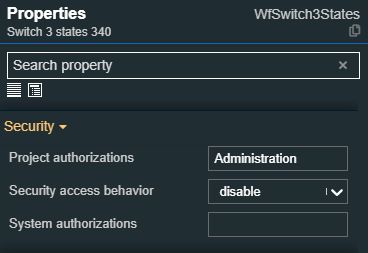
Add to the Project authorization property the "Administration" value.
Set the Security access behavior to "Disable
Build and publish your i4designer project, on the machine running your i4scada installation. If you are having trouble with this step, please also visit our i4scada platform deployments tutorials.
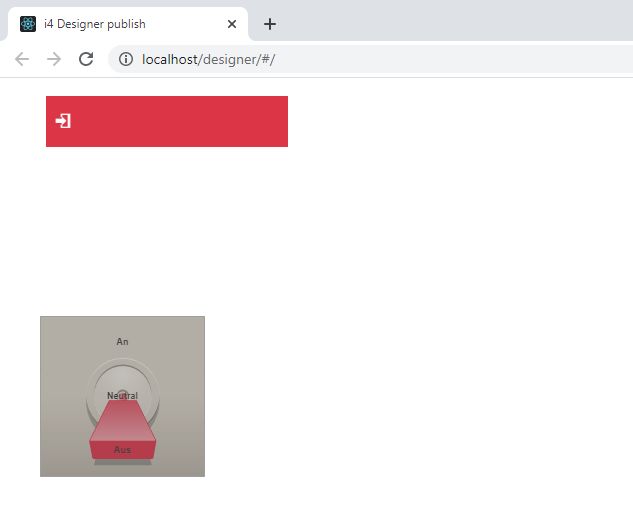
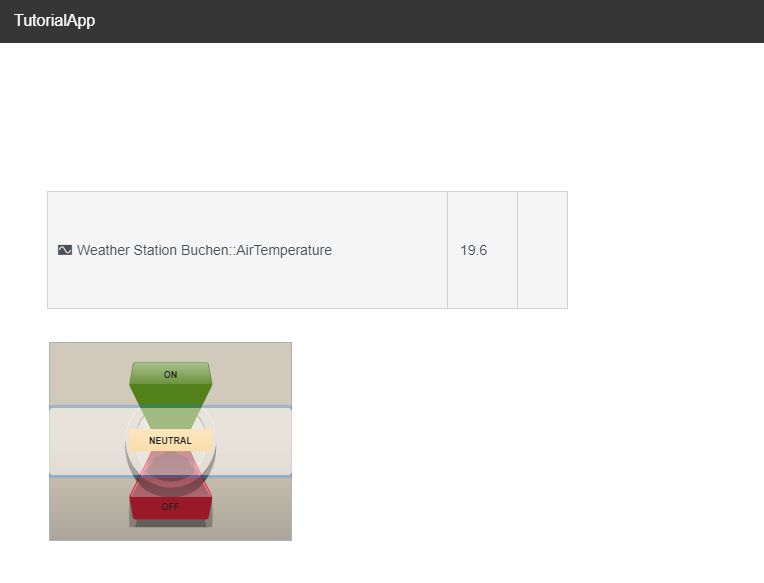
Open the run-time project. The Login component is visible, as well as the Switch 3 States. However, you can notice that the Switch 3 States component is visible, but actions for it are disabled.
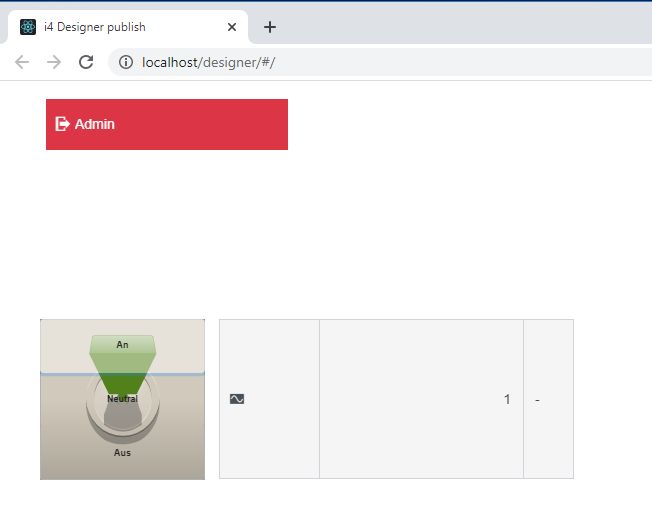
Login as an "Admin" user.
As the "Admin" user has the appropriate authorization, the Signal control component becomes visible after login, and actions of the Switch 3 States component are also possible.
Log in as Guest user (Limited rights)
The second tutorial concentrates on the limits that an unauthorized user has when visualizing a properly secured i4designer project.
Log into the i4designeri4designer application.
Using the Control Center Project management panel, open your i4scada Platform project.
Open the i4designer Toolbox panel and add the following components to your project:
the User login component
the Signal control component
the Switch 3 States component
Note
We will leave the User login component, with its default settings, but you can organize further changes at any point.
Double click the Signal control component on the design area to open the Properties panel.
Go to the Security properties of the component and organize the following settings:
Add to the Project authorization property the "Administration" value.
Set the Security access behavior to "Hide".
Make sure that your changes are saved, by following up the page visual cue.
Double click the Switch 3 States component on the design area to open the Properties panel.
Go to the Security properties of the component and organize the following settings:
Add to the Project authorization property the "Administration" value.
Set the Security access behavior to "Disable
Build and publish your i4designer project, on the machine running your i4scada installation. If you are having trouble with this step, please also visit our i4scada platform deployments tutorials.
Open the run-time project. The Login component is visible, as well as the Switch 3 States. Further on, the Switch 3 States component is visible, but actions for it are disabled, while the Signal control component is completely hidden.
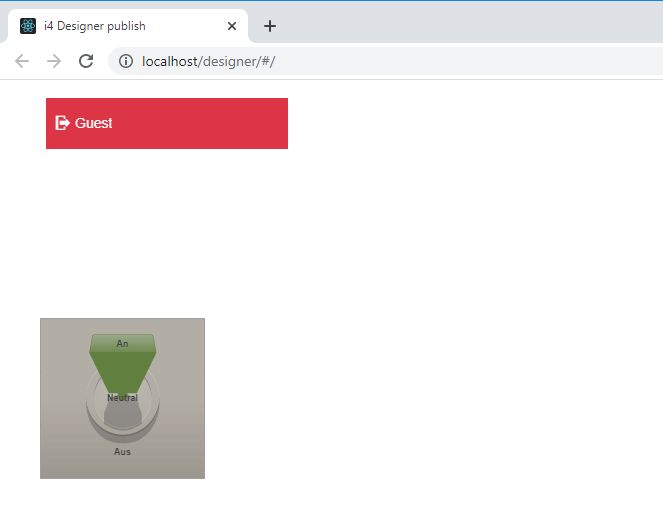
Log in as a "Guest" user;
As the "Guest" user does not have the appropriate authorization, the Signal control component is not visible, even after login.
Setting up a project using i4connected security
Check out these step-based tutorials in order to learn how to secure components on your i4connected platform projects.
Using the advantages provided by i4designer and the Components Security properties available, we will design an i4connected platform project, capable to extract its security from an i4connected environment.
Note
For this tutorial, we will build a simple i4designer project and publish it to a publicly available i4connected environment.
At i4connected end, the actors involved in this demonstration are:
User Admin - a super administrator of the system
Role Administrator is assigned
Role Admin has Configure security permission enabled.
User User1 - a limited rights user
Role Administrator is NOT assigned.
Roles PlayRole and PortalUserRole are assigned.
None of the user's roles have to Configure security permission enabled.
The upcoming sections describe some of the most common scenarios when using the security settings of an i4connected platform project:
Hiding a component if User's Role doesn't match
This tutorial demonstrates how to completely hide a component, from an i4connected visualization, for all the users that do not have the appropriate Role assigned:
Log into the i4designer application.
Using the Control Center Project management panel, open an i4connected platform project.
Open the i4designer Toolbox panel and add the following components to your project:
the Signal control component
the Switch 3 States component
Double click the Switch 3 States component on the design area to open the Properties panel.
Go to the Security properties of the component and organize the following settings:
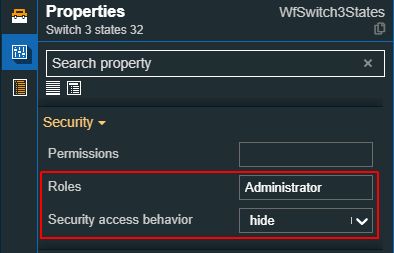
Add to the Roles property the "Administrator" value.
Set the Security access behavior to "Hide".
Make sure that your changes are saved, by following up the page visual cue.
After configuring the i4connected Application mapping, build and publish your i4designer project on publicly available i4connected environment. If you are having trouble with this step, please also visit our i4connected platform deployments tutorials.
Log into the i4connected platform as Admin user. Open the visualization and check it.
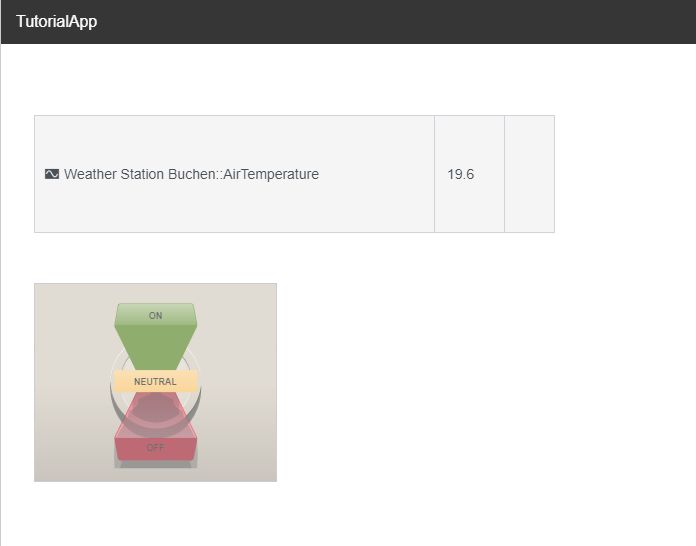
Both components are visible and the Admin user can interact with the Switch 3 States, as the user has the Administrator Role assigned.
Next, log into the i4connected platform as User1. Open the visualization and check it.
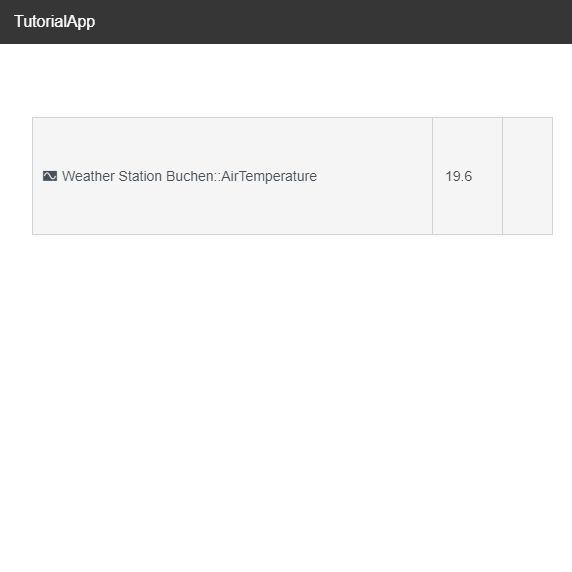
The Signal control component is visible, but the Switch 3 States is completely hidden, as the user does NOT have the Administrator Role assigned.
Hiding a component if User's Permissions set doesn't match
This tutorial demonstrates how to completely hide a component, from an i4connected visualization, for all the users that do not have the appropriate permissions set, regardless if the Role matches:
Log into the i4designer application.
Using the Control Center Project management panel, open an i4connected platform project.
Open the i4designer Toolbox panel and add the following components to your project:
the Signal control component
the Switch 3 States component
Double click the Switch 3 States component on the design area to open the Properties panel.
Go to the Security properties of the component and organize the following settings:
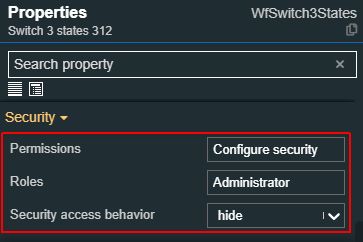
Add to the Permissions property the "Administrator" value.
Add to the Roles property the "Configure Security" value.
Set the Security access behavior to "Hide".
Make sure that your changes are saved, by following up the page visual cue.
After configuring the i4connected Application mapping, build and publish your i4designer project on publicly available i4connected environment. If you are having trouble with this step, please also visit our i4connected platform deployments tutorials.
Log into the i4connected platform as Admin user. Open the visualization and check it.
Both components are visible and the Admin user can interact with the Switch 3 States, as the user has the Configure security permission assigned.
Next, log into the i4connected platform as User1. Open the visualization and check it.
The Signal control component is visible, but the Switch 3 States is completely hidden, even though the user has the PlayRole assigned. The user does NOT meet the requirements as the Configure security Permission is not assigned.
Disabling a component if User's Role doesn't match
This tutorial demonstrates how to disable a component, from an i4connected visualization, for all the users that do not have the appropriate Role assigned:
Log into the i4designer application.
Using the Control Center Project management panel, open an i4connected platform project.
Open the i4designer Toolbox panel and add the following components to your project:
the Signal control component
the Switch 3 States component
Double click the Switch 3 States component on the design area to open the Properties panel.
Go to the Security properties of the component and organize the following settings:
Add to the Roles property the "Administrator" value.
Set the Security access behavior to "Disable".
Make sure that your changes are saved, by following up the page visual cue.
After configuring the i4connected Application mapping, build and publish your i4designer project on publicly available i4connected environment. If you are having trouble with this step, please also visit our i4connected platform deployments tutorials.
Log into the i4connected platform as an Admin user. Open the visualization and check it.
Both components are visible and the Admin user can interact with the Switch 3 States, as the user has the Administrator Role assigned.
Next, log into the i4connected platform as User1. Open the visualization and check it.
Both components are visible, but the Switch 3 States is disabled and the user cannot interact with it, as the user does NOT have the Administrator Role assigned.
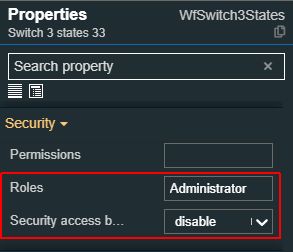
Disabling a component if User's Permissions set doesn't match
This tutorial demonstrates how to disable a component, from an i4connected visualization, for all the users that do not have the appropriate permissions set, regardless if the Role matches:
Log into the i4designer application.
Using the Control Center Project management panel, open an i4connected platform project.
Open the i4designer Toolbox panel and add the following components to your project:
the Signal control component
the Switch 3 States component
Double click the Switch 3 States component on the design area to open the Properties panel.
Go to the Security properties of the component and organize the following settings:
Add to the Roles property the "PlayRole" value.
Add to the Permissions property the "Configure Security" value.
Set the Security access behavior to "Disable".
Make sure that your changes are saved, by following up the page visual cue.
After configuring the i4connected Application mapping, build and publish your i4designer project on publicly available i4connected environment. If you are having trouble with this step, please also visit our i4connected platform deployments tutorials.
Log into the i4connected platform as Admin user. Open the visualization and check it.
Both components are visible and the Admin user can interact with the Switch 3 States, as the user has the Configure security permission assigned.
Next, log into the i4connected platform as User1. Open the visualization and check it.
Both components are visible, but the Switch 3 States is disabled and the user cannot interact with it, as the user does NOT have the Configure security permission assigned.