i4designer User Manager tutorials
Check out these articles and learn more details on how to build, publish and use the User Manager components, provided to you by the i4designer tool.
The upcoming tutorials will guide you through the needed steps to build, publish and work with an i4designer User Manager project.
Designing the Users Management project
Check out this article and learn how to design your Users Management project, by following these easy steps, accompanied by screenshots.
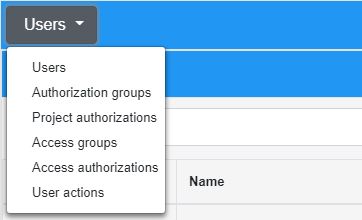
The following components can be found under the Security category, of the Toolbox panel, for all projects created on the i4scada platform:
User manager - compiles all the user management panels: Users panel, Project authorizations panel, Authorization groups panel, Access groups panel, and Access authorizations panel.
Users - list all the i4scada users, to which the currently logged-in user has access.
Project authorizations - lists all the i4scada Project authorizations, to which the currently logged-in user has access.
Authorization groups - lists all the i4scada Authorization groups, to which the currently logged-in user has access.
Access groups - lists all the i4scada Access groups, to which the currently logged-in user has access.
Access authorizations - lists all the i4scada Access authorizations, to which the currently logged-in user has access.
User actions - lists all the i4scada User actions, to which the currently logged-in user has access.
Since the User manager component compiles all the other management panels, we shall use it to build our project. You can also design a project with multiple pages, where the individual components can be distributed, as needed.
Log into the i4designer Control Center and create a new project on the i4scada platform.
Tip
For more details about the steps needed to create an i4designer project, please visit the dedicated tutorial, here.
Open the project in design mode.
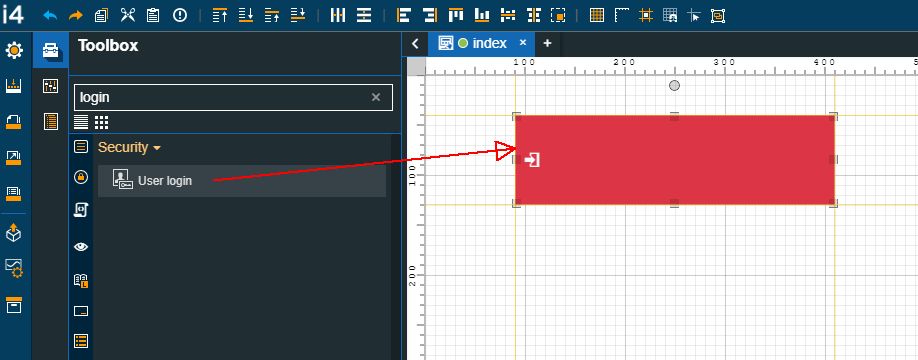
Go to the Toolbox panel, in the contextual actions area.
Drag the User login component on the drawing surface. For the present tutorial, we shall leave the Login component with its default settings.
Warning
The User login component allows users (either i4scada or Active Directory users) to log into the visualization, at run-time. This extension features login/logout functionality and automatic login options.
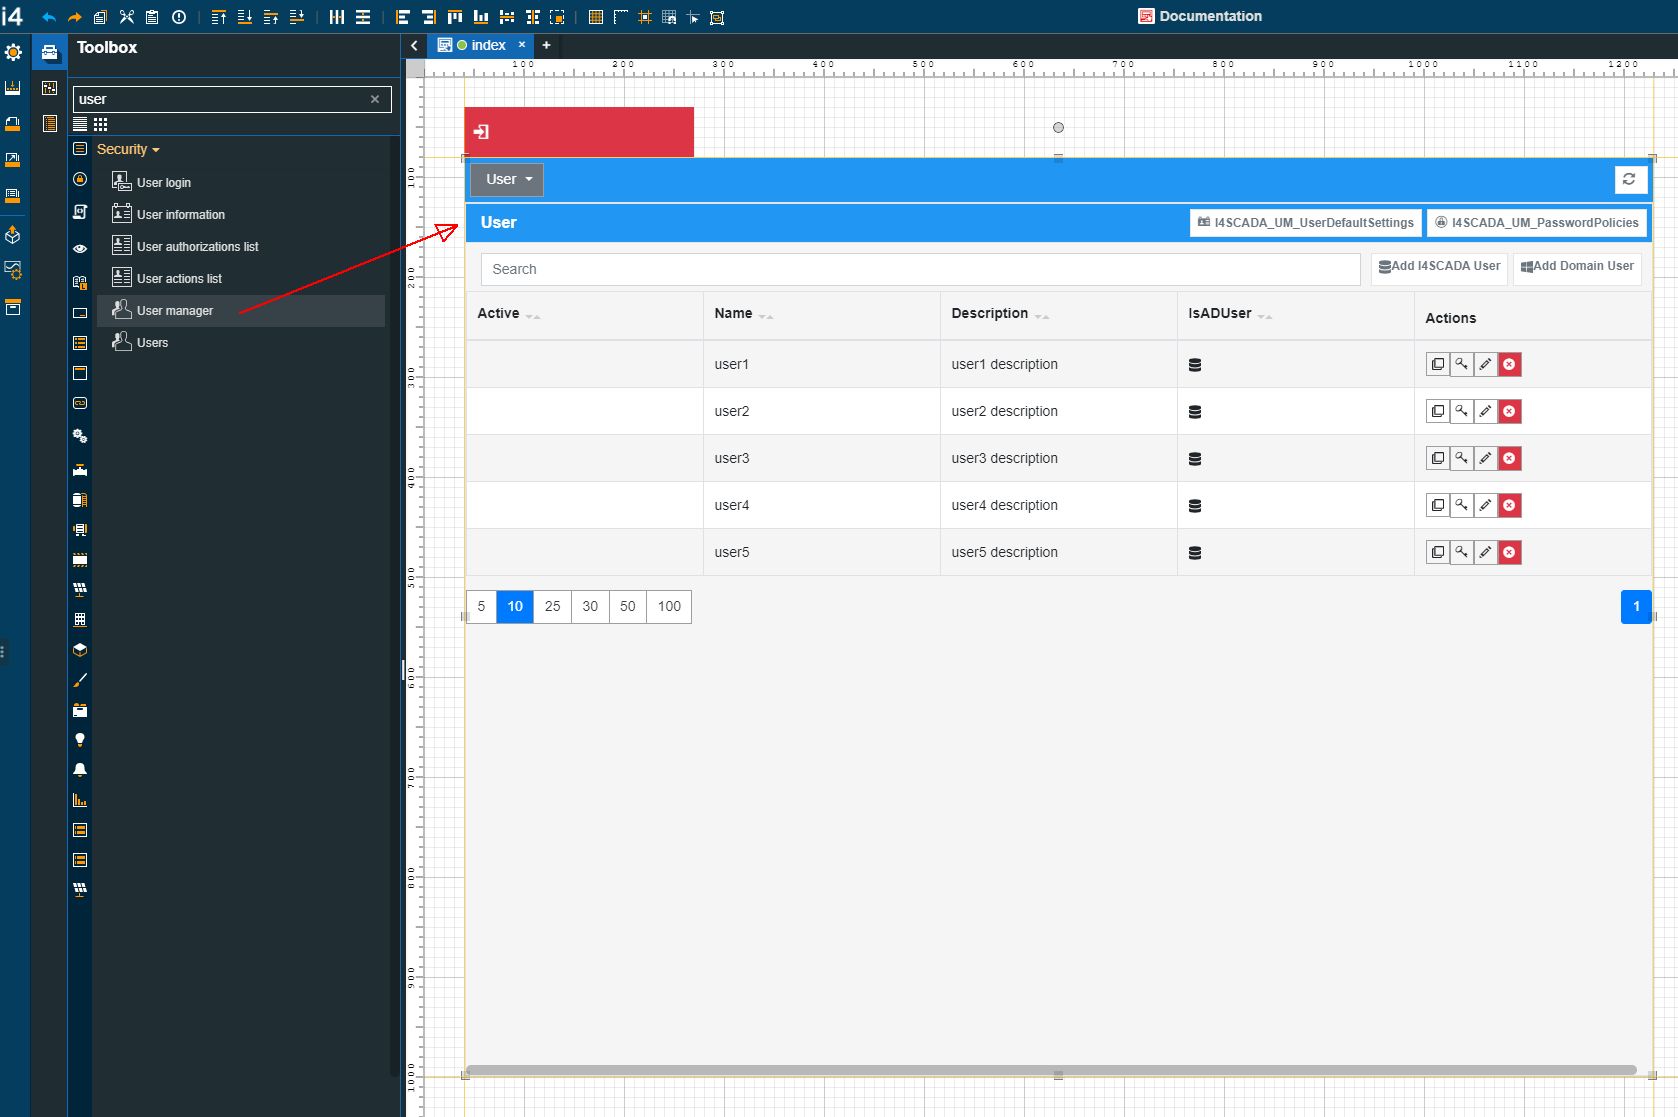
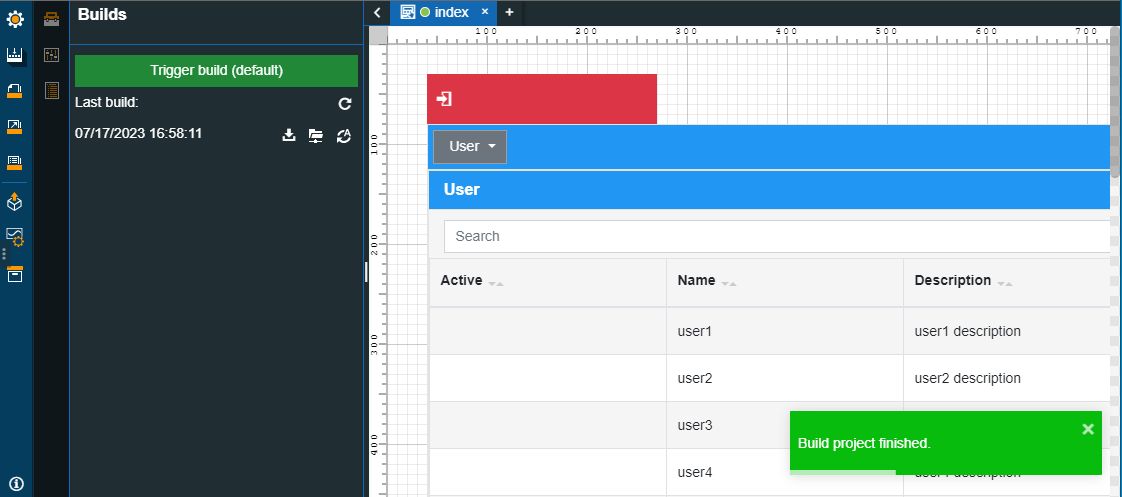
Drag the User manager component on the drawing surface of the page and double click it, to open the Properties panel. Next, proceed with the following settings:
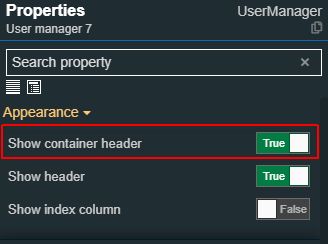
Set the Show container header property to True.
Make sure that all the processed settings are saved and go to the Builds menu, in the global actions area of the Designer application.
Build your project.
Tip
For more details about i4designer project builds, please visit the dedicated articles here.
Next, proceed with publishing the project to the target environment.
Tip
For more details about i4scada platform deployments, please visit the dedicated article here.
Managing Users at run-time
Check out this article and learn how to work with the Users Management visualization, in order to manage your i4scada users.
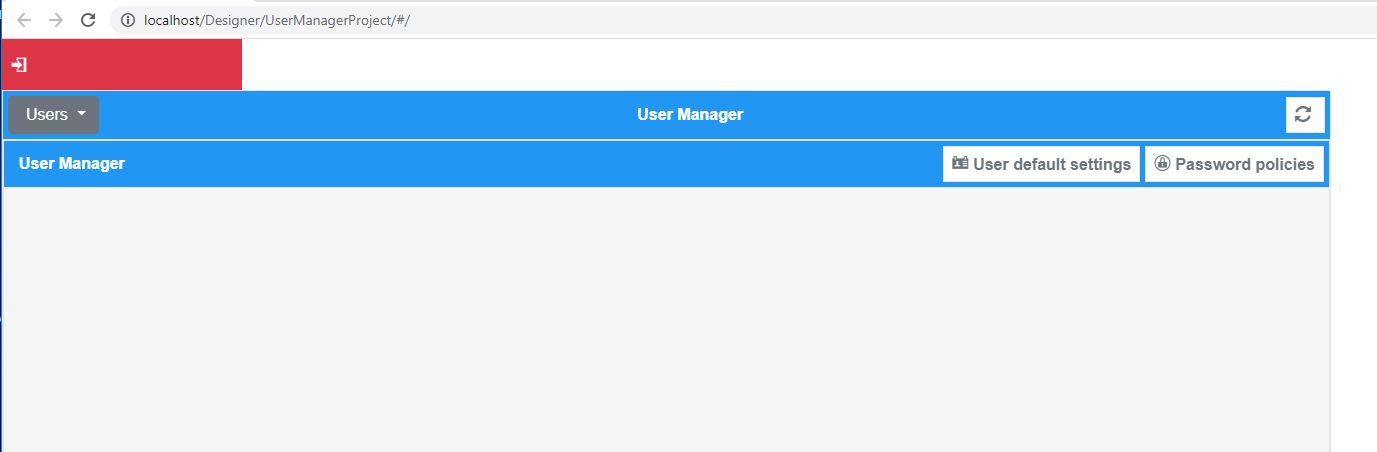
After publishing your HTML Users Management project, here is how you can use the run-time components, to manage your users.
Access your i4scada environment and open the visualization.
The User Manager component is visible on the page, but before logging into the system, the list of users is unpopulated.
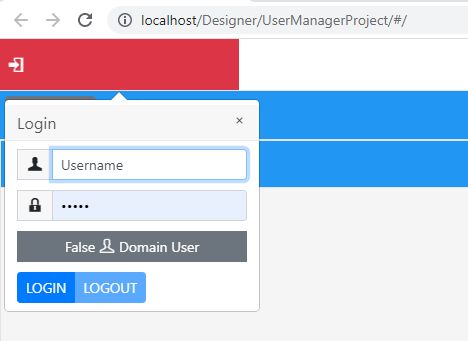
Click the Login component and fill in your credentials. Click the Login button to proceed.
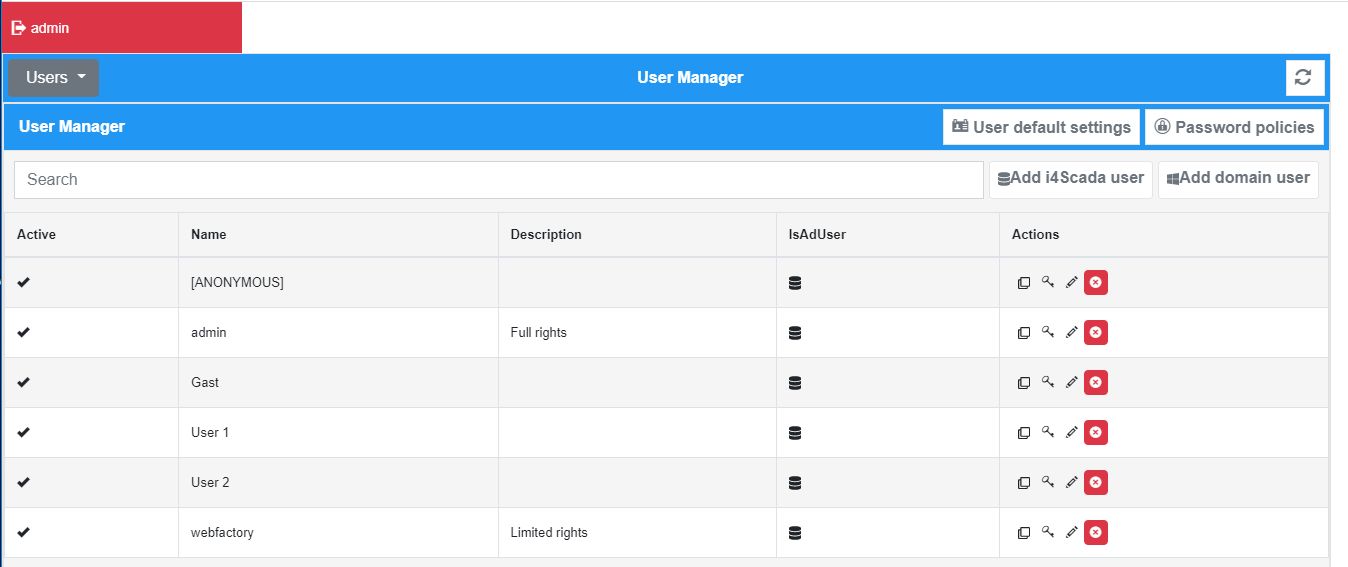
As soon as you are authenticated, the list of users is populated with all the users that you have permission to view.
The drop-down list of the User Manager component header allows you to switch between the user management panels. Each panel will be described independently in the upcoming sections:
Note
The drop-down list is by default set to display the Users panel.
The Users panel
The Users panel, of the User Manager, displays the entire list of i4scada users. Due to the security protocol enforced by the web services, the list will reveal only the users to which the logged-in user has access to see.

The Users list
The list is split up into the following columns:
Active - if the checkbox is enabled, the listed user is active.
Type - depending on the displayed icon, listed users may be either i4scada users or domain users.
Name - the name of the user.
Description - the description of the user.
Actions - allows the user with the possibility to manage the listed users, by means of the following actions: the Clone user button
 , Change password button
  , Edit button
  , and Delete button
  .
.
Tip
For more details about the i4scada Users please also visit our i4scada knowledgebase, and read the dedicated articles, here.
Authenticated users can change the default settings attributed to all new users, by clicking the User default settings button, of the Users panel:
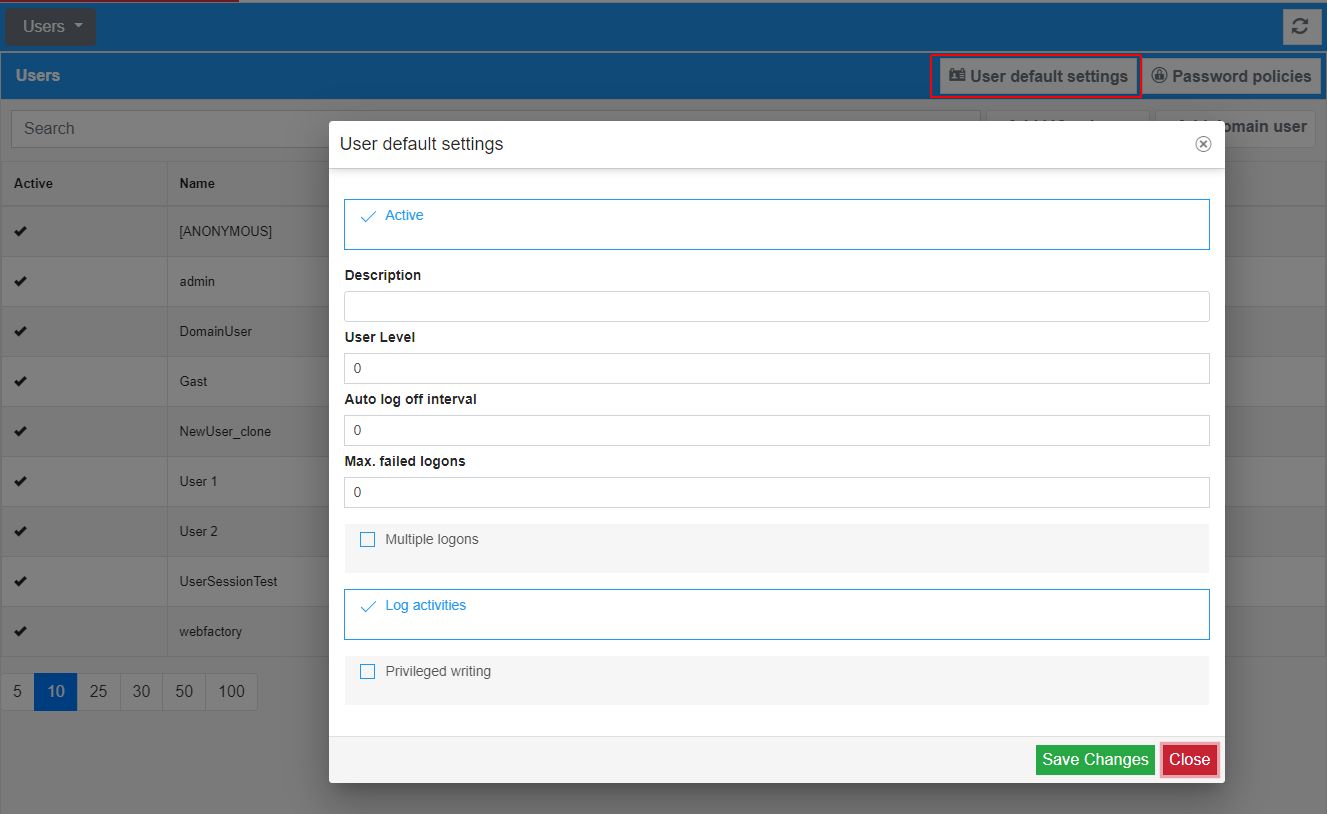
The User default settings dialog
Active - enables all new users to take actions in the system. If this option is not checked, the new users will not be able to log in or perform any actions in i4scada visualizations.
Description - sets a custom description of all new users.
User-level - sets a default user level, for all new users. Users can be split into multiple user levels for easier management. The default value is set to 0, which is the minimum value. No lower values can be added.
Auto log-off interval - sets a default log-off timer for idle users. If the amount of time specified here passes while the user is idle (performs no action while logged in an i4scada visualization), the user will be logged off. When returning from the idle state, the user must log in again. The default value is set to 0, which is the minimum value and also represents no Auto log off. No lower values can be added.
Max failed logons - sets a default number of failed login attempts that can be made before blocking the user. If the user tries and fails to log in more than the number of times specified here, the system will automatically block him for one minute. After the first minute, the user can try to log in again. If the next attempt fails, the user will be blocked for the next 2 minutes, and so on. For each consecutive failed login attempt, the block time will be increased to a maximum of 30 minutes. If the user performs a successful login, the failed login attempts and the block time will be reset. If the i4scada Server is stopped while a user is blocked, the user will be allowed to attempt to log in directly when the Server starts. If the attempt fails, the user will be blocked again and the block time increases from the previous increment.
Multiple logons - if enabled, the user is able to log on simultaneously in the same i4scada visualization from different locations.
Log activities - if enabled, all the user's login and logout actions are stored as events in the database and can be seen in the User actions panel.
Privileged writing - If enabled, sets all the new users to have privileged writing rights. Users having the privileged writing option enabled, can take ownership of the write groups configured with restricted access, even if they are currently owned by another user.
By clicking the Password policies button, authenticated users can manage the password policies:
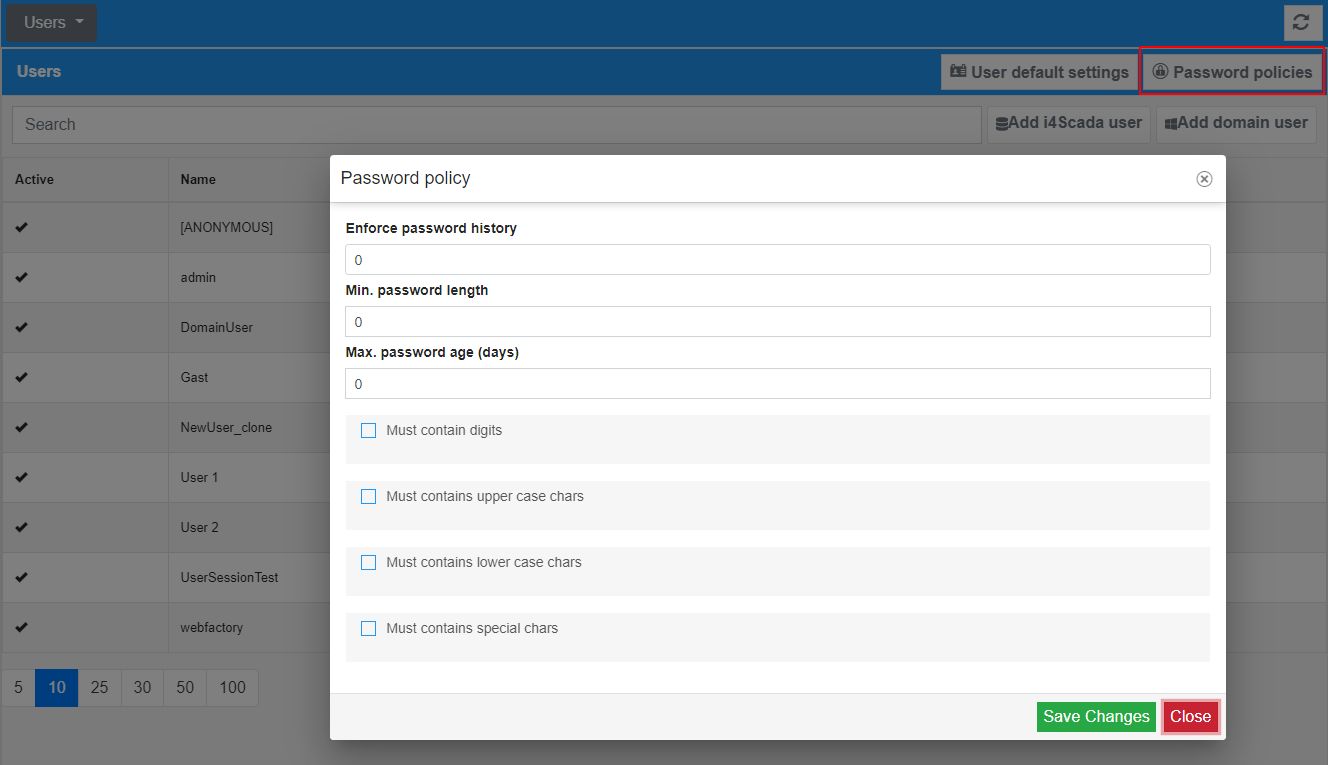
The Password policies dialog
Enforce password history - Sets the number of password renewal cycles, during which a password cannot be repeated. The default value is set to 0, which is the minimum value. No lower values can be added.
Min. password length - Sets the minimum number of characters of the password. The default value is set to 0, which is the minimum value. No lower values can be added.
Max. password age (days) - Sets the number of days until the user is forced to change the password. If the Enforce password history is set to a number of renewal cycles other than 0, the user will not be able to reuse the password until that number of cycles pass. The default value is set to 0, which is the minimum value. No lower values can be added.
Must contain digits - If enabled, all passwords must contain at least one digit.
Must contain upper case chars - If enabled, all passwords must contain at least one upper case character.
Must contain lower case chars - If enabled, all passwords must contain at least one lower case character.
Must contain special chars - If enabled, all passwords must contain at least one special character.
To create a new i4scada user please follow these steps:
Click the Add i4scada user button.

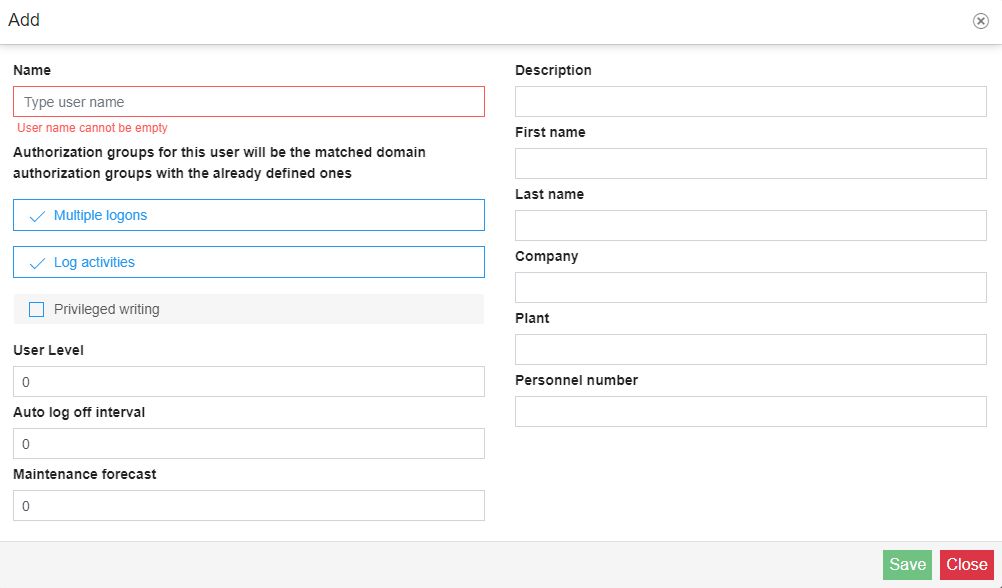
The Add dialog is opened. Enter the user name and all other desired information, as follows:
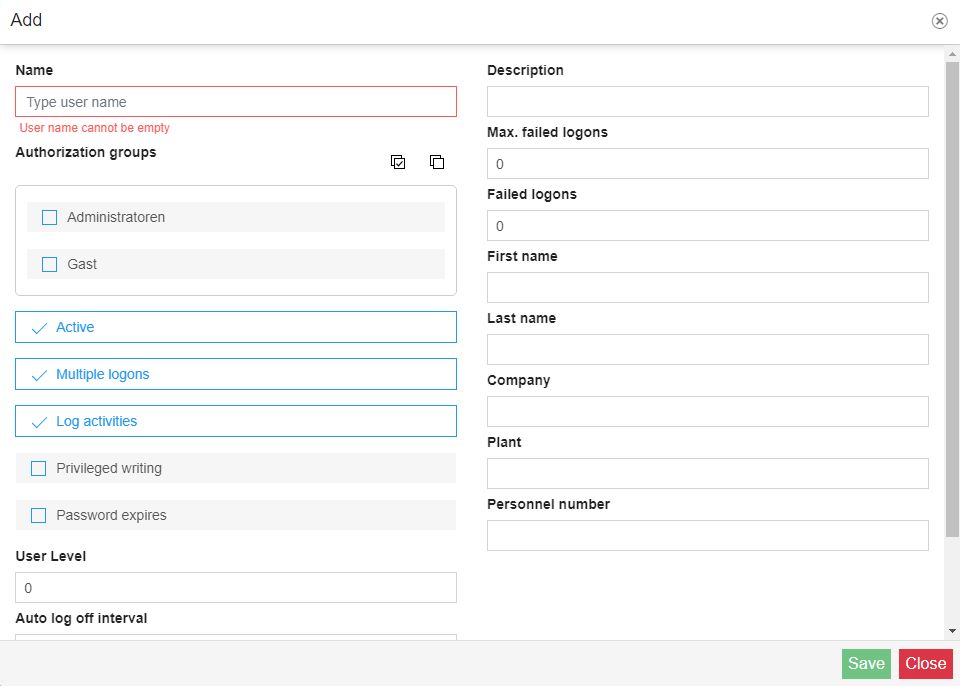
Name - The name of the user. This field is highlighted in red color, indicating that field is required.
Authorization groups - The authorization groups field, features a multi-select option that contains all the available entities. This list also displays at the top right side, the Select all/Unselect all buttons.
Active - Enables the user to take actions in the system. If this option is not checked, the user cannot log in or perform any actions in i4scada visualizations.
Multiple logons - If active, the user is able to log on simultaneously in the same i4scada visualization from different locations.
Log activities - If enabled, all the user's login and logout actions are stored as events in the database.
Privileged writing - If enabled, it allows the user to take ownership of the write groups configured with restricted access, even if they are currently owned by another user.
Password expires - If enabled, the user's password will expire after the time period specified in the Max. Password Age option of the Password Policy dialog.
User level - Displays the level of the user. Users can be split into multiple user levels for easier management.
Auto log-off interval - The log-off timer for idle users. If the amount of time specified here passes while the user is idle (performs no action while logged in an i4scada visualization), the user will be logged off. When returning from the idle state, the user must log in again.
Maintenance forecast - The number of days to display the maintenance reminder before the maintenance is scheduled.
Description - The custom description of the user. This field can be used to specify particular details about the user.
Max. failed logons - Specifies the number of failed login attempts that can be made before blocking the user. If the user tries and fails to log in more than the number of times specified here, the system will automatically block him for one minute. After the first minute, the user can try to log in again. If the next attempt fails, the user will be blocked for the next 2 minutes, and so on. For each consecutive failed login attempt, the block time will be increased to a maximum of 30 minutes. If the user performs a successful login, the failed login attempts and the block time will be reset. If the i4scada Server is stopped while a user is blocked, the user will be allowed to attempt to log in directly when the Server starts. If the attempt fails, the user will be blocked again and the block time increases from the previous increment.
Failed logons - Displays the number of failed login attempts that the selected users have. This value can be reset by an Administrator.
First name - The first name of the user.
Last name - The last name of the user.
Company - The company name.
Plant - The name of the plant or factory.
Personnel number - The serial number of the employee.
Press the Save button. The Add dialog is closed and the newly created user is available in the list view.
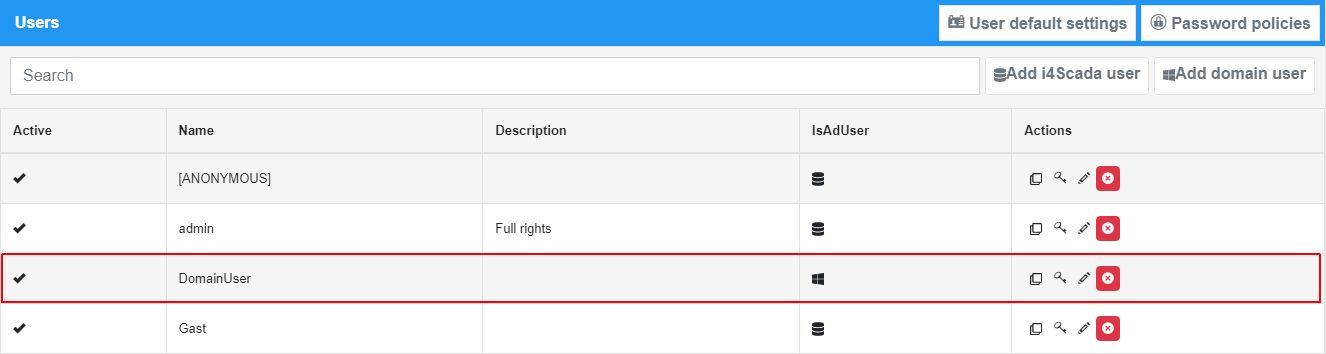
To create a new domain user, please follow these steps:
Click the Add domain user button.

The Add dialog is opened. Enter the user name and all other desired information, as follows:
Name - The name of the user. This field is highlighted in red color, indicating that field is required.
Authorization groups for this user will be matched to domain authorization groups. There have to be authorizations groups defined in i4scada which match the domain authorization groups. The membership of the groups is administrated via the Active Directory domain.
Multiple logons - If active, the user is able to log on simultaneously in the same i4scada visualization from different locations.
Log activities - If enabled, all the user's login and logout actions are stored as events in the database.
Privileged writing - If enabled, it allows the user to take ownership of the write groups configured with restricted access, even if they are currently owned by another user.
User level - Displays the level of the user. Users can be split into multiple user levels for easier management.
Auto log-off interval - The log-off timer for idle users. If the amount of time specified here passes while the user is idle (performs no action while logged in an i4scada visualization), the user will be logged off. When returning from the idle state, the user must log in again.
Maintenance forecast - The number of days to display the maintenance reminder before the maintenance is scheduled.
Description - The custom description of the user. This field can be used to specify particular details about the user.
First name - The first name of the user.
Last name - The last name of the user.
Company - The company name.
Plant - The name of the plant or factory.
Personnel number - The serial number of the employee.
Press the Save button. The Add dialog is closed and the newly created user is available in the list view.
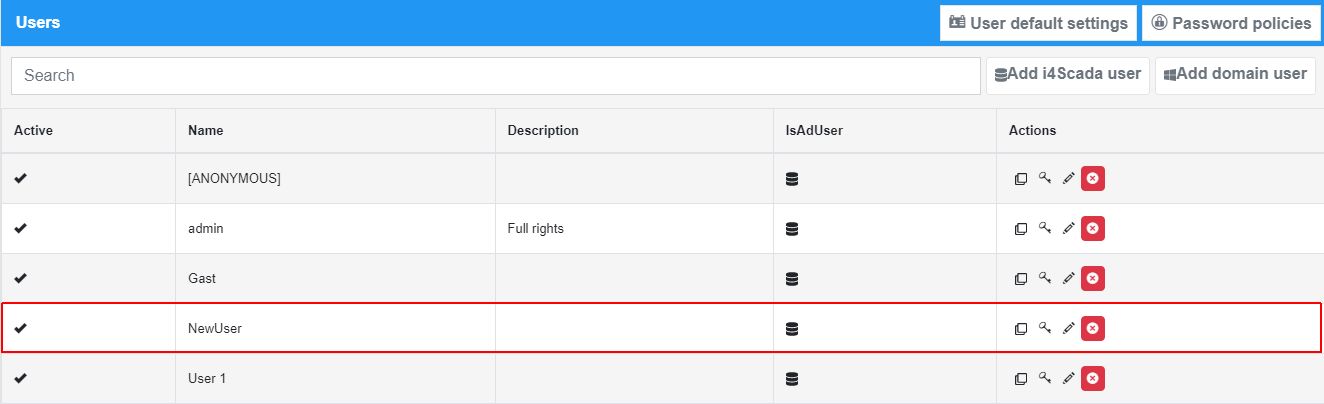
To manage your users, please proceed as follows:
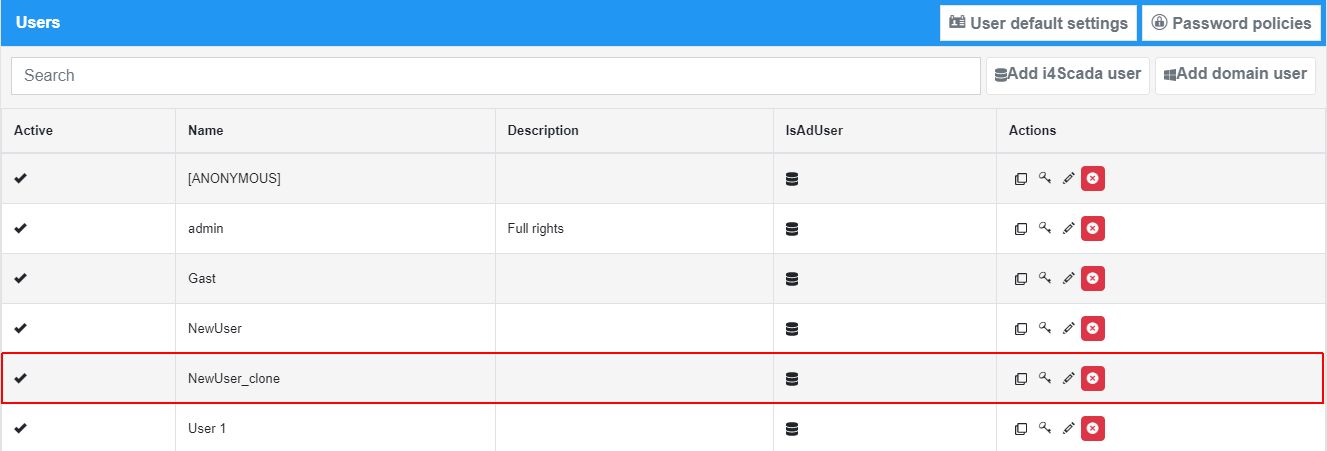
Click on the Clone button displayed in the Actions area of the previously created user.
The Clone item dialog is opened. The name of the user is copied and the suffix "_clone" is added.
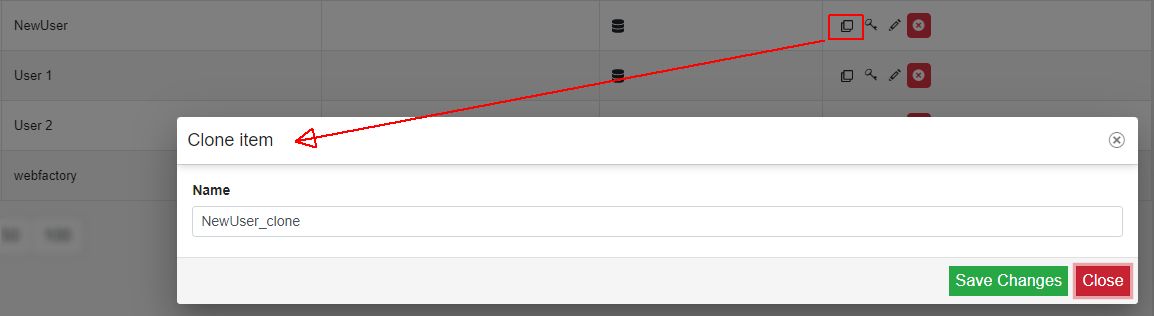
Press the Save Changes button of the Clone item dialog.
The Clone item dialog is closed and a new user is added in the list view, with the name "NewUser_clone"
Click on the Change user password button displayed in the Actions area of the new user.
The Change password dialog is opened. Enter the new password and the password confirmation.
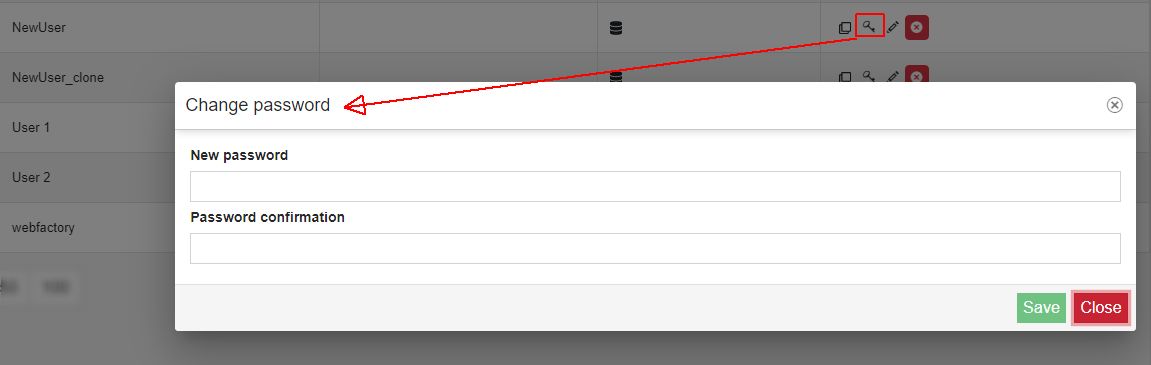
Press the Save button in the Change password dialog.
Note
The Save button becomes active, only if both passwords are the same.
The Change password dialog is closed and a confirmation message is displayed, indicating that password has been successfully changed.
Click the Edit button in the Actions are of the previously created Authorization Group.
The Edit dialog is opened. Proceed with the desired updates.
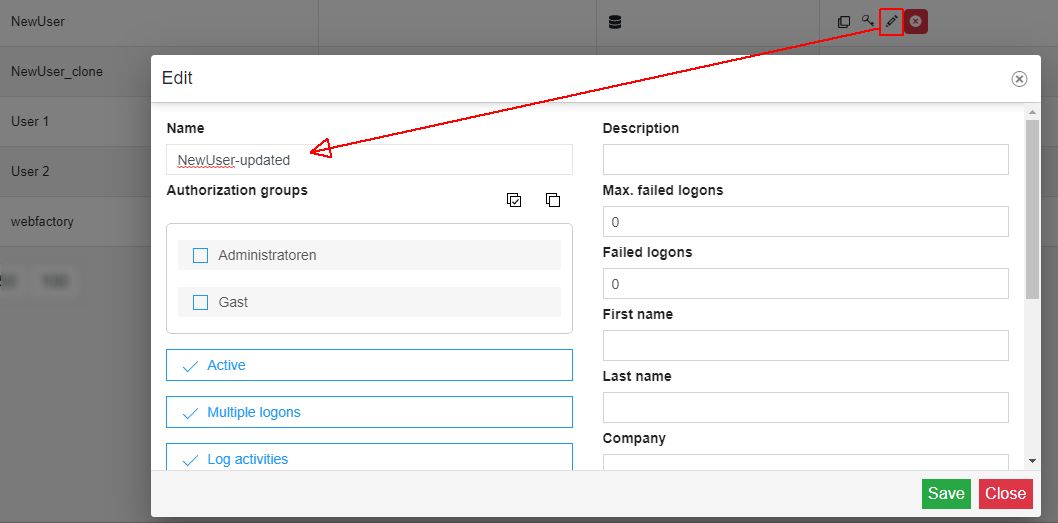
Once all the needed updates have been done press the Save button.
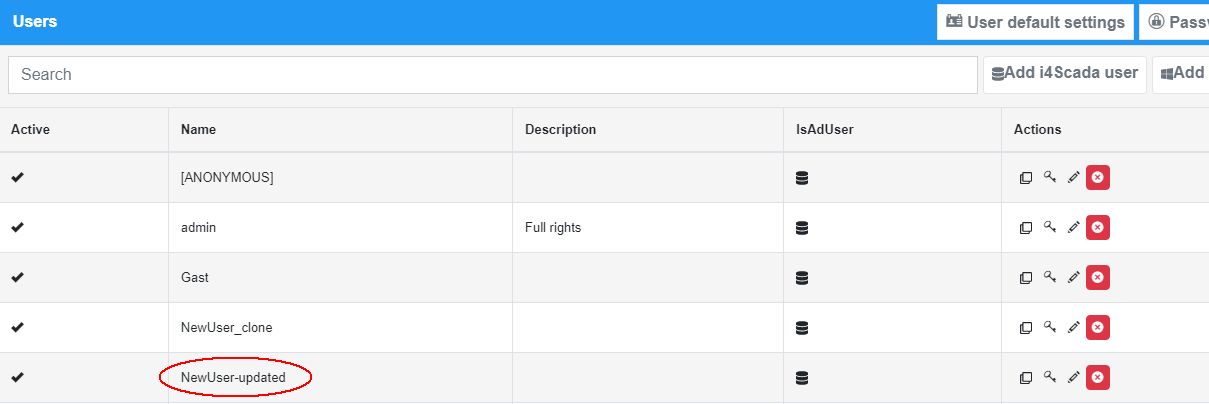
The Edit dialog is closed and the list view is refreshed. The changes at the level of User Name are visible in the list view.
Click on the Delete button in the Actions area of the previously cloned user.
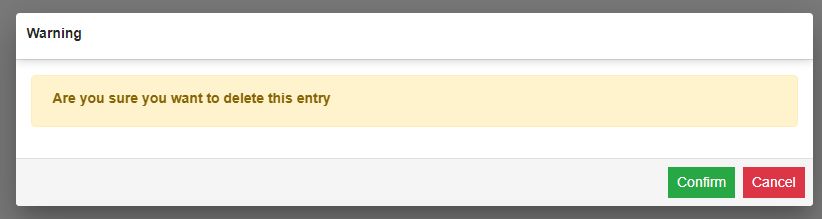
The deletion Warning dialog is opened.
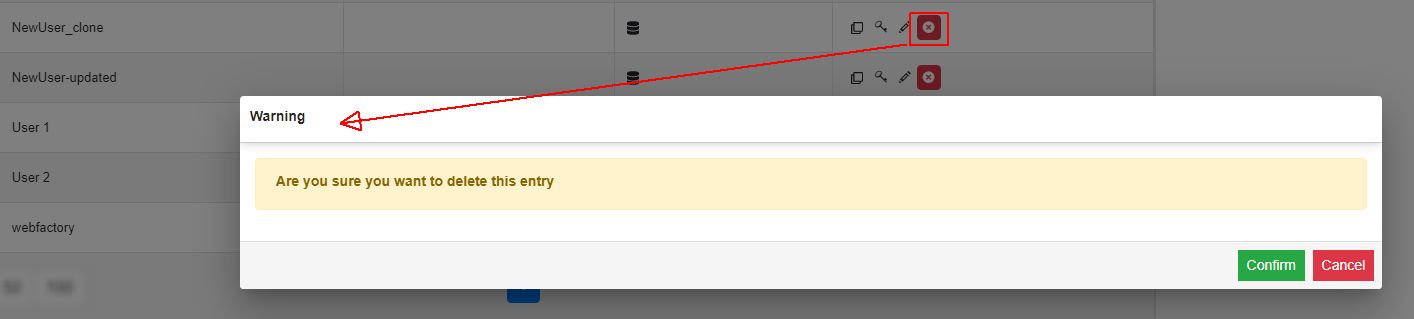
Press the button Confirm.
The Warning dialog is closed and the selected user is removed from the list.
The Authorization groups panel
The Authorization Groups panel displays the list of all available Authorization groups in the i4scada database.
The list is restricted to display only those Authorization groups that the logged-in user has access to see.
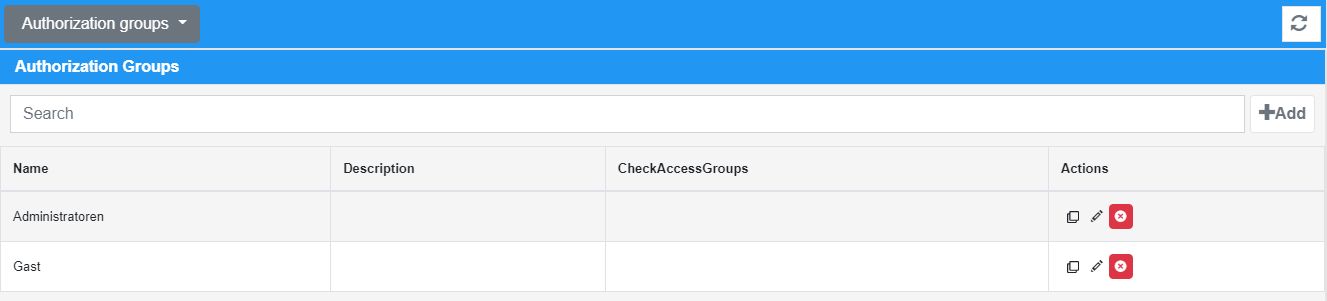
The Authorization Groups panel
The list is split up into the following columns:
Name - the name of the listed authorization group.
Description - the description of the listed authorization group.
Check access groups - shows if the check access groups option is enabled or disabled, for the listed item.
Actions - allows the user with the possibility to manage the listed authorization group, by means of the following actions: the Clone button
, the Edit button , and the Delete button .
Tip
For more details about the i4scada Authorization Groups please also visit our i4scada knowledgebase, and read the dedicated articles, here.
To create a new Authorization Group, please follow the steps below:
Click the Add button, displayed on the right side of the panel's toolbar.

The Add dialog is opened. Fill in the Name of the new Authorization Group and the rest of the needed information, as follows:
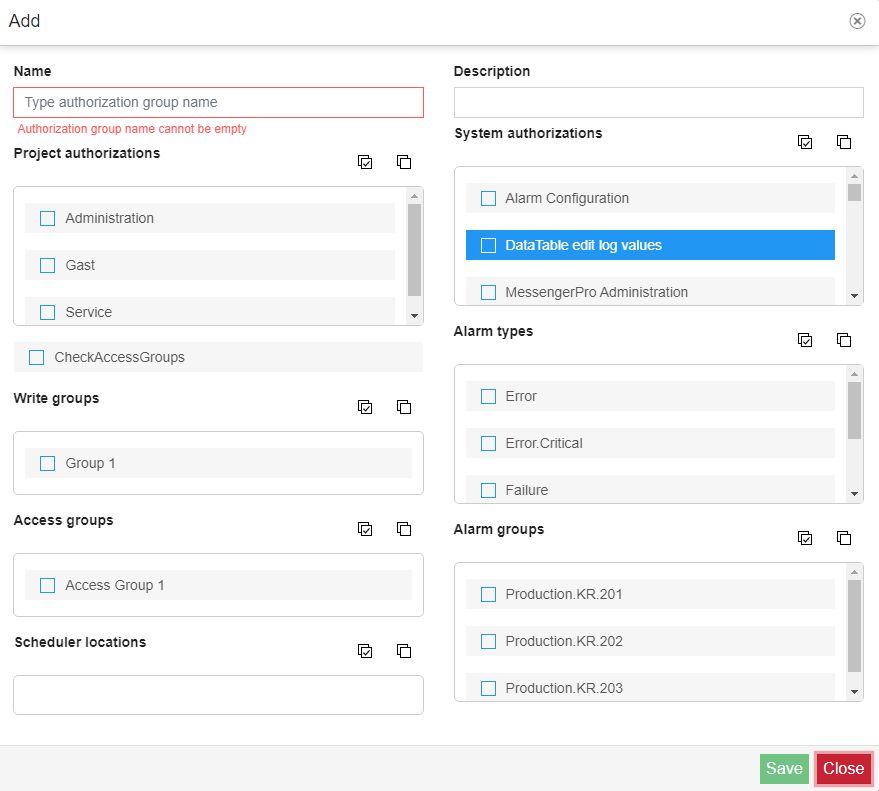
Name - The name of the Authorization group. This field is required.
Description - The custom description of the Authorization group. Allows the possibility to insert particular details about the Authorization group.
Project Authorizations - The Project Authorizations field, features a multi-select option that contains all entities available in the project database. This list also displays at the top right side, a select / unselect button.
System Authorizations - The System Authorizations field, features a multi-select option that contains all entities available in the project database. This list also displays at the top right side, a select / unselect button.
Check Access groups - If the Check access groups button is checked, the user will be granted the authorization group permissions only if the access conditions specified in the access authorizations are met.
Write groups - The Write groups field, features a multi-select option that contains all entities available in the project database. This list also displays at the top right side, a select / unselect button.
Alarm Types - The Alarm types field, features a multi-select option that contains all entities available in the project database. This list also displays at the top right side, a select / unselect button.
Alarm groups - The Alarm groups field, features a multi-select option that contains all entities available in the project database. This list also displays at the top right side, a select / unselect button.
Access Groups - The Access Groups field, features a multi-select option that contains all entities available in the project database. This list also displays at the top right side, a select / unselect button.
Scheduler locations - The Scheduler locations field, features a multi-select option that contains all entities available in the project database. This list also displays at the top right side, a select / unselect button.
Press the Save button. The Add dialog is closed and the newly created Authorization Group is available in the list view.
To manage your Authorization Groups, please proceed as follows:
Click on the Clone button displayed in the Actions area of the previously created authorization group.
The Clone item dialog is opened. The name of the authorization group is copied and the suffix "_clone" is added.
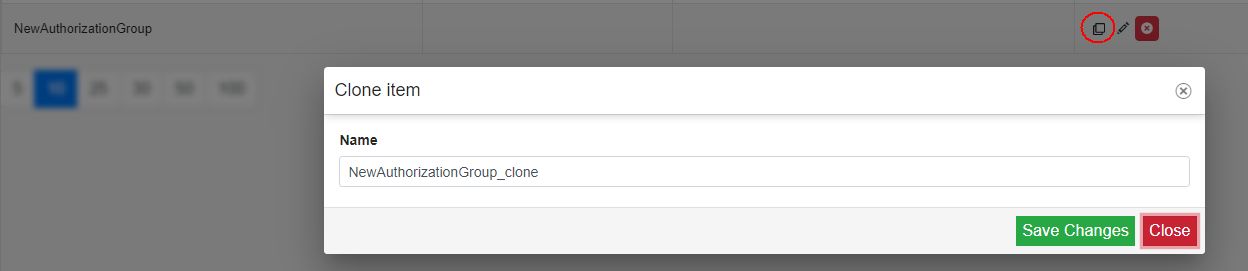
Press the Save Changes button of the Clone item dialog.
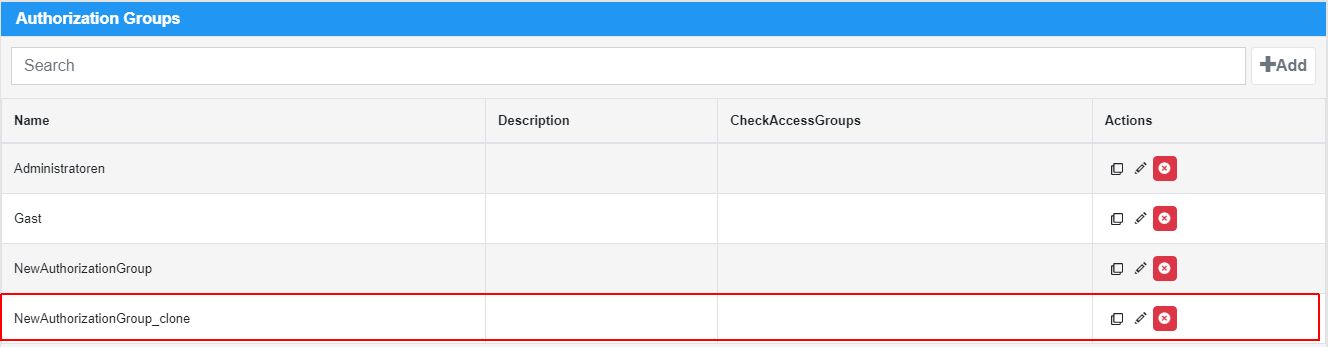
The Clone item dialog is closed and a new authorization group is added in the list view, with the name "NewAuthorizationGroup_clone"
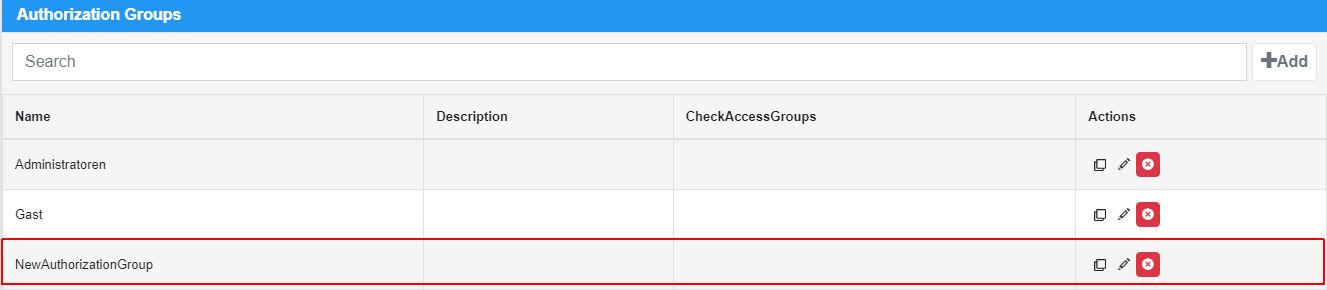
Click the Edit button in the Actions area of the previously created Authorization Group.
The Edit dialog is opened. Proceed with the desired updates.
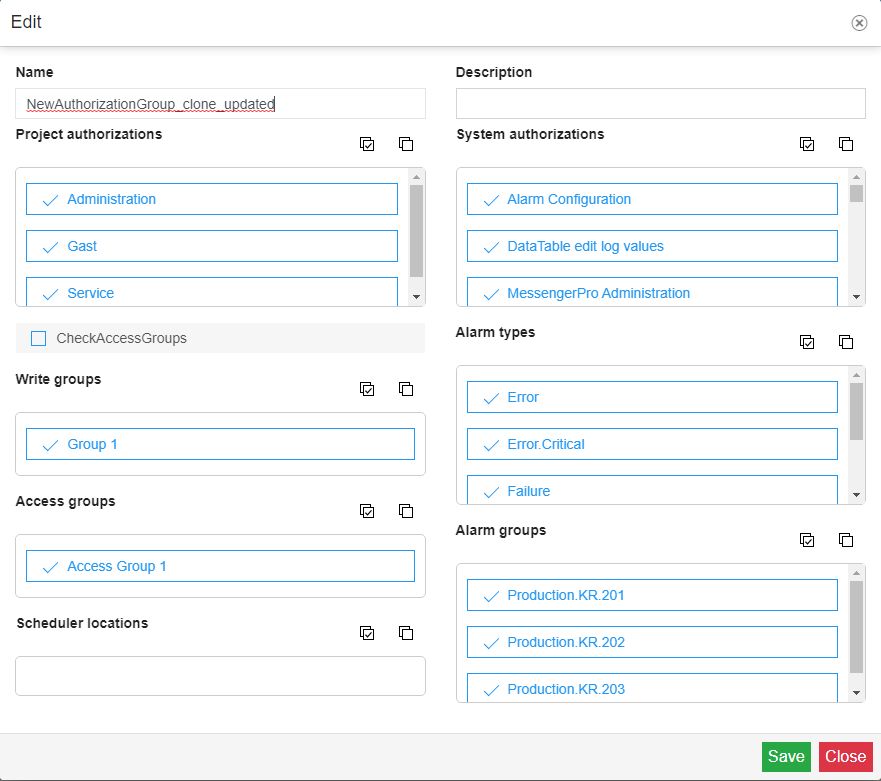
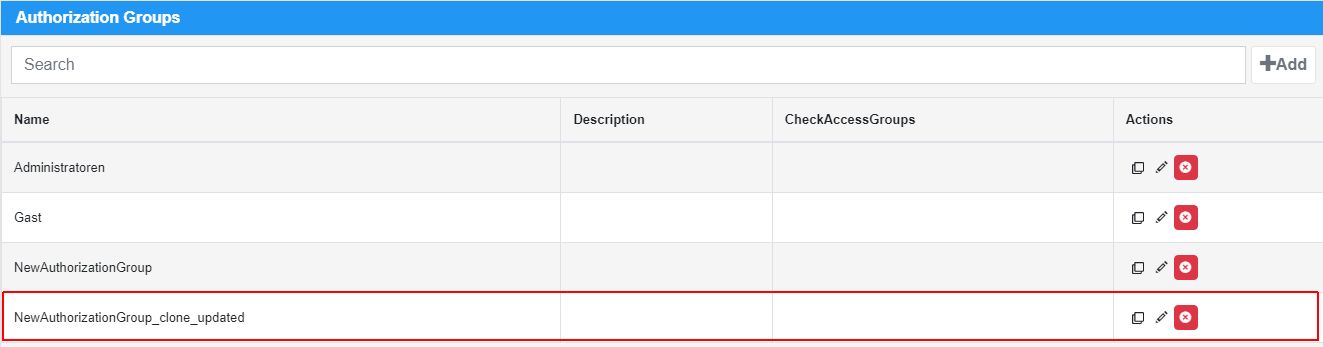
Once all the needed updates have been done press the Save button.
The Edit dialog is closed and the list view is refreshed. The changes at the level of Authorization Group are visible in the list view.
Click the Delete button in the Actions area of the previously cloned Authorization Group.
The deletion Warning dialog is opened.

Press the button Confirm.
The Warning dialog is closed and the selected Authorization Group is removed from the list.
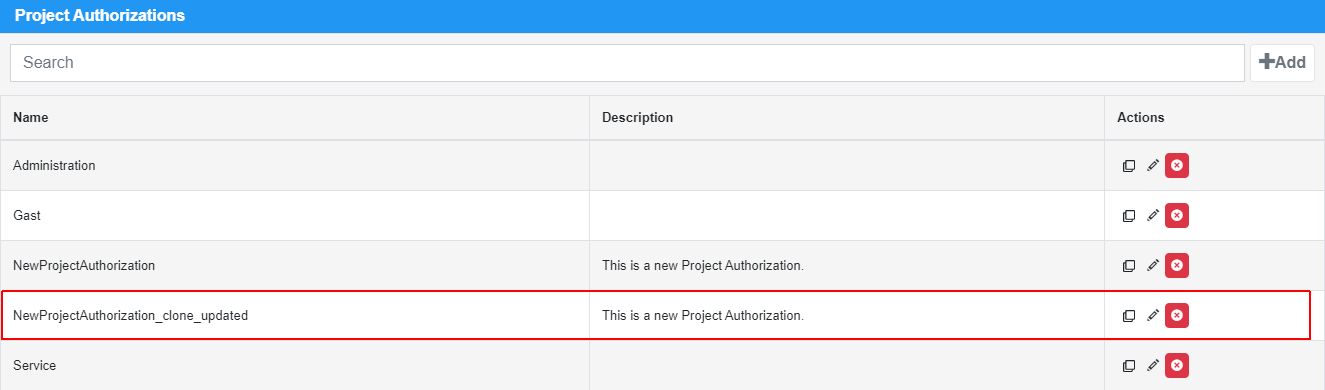
The Project authorizations panel
The Project Authorizations panel displays the list of all available Project Authorizations in the i4scada database.
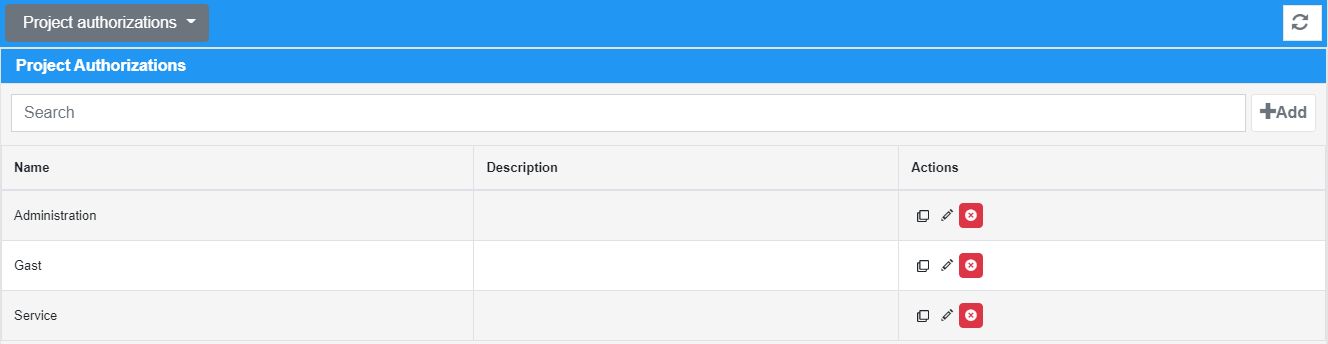
The Project Authorizations panel
The list of Project Authorizations displays only the items that the logged-in user has access to see.
Tip
For more details about the i4scada Project Authorizations please also visit our i4scada knowledgebase, and read the dedicated articles, here.
The list is split up into the following columns:
Name - the name of the listed project authorization.
Description - the description of the listed project authorization.
Actions - allows the user with the possibility to manage the listed project authorization, by means of the following actions: the Clone button
, the Edit button , and the Delete button .
To create a new Project Authorization, please follow the steps below:
Click the Add button, displayed on the right side of the panel's toolbar.

The Add dialog is opened. Fill in the Name of the new Project Authorization and the rest of the needed information, as follows:
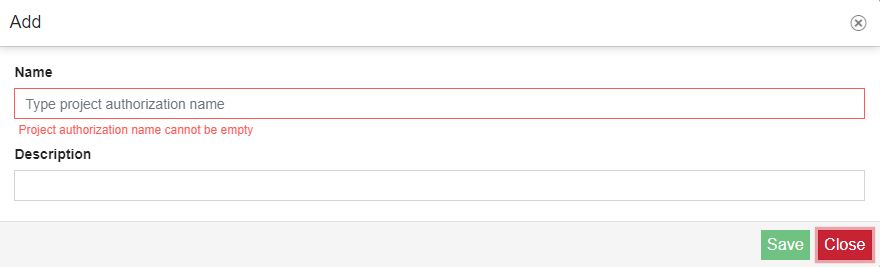
Name - The name of the Project Authorization. This field is required.
Description - The custom description of the Project Authorization. Allows the possibility to insert particular details about the Project Authorization.
Press the Save button. The Add dialog is closed and the newly created Project Authorization is available in the list view.
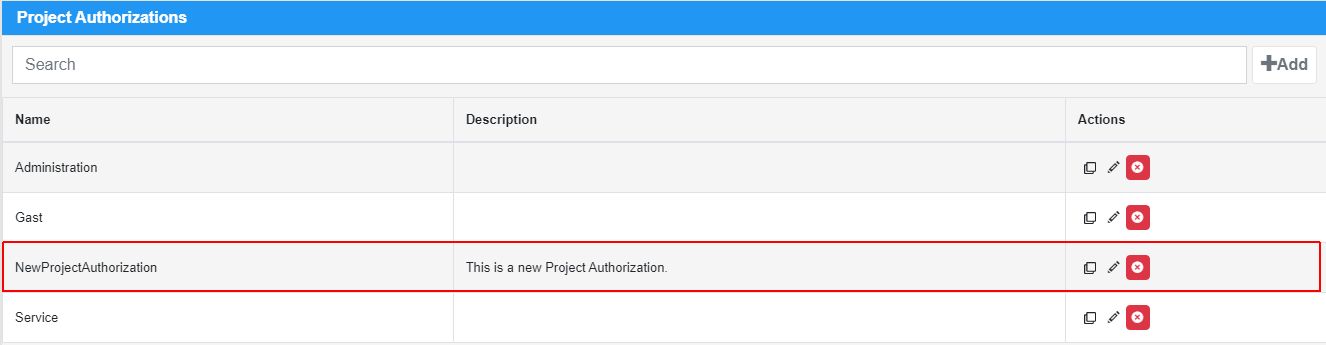
To manage your Project Authorizations, please proceed as follows:
Click on the Clone button displayed in the Actions area of the previously created Project Authorization.
The Clone item dialog is opened. The name of the Project Authorization is copied and the suffix "_clone" is added.
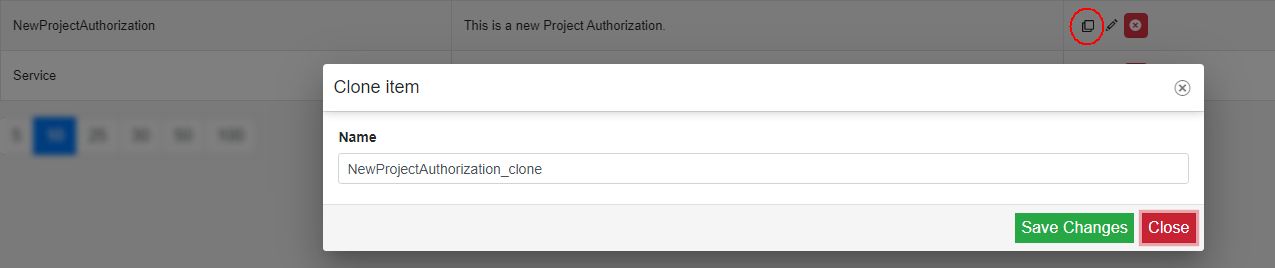
Press the Save Changes button of the Clone item dialog.
The Clone item dialog is closed and a new Project Authorization is added in the list view, with the name "NewProjectAuthorization_clone"

Click the Edit button in the Actions area of the previously created Project Authorization.
The Edit dialog is opened. Proceed with the desired updates.
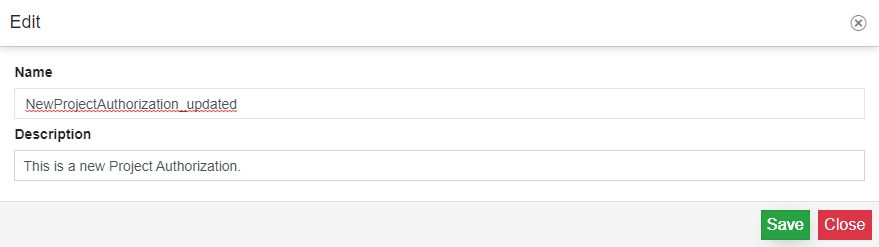
Once all the needed updates have been done press the Save button.
The Edit dialog is closed and the list view is refreshed. The changes at the level of Project Authorization are visible in the list view.
Click the Delete button in the Actions area of the previously cloned Project Authorization.
The deletion Warning dialog is opened.
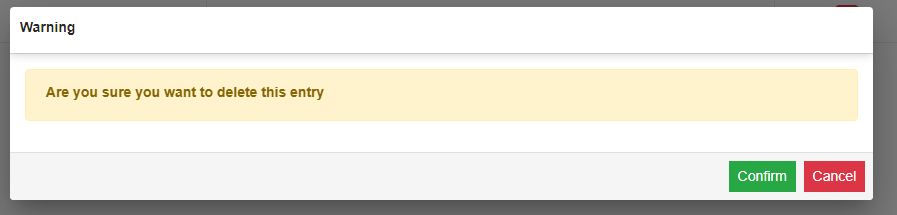
Press the button Confirm.
The Warning dialog is closed and the selected Project Authorization is removed from the list.
The Access groups panel
The Acess Groups panel displays the list of all available Access Groups in the i4scada database.

The Access Groups panel
The list of Access Groups displays only the items that the logged-in user has access to see.
The list is split up into the following columns:
Name - the name of the listed Access Group.
Description - the description of the listed Access Group.
Actions - allows the user with the possibility to manage the listed Access Groups, by means of the following actions: the Clone button
, the Edit button , and the Delete button .
Tip
For more details about the i4scada Access Groups please also visit our i4scada knowledgebase, and read the dedicated articles, here.
To create a new Access Group, please follow the steps below:
Click the Add button, displayed on the right side of the panel's toolbar.

The Add dialog is opened. Fill in the Name of the new Access Group and the rest of the needed information, as follows:
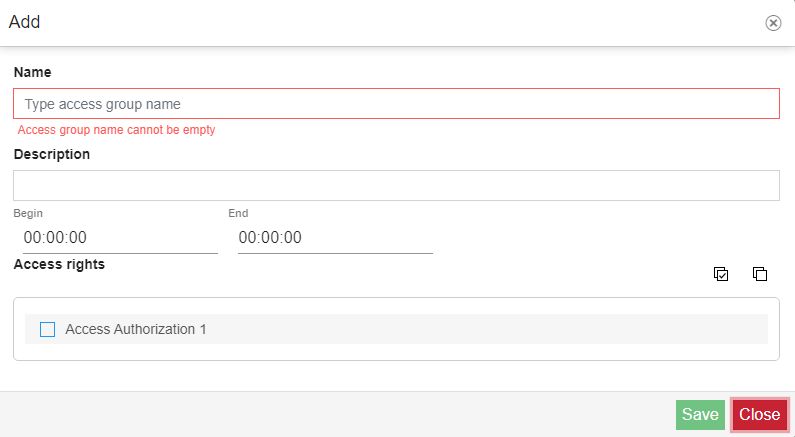
Name - The name of the Access Group. This field is required.
Description - The custom description of the Access Group. Allows the possibility to insert particular details about the Access Group.
Begin - Defines the start time, when the new Access Group will start being active. The selection is done with the time selector. The available options in the time selector are hour, minute, and second.
End - Defines the end time, when the new Access Group will stop being active. The selection is done with the time selector. The available options in the time selector are hour, minute, and second.
Access rights - The Access rights field, features a multi-select option that contains all Access Authorizations available in the project database. This list also displays at the top right side, a select / unselect button, which eases the selection process.
Press the Save button. The Add dialog is closed and the newly created Access Group is available in the list view.

To manage the listed Access Groups, please follow the steps below:
Click on the Clone button displayed in the Actions area of the previously created Access Group.
The Clone item dialog is opened. The name of the Access Group is copied and the suffix "_clone" is added.
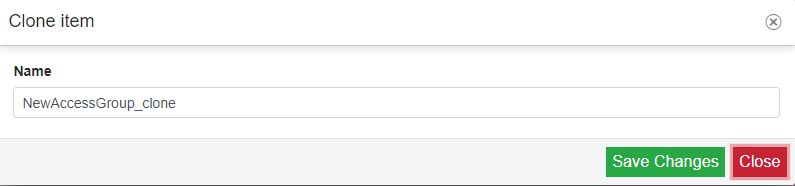
Press the Save Changes button of the Clone item dialog.
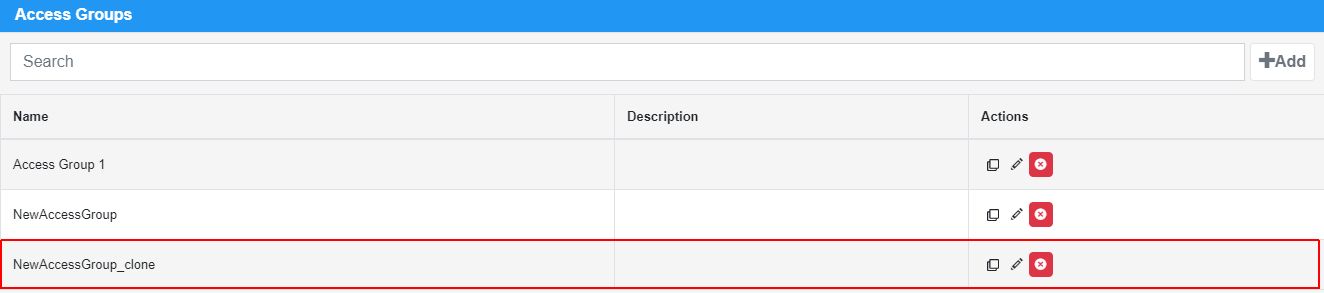
The Clone item dialog is closed and a new Access Group is added in the list view, with the name "NewAccessGroup_clone"
Click the Edit button in the Actions area of the previously created Access Group.
The Edit dialog is opened. Proceed with the desired updates.
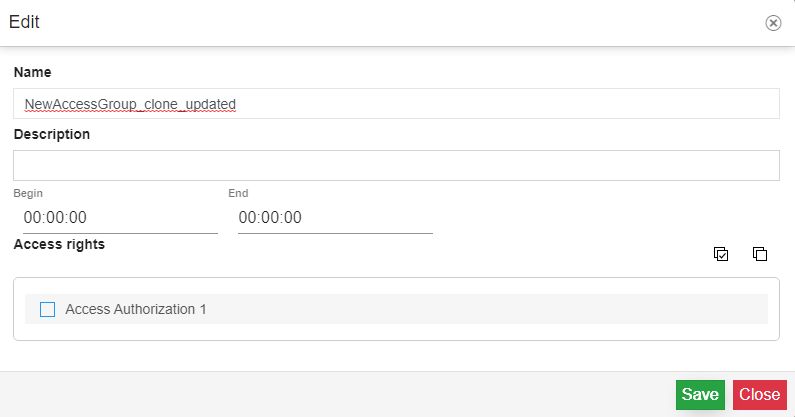
Once all the needed updates have been done press the Save button.
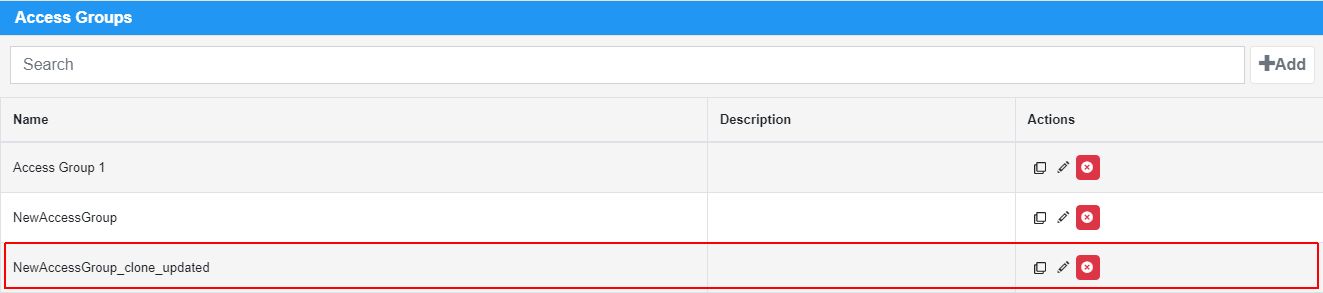
The Edit dialog is closed and the list view is refreshed. The changes at the level of Access Group are visible in the list view.
Click the Delete button in the Actions area of the previously cloned Access Group.
The deletion Warning dialog is opened.
Press the button Confirm.
The Warning dialog is closed and the selected Access Group is removed from the list.
The Access authorizations panel
The Access Authorizations panel displays the list of all available Access Authorizations in the i4scada database.

The Access Authorizations panel
The list of Access Authorizations displays only the items that the logged-in user has access to see.
The list is split up into the following columns:
Name - the name of the listed Access Authorization.
Description - the description of the listed Access Authorization.
Actions - allows the user with the possibility to manage the listed Access Authorizations, by means of the following actions: the Clone button
, the Edit button , and the Delete button .
Tip
For more details about the i4scada Access Authorizations please also visit our i4scada knowledgebase, and read the dedicated articles, here.
To create a new Access Authorization, please proceed as follows:
Click the Add button, displayed on the right side of the panel's toolbar.

The Add dialog is opened. Fill in the Name of the new Access Authorization and the rest of the needed information, as follows:
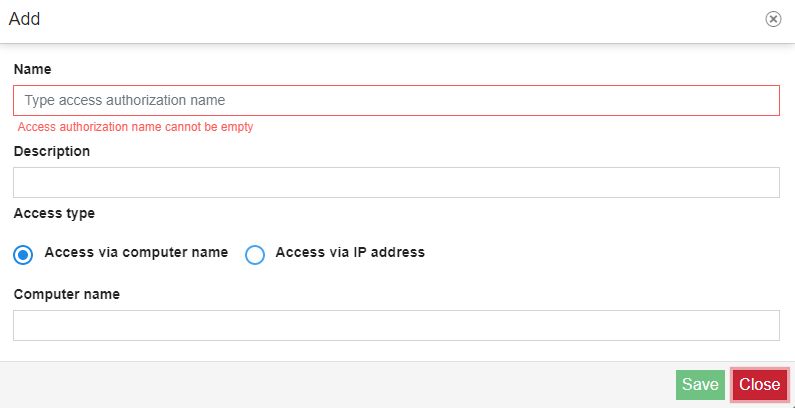
Name - The name of the Access Authorization. This field is required.
Description - The custom description of the Access Authorization. Allows the possibility to insert particular details about the Access Authorization.
Access Type
Access via computer name - Access Authorization, uses the computer name to validate the access.

Computer name - The computer name is required.
Access via IP address - Access Authorization, uses the IP to validate the access. If this setting is enabled, the "Access via computer" setting will be automatically disabled.
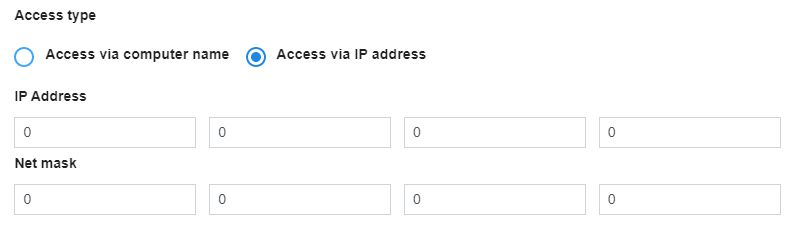
IP Address - the IP Address is required
Net mask - the Net mask enables the selection of a whole subnet.
Press the Save button. The Add dialog is closed and the newly created Access Authorization is available in the list view.

To manage the listed Access Authorizations, please proceed as follows:
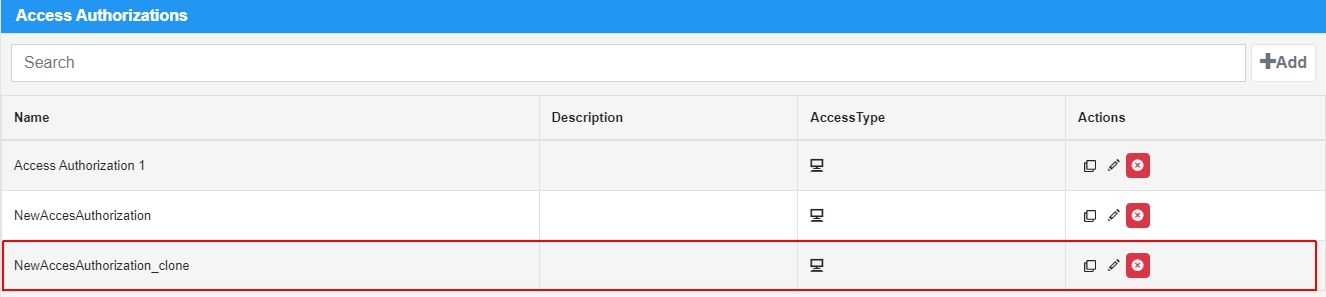
Click on the Clone button displayed in the Actions area of the previously created Access Authorization.
The Clone item dialog is opened. The name of the Access Authorization is copied and the suffix "_clone" is added.
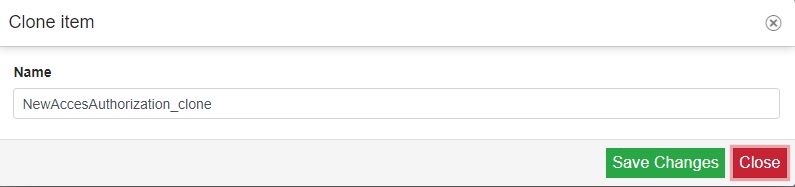
Press the Save Changes button of the Clone item dialog.
The Clone item dialog is closed and a new Access Authorization is added in the list view, with the name "NewAccessAuthorization_clone"
Click the Edit button in the Actions area of the previously created Access Authorization.
The Edit dialog is opened. Proceed with the desired updates.
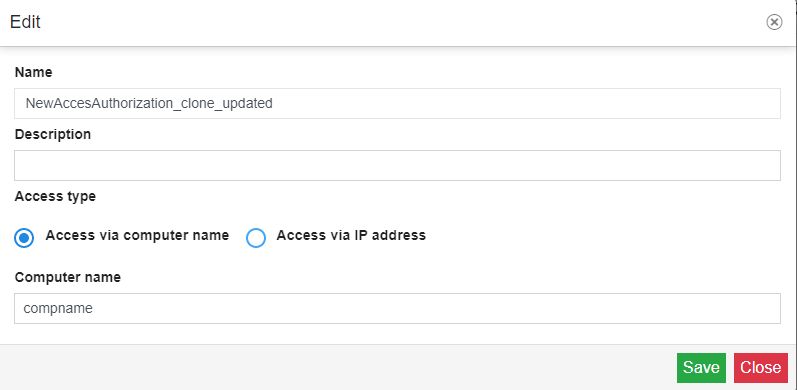
Once all the needed updates have been done press the Save button.
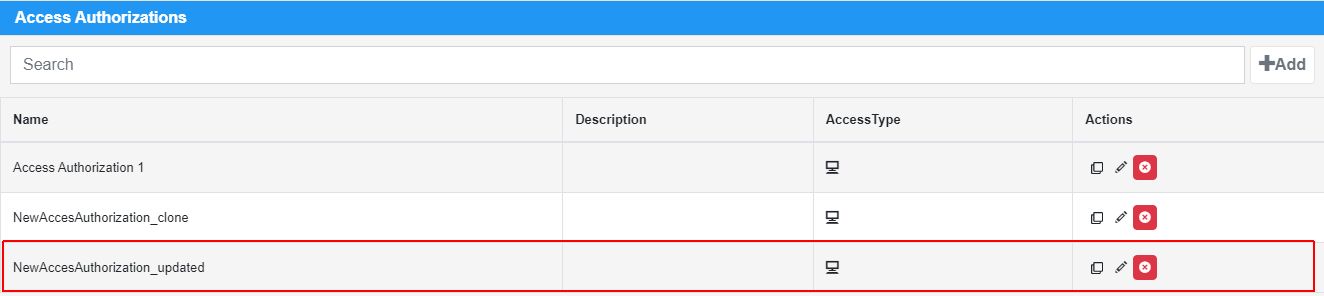
The Edit dialog is closed and the list view is refreshed. The changes at the level of Access Authorization are visible in the list view.
Click the Delete button in the Actions area of the previously cloned Access Authorization.
The deletion Warning dialog is opened.
Press the button Confirm.
The Warning dialog is closed and the selected Access Authorization is removed from the list.
The User actions panel
This tutorial will guide you through the steps, a user needs to perform, to properly use the User Actions List component, at run-time, while visualizing a published i4scada project.
The User Actions List component is a list of actions, performed by users, on the target i4scada environment. This component can be added to your project individually, or used in the context of the User manager component.
Tip
For more details about the design-time properties, of the User Actions List component, please also visit the dedicated article, here.
Warning
Since the contents of the list are restricted on basis of the user's permissions, please note that the User Login component should be added to your i4designer project.
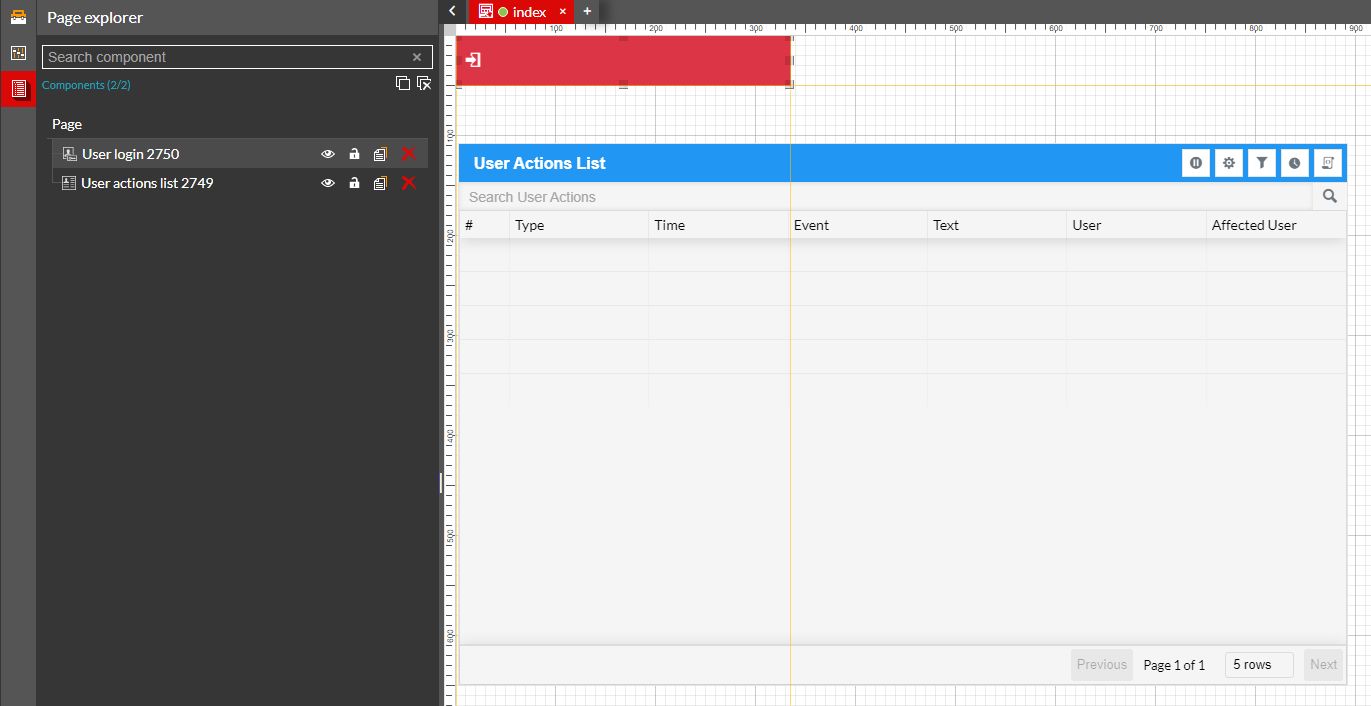
i4designer design-time project
Select the User actions list option of the User Manager panel.
As soon as the User Actions List panel is opened, proceed with filtering the User Actions List, as follows:
Click on the Filter Actions button.

In the Filter Actions dialog, select the desired actions count amount, the management events, the activity events, and filter users options.
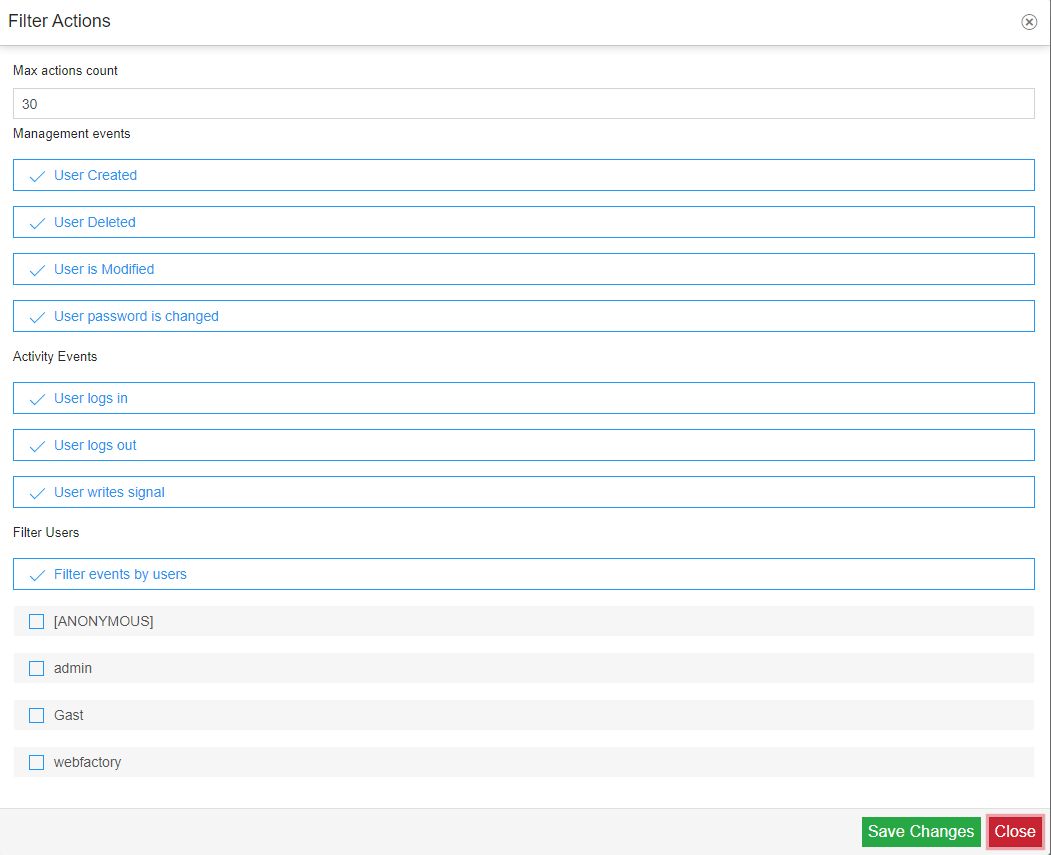
Tip
For the present tutorial, we shall leave the filter actions as per default.
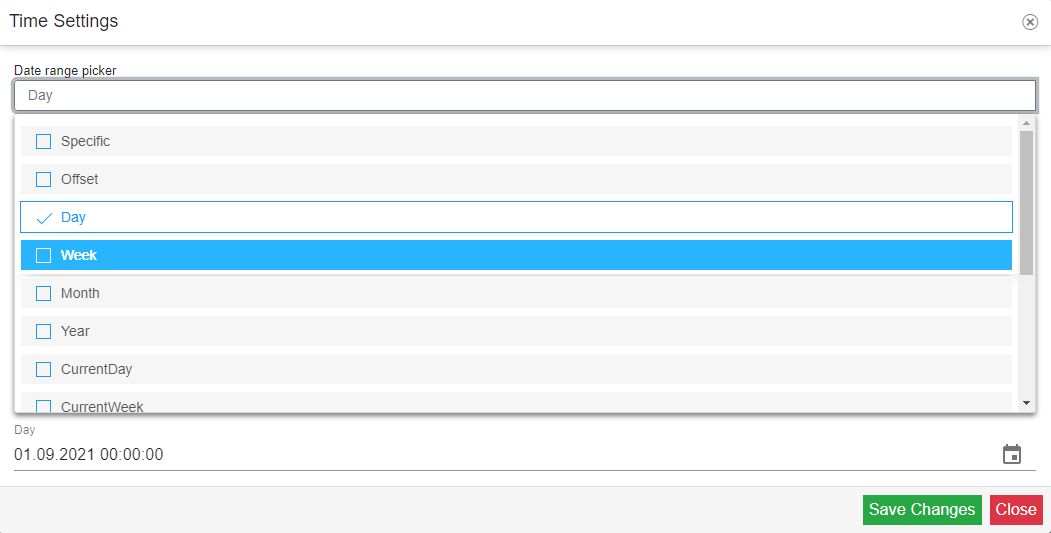
After setting up the desired list filter, click on the Time interval button to open the dialog with the same name.

Using the Date range picker and the calendar selector(s), apply the desired time interval and click the Save changes button.
Tip
The Date range picker drop-down list features the following options:
Specific - allows the user to pick the desired time interval, using the From / To calendar selectors.
Offset - allows the user to pick the current filter, on a specified date, using the design-time properties Start offset and End offset, by choosing the type (seconds, minutes, hours, days). The time frame is by default calculated and set.
Day - allows the user to select the desired Day as time range, from a specialized pop-up window.
Week - allows the user to select the desired Week as time range, from a specialized pop-up window.
Month - allows the user to select the desired Month as time range, from a specialized pop-up window.
Year - allows the user to select the desired Year, as time range, from a specialized pop-up window.
Current Day - allows the user to select the current day, as a time range. The time frame of 24 hours is by default calculated and set.
Current Week - allows the user to select the current week, as a time range. The time frame of 7 days is by default calculated and set.
Current Month - allows the user to select the current month, as a time range. The time frame is by default calculated and set.
Current Year - allows the user to select the current year, as a time range. The time frame is by default calculated and set.
Last Day - allows the user to select the day before the current one. The time frame of 24 hours is by default calculated and set.
Last Month - allows the user to select the month before the current one. The time frame is by default calculated and set.
Last Year - allows the user to select the year before the current one, as time range. The time frame is by default calculated and set.
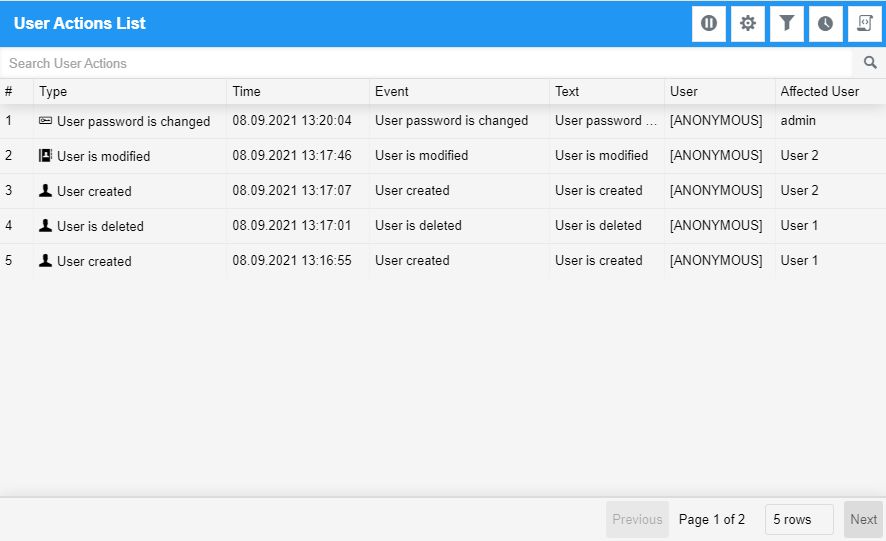
As soon as the time interval has been fixed, the list of user actions is populated with data.
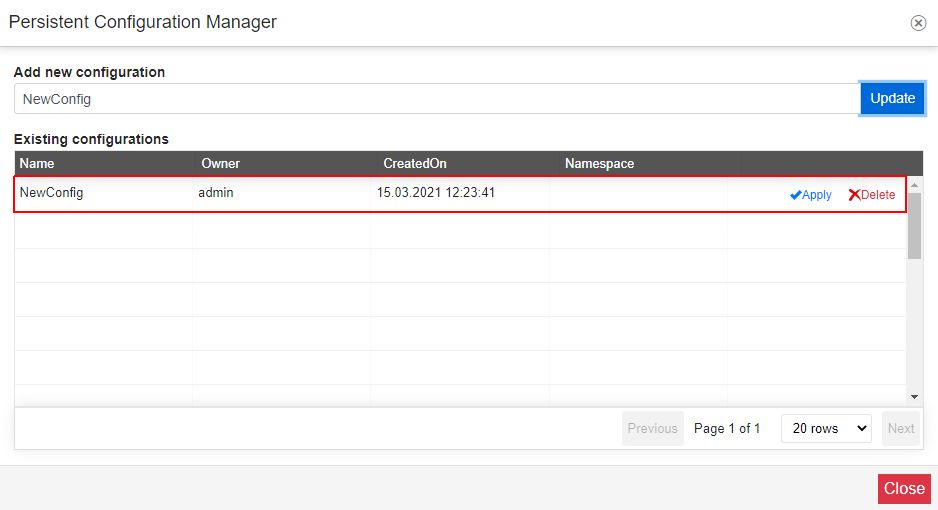
To save the currently applied filters, click on the Load / Save button.

In the Persistent Configuration Manager dialog, fill in the name of your new custom configuration, in the Add new configuration field, and click the Add button.
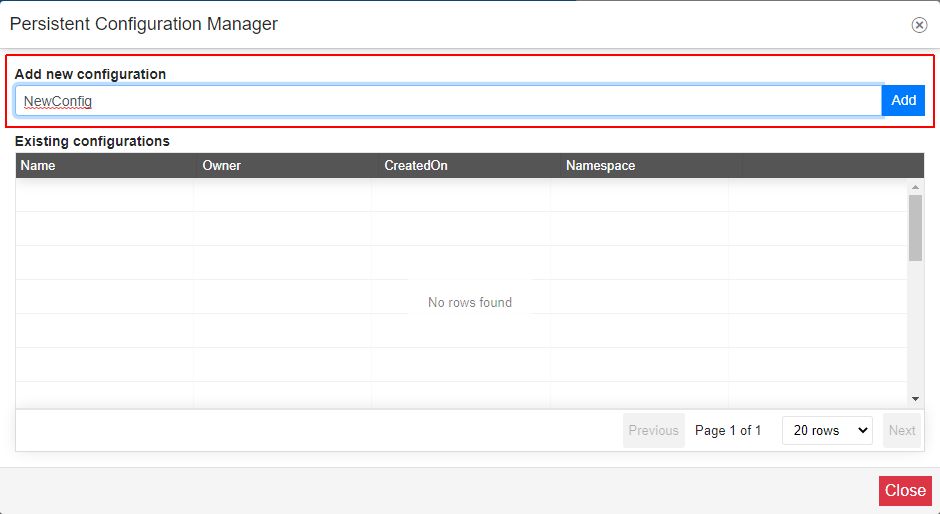
The new configuration is added to the Existing configurations list, allowing the user to either Apply it or Delete it.
To enable/disable the Auto-refresh option, click on the dedicated toolbar button.
Auto-refresh enabled

Auto-refresh disabled, allows the user to manually refresh the list.

Tip
The Auto-refresh option can also be enabled or disabled, at design time, as well.
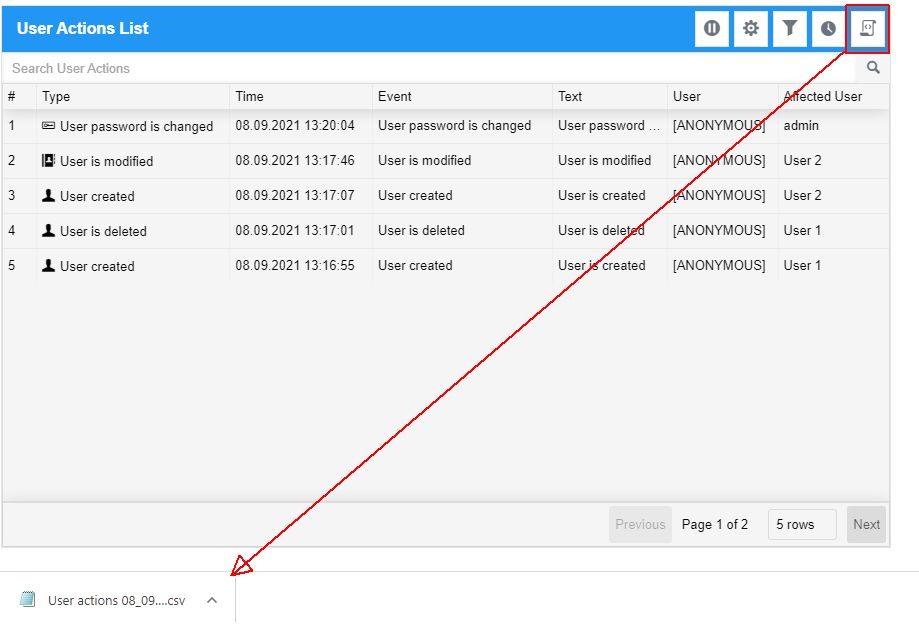
To obtain an output of the current list, click the Export toolbar button. The exported content will be saved on your local machine, to a storage location of your choice.
The User actions document is saved in CSV format.