Managing Access Authorizations
The Access Authorisations can restrict the location from where the system can be accessed. One can add multiple Access Authorisations in one Access Group.
The scope of i4scada Access Authorizations is to restrict the location from where the system can be accessed. Access authorizations are grouped in access groups.
Before starting to work with the i4scada Studio User Manager, make sure that the i4scada Server is running. To start the i4scada Server open i4scada Service Manager.
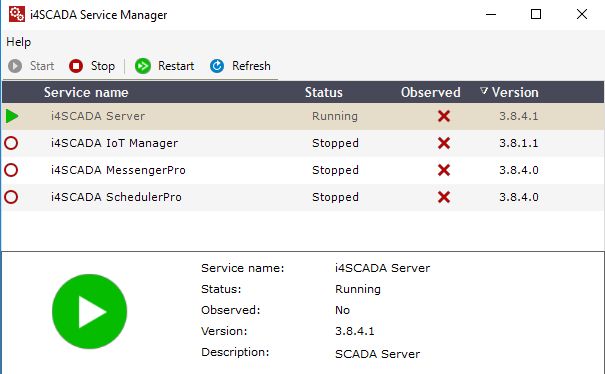
i4scada Server running
To see the Access Authorizations panel, select the respective option from the primary toolbar drop-down list, of User Manager. Panel lists all database Access Authorizations, structured into following columns:
Name - The Access Authorization name.
Description - The Access Authorization custom description.
Access via - The type of access indicated by icons:
 (via computer name) and
  (via IP address)
Note
Starting with version 3.8.13 of the i4scada, Access Authorization will no longer require access location information from both Computer name and IP Address.
Actions - this last column is an atypical one. In Actions column, the actual user management actions are available. The available actions for a listed Access Authorizations are: Clone
 , Change password
  , Edit
  and Delete
  .
.
The list of Access Authorizations allows user with possibility to sort, filter and search for desired items.
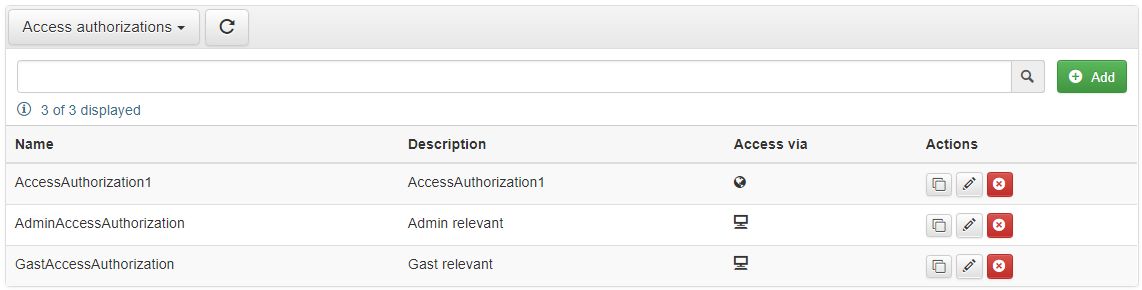
Access Authorizations panel
In order to add a new Access Authorizations in Studio, select the  button. The Add dialog is opened where following fields are available, for definition of a new Access Authorization:
Name - The Access Authorization name.
Description - The custom description of the Access Authorization. Allows possibility to insert particular details about the Access Authorization.
Access via Computer name - Access Authorization, uses the computer name of the user to validate the access.
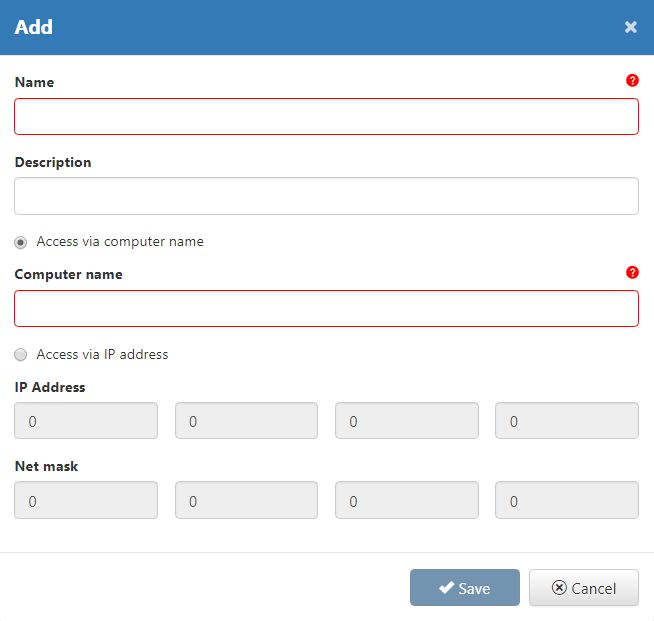
Add new Access Authorization
Computer name - if "Access via Computer name" setting was selected, Computer name is required.
Access via IP address - Access Authorization, uses the IP of the user to validate the access. If this setting is enabled, the "Access via computer" setting will be automatically disabled.

IP Address - field expects the IP Address of the user
Net mask - field expects the Net mask
After all desired settings have been introduced user can either Save changes or Cancel.
 button - the dialog will be closed and the new Access Authorization will be saved. The new elements will be immediately added in the list view.
 button - the dialog will be closed and the changes discarded.
Cloning an existing Access Authorization is possible by selecting Actions toolbar option . Once the option is selected, the Clone dialog is opened. The name of the close is constructed from the selected Access Authorization name and suffix "_clone":
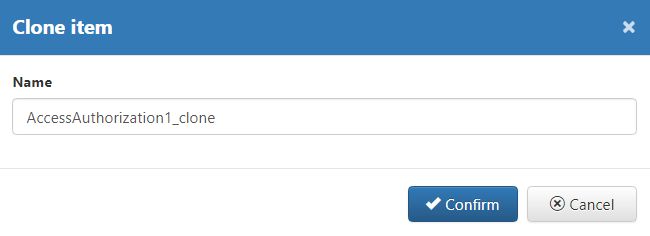
Clone Access Authorization
The actual name of the clone may also be manually defined.
To proceed with the Access Authorization clone, user can either Confirm or Cancel the action.
 button - the dialog will be closed and the changes saved in the database, for future use. Saving a new Access Authorization will consequently update the list, making the changes immediately visible.
- button - the dialog will be closed and the changes discarded.
The existing Access Authorizations can be further updated, by selecting toolbar option . By clicking this button, system opens the Edit dialog, where all the previously presented Access Authorization fields may updated: Name, Description, Access via computer name setting and Access via IP Address settings.
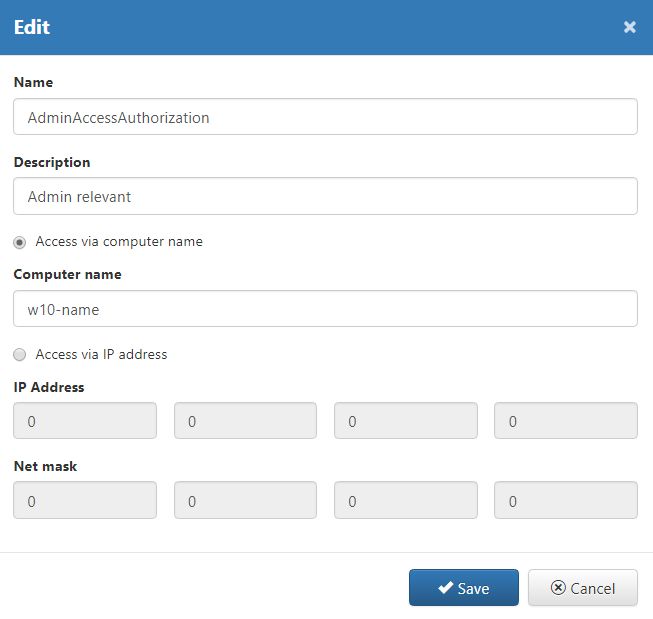
Edit Access Authorization
To confirm the changes and close the Edit dialog, press button . In case you desire to discard the changes and leave the edit mode, press button .
The User Manager allows deletion of Access Authorizations, by selecting option , in Actions column of the item to be removed. Once the Delete option is selected, a confirmation dialog is opened, allowing user either to Confirm or Cancel.
- button - leads to deletion of the selected Access Authorization. Item is removed from the list.
- button - closes the confirmation dialog and all changes are discarded.