Recipes at run-time
We think you are ready for your i4scada SmartEditor Recipe Manager to be published! Take another look and get busy!
After preparing the Recipe extensions as described in the Recipes at design-time chapter, the Recipe i4scada SmartEditor project is ready to be published.
Tip
For a set of step-based tutorials describing specific use cases involving Recipes and Recipe Definitions, please also visit the SmartEditor Recipe Manager tutorials chapter.
Recipe Manager
Check out this article to learn your way around the i4scada SmartEditor Recipe Manager, before starting the Recipes management.
After publishing the i4scada SmartEditor extension "wf-recipe-manager" the visual structure features the following sections:
the Recipe Management toolbar
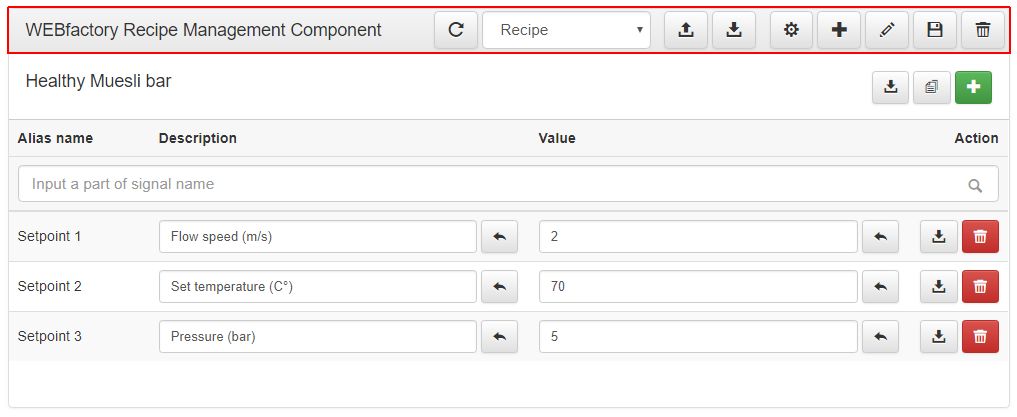
the Recipe Management Components toolbar

the list of Recipe items
The Recipe Manager chapter has been split up into the following articles:
Management of Recipe Definitions
If you got this far you already have your Recipe Manager project out there! Gain more knowledge about the management of Recipe Definitions.
The toolbar drop-down list allows the user to easily switch between Recipe and Recipe Definition.

Drop-down selector
By selecting the Recipe Definition option, the loaded panel is by default empty, allowing the user to either Add, Load or Import a Recipe Definition.
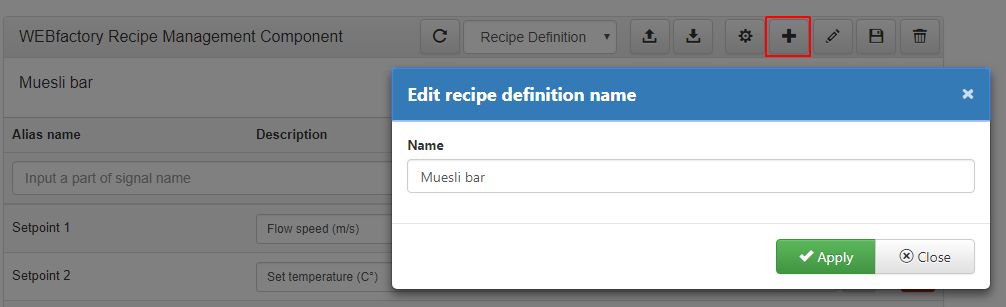
To define a new Recipe definition, select the Add toolbar button. The Add recipe definition dialog is opened. At this point user can only type in the Name of the new Recipe Definition.
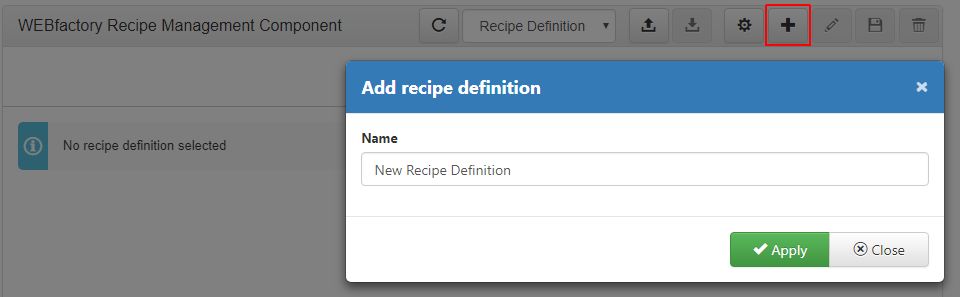
Add recipe definition dialog
The Add recipe definition dialog provides user with following options:
 - applies the new recipe definition. Once the button Apply is clicked, the Add recipe definition dialog is closed and the new empty Recipe Definition is applied to the Recipe Manager, for further processing.
 - closes the Add recipe definition dialog and discards the changes.
The Load toolbar button opens the Load recipe definition window, where the list of all available Recipe Definitions is displayed.
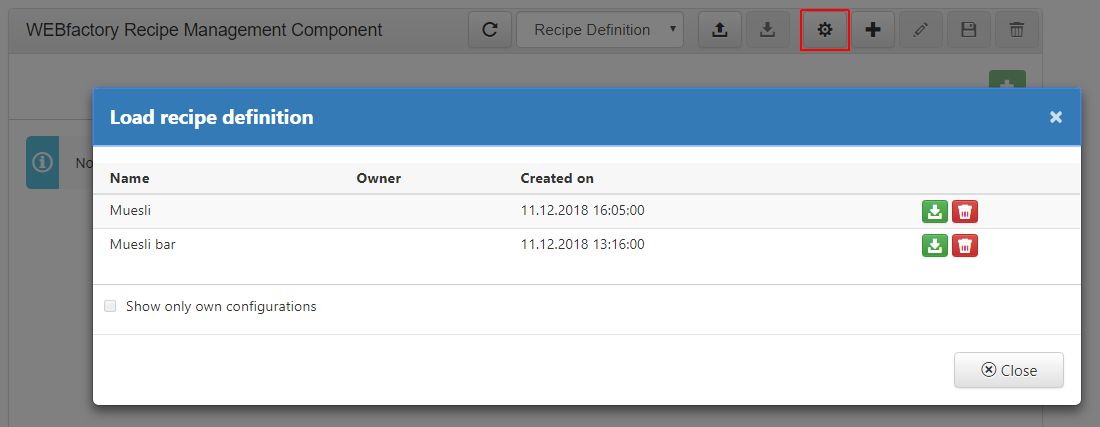
Load Recipe Definition window
In this view, the user has the following options:
 button - Opens the selected Recipe Definition, for further use.
 button - Deletes the selected Recipe Definition, from the list view.
Show only own configurations check-box - if enabled, a filter is applied to the recipe definitions list, to display only the elements owned by the logged in user.
The Show only own configurations check-box is activated, only if any security settings were defined at design-time.
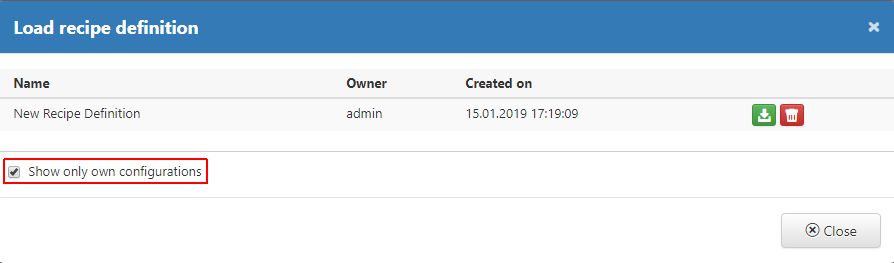
- button - Closes the Load recipe definition window and returns to the main panel.
The toolbar button Edit becomes active only after adding a Recipe Definition to the manager. By clicking the Edit button, the Edit recipe definition name dialog is opened. The edit function allows the user to update only the Recipe Definition name.
Edit recipe definition name dialog
The Edit recipe definition name dialog provides user with two options:
- button - applies the new Recipe Definition name. Once the button Apply is clicked, the dialog is closed and the Recipe Definition name is updated.
- button - closes the dialog and discards the changes.
To preserve the changes made to a Recipe Definition, user can click the toolbar button Save . Changes are automatically saved in the background.
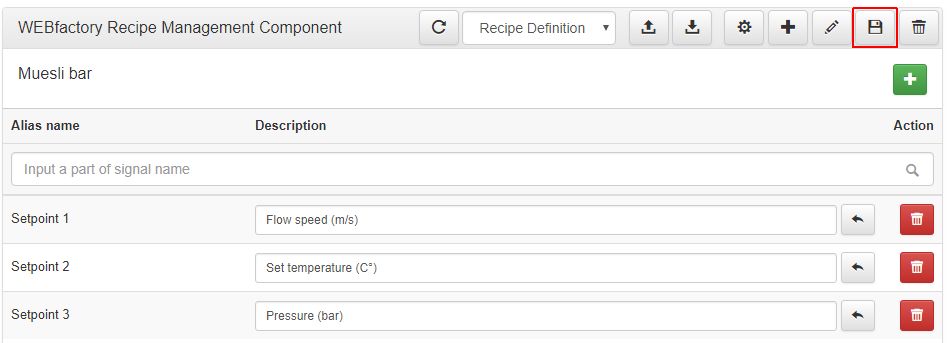
Save recipe definition option
The toolbar button Delete is activated only after loading a Recipe Definition in the manager. Clicking the Delete button, the Delete recipe definition dialog pops-up.
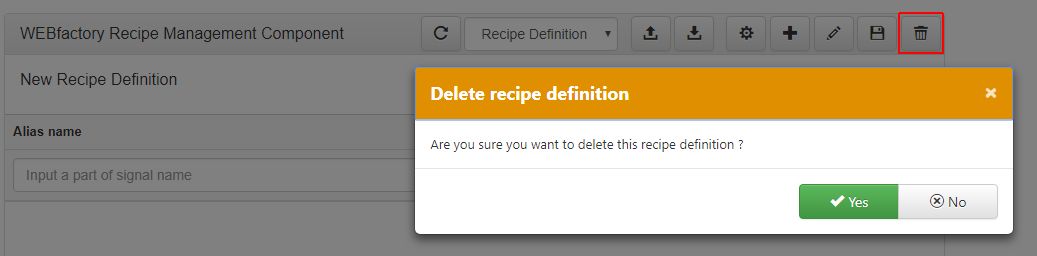
Delete recipe definition dialog
The Delete recipe definition dialog allows the user to either confirm or deny the deletion:
 button - confirms the deletion. The dialog is closed and the Recipe Definition is removed.
 button - denies the deletion. The dialog is closed without removing the Recipe Definition.
Besides the above described functions, the Recipe Definitions can also be exported or imported.
The Import button is active and available in the main toolbar. Clicking the Import button, the Import recipe definition window pops-up.
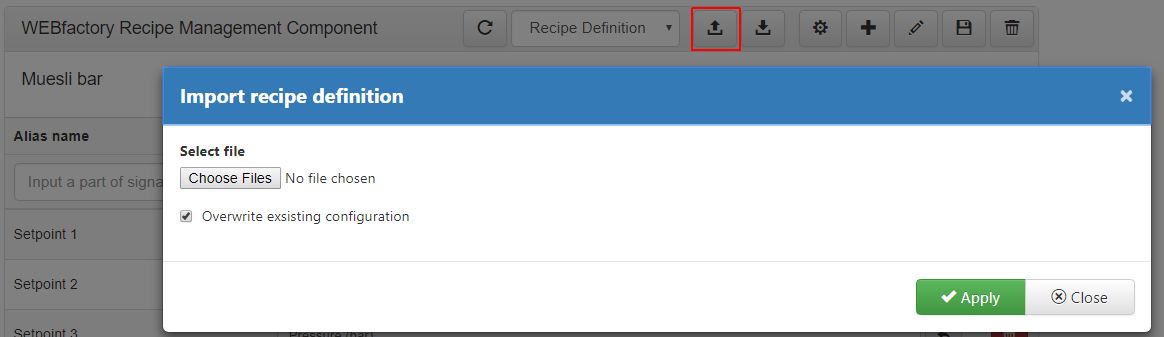
Import Recipe Definition window
In the Import recipe definition window, the user is provided with the following options:
 button - opens a Browse window, where the user can search for the import file on the PC.
Note
As the Recipe Definitions are stored as serialized JSON files, the import file should be in the JSON format type. Any other file format will be ignored and an error message will appear at the bottom right side of the browser page.

Overwrite existing configuration check -box - if enabled, it checks for duplicates and overwrites the configurations of the already available Recipe Definitions.
Note
If the check-box Overwrite existing configuration is disabled and duplicates are found, a warning message will appear at the bottom right side of the browser page.

- button - applies the previously selected import file.
Note
After choosing the import file and clicking the Apply button, the Recipe Definition will be added to the current list of definitions. To view and open the Recipe Definition you need to visit the Load recipe definition window.
- button - Closes the Import recipe definition window and returns to the main panel.
The Export toolbar button becomes active after a Recipe Definition is opened in the manager. After clicking the Export button, the Recipe Definition is opened automatically in the browser page. The export file is stored in serialized JSON format.
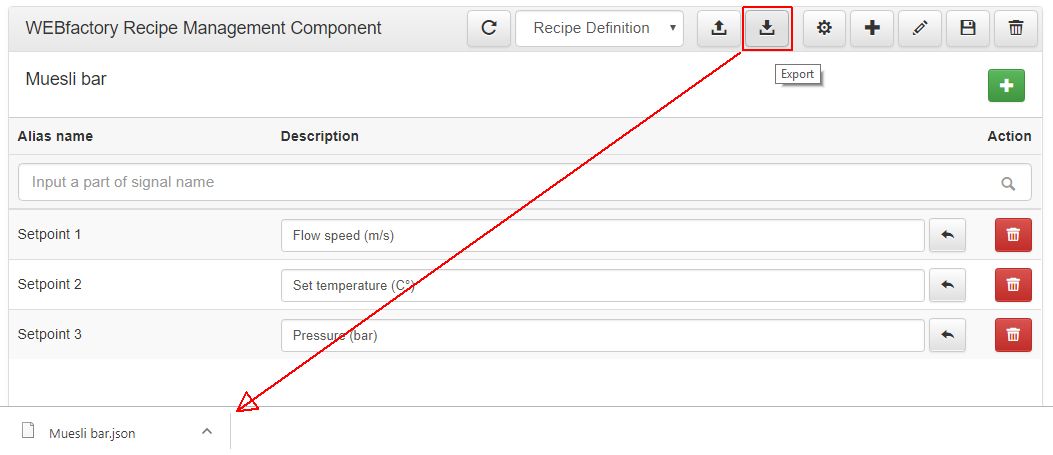
Export Recipe Definition
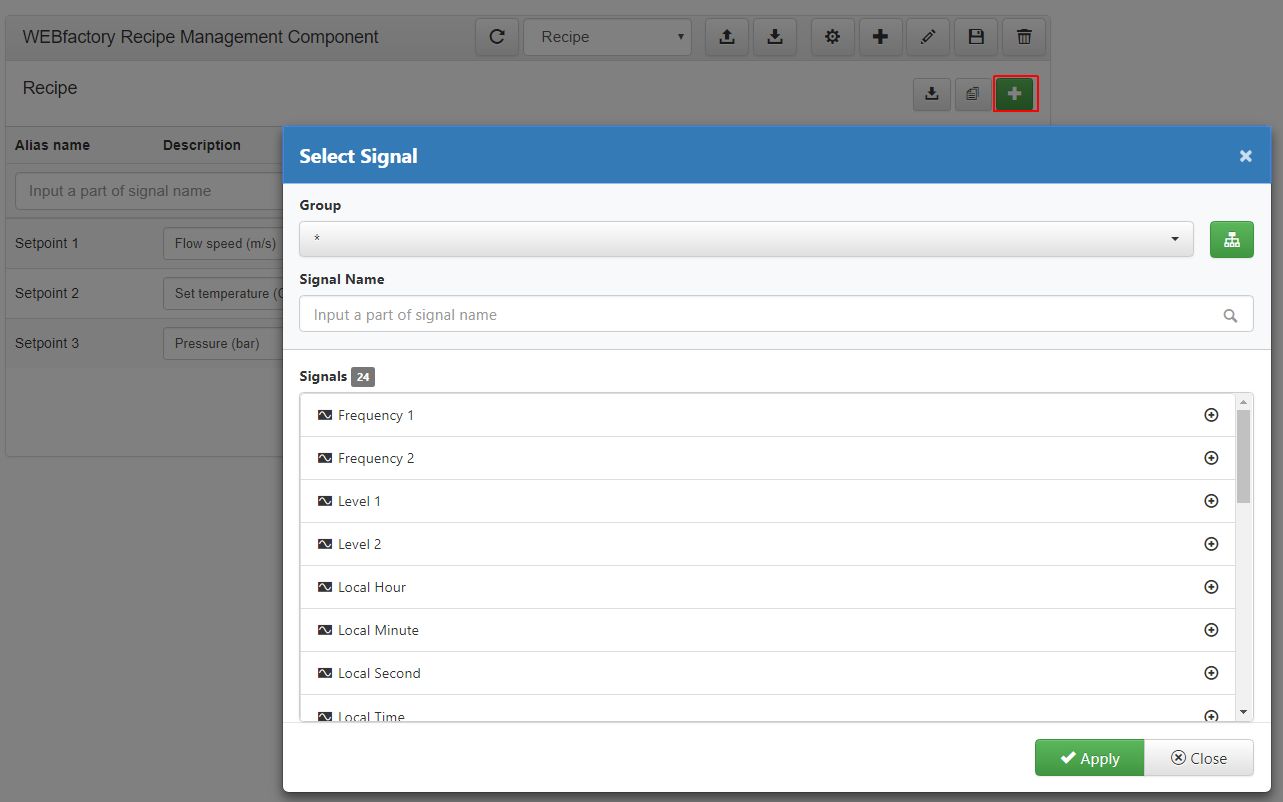
One or more Signals can be added to a Recipe Definition by clicking the Add recipe definition item button. The Select Signal window pops-up displaying the list of Signals, where the user can make the following selections:
Group drop-down list - displays the list of the Groups available in the i4scada Server.
Note
By default, the drop-down list does not feature any Group selection.
Selecting a Group may affect the amount of Signals displayed in the list view. The Group selection will filter the Signals list, to display only those Signals that are part of the selected Group.
 button - applies the selection to all the listed Signals.
Note
The selected Signals are highlighted with a blue background. To remove the selection from a Signal, the user can click on it, in the list view.

Signal Name search field - filters the list of signals by name.
Signals list - displays the list of all Signals available in the i4scada Server or the Server Group.
- button - adds the previously selected Signal to the Recipe Definition.
- button - closes the Select Signal window without applying any change to the Recipe Definition.
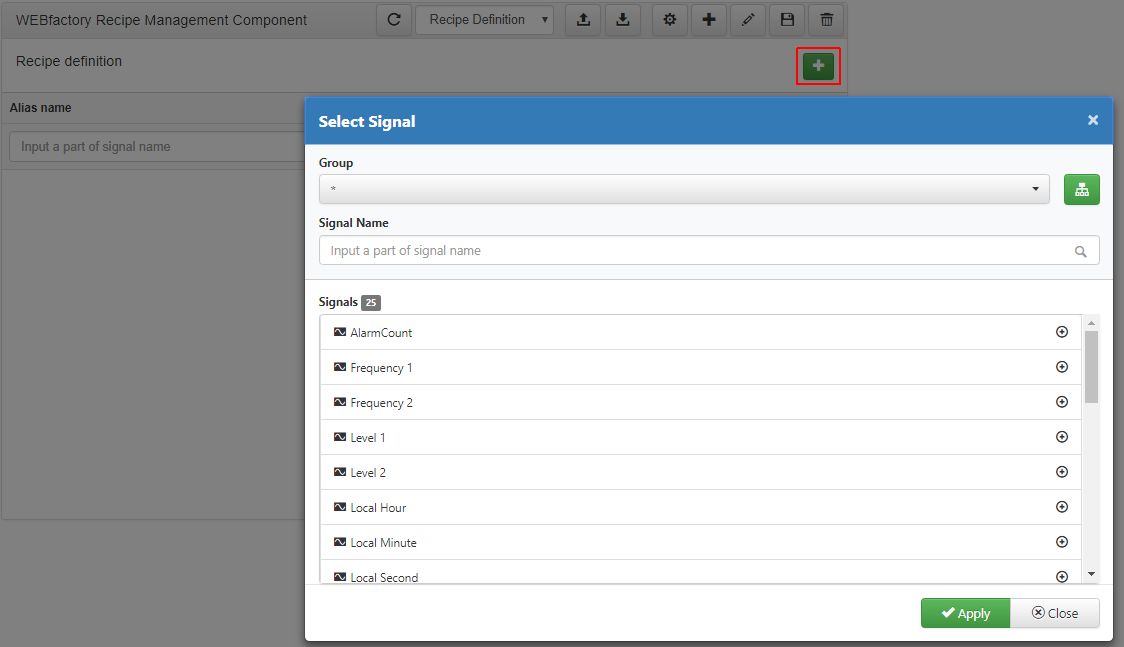
Select Signal window
After processing the Recipe Definition Signals, the list is split up into 3 columns:
Alias name - the Signal name
Description - the Signal description. By default, the Signal name is parsed as description.
Note
The user can manually change the description of a Recipe Definition Signal. If the changes were not saved, the Reset button
 will restore the previous description.
Action - displays the Delete button
 . By clicking the Delete button, the corresponding Signal is automatically removed from the Recipe Definition.

The list of Recipe Definition Signals
Management of Recipes
Manage your Recipes in the i4scada SmartEditor project, by following the description and advises in this article.
To proceed with management of Recipes, switch to the Recipe value, from the drop-down list.
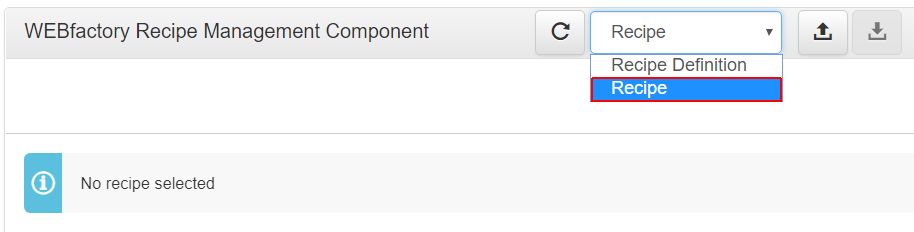
Recipe
Initially, no Recipe is selected. Recipes can be added to the manager, by means of Add, Load and Import functions.
Clicking the toolbar button Add opens the Add recipe window.
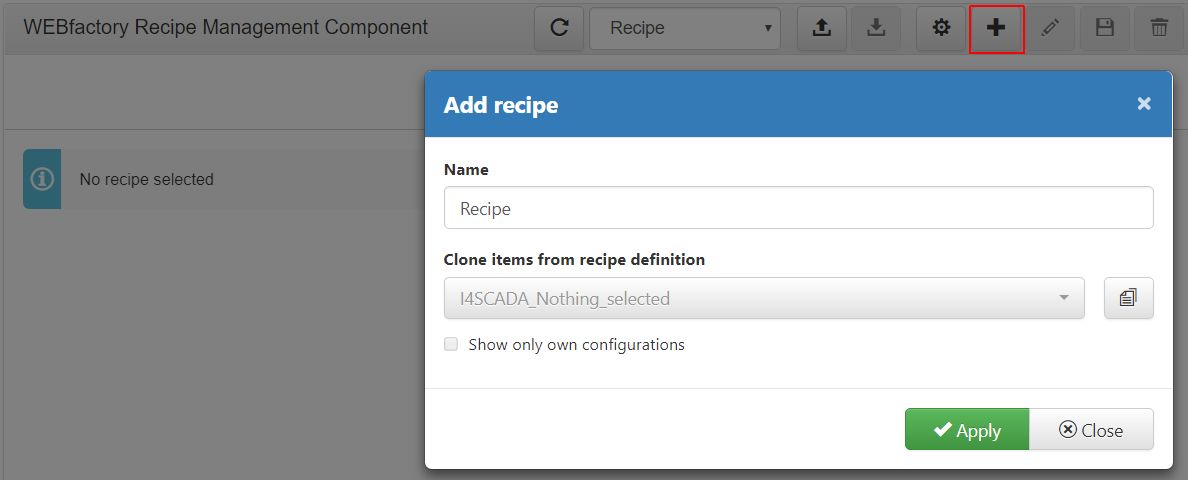
Add Recipe window
This view is structured as follows:
Name field - defines the name of the Recipe.
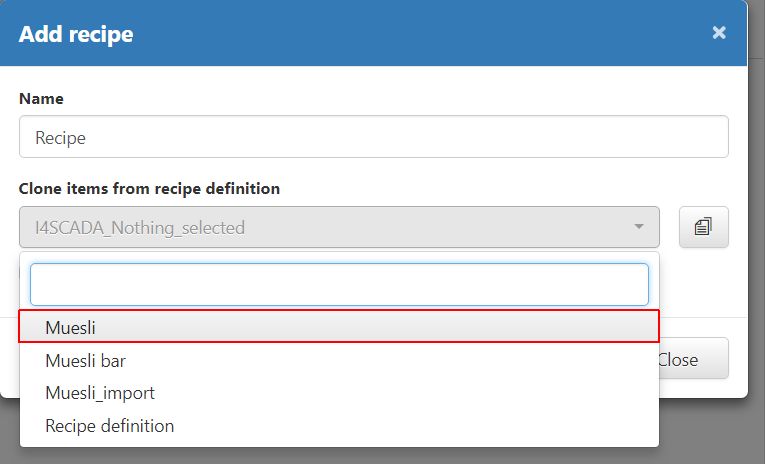
Clone items from recipe definition drop-down list - displays the list of all available Recipe Definitions.
Note
Recipes can use the existing Recipe Definitions, as templates.
The user can decide to select a Recipe Definition from the drop-down list, in order to clone all the Items (Signals) and assign them to the new Recipe.
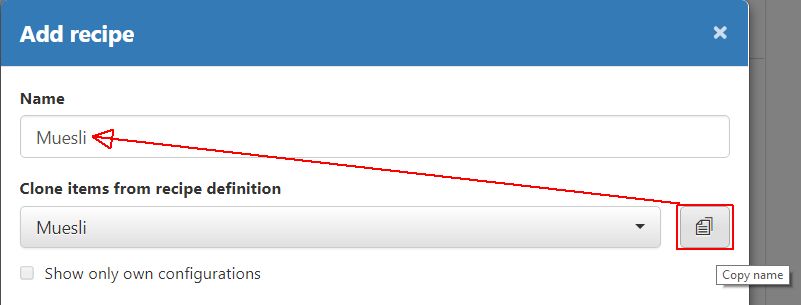
Copy name
 button - copies the selected Recipe Definition name and adds / overwrites the text in Recipe Name field.
The Copy name function will make changes to the Recipe name only if a Recipe Definition has been selected upfront. Otherwise, copying is not possible.
Show only own configurations check-box - if enabled, a filter is applied to the Recipes drop-down list, to display only the elements owned by the logged in user. The Show only own configurations check-box is active, only if the security settings were defined at design-time.
- button - applies the new Recipe. Once the button Apply is clicked, the Add recipe window is closed and the new Recipe is applied to the Recipe Manager, for further processing.
- - button - closes the Add recipe dialog and discards the changes.
To manage an already existing Recipe, the user can click the Load toolbar button. The Load recipe window pops-up displaying the list of all existing Recipes.
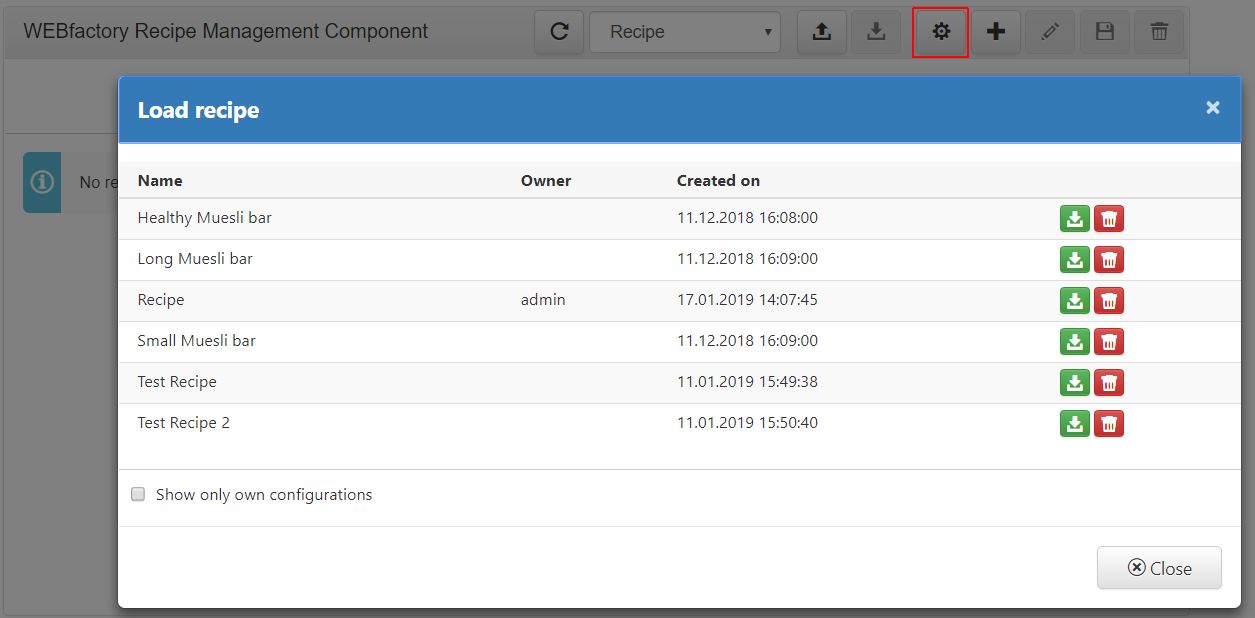
Load Recipe window
The Load recipe window provides the user with the following actions:
- button - loads the selected Recipe and closes the Load recipe window.
- button - removes the selected Recipe.
Note
The Recipe deletion will be automatically performed, without any further confirmations.
Show only own configurations check-box - if enabled, a filter is applied to the Recipes drop-down list, to display only the elements owned by the logged in user. The Show only own configurations check-box is activated, only if any security settings were defined at design-time.
- button - closes the Load recipe dialog and discards the changes.
The Recipe manager allows the user to update existing Recipes, by means of the Edit function.
The toolbar button Edit is activated only after loading a Recipe to the manager. By clicking the Edit button, the Edit recipe name dialog is opened. The edit function allows the user to update only the Recipe name.
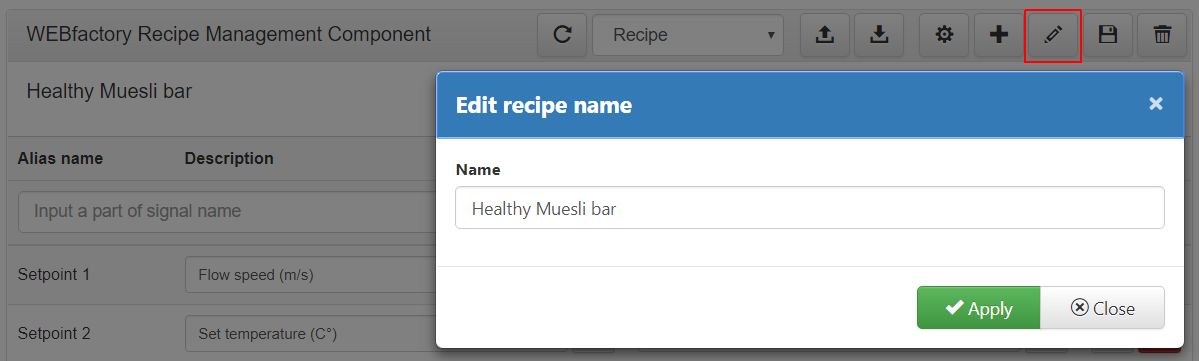
Edit Recipe name dialog
Besides the Recipe name, the user can either approve or reject the changes as follows:
- button - applies the updated Recipe name. Once the button Apply is clicked, the dialog is closed and the Recipe name is updated.
- button - closes the dialog and discards the changes.
To preserve any Recipe changes the user can click the Save toolbar button. The save is automatically performed and no further confirmations are required.

Save Recipe
The redundant Recipes can be removed by clicking the Delete toolbar button . The Delete recipe dialog is opened asking the user to confirm or reject the deletion.
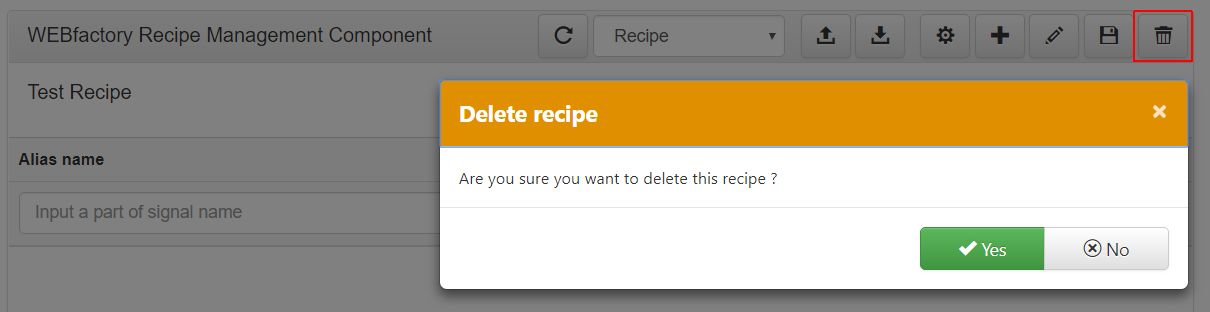
Delete recipe dialog
- button - confirms the deletion. The dialog is closed and the Recipe is removed.
- button - denies the deletion. The dialog is closed without removing the Recipe.
The user can also upload external Recipes to the manager, using the Import toolbar button. The Import recipe window is opened, providing the user with the following options:
 button - opens a Browse window, where user can search for the file to be imported.
Note
As the Recipe Definitions are stored as serialized JSON files, the import file should be in the JSON format type. Any other file format will be ignored and an error message will appear at the bottom right side of the browser page.
Overwrite existing configuration check-box - if enabled, it checks for duplicates and overwrites the configurations of the already available Recipes.
Note
If check-box Overwrite existing configuration is disabled and duplicates are found, a warning message will appear at the bottom right side of the browser page.
- button - applies the previously selected import file.
Note
After choosing the import file and clicking the Apply button, the Recipe is added to the current list of definitions. To view and open the Recipe, you need to visit the Load recipe window.
- button - Closes the Import recipe window and returns to the main panel.
The Export toolbar button becomes active after a Recipe is opened in the manager. After clicking the Export button, the Recipe is opened automatically in the browser page. The export file is stored in serialized JSON format.
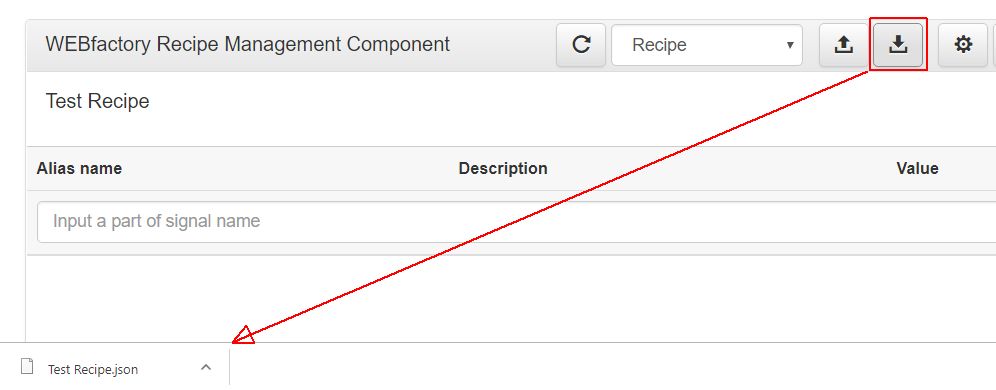
Export Recipe
Further on, having a Recipe added to the manager, the components toolbar features the following options:
- Load current values button - adds the current Web Service Signal value to all listed Signals.
 Concatenate from recipe definition button - allows the user to combine items of multiple Recipe Definitions.
- Add recipe item button - opens the list of Signals.
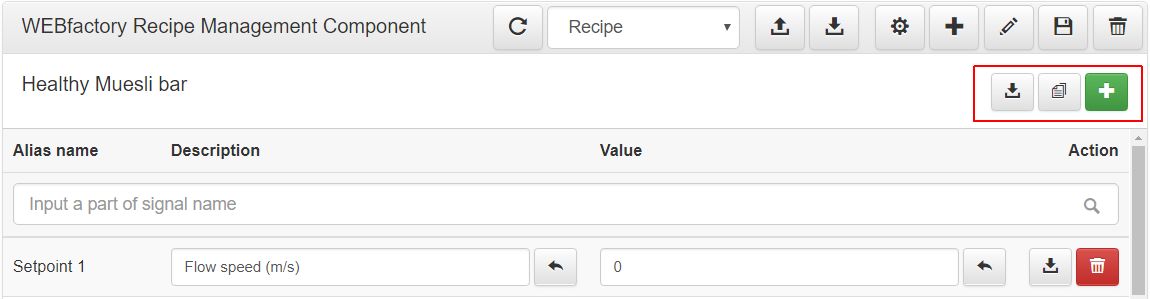
Recipe components toolbar
To manually add Signals to a Recipe, the user can click the button Add recipe item. The Select Signal window is opened displaying the list of all i4scada Server Signals.
Select Signal window
This view provides the user with the following options:
Group drop-down list - displays the list of the Groups available in the i4scada Server.
Note
By default, the drop-down list does not feature any Group selection.
Selecting a Group may affect the amount of Signals displayed in the list view. The Group selection will filter the Signals list, to display only those Signals that are part of the selected Group.
- button - applies the selection to all the listed Signals.
Note
The selected Signals are highlighted with a blue background. To remove the selection from a Signal, the user can click on it, in the list view.
Signal Name search field - filters the list of signals by name.
Signals list - displays the list of all Signals available in the i4scada Server or the Server Group.
- button - adds the previously selected Signal to the Recipe.
- button - closes the Select Signal window without applying any change to the Recipe.
On the other hand, the Concatenate from recipe definition function, opens a window where the user can select a Recipe Definition to be used as Recipe template. The scope of concatenation function is to allow the user to use the Signal(s) of multiple definitions, for one single Recipe. Selecting multiple definitions results in a list of Signal names for which the user can add specific value.
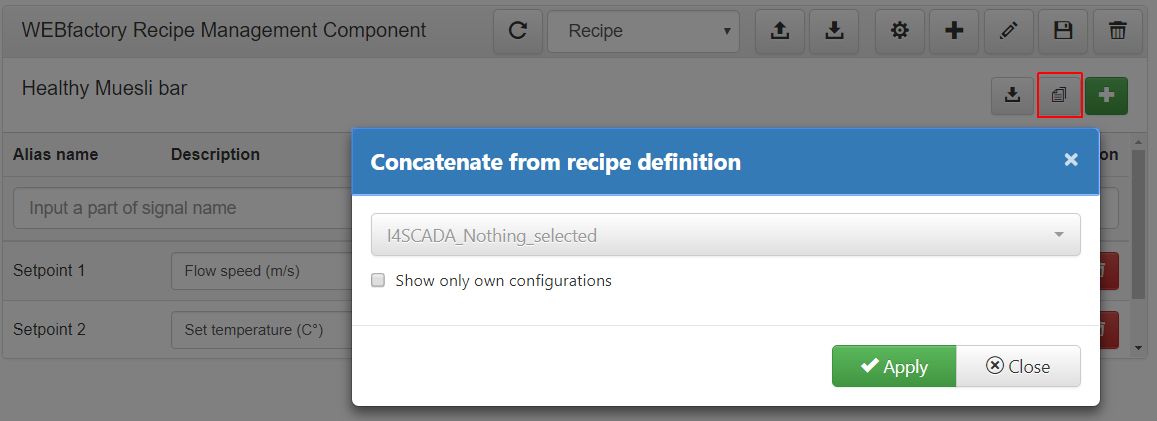
Concatenate from recipe definition
This window features the following options:
Recipe definition drop-down list - displays all Recipe Definitions.
Show only own configurations - if enabled, a filter is applied to the Recipes Definitions drop-down list, to display only the elements owned by the logged in user. The Show only own configurations check-box is active, only if any security settings were defined at design-time.
- button - adds the Recipe Definition Signals to the currently managed Recipe.
- button - closes the Concatenate from recipe definition window without applying any changes to the Recipe.
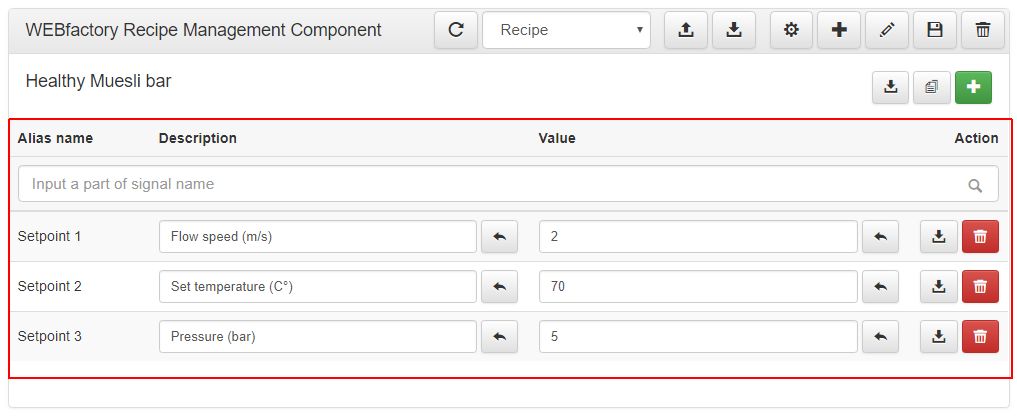
The Recipe items list is split up into the following columns:
Alias name - the Signal name
Description - the Signal description. By default, the Signal name is parsed as description.
Note
The user can manually change the description of a Recipe Definition Signal. If the changes were not saved, the Reset button
will restore the previous description.Value - the Signal value.
Note
The user can manually maintain the Signal value. If the input value was not saved, the Reset
button will set a null value.Action - features two available actions:
Load current value
- adds the current WebService Signal value to selected Signal.Delete
- automatically removes the selected Recipe Signal along with its value.
To draw a conclusion, the user can add Signals to Recipes by means of multiple methods:
Manage manually
E.g. - The user adds a new Recipe and afterwards the Recipe Items are manually selected from the Signals list.
Clone from Recipe Definition
E.g. - The user adds a new Recipe and selects the Signals from the "Clone items from recipe definition" drop-down list.
Concatenate from Recipe Definition(s)
E.g. - The user adds or loads a Recipe and uses the "Concatenate from recipe definition" function to add Signals from one or multiple Recipe Definitions.
Combine all above indicated methods
E.g. - The user adds a new Recipe. The first Signal is manually added. The second Signal comes from the "Recipe Definition 1" and was added via the clone function. The third Signal comes from the "Recipe Definition 2" and was added using the concatenate function.
Recipe
Read this short article to gather more knowledge before starting to write your own Recipes in the i4scada SmartEditor project.
The Recipe tool is the result of publishing the i4scada SmartEditor "wf-recipe" extension. At run-time, the Recipe tool allows the user to open the recipes defined under the Recipe Manager. Unlike the Recipe Manager, the Recipe tool scope is to allow the user to write the Recipes into the i4scada server, including a very small range of actions.

Recipe tool at Run-time
When opening the Recipe tool in a browser, no Recipe is loaded. The toolbar displays the following options:
The Recipe drop-down list - displays the list of all available Recipes.
Save button
 - saves the current value. A pop-up notification will be shown to confirm the save.
Write recipe button
 - After clicking the Write Recipe button, all the Signals with their values will be written in the Server.
In the application background, the Write Recipe action is responsible for the following occurrences:
A Write Signal Value event is triggered in the i4scada Server.
A call is made to the WebService asking based on which the event is generated in the Database.
Note
If there are errors in the write event, a pop-up notification will be shown.
In case no errors are found, a pop-up notification will be shown, confirming the successful operation.
Refresh button
 - refreshes the page content.

Visual structure of the Recipe tool
Tip
Please also visit the SmartEditor Recipe Manager tutorials chapter, for a set of step-based tutorials.