Studio Project Tutorials
Our i4scada Studio Project Tutorials are only available for viewing on this site. Take a peak on how to configure your Database, Alarming and Logging system.
Using Studio on high resolution screens
Check out this tutorial to learn how to adjust your view when using a high-DPI device, such as 4K or higher resolution monitors.
When using a high-DPI device such as a 4k and higher resolution monitors, one may encounter Studio scaling issues (e.g.: elements are too small or too large, compared to the rest of the desktop). To resolve this issue, organize the following settings:
Install i4scada application.
Go to This PC > Local Disc (C) > Program Files (x86) > i4scada > Studio.
Scroll until reaching the Studio application.
Click-right on the Studio icon and select the Properties option from the contextual menu.
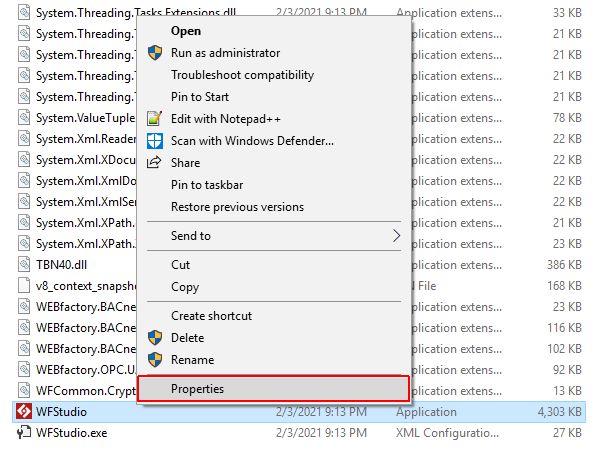
Studio Properties
In Studio Properties window switch to the Compatibility TAB.
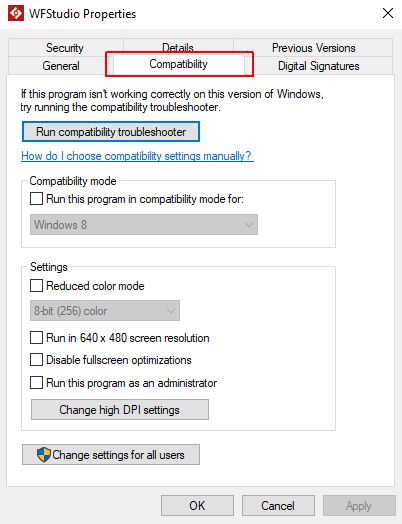
Studio Compatibility
Click on the Change high DPI settings button.
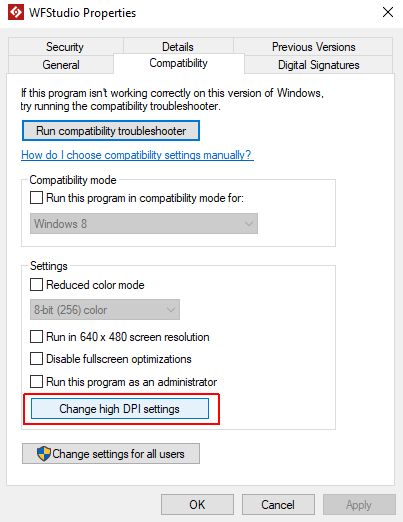
Change High DPI settings button
A new window is opened, which features the high DPI settings for the Studio application. Mark the "Override high DPI scaling behaviour" checkbox and select the "System" option from the "Scaling performed by" drop-down list.
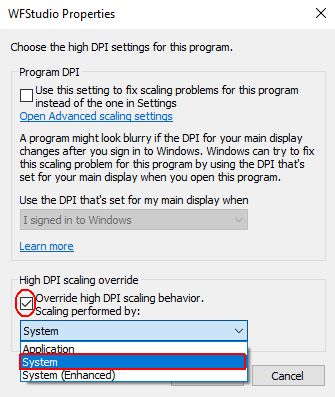
Override High DPI scaling
To preserve all the changes, click the OK button. The high DPI settings for the Studio program window is closed.
Select the Apply button, and consequently click the Ok button, in the Studio Properties window.
Create a new Studio Database
Check out this step-based tutorial to learn how to create a new Database and to configure a Connector, in the i4scada Studio application.
As a first step towards working with i4scada Studio is to create your own Database. Follow up the below described steps, in order to create a new Database, in i4scada Studio:
Open the i4scada Studio
The login dialog is opened. Fill in your credentials (if you are a new user and made no changes during i4scada installation, the default user name is "sa" and the password is "webfactory").
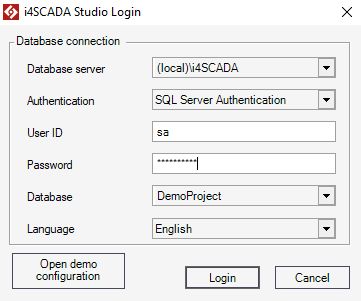
Select the [New Database] option from the Database drop-down list.
The New Database dialog is opened allowing the user to fill in the Database name and if needed to change the Database path.
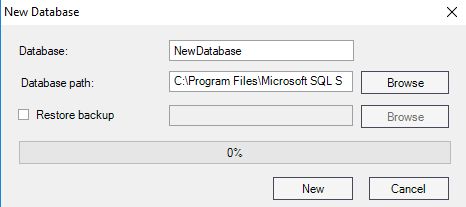
Press the button New to start generating the new Database.
Once the Database is prepared, press the Login button.
The i4scada Studio is opened. An information window pops-up asking the user to confirm if the new database should be set as Default or not.
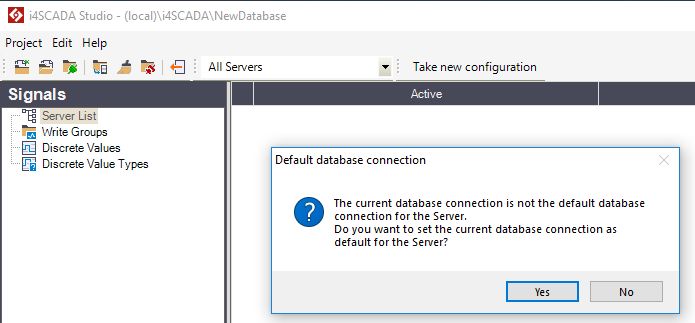
For current use case we shall set the New database as default, hence button Yes will be selected.
Under the "Signals" section click right on the Server List node.
The Server contextual dialog is displayed. Select the option New Server.
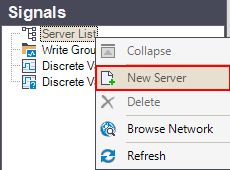
A new Server node is added, under Server List. We shall name the new Server "." as for the current use case the Server runs on same machine as the i4scada Studio.
Select the Server node and click-right. Select the option Browse Server from the contextual menu.
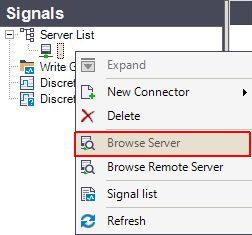
The Browse Server dialog pops-up. Select the Connector for your new Database and click the button Update.
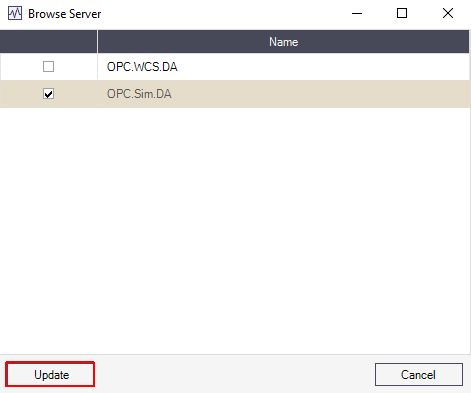
The Connector node is added to the list view.

Click-right on the Connector node and select the option New group, from the contextual menu.
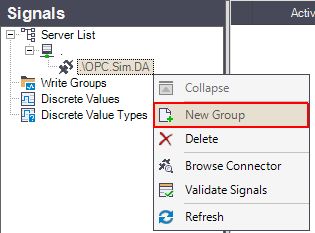
A new sub-node is generated, representing the Group. By default, the name is set to Group1. More groups can be created, by repeating step 15.
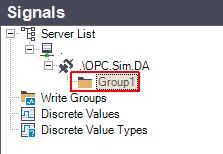
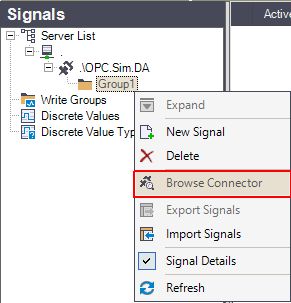
Next, we need to add some Signals to Group1. Click-right the respective node and select the option Browse Connector, from the contextual menu.
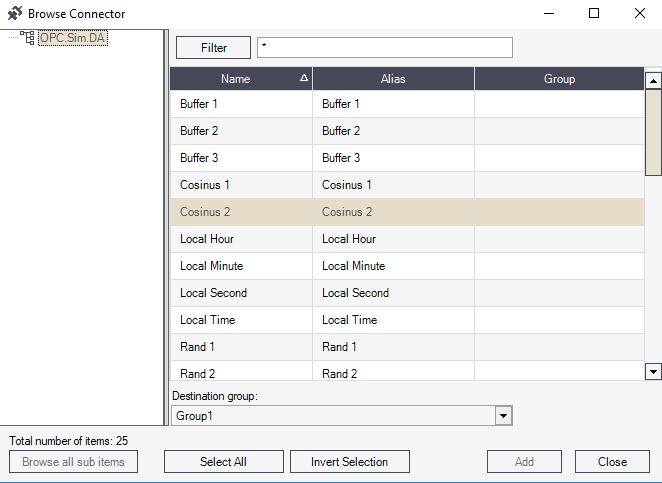
The Browse Connector dialog is opened. Select the desired Connector Signals. Signals can be also added one by one, by selecting them in the list and clicking the Add button, or collectively selected via the Select all button and Add.
Once the desired Signals have been added to Group1, these are listed and can be further managed.

Signals management can be organized in the Signal Details panel. More details can be found in the article Edit Signals in the Signal Details panel.
Create new Alarming configurations
i4scada Studio application provides the means to create your own Alarming structure. Open this article for a step-based tutorial.
Defining an alarming structure for your i4scada Project can be organized as described below:
Open the i4scada Studio
Log into your database
Tip
Read also the Create a new Studio Database tutorial.
Once the Server, Connector, Group, and Signals have been defined, we can proceed to the Alarming section of i4scada Studio.
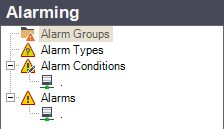
Click-right on the Alarm Groups node and select the option New, from the contextual menu.
A new Alarm Group is listed. Name the new Alarm group and provide (if desired) its translations.
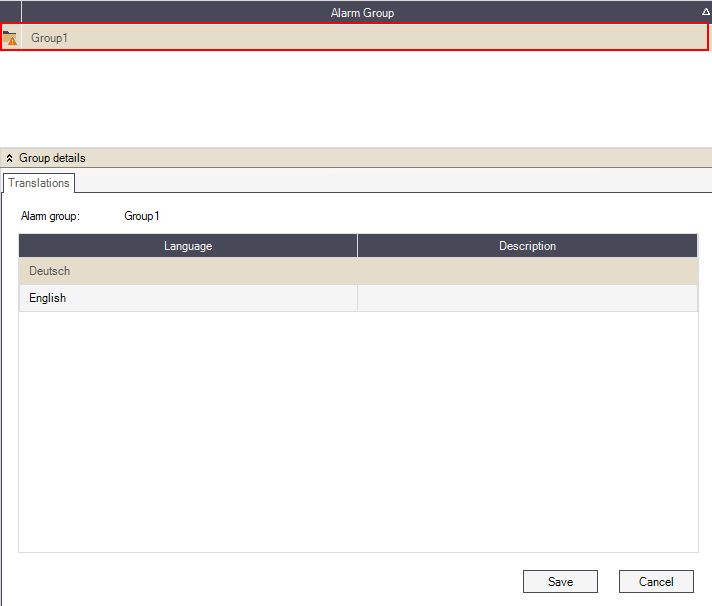
Press the button Save to preserve changes done.
Proceed to the Alarm Types node and click-right on it. Select the contextual menu option New.
A new Alarm type is added to the list view, allowing you to define a custom name, set it to Automatic alarm acknowledgement, and introduce translations (if desired).
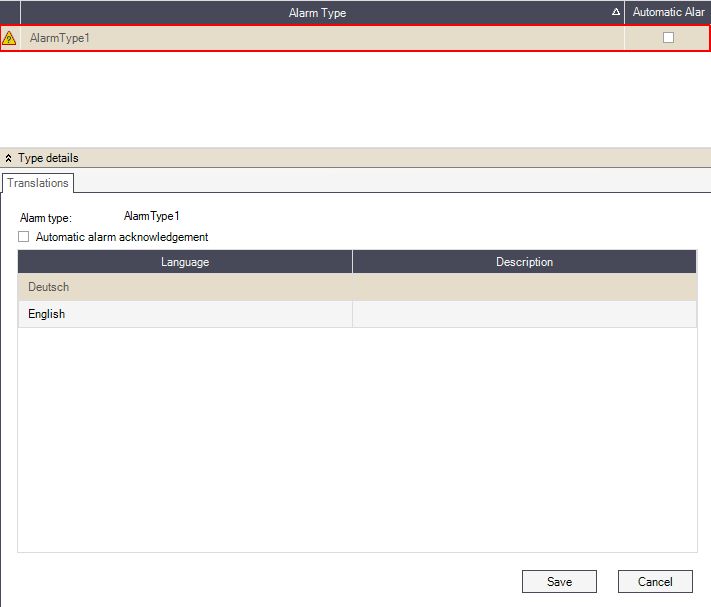
Press the button Save to confirm and preserve your changes.
Next, click-right on the Alarm Conditions node. Select the contextual menu option New.
A new Alarm Condition is added to the list view, allowing you to define a custom Name and Criteria. Based on the selected criteria, further settings can be organised. More details about Alarm conditions can be found in the article i4scada Studio Alarming .
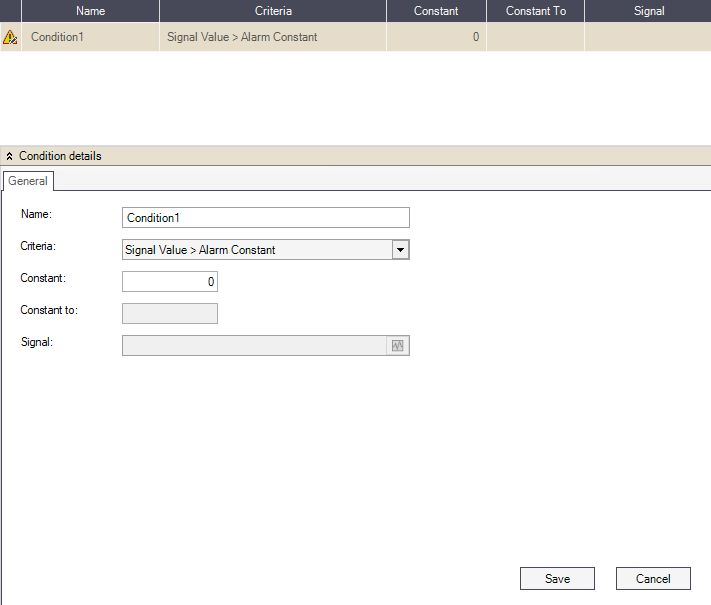
Select the Save button to preserve your settings.
Click-right on the Alarms node and select the contextual menu option New.
The Signal Browser window is opened. Select the desired Signal for your new Alarm and click the OK button.
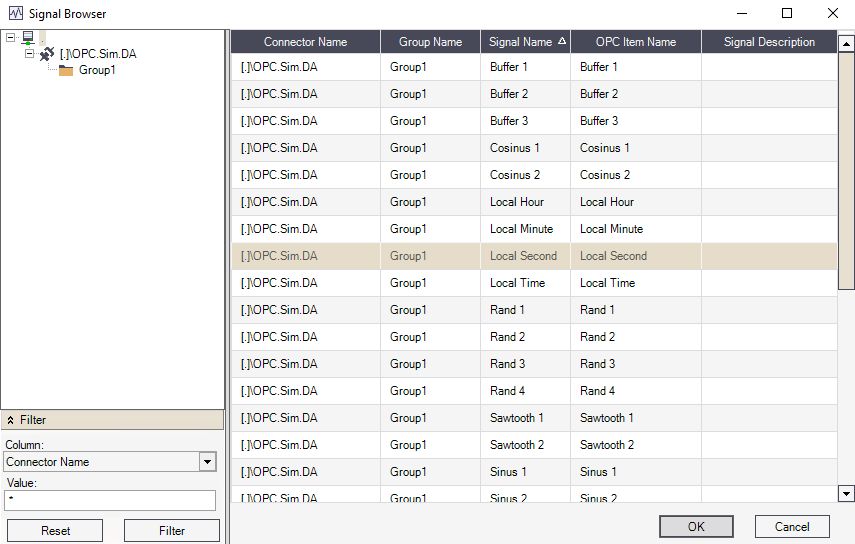
The new Alarm is added to the Alarm list view. By clicking on the new Alarm, the Alarm details panel is made visible, at the bottom of the list. For more details read also the Alarm Properties article.
To preserve your Alarm click the button Save.
Create new Log conditions
Define the Log conditions needed for your i4scada Studio Project right now, by following the steps provided by this article.
This tutorial will guide you through the needed steps for creating a new log condition.
Open the i4scada Studio
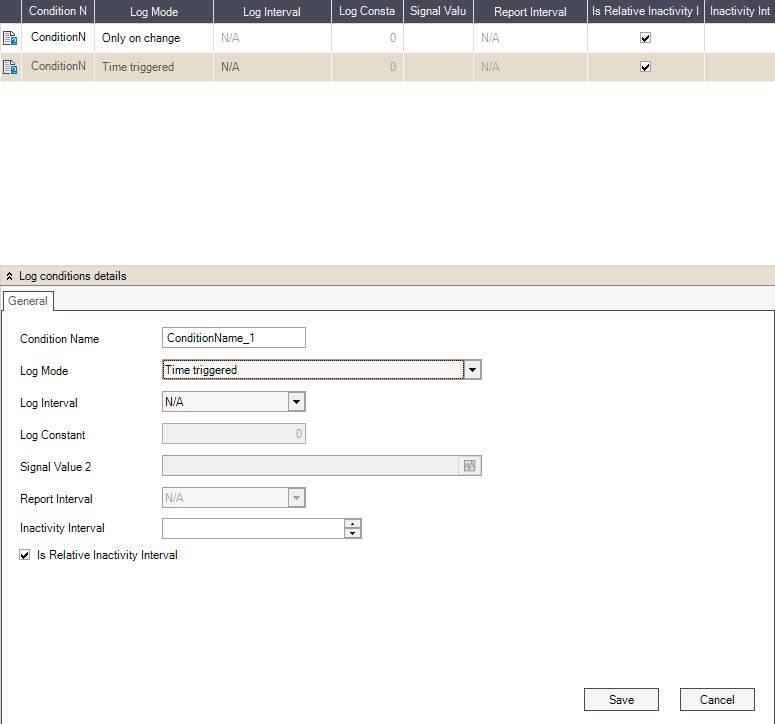
Go to the Logging section and right-click on the Log Conditions node in the tree menu or inside the log conditions view and select New.

Name your new log condition.
Select the desired Log Mode. This is the criteria that will trigger the logging if the conditions are met. Depending on the selected Log Mode, choose one of the following selections:
Select the Log Interval, when using the Time Triggered, Mean Value or Counter Mean Value log modes. This is the time interval between two value logs. If you select N/A, logging will be disabled if this condition is used for any log.
Select the Log Constant, when using any constant value dependent log mode. This constant value will be used for comparison by the selected log mode.
Select the Signal Value 2 signal, when using any signal value dependent log mode. This signal's value will be used for comparison by the selected log mode.
Select the Report Interval, when using the Mean Value or Counter Mean Value log modes. This time span is used for calculating the average value that will be logged at the end of the time span.
Store the new log condition using the Save button.
Create new Logs
Wondering how to create your own i4scada Log definitions? Check out this tutorial and get closer to a fully defined Studio project!
To create new signal log definitions, organize the following steps:
Open the i4scada Studio.
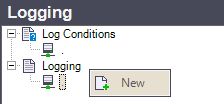
Go to the Logging section and right-click on the Logging node in the tree menu or inside the logging view and select New.
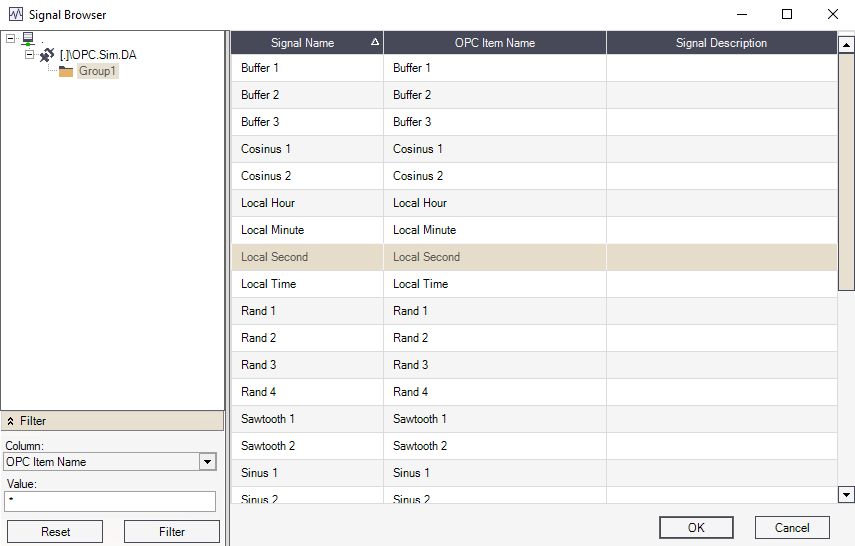
The Signal Browser window pops up. Select the desired Signal(s) and click the OK button.
The new Log is added to the list view. By selecting it, the Logging details panel is made visible, at the bottom of the list. More details about the tabs General, Compression, and Exception can be found in the article i4scada Logs.
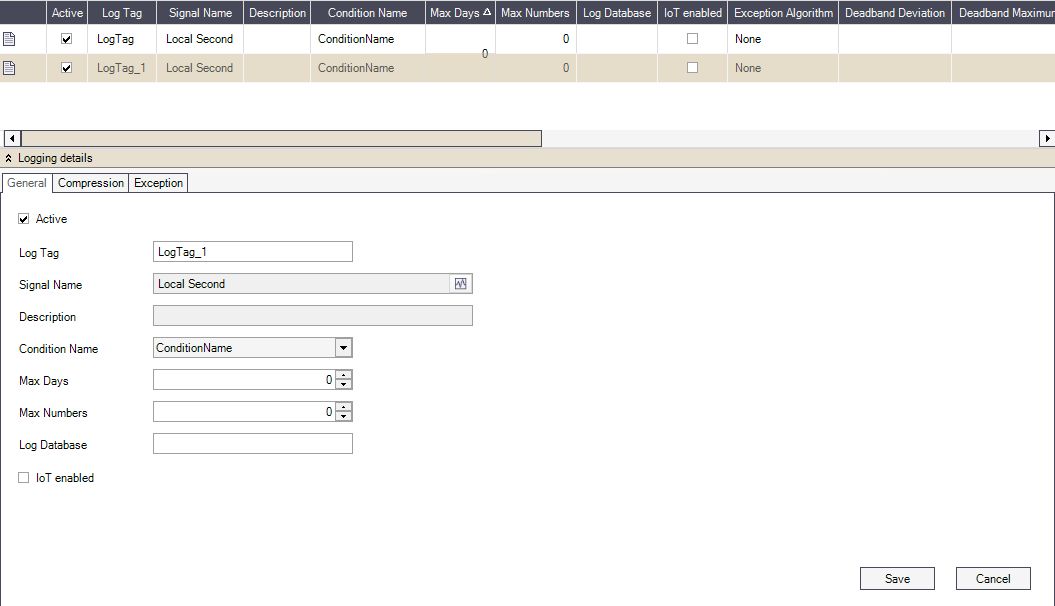
Under the General tab activate the new log, so that it's taken into account by the i4scada Server.
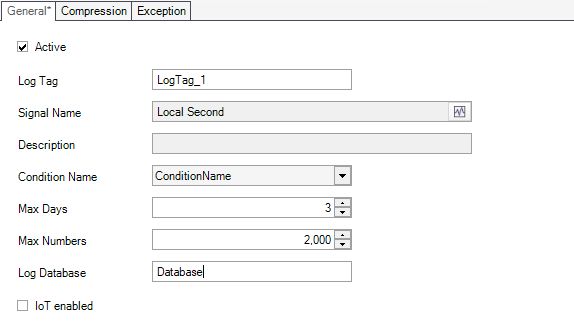
Name your new log using the Log Tag field.
Enter the number of days to keep the log before purging, using the Max Days option. The logged values reaching this specified age will be deleted. "0" means this condition is not used for deleting logged values.
Enter the maximum number of logs to be stored, using the Max Numbers option. Once this number is reached, the oldest logged value will be deleted when a new one is stored. "0" means this condition is not used for deleting logged values.
Enter the name of the database where the logs will be stored, using the Log Database field. If no database is specified, the logs will be stored in the default log database.
To enable access via IoT Hub, check the IoT enabled checkbox.
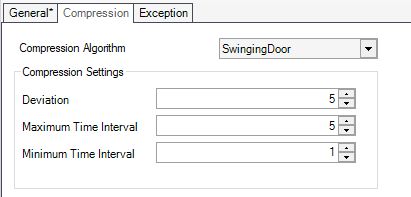
Switch to the Compression tab. To add Compression, select the algorithm "Swinging Door" from the drop-down list.
Organize the Compression settings by adding Deviation, Maximum Time Interval , and Minimum Time Interval.
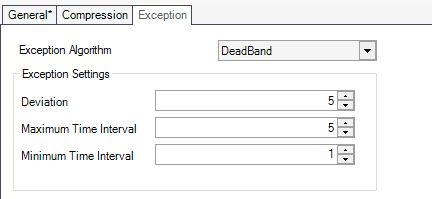
Switch to the Exception tab. To add Exceptions select the algorithm "DeadBand" from the drop-down list.
Organize the Exception settings by adding Deviation, Maximum Time Interval , and Minimum Time Interval.
Store the new log condition using the Save button.
Retrigger Alarm until Condition is met
Learn how to retrigger an Alarm until the defined Condition is met, without duplicating that Alarm. Reduce the number of Alarms in your system.
For a better understanding of this tutorial, let's imagine the following situation:
For the food in your refrigerator to stay fresh for as long as possible the refrigerator temperature should hover right around 2° - 3° C. In case the refrigerator door remains open, by mistake, the temperature will raise. In case the door is not closed in due time, the temperature keeps on increasing. What if we have an Alarm set, to ensure that the temperature in your refrigerator is maintained within the optimum range?
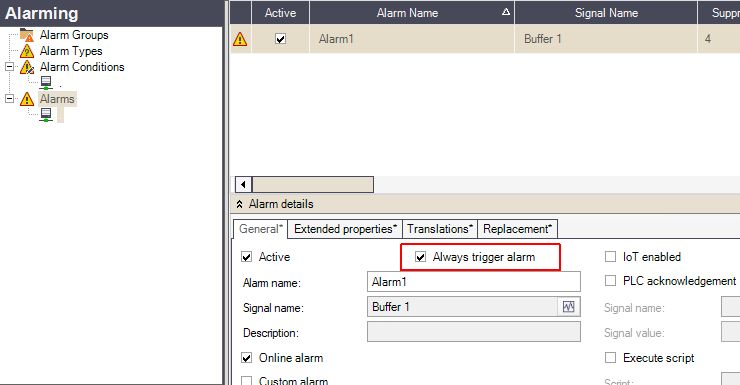
When the temperature reaches 3° C, the Alarm is triggered. But what if no one closes the door soon enough and the temperature is increased up to 5° C? Having the "Always trigger alarm" feature activated, will ensure that the alarm is reraised, each time the value is outside the established range. By this, you will not need to set up an Alarm for each of it's potential erroneous states.
To reduce the number of Alarms in your i4scada Project, check out this step-based tutorial, describing the Preparation of the Alarm, Testing it's behavior, and Combining the Alarm retriggering feature with a Suppression Interval.
Note
The present tutorial uses the Demo Database of Studio project and the Signals associated with it.
Preparing the Alarm
Create a new Studio Database, as described here.
Create new Alarming Configurations, as described in this tutorial.
Set the Alarm Condition Criteria to Out of Range option.
Set the value Constant "2" and the Constant to "3".
Assign a Signal to your Alarm (e.g. Buffer 1).
Make sure that the Always trigger alarm check-box is set.
Define a new Log Condition, as explained in this tutorial.
Set the Log Mode to option "Only on change, when signal value > constant value".
Set the Log Constant to value "2".
Define a new Log, as described here.
Assign the new Log to the same Signal, as the previously created Alarm (e.g. Buffer 1).
Make sure that all your settings have been saved.
Testing the behavior
Further on let's check the behavior of the above i4scada Studio Alarm:
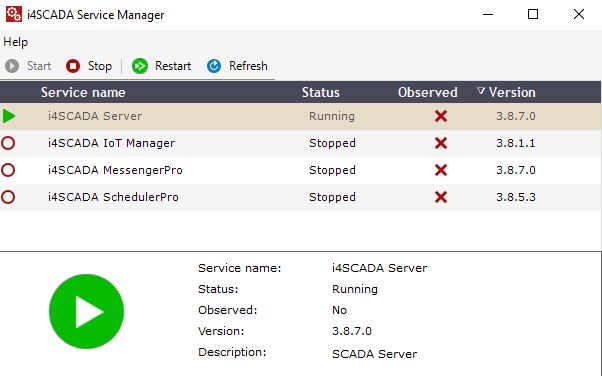
Open the i4scada Service Manager and start the i4scada Server.
Open the i4scada Test Center and add your Signal there, for further processing. (e.g. Buffer 1)
Tip
Check out the i4scada tutorial for more details.
The i4scada Test Center tool displays the Signal current value and allows you to change it. In our current UC, the value of the Signal is "0".

Open the i4scada Activity Analyzer tool and press the Start toolbar button.

Tip
Check out the i4scada tutorial for more details.
Multiple messages are now written in the Activity Analyzer.
Return to the Test Center tool and write the Signal value "4".

Check the lines registered in the Activity Analyzer tool. Based on the defined Condition, the value "4" is outside the range. Hence, the Alarm will be stopped and immediately triggered.

Let's assume that the value of the Signal starts to increase up to value "5". To test this behaviour, write value "5" in the i4scada Test Center.
Check the lines registered in the Activity Analyzer tool. As the Condition is no longer met the Alarm is again stopped and automatically retriggered.
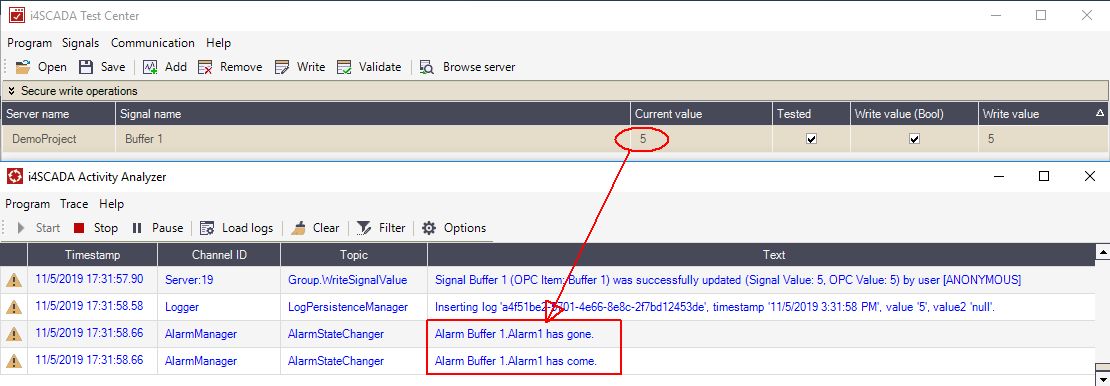
In case the Signal value is corrected to meet the Condition, the Alarm will be stopped.

The Suppression Interval
For a better outcome, the "Always trigger alarm" feature can be combined with the Alarm Suppression Interval, as follows:
Go to i4scada Studio application and open the Alarming section.
Select your Alarm and go to the Alarm details panel.
In the General TAB set the Suppression Interval to value 30 seconds.
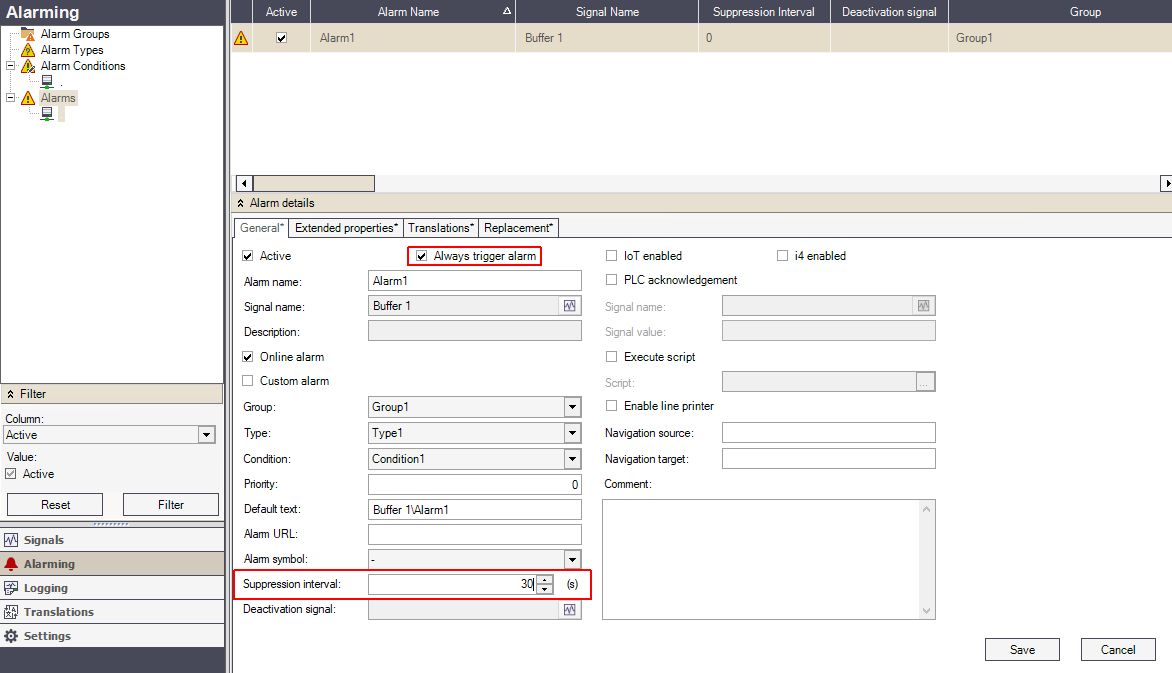
Save your changes and restart the i4scada Server, under the Service Manager Tool.
Go to Test Center and change the Signal value from "2" to "4".
As the Alarm Condition considers value "4" to be outside the range, the Alarm will be triggered. However, the Suppression Interval feature will wait for 30 seconds, before triggering the Alarm.

If the Signal value returns back within the Condition range, the Suppression Interval will no longer wait for 30 seconds, but will stop the Alarm immediately.

Note
The Suppression Interval role is to allow the Signal of the Alarm to return within the Condition range, hence avoiding a large amount of running Alarms.
Triggering Alarms with Regex condition criteria
Wondering how to create your own i4scada Alarm condition - Regex? Check out this tutorial and get closer to a fully defined Studio project!
Regex (Regular expressions) provides a powerful, flexible, and efficient method for processing text. The extensive pattern-matching notation of regular expressions enables you to quickly parse large amounts of text to find specific characters patterns; validate text to ensure that it matches a predefined pattern; extract, edit, replace or delete text substrings, or add extracted strings to a collection in order to generate a report.
Note
The present tutorial uses the Demo Database of the Studio project and the Regex alarm condition.
Open the i4scada Studio.
Log into your database.
Tip
Read also the Create a new Studio Database tutorial.
Once the Server, Connector, Group, and Signals have been defined, we can proceed to the Alarming section of i4scada.

Add a new Alarm Group. For more details about Alarm Groups, please visit the dedicated article, here.

Proceed to the Alarm Types node and add a new Alarm Type. For more details, please visit the dedicated article, here.

A new Alarm type is added to the list view, allowing you to define a custom name.
Next, click right on the Alarm Conditions node. A new Alarm Condition is added to the list view allowing you to define a custom name.
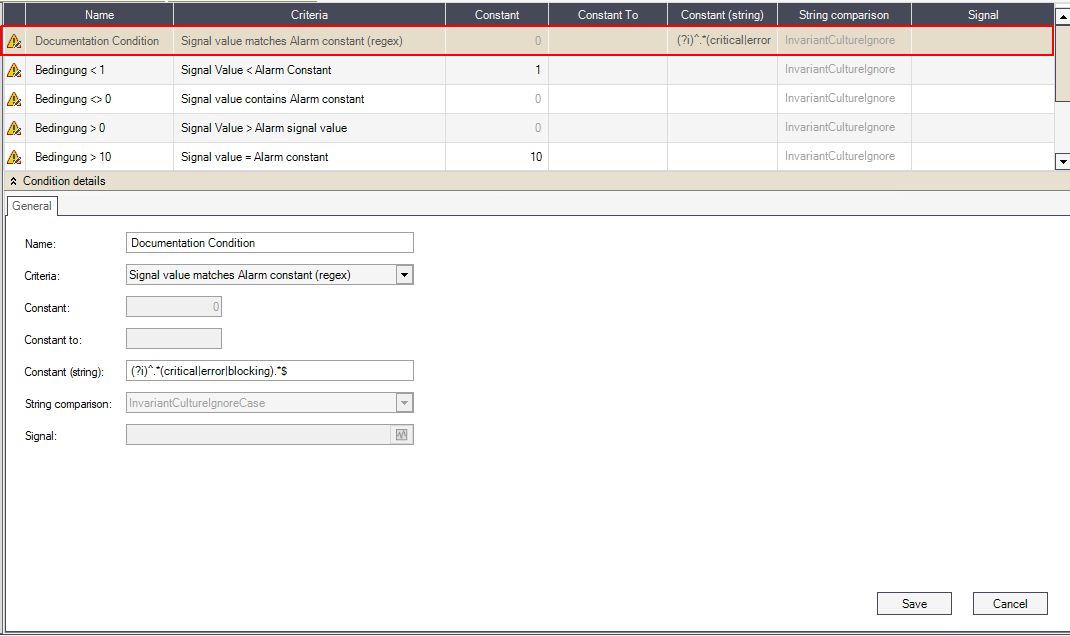
Set the name of the Alarm Condition.
Select the Criteria - Signal value matches Alarm constant (regex).
Choose a Constant (string).
Tip
For this tutorial, we have used the Constant (string) (?i)^.*(critical|error|blocking).*$.
Make sure that all your settings have been saved.
Create a new Alarm. For more details please visit the dedicated article, here.
Set the name of your new Alarm.
Add your previously created Alarm Group, Type, and Condition.
Set a string Signal.
Make sure that all your settings have been saved.
Open the i4scada Service Manager and start the i4scada Server.

Open the i4scada Test Center and add your string Signal there, for further processing.
Tip
Check out the i4scada tutorial for more details.
The i4scada Test Center tool displays the Signal current value and allows you to change it. In our current UC, the value of the signal is "error".

Open the i4scada Activity Analyzer tool and press the Start toolbar button.

Tip
Check out the i4scada tutorial for more details.
Multiple messages are now written in the Activity Analyzer.
Return to the Test Center tool and write the Signal value "error". Based on the defined condition, the alarm is triggered.
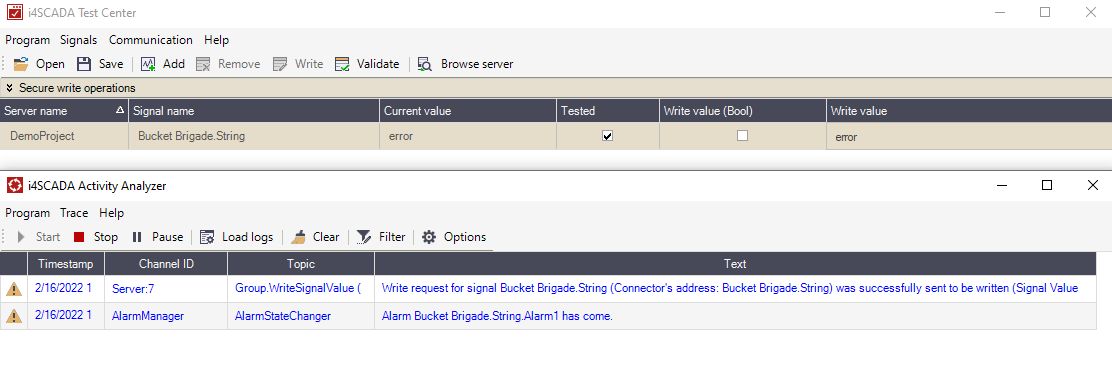
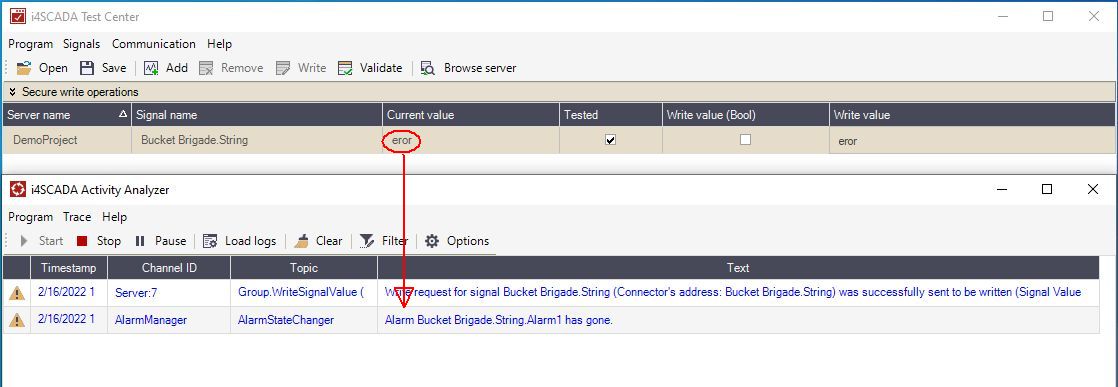
Return to the Test Center tool and write the Signal value "eror"
Check the lines registered in the Activity Analyzer tool. Based on the defined Condition, the value "eror" stops the alarm.
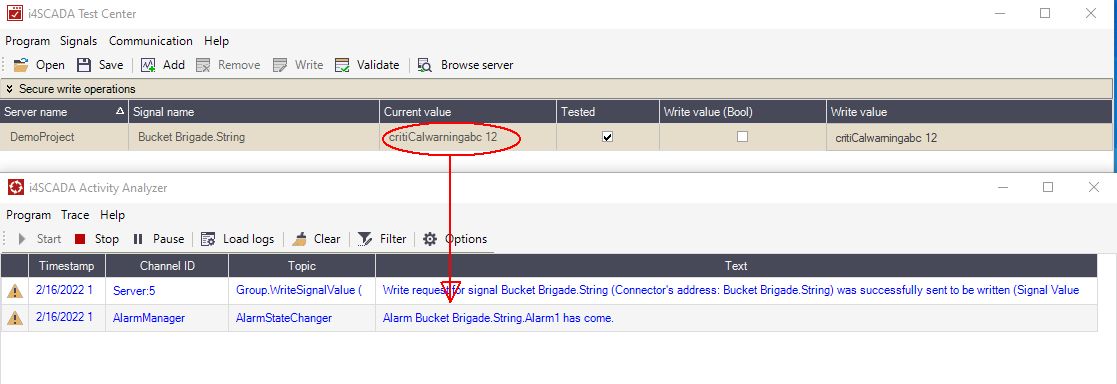
Return to the Test Center tool and write the Signal value "critiCalwarningabc 12". Based on the defined condition, the value "critiCalwarningabc 12" is matching the Criteria, and the alarm will be again triggered.
Tip
Regex expressions provide a flexible method for processing string signal values, allowing you to match large amounts of texts to the alarm condition criteria. As exemplified in the above tutorial, having the Regex pattern "(?i)^.*(critical|error|blocking).*$" defined for the alarm condition will check the signal values, and each time the 3 keywords "critical", "warning", "error", are matched, an alarm will be triggered.
For more details about .NET regular expressions, please check the article, here. You can also use this online tester to check your Regex expressions.
Manage Project Translations
Are you working with multilingual users? Check out how to ensure the i4scada Studio project translations, by following these steps!
The present article will guide you through a set of tutorials helping you to manage your Studio project translations. Additional information about the Translations section can be read in the article i4scada Studio Translation.
Setting up Languages
Open the i4scada Studio
Go to the Translations section. By default the Languages tree node is selected.
The Languages panel displays the list of available languages. By default, only Deutsch and English are available. Deutsch is set as Active and Default.

Activate the English language, by marking the Active check-box as true.

Change the default language from Deutsch to English, by marking the Default check-box as true.

Right-click on the Languages node in the tree menu or inside the languages view and select the option Add new language.

The Add language dialog pops-up. The list of languages available for your i4scada Studio project is displayed. The Language list is alphabetically ordered.
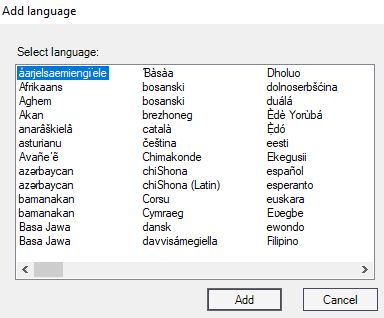
Use the horizontal scroll bar to locate the desired language and press the button Add.

Once added in the i4scada Studio, the language can be enabled or disabled by checking the Activate check-box, and set as default language by checking the Default check-box.
To delete a language from your Studio project, click-right inside the languages view and select the option Remove language.

The language is removed from the list view.
Translating Signal Groups
Open the i4scada Studio
Go to the Translations section. By default the Languages tree node is selected.
Switch to the Signal Groups tree node.
The list of available Signal Groups is displayed.

By double clicking in Default Text, Deutsch, English or other languages cells, free textual information can be added.

Click-right inside the Signal Groups view and select the option Visible languages.

The Set visible languages window is opened.
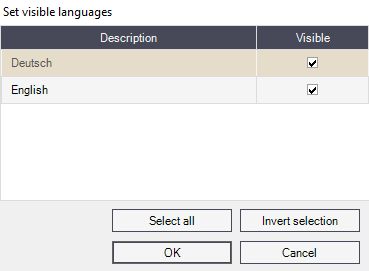
Un-mark Deutsch language and click the button OK.
The Signal Groups list view is updated. Deutsch language is no longer visible.

Click-right inside the Signal Groups view and select the option Export text translations / Export all text translations

The Save As dialog is opened allowing you to insert a name and a location for the XML file
The Export text translations window is displayed allowing you to follow up the export task in a progress-bar.
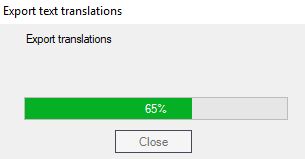
Once the progress bar reaches 100%, the Export XML file is made available in the designated location.
Click-right inside the Signal Groups view and select the option Import text translations.
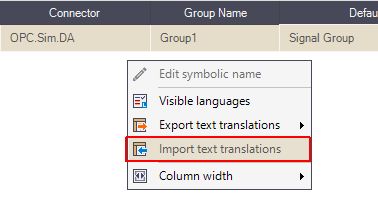
The Open window pop-up allowing you to select the desired XML file for import. Select the import file.
The import starts and it's progress can be followed up in Import text translations window, after pressing the Import button.
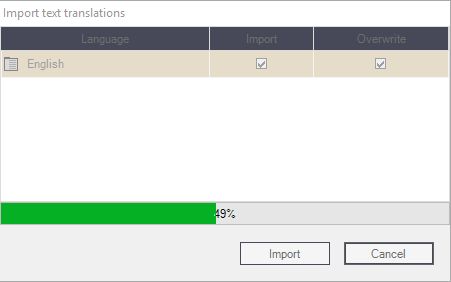
Once the progress bar reaches 100% the import is finished.
Click-right inside the Signal Groups view and select the option Column width.
Select the desired Column width method, choosing between Auto fit and Fit to page.
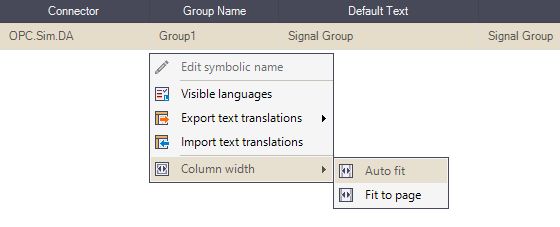
Based on the selected method the column width is updated.
The organized changes do not require further saving. Translations and actions are automatically preserved.
Translating Signals
Open the i4scada Studio
Go to the Translations section. By default the Languages tree node is selected.
Switch to the Signals tree node.
The list of available Signals is displayed.

By double clicking in Default Text, Deutsch, English or other languages cells, free textual information can be added.

Click-right inside the Signals view and select option Visible languages.
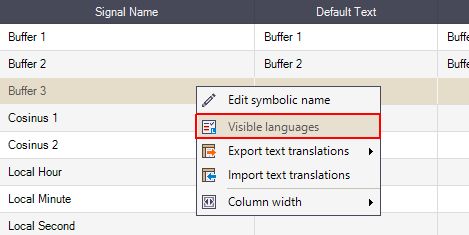
System opens the Set visible languages window.

Un-mark Deutsch language and click the button OK.
The Signals list view is updated. Deutsch language is no longer visible.

Click-right inside the Signals view and select the option Export text translations / Export all text translations

The Save As dialog is opened allowing you to insert a name and a location for the XML file
The Export text translations window is displayed allowing you to follow up the export task in a progress-bar.

Once the progress bar reaches 100%, the Export XML file is made available in the designated location.
Click-right inside the Signals view and select the option Import text translations.
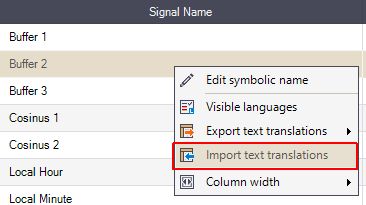
The Open window pop-up allowing you to select the desired XML file for import. Select the import file.
The import starts and it's progress can be followed up in Import text translations window, after pressing the Import button.

Once the progress bar reaches 100% the import is finished.
Click-right inside the Signals view and select option Column width.
Select the desired Column width method, choosing between Auto fit and Fit to page.
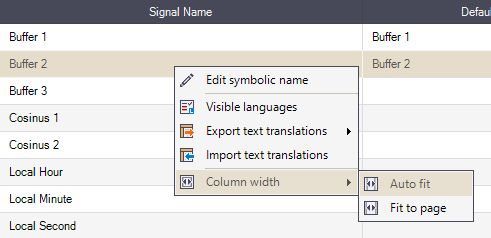
Based on the selected method the column width is updated.
The organized changes do not require further saving. Translations and actions are automatically preserved.
Translating Discrete Values
Open the i4scada Studio
Go to the Translations section. By default the Languages tree node is selected.
Switch to the Discrete Values tree node.
The list of available Discrete Values is displayed.

By double clicking in Default Text, Deutsch, English or other languages cells, free textual information can be added.

Click-right inside the Discrete Values and select option Visible languages.
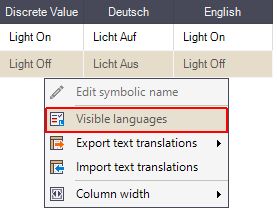
System opens the Set visible languages window.

Un-mark Deutsch language and click button OK.
The Discrete Values list view is updated. Deutsch language is no longer visible.

Click-right inside the Discrete Values view and select the option Export text translations / Export all text translations

The Save As dialog is opened allowing you to insert a name and a location for the XML file
The Export text translations window is displayed allowing you to follow up the export task in a progress-bar.

Once the progress bar reaches 100%, the Export XML file is made available in the designated location.
Click-right inside the Discrete Values view and select the option Import text translations.
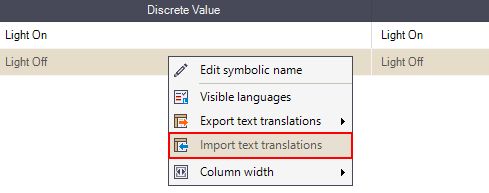
The Open window pop-up allowing you to select the desired XML file for import. Select the import file.
The import starts and it's progress can be followed up in Import text translations window, after pressing the Import button.

Once the progress bar reaches 100% the import is finished.
Click-right inside the Discrete Values view and select the option Column width.
Select the desired Column width method, choosing between Auto fit and Fit to page.
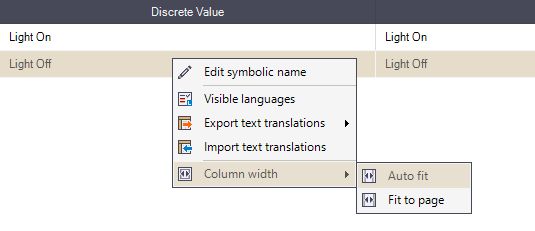
Based on the selected method the column width is updated.
The organized changes do not require further saving. Translations and actions are automatically preserved.
Translating Extended Alarm Properties
Open the i4scada Studio
Go to the Translations section. By default the Languages tree node is selected.
Switch to the Extended Alarm Properties tree node.
The list of available Extended Alarm Properties is displayed.

By double clicking in Default Text, Deutsch, English or other languages cells, free textual information can be added or updated.
Click-right inside the Extended Alarm Properties and select the option Visible languages.

The Set visible languages window is opened.

Un-mark Deutsch language and click the button OK.
The Extended Alarm Properties list view is updated. Deutsch language is no longer visible.

Click-right inside the Extended Alarm Properties view and select the option Export text translations / Export all text translations
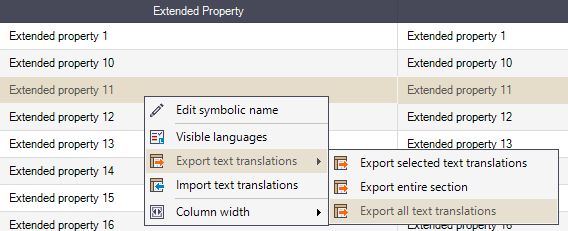
The Save As dialog is opened allowing you to insert a name and a location for the XML file
The Export text translations window is displayed allowing you to follow up the export task in a progress-bar.

Once the progress bar reaches 100%, the Export XML file is made available in the designated location.
Click-right inside the Extended Alarm Properties view and select the option Import text translations.
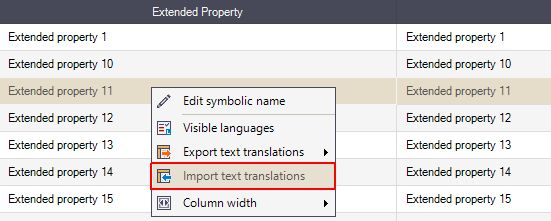
The Open window pop-up allowing you to select the desired XML file for import. Select the import file.
The import starts and it's progress can be followed up in Import text translations window, after pressing the Import button.

Once the progress bar reaches 100% the import is finished.
Click-right inside the Extended Alarm Properties view and select the option Column width.
Select the desired Column width method, choosing between Auto fit and Fit to page.
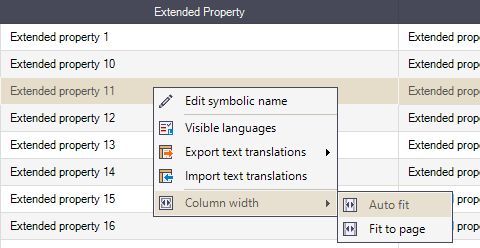
Based on the selected method the column width is updated.
The organized changes do not require further saving. Translations and actions are automatically preserved.
Translating Alarm Groups
Open the i4scada Studio
Go to the Translations section. By default the Languages tree node is selected.
Switch to the Alarm Groups tree node.
The list of available Alarm Groups is displayed.

By double clicking in Default Text, Deutsch, English or other languages cells, free textual information can be added or updated.

Click-right inside the Alarm Groups and select the option Visible languages.
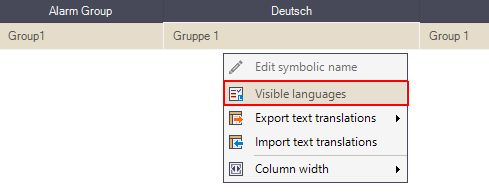
The Set visible languages window is opened.

Un-mark Deutsch language and click the button OK.
The Alarm Groups list view is updated. Deutsch language is no longer visible.

Click-right inside the Alarm Groups view and select the option Export text translations / Export all text translations

The Save As dialog is opened allowing you to insert a name and a location for the XML file
The Export text translations window is displayed allowing you to follow up the export task in a progress-bar.

Once the progress bar reaches 100%, the Export XML file is made available in the designated location.
Click-right inside the Alarm Groups view and select the option Import text translations.
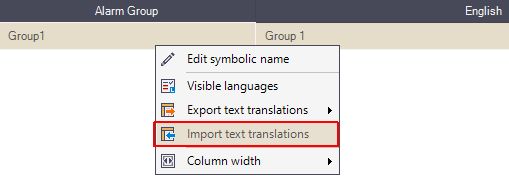
The Open window pop-up allowing you to select the desired XML file for import. Select the import file.
The import starts and it's progress can be followed up in Import text translations window, after pressing Import button.

Once the progress bar reaches 100% the import is finished.
Click-right inside the Alarm groups view and select the option Column width.
Select the desired Column width method, choosing between Auto fit and Fit to page.
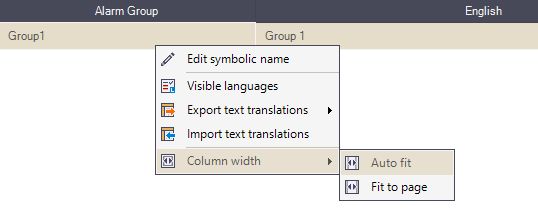
Based on the selected method the column width is updated.
The organized changes do not require further saving. Translations and actions are automatically preserved.
Translating Alarm Types
Open the i4scada Studio
Go to the Translations section. By default the Languages tree node is selected.
Switch to the Alarm Types tree node.
The list of available Alarm Types is displayed.

By double clicking in Default Text, Deutsch, English or other languages cells, free textual information can be added or updated.

Click-right inside the Alarm Types and select the option Visible languages.
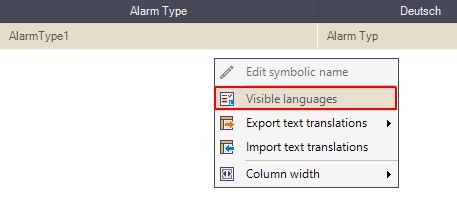
The Set visible languages window is opened.

Un-mark Deutsch language and click the button OK.
The Alarm Types list view is updated. Deutsch language is no longer visible.

Click-right inside the Alarm Types view and select the option Export text translations / Export all text translations

The Save As dialog is opened allowing you to insert a name and a location for the XML file
The Export text translations window is displayed allowing you to follow up the export task in a progress-bar.

Once the progress bar reaches 100%, the Export XML file is made available in the designated location.
Click-right inside the Alarm Types view and select the option Import text translations.

The Open window pop-up allowing you to select the desired XML file for import. Select the import file.
The import starts and it's progress can be followed up in Import text translations window, after pressing the Import button.

Once the progress bar reaches 100% the import is finished.
Click-right inside the Alarm Types view and select the option Column width.
Select the desired Column width method, choosing between Auto fit and Fit to page.

Based on the selected method the column width is updated.
The organized changes do not require further saving. Translations and actions are automatically preserved.
Translating Alarm Texts
Open the i4scada Studio
Go to the Translations section. By default the Languages tree node is selected.
Switch to the Alarm Texts tree node.
The list of available Alarm Texts is displayed.

By double clicking in Default Text, Deutsch, English or other languages cells, free textual information can be added or updated.

Click-right inside the Alarm Texts and select the option Visible languages.
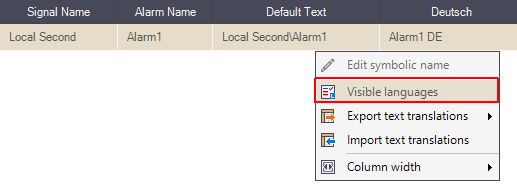
The Set visible languages window is opened.

Un-mark Deutsch language and click the button OK.
The Alarm Texts list view is updated. Deutsch language is no longer visible.

Click-right inside the Alarm Texts view and select the option Export text translations / Export all text translations

The Save As dialog is opened allowing you to insert a name and a location for the XML file
The Export text translations window is displayed allowing you to follow up the export task in a progress-bar.

Once the progress bar reaches 100%, the Export XML file is made available in the designated location.
Click-right inside the Alarm Texts view and select the option Import text translations.
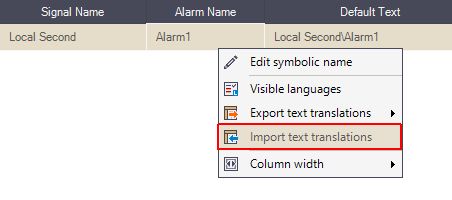
The Open window pops-up allowing you to select the desired XML file for import. Select the import file.
The import starts and it's progress can be followed up in Import text translations window, after pressing the Import button.

Once the progress bar reaches 100% the import is finished.
Click-right inside the Alarm Texts view and select the option Column width.
Select the desired Column width method, choosing between Auto fit and Fit to page.
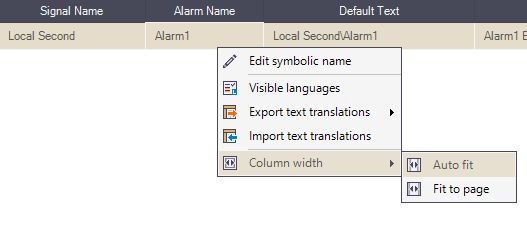
Based on the selected method the column width is updated.
The organized changes do not require further saving. Translations and actions are automatically preserved.
Shared Help Texts
Open the i4scada Studio
Go to the Translations section. By default the Languages tree node is selected.
Switch to the Shared Help Texts.
The list of Shared Help Texts is displayed. To add new Shared Help Text click-right inside the list view and select option Add new symbolic name.

A new text row is added to the list view. Double click on each cell, in columns Default Text, Deutsch and English, to add information.

Click-right the added Text and select the option Edit symbolic name.
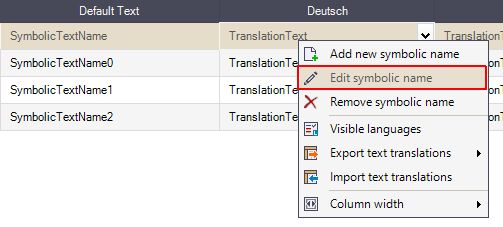
Edit the textual information of the Shared Help Text.
Click right the edited Text and select the option Remove symbolic name.
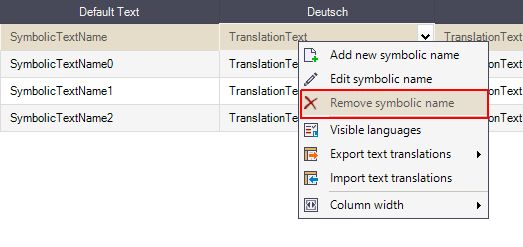
The Shared Help Text is deleted from the list view.
Translating Logs
Open the i4scada Studio
Go to the Translations section. By default the Languages tree node is selected.
Switch to the Logs tree node.
The list of available Logs is displayed.

By double clicking in Default Text, Deutsch, English or other languages cells, free textual information can be added or updated.

Click-right inside the Logs and select the option Visible languages.
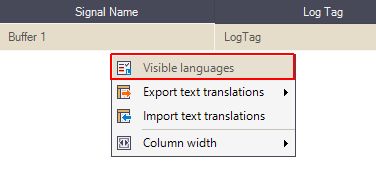
The Set visible languages window is opened.

Un-mark Deutsch language and click the button OK.
The Logs list view is updated. Deutsch language is no longer visible.

Click-right inside the Logs view and select the option Export text translations / Export all text translations

The Save As dialog is opened allowing you to insert a name and a location for the XML file
The Export text translations window is displayed allowing you to follow up the export task in a progress-bar.

Once the progress bar reaches 100%, the Export XML file is made available in the designated location.
Click-right inside the Logs view and select the option Import text translations.
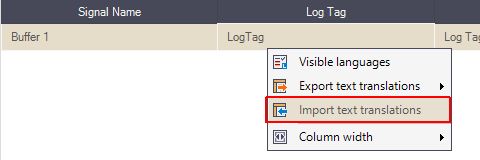
The Open window pop-up allowing you to select desired XML file for import. Select the import file.
The import starts and it's progress can be followed up in the Import text translations window, after pressing the Import button.

Once the progress bar reaches 100% the import is finished.
Click-right inside the Logs view and select the option Column width.
Select the desired Column width method, choosing between Auto fit and Fit to page.
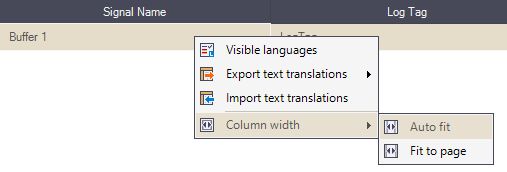
Based on the selected method the column width is updated.
The organized changes do not require further saving. Translations and actions are automatically preserved.
Translation Texts
Open the i4scada Studio
Go to the Translations section. By default the Languages tree node is selected.
Switch to the Translation Texts tree node. The list of Translation texts is displayed.

Click-right inside the Translation Texts and select the option Suppress internally used names.
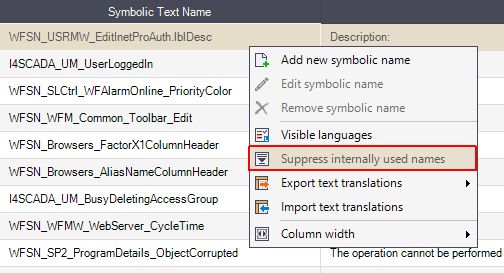
The symbolic texts used internally by the system are hidden. List is now empty.

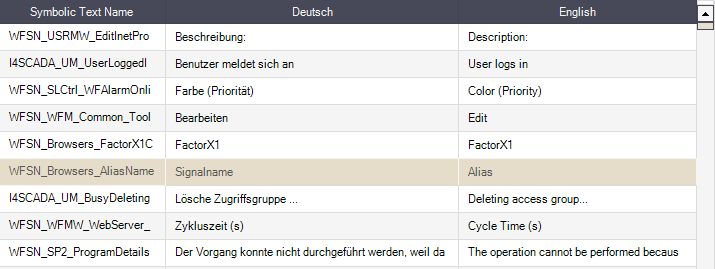
To re-populate the list with the Symbolic texts click-right inside the Translation Texts and select the option Suppress internally used names.
Importing Alarms with Shared Help Texts
Check out this tutorial and learn how to add shared help texts for alarms defined in XML, using a spreadsheet application.
The following tutorial will guide you through the process of adding shared help texts for alarms defined in XML, using a spreadsheet application (like Microsoft Excel).
The goal of this tutorial is to add shared help texts that will be automatically added in i4scada Studio when importing the alarm from the XML file.
Tip
The same workflow applies to HelpCauseText, HelpEffectText, and HelpRepairText.
The Shared Help Texts are help texts that can be shared by multiple alarms. To define a Shared Help Text in XML, a specific prefix must be used. The Shared Help Text prefix will help the i4scada Studio Studio to recognize the help texts as Shared Help Texts and automatically add them to the Studio's Shared Help Texts list.
Tip
The prefix must be added in front of the translations for each language.
The Shared Help Text prefix uses the symbolic name of the shared help text in the translations, which is "SharedName".
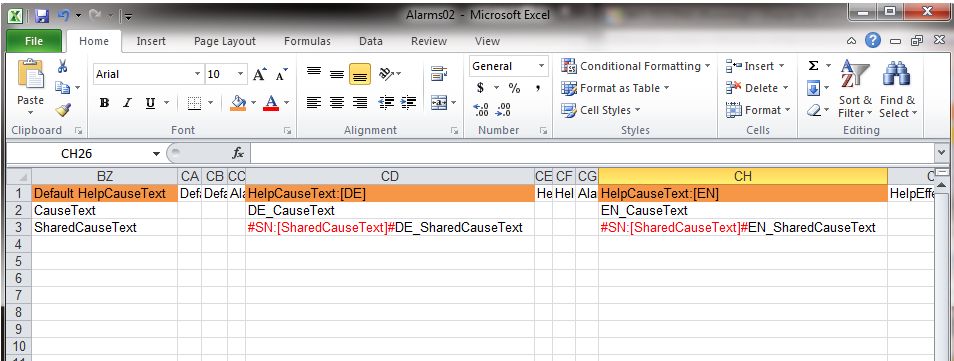
#SN:[SharedName]#
Example 1
The above picture shows on the first line an alarm that has custom help texts. On the second line, the alarm with shared help texts is listed.
It is easy to see that the prefix of the shared help texts is formed from #SN:[, the symbolic text name of the help text, and ]#.
Important
In the XML file, the SharedName from the prefix used in the translations columns MUST match the SharedName from the Default HelpCauseText column. This is compulsory if using HelpEffectText and HelpRepairText too.
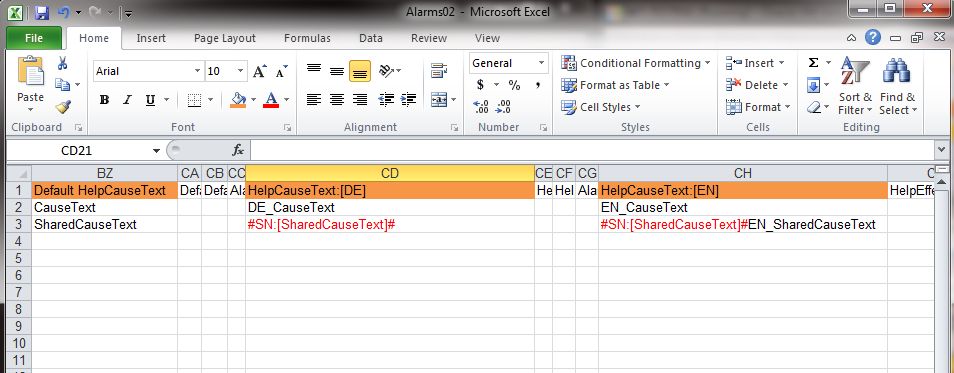
Example 2
In the Example 2 image, the German translation DE_SharedCauseText is missing. In this case, the Studio will import the alarm with no translation for the German language for the shared help text. This method is used when translations are not needed for all languages.
Important
The shared help text prefix is needed even if no translation is available for a language!
When importing alarms with new shared help texts in Studio, the new shared help texts will be automatically saved in the shared help text list of the Studio.
Note
The same prefix can be found when exporting alarms with shared help texts from i4scadaStudio.
Configuring the i4scada Server as OPC / OPC UA Server
Sounds complicated, when it is not! Get your way through this easy step-based tutorial and get your i4scada Sever to behave as an OPC or OPC UA Server.
OPC is the interoperability standard for the secure and reliable exchange of data in the industrial automation space and in other industries.
OPC is a Client / Server based communication, where one or more Servers can get requests, send answers or updates to and from Clients. The modern version of the OPC is the OPC UA (Unified Architecture) which does not rely on OLE or DCOM technology from Microsoft and can be implemented on any other platform, such as Apple, Linux, or Windows. Unlike OPC, the OPC UA allows the possibility to use structures or models, which makes maintenance much easier.
In order to use the i4scada Server as an OPC or OPC UA Server the following steps need to be organized:
Go to Windows Start and search for the Services Manager application.
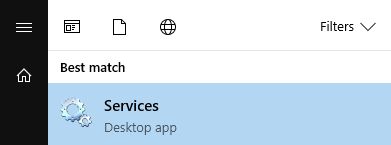
Search for Windows Services Manager
Open the Windows Services Manager application.
Browse among the listed services to find the i4scada WCS OPC Server or the i4scada WCS OPC UA Server.
Note
It is possible to connect both OPC and OPC-UA, to one single i4scada Server. However, one i4scada Server can either be used as an OPC Server or as an OPC UA Server, but not both at the same time, as one of the two Services will be inactive.
Select the desired service and press the Start option.

Start the i4scada Simulation OPC / OPC UA Server
The service is started on a local computer. The progress can be followed up in the pop-up dialog.
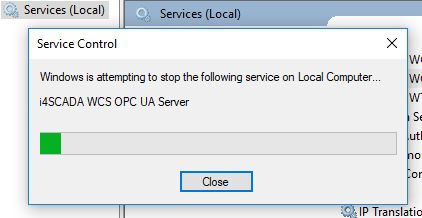
i4scada WCS OPC / OPC UA Server
Next, open the i4scada Studio application, navigate to Server List and select the connector containing the signals.
Select the signal(s) needed for the OPC Server.
In the Signal Details panel, check the OPC enabled option.
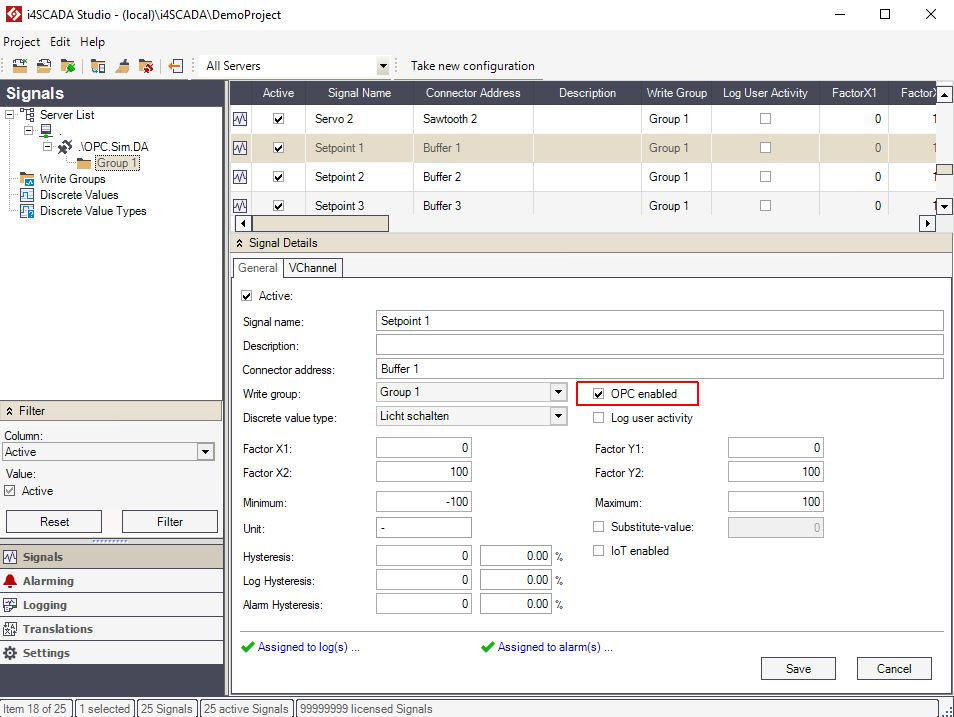
The OPC enabled setting
Finally, open the i4scada Service Manager and start the i4scada Server.
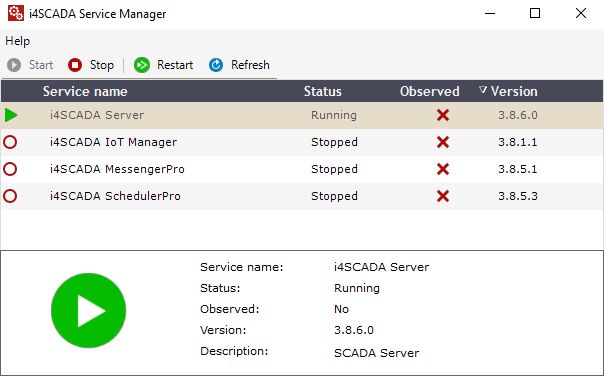
i4scada Server running
Organizing the above described steps will enable communication between the i4scada Server and the OPC / OPC UA Client.
Important
The communication between i4scada and OPC / OPC UA Client is enabled through endpoints with the following formats:
opc.tcp://ComputerName:62541/ServerName
http://ComputerName:62540/ServerName
The ServerName can be extracted from the Services Manager application, by clicking right on the desired Service and selecting the Properties option.
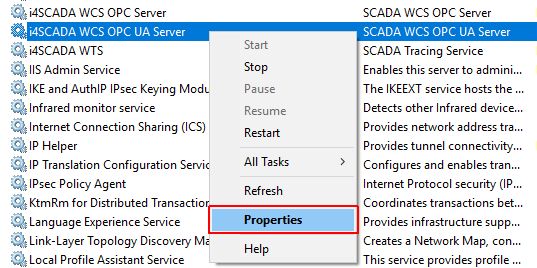
The Properties option
In the Properties dialog, the Service name can be extracted from the Tab General.
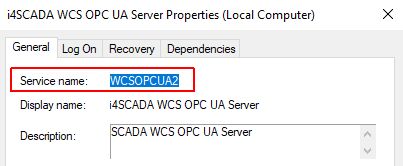
The Service name