Using Buffer Writing
Check out a quick example that can be used for the Buffer Writing functionality, in the i4scada App Template.
For demonstrative purposes, let's take a simple, imaginary pastry recipe, which uses three main ingredients: flour, sugar, and salt. In the initial state, the recipe is implemented in production via SCADA signals and the quantity output is 10 pastry portions. Our goal is to increase the quantity of ingredients in order to increase the output to 100 pastry portions. Given the nature of the recipe, we cannot add more than one ingredient without altering the recipe, so all three ingredients must be adjusted at once. Let's build a web application to do just that.
Tip
You can check out the example below in your own i4scada App Template application by adding the #tutorialBufferWrite route to the end of the application's URL. The files are available in the i4scada App Template solution at the following locations:
App/src/views/tutorials/tutorialBufferWrite.html
App/src/viewsModels/tutorials/tutorialBufferWrite.js
The example included in the i4scada App Template as well as the one created in this guide will use the default Ewon by HMS Networks database signals Setpoint 1, Setpoint 2, and Setpoint 3.
Setting up the application
Set up the application by creating the framework as described in this i4scada App Template tutorial.
For our Buffer writing tutorial, we will start by creating the framework of our application: a view, viewModel, and a navigation route to allow access to the new components.
In your existing i4scada App Template based application (or in a new one), create a new view and viewModel pair to host our demonstration. For demonstrative purposes, we will name our view tutorialBufferWrite.html and our viewModel tutorialBufferWrite.js.
Tip
To learn more about creating i4scada App Template based application and using view and viewModels, read this article: i4scada Web Application.
Open the new tutorialBufferWrite.js viewModel and add the boiler-plate code:
define(
function () {
    var example = function () {
        var self = this;
    };

    return example;
});
Use the Shell.ts file to define a new navigation route for the new view and viewModel.
Tip
To learn more about creating navigation routes, read this article section "Adding navigation routes", under Your First i4scada Web Application.
Implementing the Buffer Writing
Learn how to configure the components to make the recipe modifications, store them into a buffer and write them all at once by pushing one button.
For our simple use case, we will focus on the tutorialBufferWrite.html view. Here we will configure the components that will allow us to make the recipe modifications, store them into a buffer and write them all at once by pushing one button.
Open the tutorialBufferWrite.html view and create a container to hold our components and a page header:
<div class="container">
    <header>
        <h1 class="page-header">Buffer Write</h1>
    </header>

</div>
We will use the included Bootstrap framework to create the DIV based HTML structure. Right under the
</header>tag, add a new row DIV with a single wide column inside. We will use this structure to hold the Buffer Write components:<div class="row"> <div class="col-sm-12"> </div> </div>Inside the column div, add a panel structure with a header holding a title, a body split in three columns and a footer:
<div class="panel panel-default">
    <div class="panel-heading">
        <h2 class="panel-title">Buffered Ingredients Quantities </h2>
    </div>
    <div class="panel-body">
        <div class="row">
            <div class="col-xs-12 col-sm-4">

            </div>
            <div class="col-xs-12 col-sm-4">

            </div>
            <div class="col-xs-12 col-sm-4">

            </div>
        </div>
    </div>
    <div class="panel-footer">

    </div>
</div>
Now let's start adding the components. In the first column of the panel body, add a wfInputValue component. This component will allow us to write the quantity value for our first ingredient, flour:
<div data-bind="wfInputValue: { signalName: 'Setpoint 1', unitLabel: true, staticUnitText: 'kg', writeSecure: false, label: 'Flour'}"></div>So far, the wfInputValue component will write the value to the Setpoint 1 signal. But as stated in the beginning of this guide, we want to write the value to a buffer and store it there for later. To achieve this, we need to tell our component to write the value to the buffer and not to the signal directly. We can do this by setting the writeToBuffer property to true.
<div data-bind="wfInputValue: { signalName: 'Setpoint 1', unitLabel: true, staticUnitText: 'kg', writeSecure: false, label: 'Flour', writeToBuffer: true}"></div>When the writeToBuffer property is true for any input component, the value that is written will be stored into a buffer. This buffered values can be written to the SCADA signals at any given moment using the wfBufferButton component.
Using the same procedure described in step 4 and 5, add similar wfInputValue components for the second and third ingredients (sugar and salt), in the second and third columns of the panel body. Make sure to configure the writeToBuffer property for them too and set their signals to Setpoint 2 and Setpoint 3.
<div data-bind="wfInputValue: { signalName: 'Setpoint 2', unitLabel: true, staticUnitText: 'kg', writeSecure: false, label: 'Sugar', writeToBuffer: true}"></div><div data-bind="wfInputValue: { signalName: 'Setpoint 3', unitLabel: true, staticUnitText: 'kg', writeSecure: false, label: 'Salt', writeToBuffer: true}"></div>So far we have the components required to write the three ingredient quantities to the buffer, but we have no way of writing the buffered values to the actual SCADA signals. For this, we will add the dedicated wfBufferButton component in the footer section of our panel.
<div class="btn-inline" data-bind="wfBufferButton: { buttonText: 'Write Buffer', iconClass: 'wf wf-check', cssClass: 'btn-success'}"></div>The new wfBufferButton component will allow us to write the buffered values. But in case we need to adjust the values that are already buffered, we also need a way of resetting the buffer. We can use another wfBufferButton component to reset the buffer by simply setting the clearBuffer property to true.
<div class="btn-inline" data-bind="wfBufferButton: { buttonText: 'Reset Buffer', iconClass: 'wf wf-arrow-undo', cssClass: 'btn-default', clearBuffer: true}"></div>
Now our tutorialBufferView.html contains all the required components to write the ingredient quantities to a buffer and apply that buffered values all at once, at any desired time. So far, the code should look like this:
<div class="container">
    <header>
        <h1 class="page-header">Buffer Write</h1>
    </header>

<div class="row">
    <div class="col-sm-12">
<div class="panel panel-default">
    <div class="panel-heading">
        <h2 class="panel-title">Buffered Ingredients Quantities </h2>
    </div>
    <div class="panel-body">
        <div class="row">
            <div class="col-xs-12 col-sm-4">
                <div data-bind="wfInputValue: { signalName: 'Setpoint 1', unitLabel: true, staticUnitText: 'kg', writeSecure: false, label: 'Flour', writeToBuffer: true}"></div>
            </div>
            <div class="col-xs-12 col-sm-4">
                <div data-bind="wfInputValue: { signalName: 'Setpoint 2', unitLabel: true, staticUnitText: 'kg', writeSecure: false, label: 'Sugar', writeToBuffer: true}"></div>
            </div>
            <div class="col-xs-12 col-sm-4">
                <div data-bind="wfInputValue: { signalName: 'Setpoint 3', unitLabel: true, staticUnitText: 'kg', writeSecure: false, label: 'Salt', writeToBuffer: true}"></div>
            </div>
        </div>
    </div>
    <div class="panel-footer">
        <div class="btn-inline" data-bind="wfBufferButton: { buttonText: 'Write Buffer', iconClass: 'wf wf-check', cssClass: 'btn-success'}"></div>
        <div class="btn-inline" data-bind="wfBufferButton: { buttonText: 'Reset Buffer', iconClass: 'wf wf-arrow-undo', cssClass: 'btn-default', clearBuffer: true}"></div>
    </div>
</div>
    </div>
</div>

</div>
Displaying the SCADA signal values
Check out how to create an HTML structure using the Bootstrap framework and the panel classes, for the i4scada App Template Buffer Writing.
Now that our application can write values to a buffer and apply or reset it, we need to create a control mechanism that shows the actual scada signals values for our ingredients. For this, we will create a similar HTML structure as before, using the Bootstrap framework and the panel classes.
Start by adding a line break tag <br /> after the first row div in our view and create a new row and panel structure below it:
<br />

<div class="row">
    <div class="col-xs-12">
        <div class="panel panel-default">
            <div class="panel-heading">
                <h2 class="panel-title">Written Ingredients Quantities</h2>
            </div>
            <div class="panel-body">
                <div class="row">
                    <div class="col-xs-12 col-sm-4">

                    </div>
                    <div class="col-xs-12 col-sm-4">

                    </div>
                    <div class="col-xs-12 col-sm-4">

                    </div>
                </div>
            </div>
        </div>
    </div>
</div>
Inside the three panel body columns, add the wfValueDisplay component, one for each column. These components must display the values written to the SCADA signals used to drive the ingredients' quantities in our recipe, so make sure to link each wfValueDisplay component to the right signal (Setpoint 1, Setpoint 2, and Setpoint 3).
<div data-bind="wfValueDisplay: { signalName: 'Setpoint 1', label: 'Flour', unitLabel: true, staticUnitText: 'kg' }"></div><div data-bind="wfValueDisplay: { signalName: 'Setpoint 2', label: 'Sugar', unitLabel: true, staticUnitText: 'kg' }"></div><div data-bind="wfValueDisplay: { signalName: 'Setpoint 3', label: 'Salt', unitLabel: true, staticUnitText: 'kg' }"></div>
The application is now complete. Before running it, check out the complete code:
<div class="container">
    <header>
        <h1 class="page-header">Buffer Write</h1>
    </header>

    <div class="row">
        <div class="col-sm-12">
            <div class="panel panel-default">
                <div class="panel-heading">
                    <h2 class="panel-title">Buffered Ingredients Quantities </h2>
                </div>
                <div class="panel-body">
                    <div class="row">
                        <div class="col-xs-12 col-sm-4">
                            <div data-bind="wfInputValue: { signalName: 'Setpoint 1', unitLabel: true, staticUnitText: 'kg', writeSecure: false, label: 'Flour', writeToBuffer: true}"></div>
                        </div>
                        <div class="col-xs-12 col-sm-4">
                            <div data-bind="wfInputValue: { signalName: 'Setpoint 2', unitLabel: true, staticUnitText: 'kg', writeSecure: false, label: 'Sugar', writeToBuffer: true}"></div>
                        </div>
                        <div class="col-xs-12 col-sm-4">
                            <div data-bind="wfInputValue: { signalName: 'Setpoint 3', unitLabel: true, staticUnitText: 'kg', writeSecure: false, label: 'Salt', writeToBuffer: true}"></div>
                        </div>
                    </div>
                </div>
                <div class="panel-footer">
                    <div class="btn-inline" data-bind="wfBufferButton: { buttonText: 'Write Buffer', iconClass: 'wf wf-check', cssClass: 'btn-success'}"></div>
                    <div class="btn-inline" data-bind="wfBufferButton: { buttonText: 'Reset Buffer', iconClass: 'wf wf-arrow-undo', cssClass: 'btn-default', clearBuffer: true}"></div>
                </div>
            </div>
        </div>
    </div>

    <br />

    <div class="row">
        <div class="col-xs-12">
            <div class="panel panel-default">
                <div class="panel-heading">
                    <h2 class="panel-title">Written Ingredients Quantities</h2>
                </div>
                <div class="panel-body">
                    <div class="row">
                        <div class="col-xs-12 col-sm-4">
                            <div data-bind="wfValueDisplay: { signalName: 'Setpoint 1', label: 'Flour', unitLabel: true, staticUnitText: 'kg' }"></div>
                        </div>
                        <div class="col-xs-12 col-sm-4">
                            <div data-bind="wfValueDisplay: { signalName: 'Setpoint 2', label: 'Sugar', unitLabel: true, staticUnitText: 'kg' }"></div>
                        </div>
                        <div class="col-xs-12 col-sm-4">
                            <div data-bind="wfValueDisplay: { signalName: 'Setpoint 3', label: 'Salt', unitLabel: true, staticUnitText: 'kg' }"></div>
                        </div>
                    </div>
                </div>
            </div>
        </div>
    </div>

</div>
Running the Buffer Write application
Having all the settings and configurations done as described in previous articles, it is time to see how Buffer Writing actually works.
Now it's time to see how the Buffer Writing actually works:
Save, publish, and run the application in a web browser.
When running the application, you can access the tutorialBufferWrite view that we have just written by simply adding the navigation route at the end of the URL, like this: http://localhost/wfspa3/#tutorialBufferWrite.

Buffer Write example
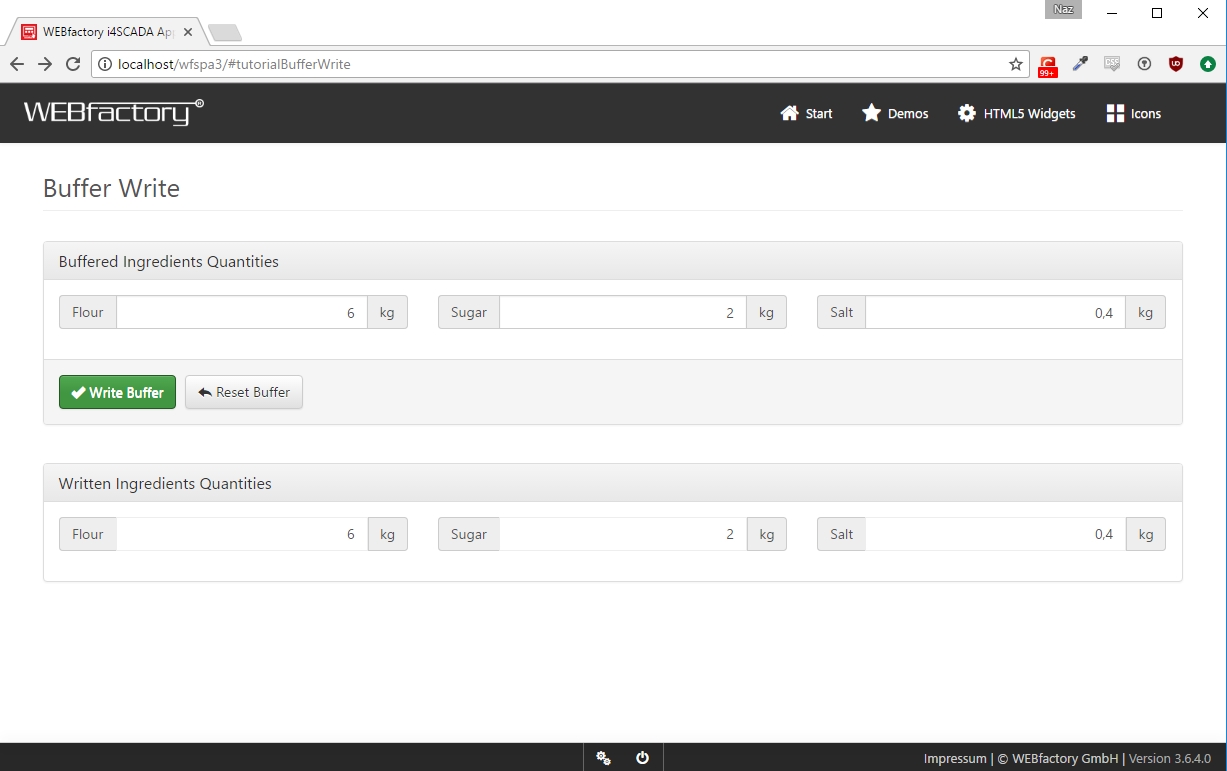
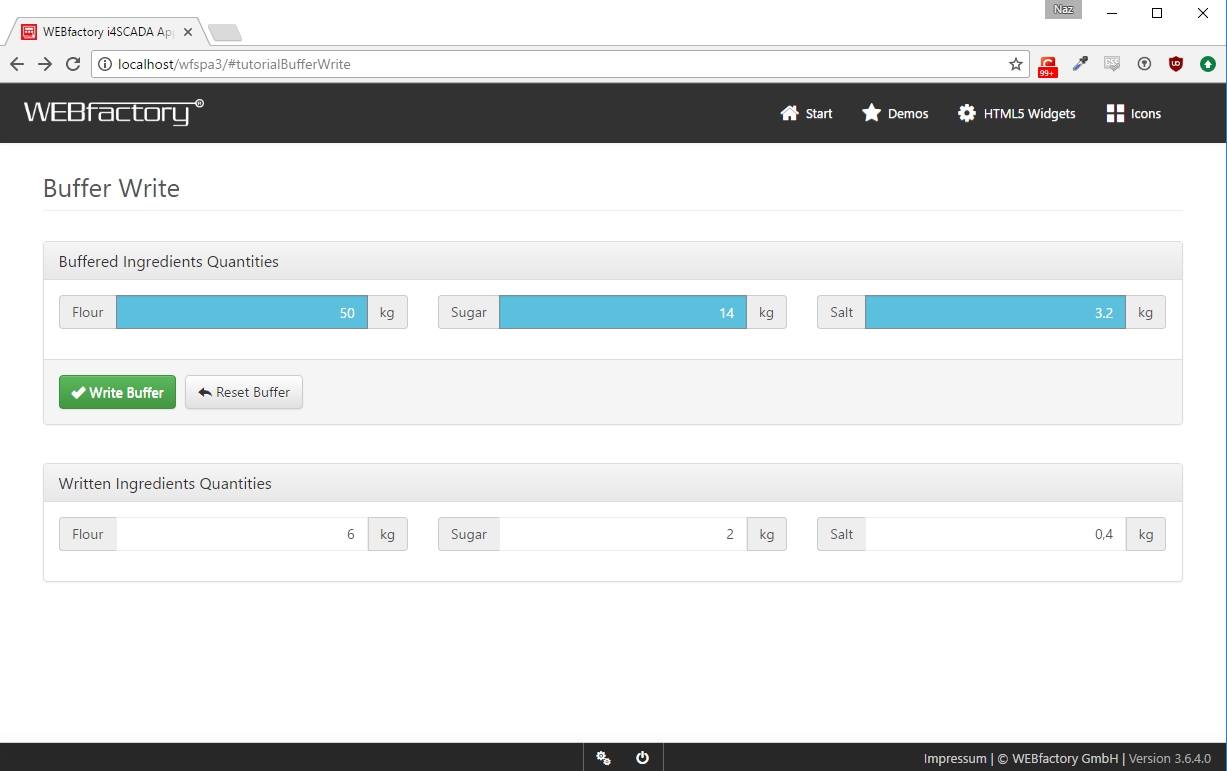
The Buffered Ingredients Quantities panel allows us to write the new ingredients' quantities, while the Written Ingredients Quantities shows the current quantities coming from the SCADA signals. If we modify the recipe quantities to increase the portion output, the new values will be stored in a buffer. The input components will turn blue when the values are buffered.

Buffered Ingredients Quantities
Note
Note that the actual signal values, displayed in the Written Ingredients Quantities panel have not changed.
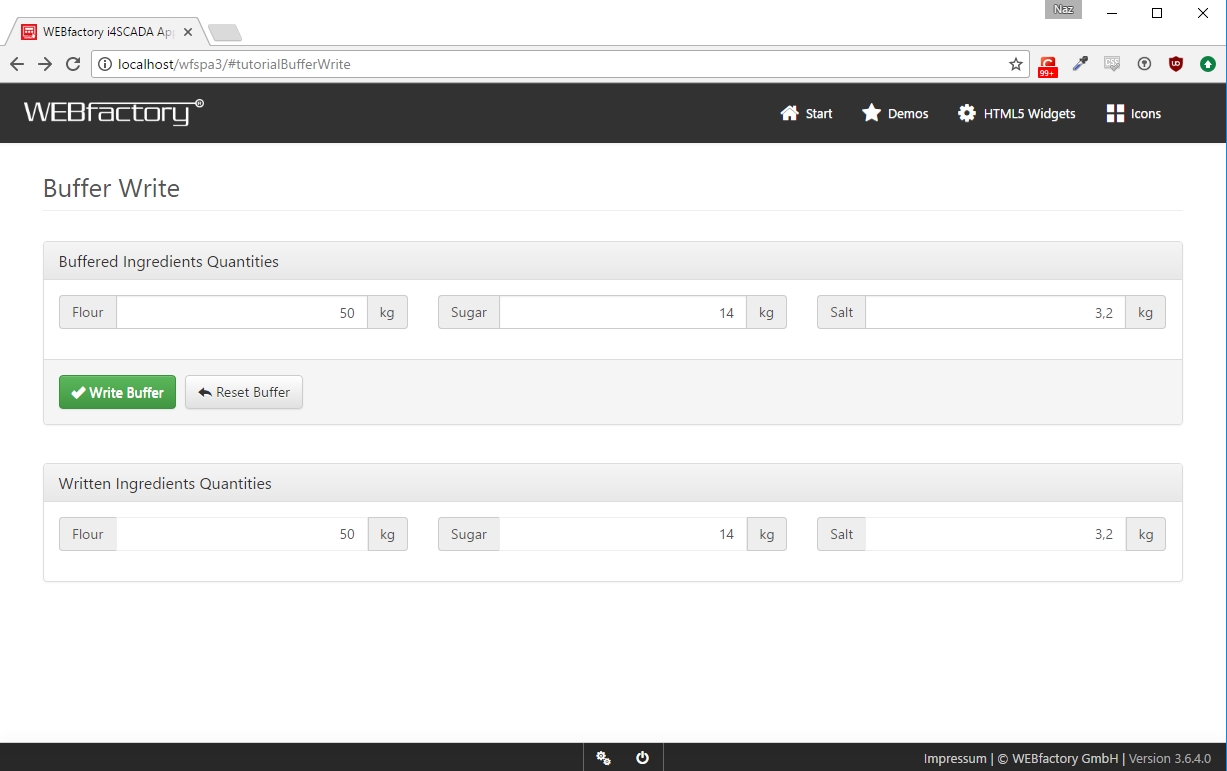
To write the buffered values to the three scada signals and modify the recipe, click the Write Buffer button. Notice that the Written Ingredients Quantities panel will update the values with the new ones, and the buffer will be cleared upon writing.

Write Buffer button
To reset the buffered values, simply click the Reset Buffer button and the buffer will be purged.