Running i4scada on three separate machines
To configure your i4scada Server, Database, and Web Server to communicate with each other over the network on three different machines, check out these tutorials.
i4scada can be set up to run its server, database, and web server on three different machines which communicate with each other over the network. This article will describe the setup procedure for achieving this multiple-machine i4scada environment.
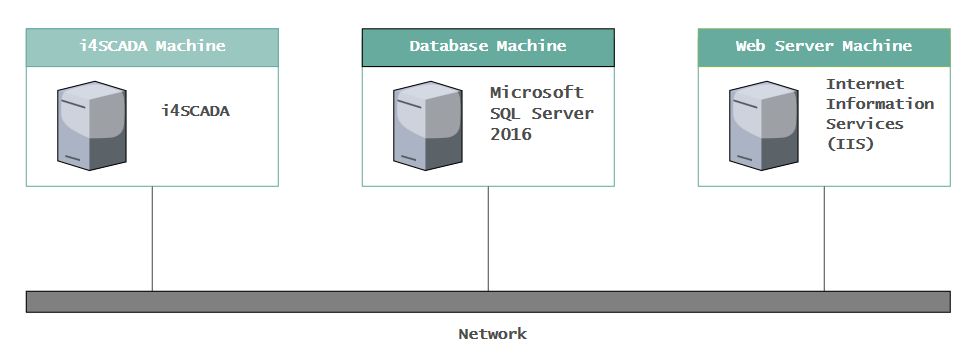
Multiple machine i4scada environment
Important
As these settings have a higher degree of difficulty than the previous ones, please pay attention to each step provided in this tutorial!
The three-way i4scada setup requires three running Windows servers to support the distribution of the i4scada services. The three machines are summarised below:
A Database Server - the server running the Microsoft SQL database server, hosting the SCADA database (SCADA1)
An i4scada Server - the server running the i4scada server, with access to the Database Server and Web Server (SCADA2)
A Web Server - the server running IIS and hosting the SCADA web services (SCADA3)
To achieve this goal, the following prerequisites must be met:
One physical or virtual machine running i4scada version 3.8.x with Internet Information Services (IIS). See the Requirements and recommendations article.
One physical or virtual machine running Microsoft SQL Server 2016.
One physical or virtual machine running Internet Information Services (IIS).
Proper networking - the machines must be in the same local network or must be connected using a VPN if they are communicating over the internet.
Tip
In order to allow i4scadaStudio to find and connect to the Microsoft SQL Server, you need to allow the SQL Server Browser through the Firewall, as follows:
Go to Windows Start, click on the Settings entry, and select Update and Security.
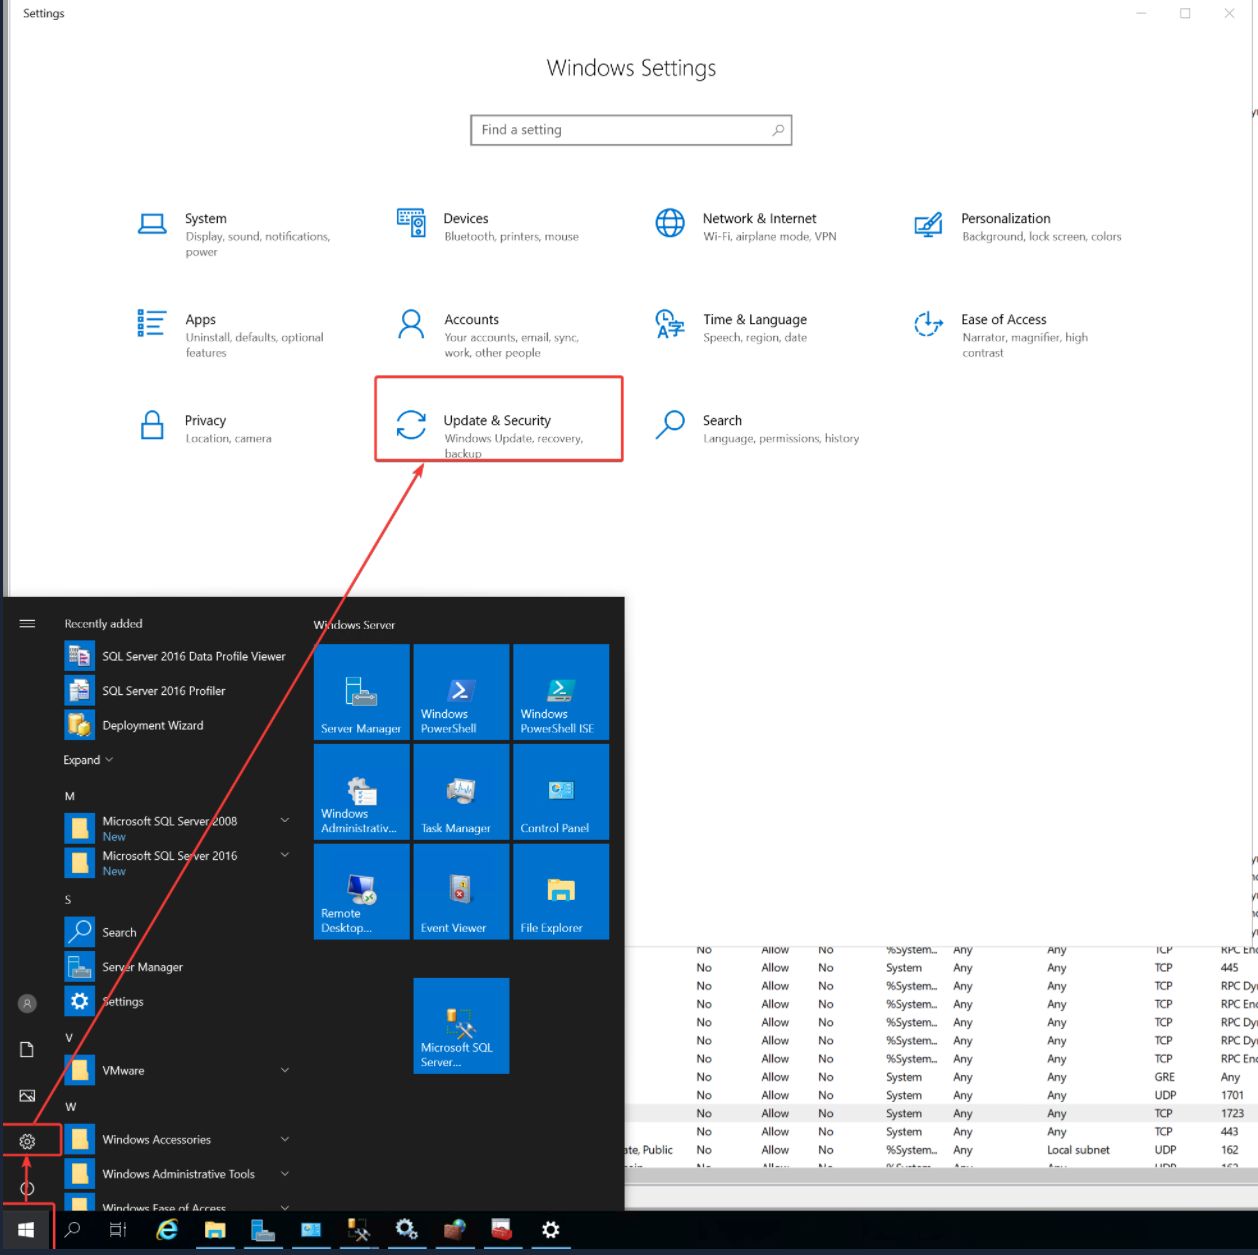
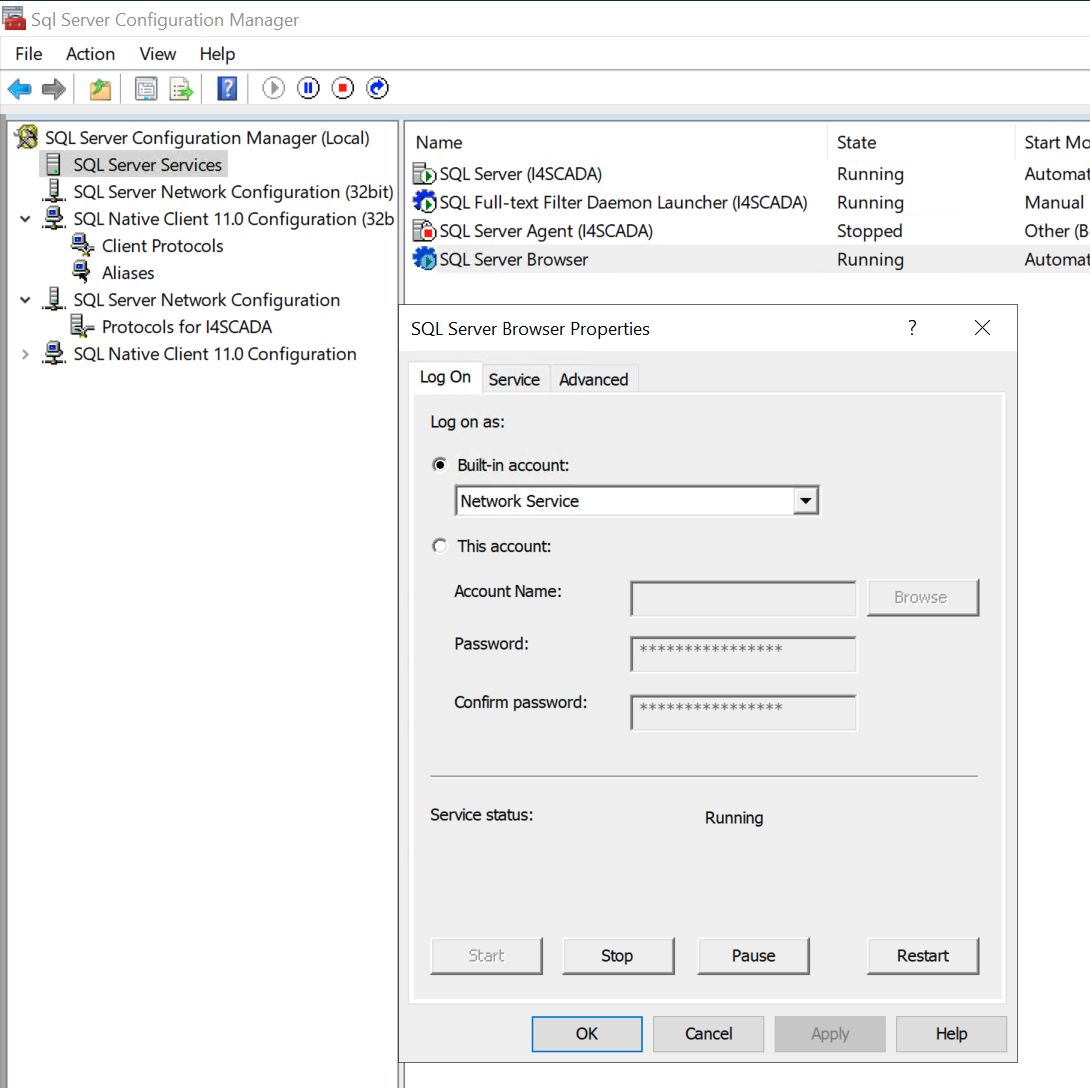
NOTE: It might also be necessary (or advised) to set the SQL Server Browser to log on as a Network Service in the SQL Server Configuration Manager.
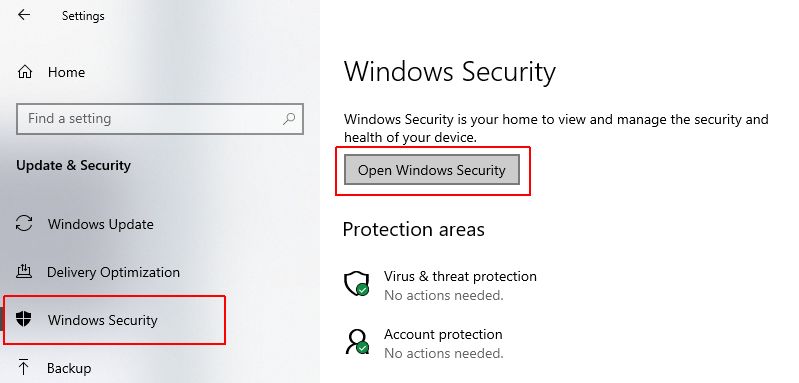
Switch to the Windows Security tab and click the Open Windows Security button.
Switch to the Firewall and network protection tab and click the Allow an app through Firewall option.
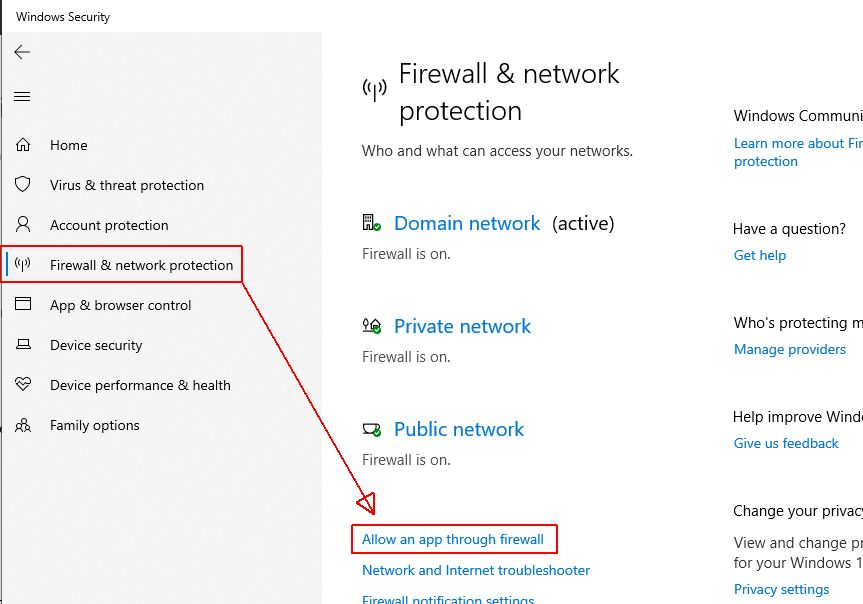
The Control Panel path "Control Panel\System and Security\Windows Defender Firewall\Allowed apps" is opened.
Click the Change Settings button and then select the Allow another app... option.
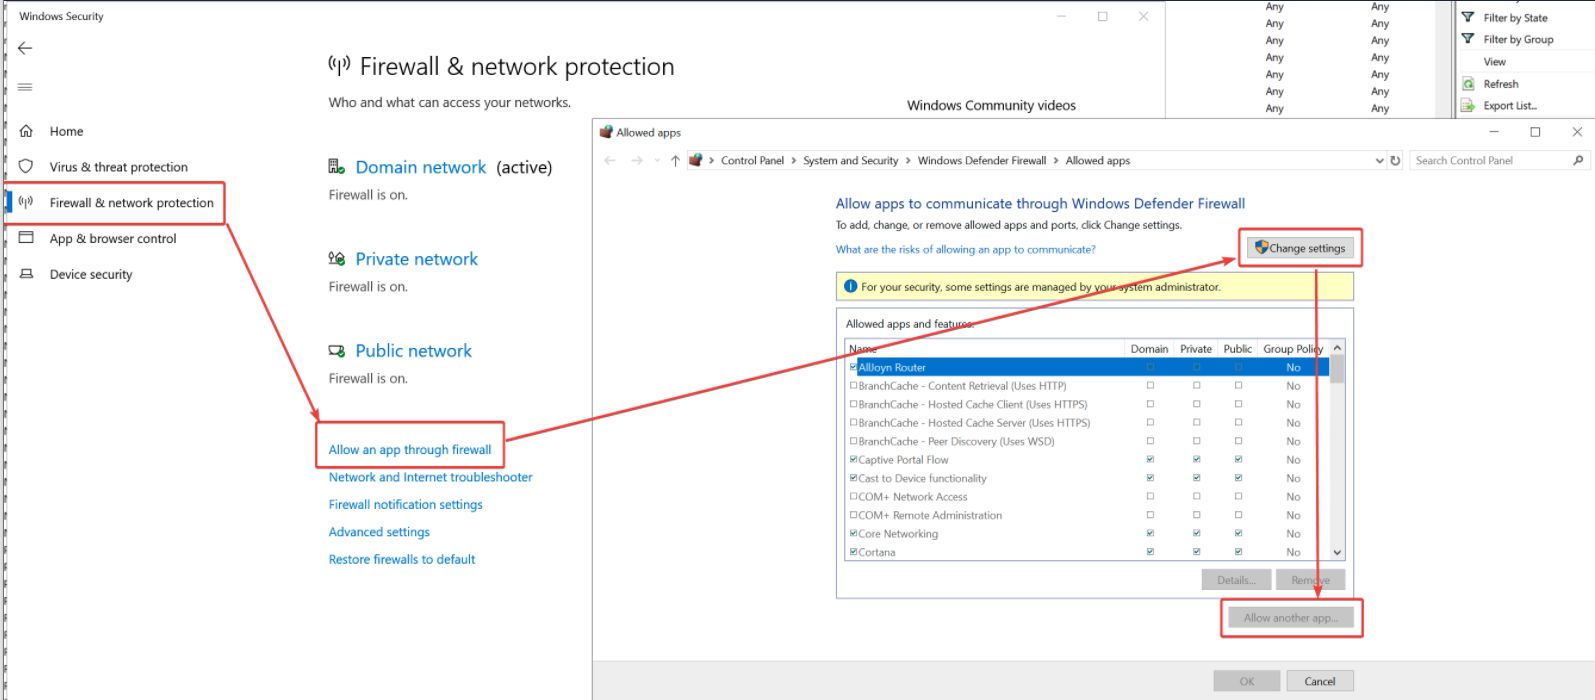
A new small window is opened allowing you to click the Browse button and navigate to the sqlbrowser.exe file location.

Select the sqlbrowser.exe file, click the Open button, and then the Add button to add the sqlbrowser.exe file to the list of apps allowed to communicate through the Firewall.
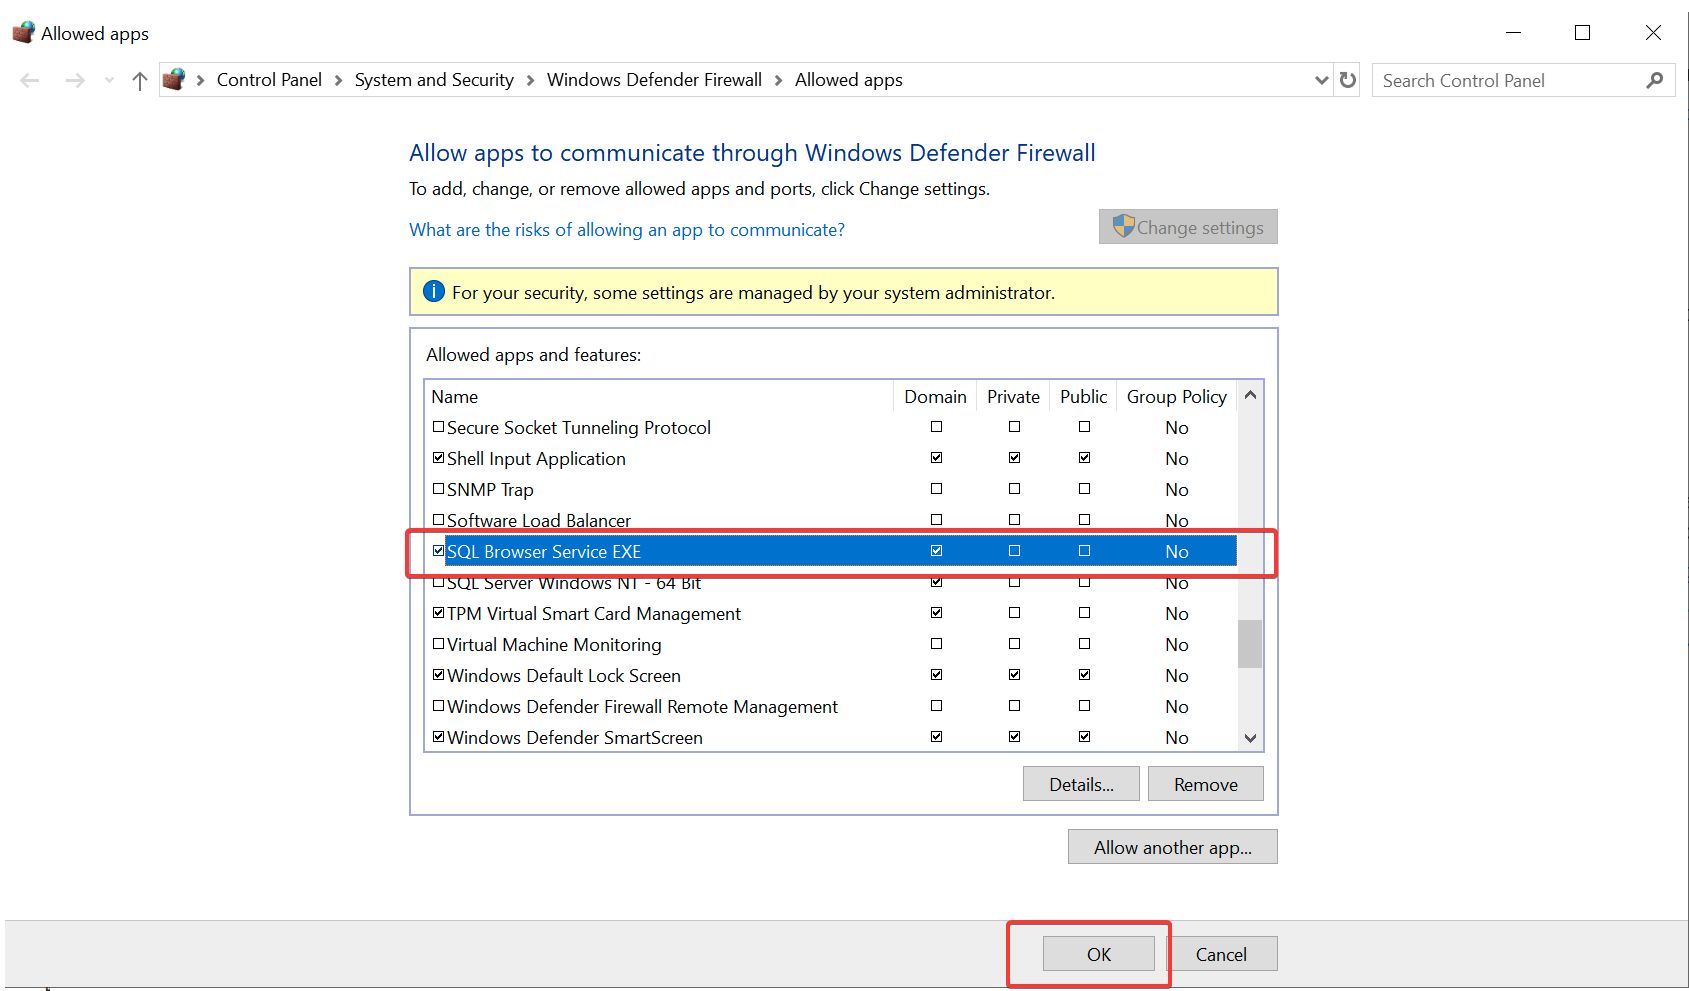
Tip
You can check/uncheck the Domain/Private/Publish checkboxes according to your network setup. In most cases, checking private&domain should suffice.
Finally, click the OK button to finish up the operation.
Note
This article focuses on setting up i4scada to work in a three machines environment. The installation of operating systems, i4scada software, database server, or web server is not subject to this article. Please refer to the proper documentation to achieve the setup required, to follow this article.
Additionally, we have provided you with two setup methods. Regardless of the selected method, we strongly advise you to pay attention to each step, since we deal with a higher degree of difficulty.
Method 1: Setting up the triple-machine environment
The following configuration must be applied to the trio of servers in order to distribute the i4scada installation properly.
Setting up the Database Server (SCADA1)
This Windows Server must be configured as an SQL Database server. For i4scada, the Microsoft SQL Server 2016 must be installed on this machine in order to host the SCADA database. SQL Management Tools must be installed along with the SQL Server, in order to provide access to the Microsoft SQL Server Management Studio.
Enable the TCP/IP protocol in the SQL Server Network Configuration section of the SQL Server Configuration Manager
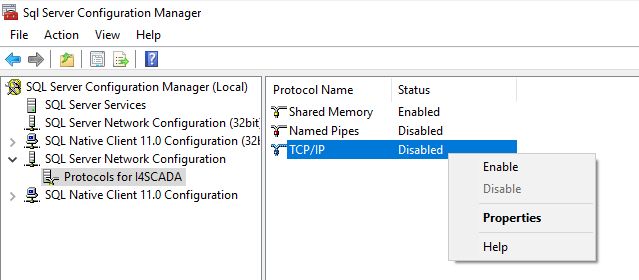
Set the SQL Server Browser to Automatic start and make sure it’s running (in the SQL Server Services section of the SQL Server Configuration Manager, as follows:
Select the SQL Server Browser Properties option and set the Start Mode to Automatic, under TAB Service.
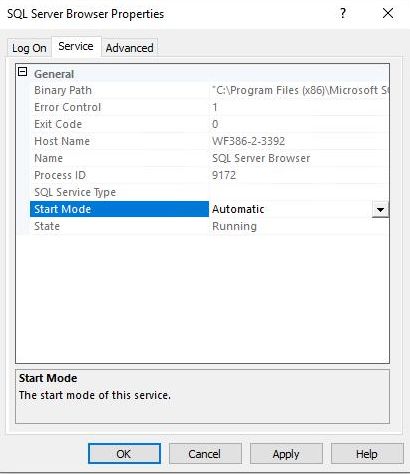
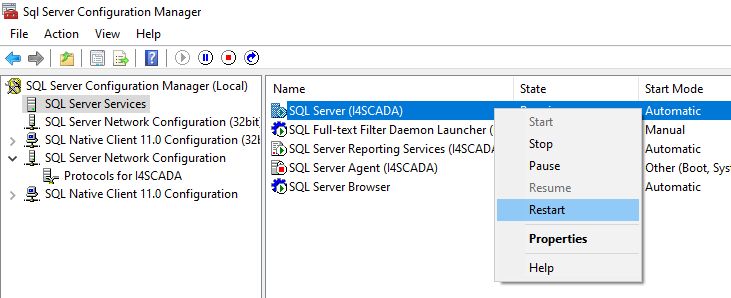
Check the SQL Server Browser status and make sure it is in status Running. In case it did not start, click right and select the option Start.

Restart the SQL Server service in the SQL Server Configuration Manager
Find out what ports are used by the SQL Server, as follows:
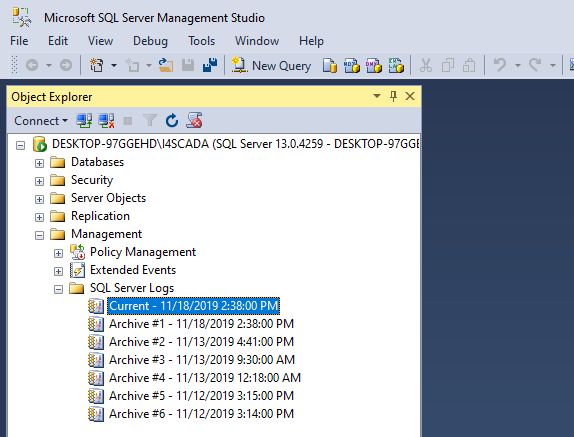
Open the SQL Server Management Studio
Open the Management folder
Open the SQL Server Logs folder
Select the Current log file and click right to open the Log Filter Viewer dialog.
In the Log Filter Viewer dialog select the Filter toolbar option or the View filter settings linkable field.
The Filter Settings dialog is opened allowing you to input the text “server is listening on” in the Message Contains Text field and Enable the Apply filter option.
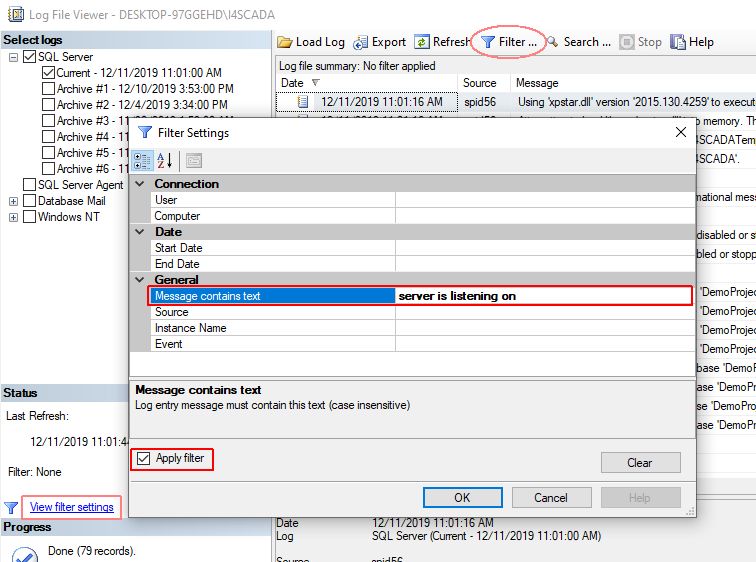
Press the OK button. The SQL Server port number will be displayed in the logs as listened to.

Allow inbound and outbound port rules for port 1433 for both TCP and UDP protocols, as follows:
Open Windows Defender Firewall.
Click on the Advanced settings option.
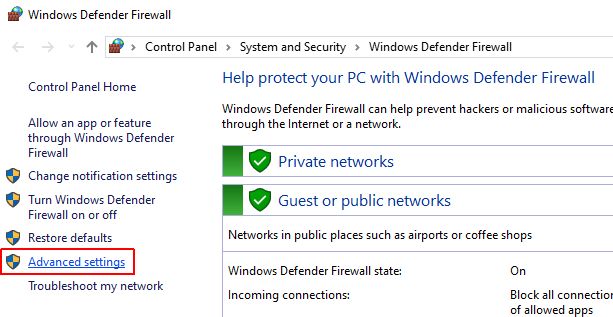
The Windows Defender Firewall with Advanced Security dialog is opened.
Select the Inbound Rules menu entry and click on the New Rule option.

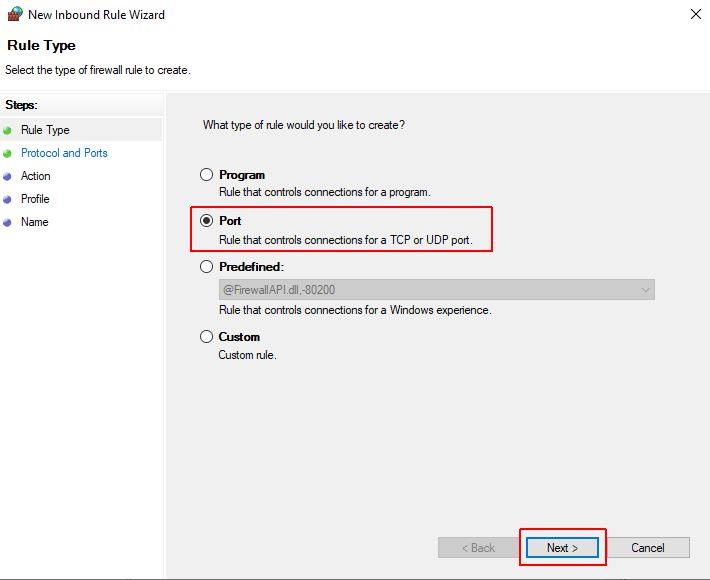
The New inbound Rule Wizard dialog is opened. In this view select the Port option and press the button Next.
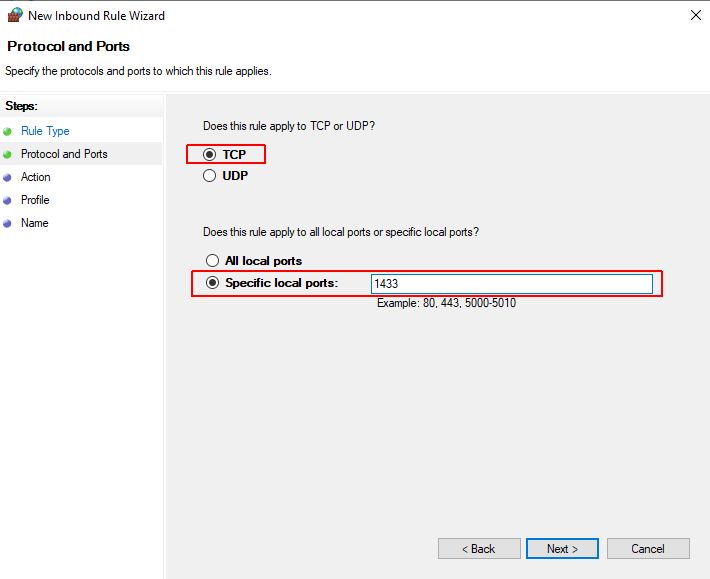
Add in the "Specific local ports" field the TCP port number 1433. Click again the Next button.
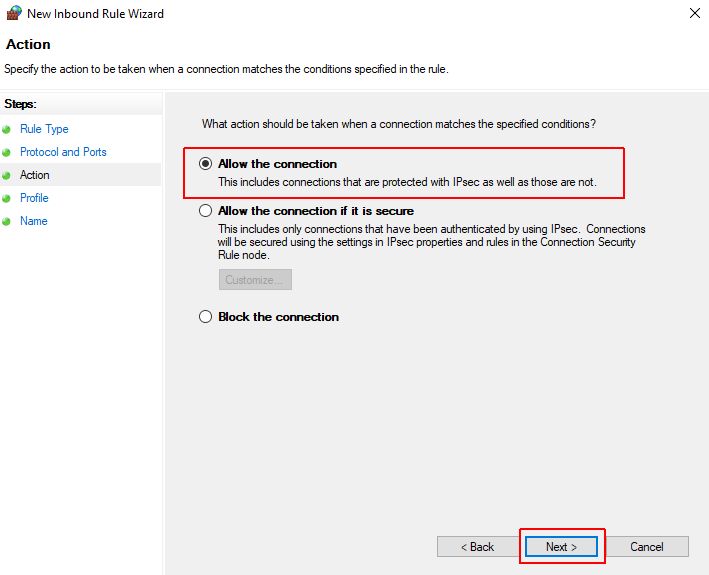
Make sure that option Allow connection is selected and press the Next button.
In the next window select the desired location where the new rule should be applied (by default, all options are selected). Click again the Next button.
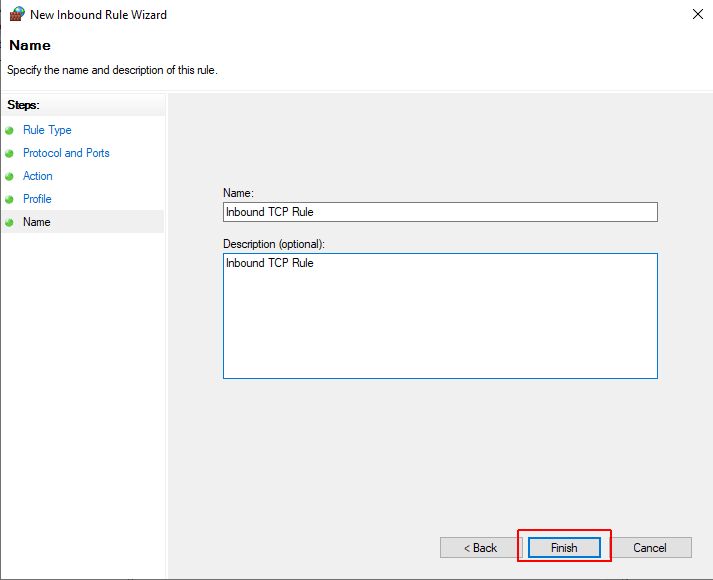
Define a Name and Description for the new Inbound TCP Rule and click the Finish button.
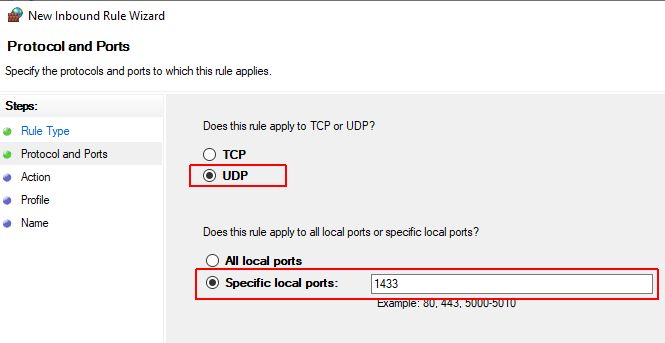
Next, add the Inbound UDP Rule for the 1433 port described above.
Repeat the steps described above, for the Outbound TCP and UDP Rules, under the Outbound Rules menu entry of Windows Defender Firewall.

Allow inbound and outbound port rules for port 1434 for both TCP and UDP protocols, as follows:
Open Windows Defender Firewall.
Click on the Advanced settings option.

The Windows Defender Firewall with Advanced Security dialog is opened.
Select the Inbound Rules menu entry and click on the New Rule option.

The New Inbound Rule Wizard dialog is opened. In this view select the Port option and press the button Next.

Add in the "Specific local ports" field the TCP port number 1434. Click again the Next button.
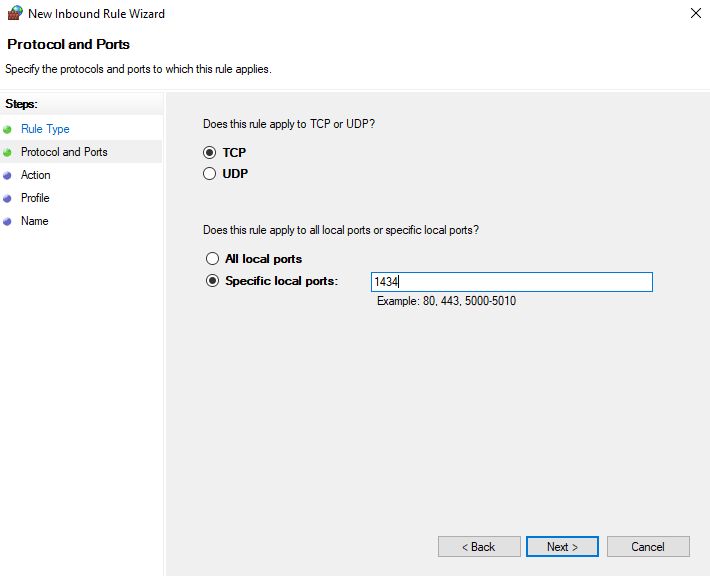
Make sure that option Allow connection is selected and press the Next button.

In the next window select the desired location where the new rule should be applied (by default, all options are selected). Click again the Next button.
Define a Name and Description for the new Inbound TCP Rule and click the Finish button.

Next, add the Inbound UDP Rule for the 1443 port, as described above.
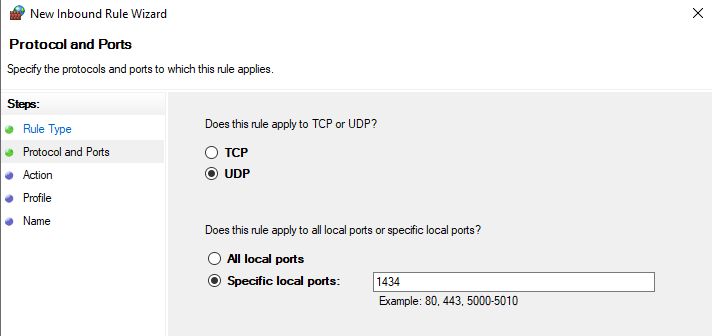
Repeat the steps described above, for the Outbound TCP and UDP Rules, under the Outbound Rules menu entry of Windows Defender Firewall.

Allow inbound and outbound port rules for the SQL Server port (in our case, 49741) for both TCP and UDP protocols, as follows:
Open Windows Defender Firewall.
Click on the Advanced settings option.

The Windows Defender Firewall with Advanced Security dialog is opened.
Select the Inbound Rules menu entry and click on the New Rule option.

The New Inbound Rule Wizard dialog is opened. In this view select the Port option and press the button Next.

Add in the "Specific local ports" field the TCP port number 49741. Click again the Next button.
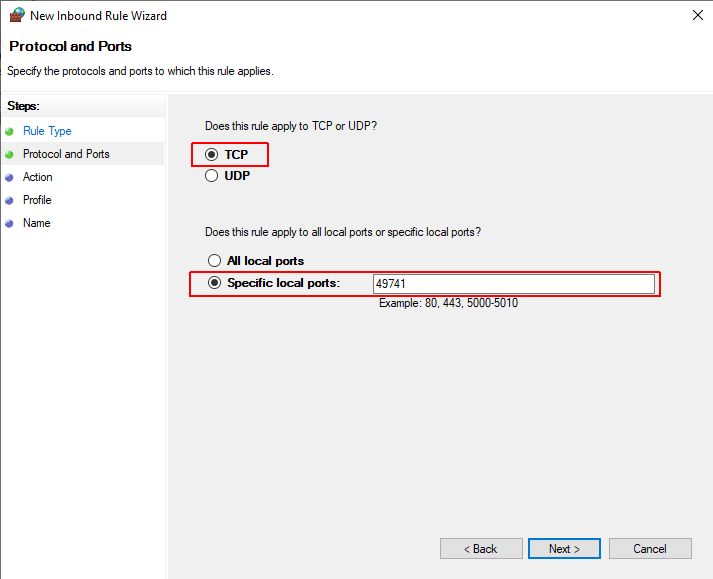
Make sure that option Allow the connection is selected and press the Next button.

In the next window select the desired location where the new rule should be applied (by default, all options are selected). Click again the Next button.
Define a Name and Description for the new Inbound TCP Rule and click the Finish button.

Next, add the Inbound UDP Rule for the 49741 port described above.
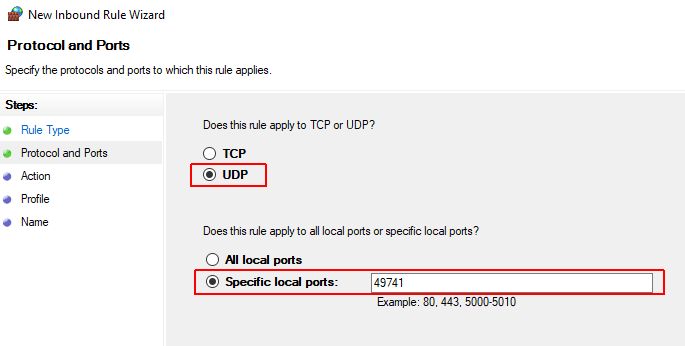
Repeat the steps described above, for the Outbound TCP and UDP Rules, under the Outbound Rules menu entry of Windows Defender Firewall.

Last but not least, make sure that the Network Discovery is enabled for the network you are connected to, as follows:
Go to Control Panel and select the option Network and Internet.
Select the Network and Sharing Center and click on the Change advanced sharing settings.
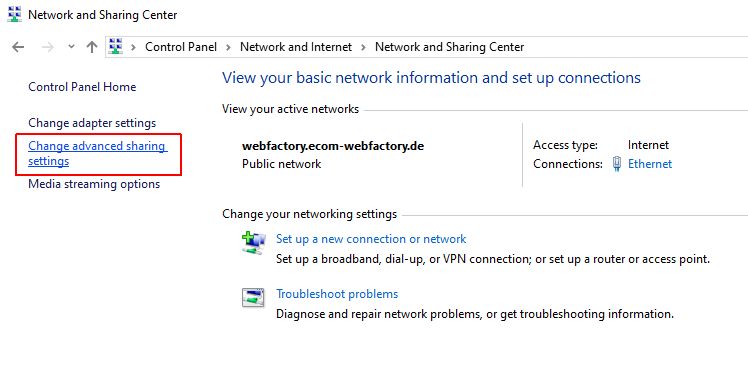
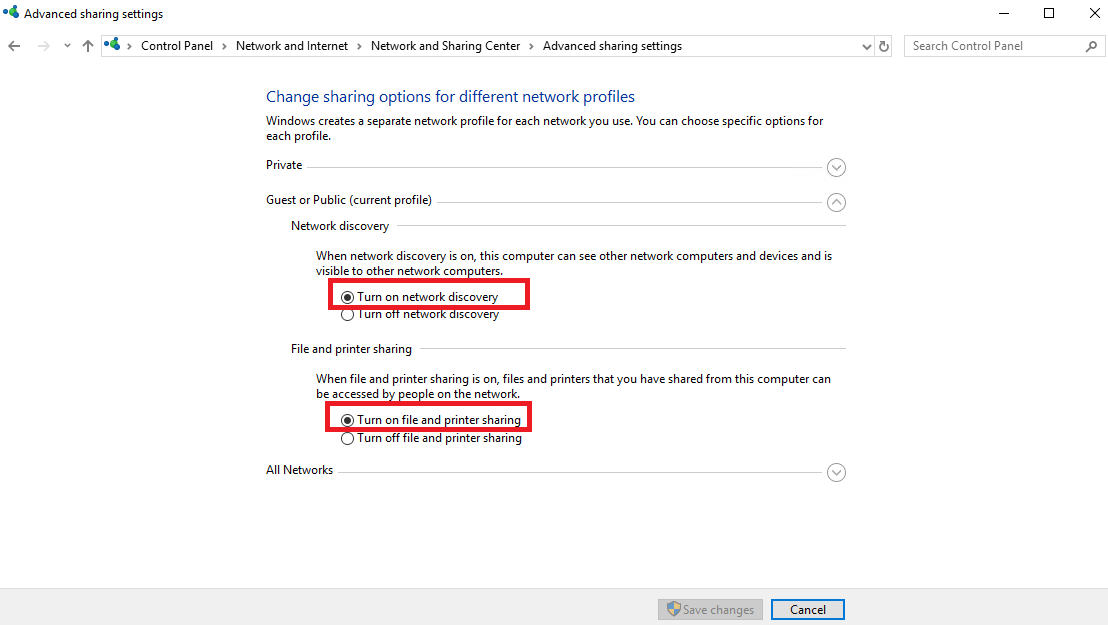
In the Advanced Sharing settings make sure that the Network discovery and/or File and printer sharing are turned ON, for your current profile.
Tip
Changes at the level of Network discovery can be lost after saving them if the dependency services are disabled. Please make sure the following services are enabled and running:
DNS Client
Function Discovery Resource Publication
SSDP Discovery
UPnP Device Host.
Further details for troubleshooting such issues can be found on the forum linked here.
Setting up the i4scada Server (SCADA2)
The SCADA server must be configured with the standard SCADA prerequisites. Some of those, like IIS, may not actually be used in the final three-way SCADA setup, but are still required by the i4scada Setup.
Tip
Please refer to the i4scada Setup tutorial for more details about the steps required for this installation.
To set up the SCADA Server the following steps should be processed:
Install i4scada as a normal installation, including all required prerequisites: Windows Roles and Features (IIS and .NET Framework 3.5 and 4.7). Some features may be available only after the initial installation.
Note
The SQL Server setup part of the i4scada installation can be skipped since we will use the Database Server’s SQL.
Make sure that the i4scada Studio can connect to the Database Server SQL database, as follows:
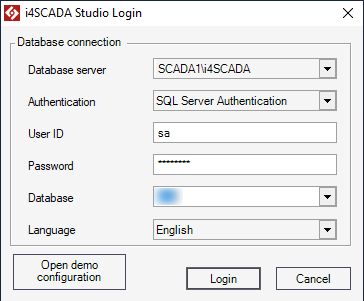
Open the Command Prompt application on the i4scada Server machine (SCADA2). and
Ping the IP of the DB server - e.g. Ping [database server ip].
Tip
The local IP can be identified using the Ipconfig command.
If there is a network communication between the 2 machines the ping command should output:
C:\Users\vagrant>ping 19x.16y.xx.yy (the IP of the Machine where the SQL is installed - SCADA1)
If the connection was successfully working the result should be something like:
Pinging 19x.16y.xx.yy with 32 bytes of data:
Reply from 19x.16y.xx.yy: bytes=32 time=2ms TTL=128
Reply from 19x.16y.xx.yy: bytes=32 time<1ms TTL=128
Note
Since i4scada was not installed on the Database Server, the Demo Project DB will not be present on the Database Server. Either restore a SCADA database on the Database Server and connect to it from the SCADA Server’s Studio or create a new SCADA DB using Studio’s interface.
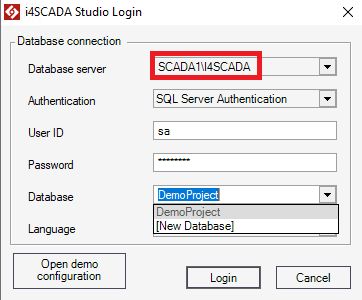
Set the remote SCADA DB as the default Studio DB once connected to it (either via the initial dialog or from the Database Access section of the Settings area), as follows:
Copy the SCADA Database name.
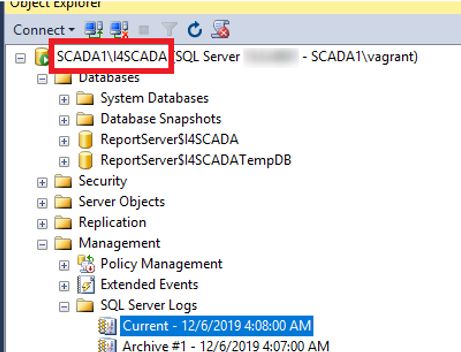
Use it to replace the Database server so that we can connect to the newly created database.
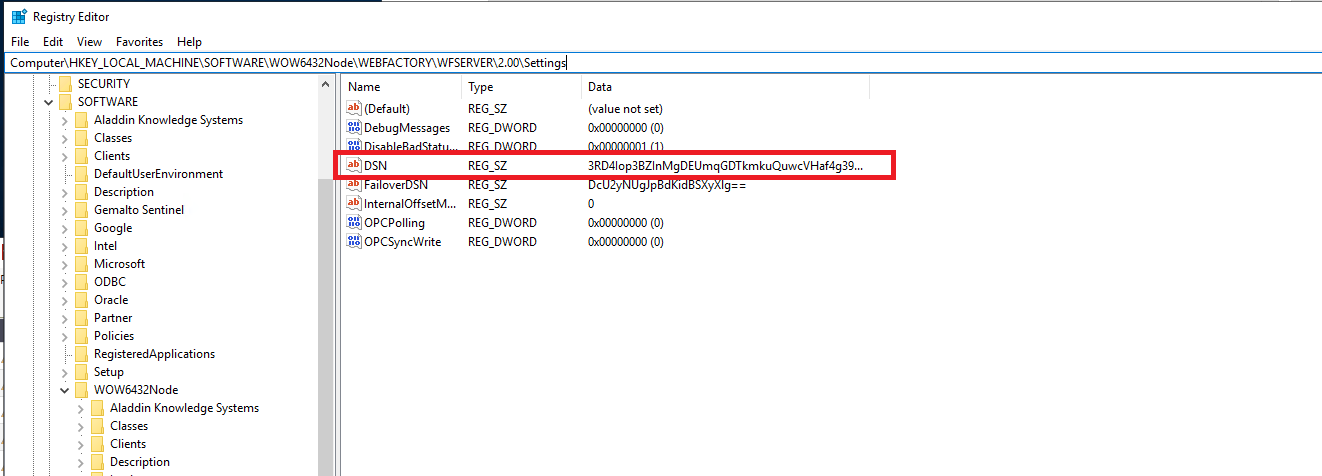
Next, open the Registry Editor application and export the DSN registry key from HKEY_LOCAL_MACHINE\SOFTWARE\Wow6432Node\WEBFACTORY\WFSERVER\2.00\Settings and store it for later use.

Edit the Scada.CommunicationManager.Server.exe.config file with a text editor. This file can be found through the path [your-install-location]/i4scada\Server\CommunicationManager).
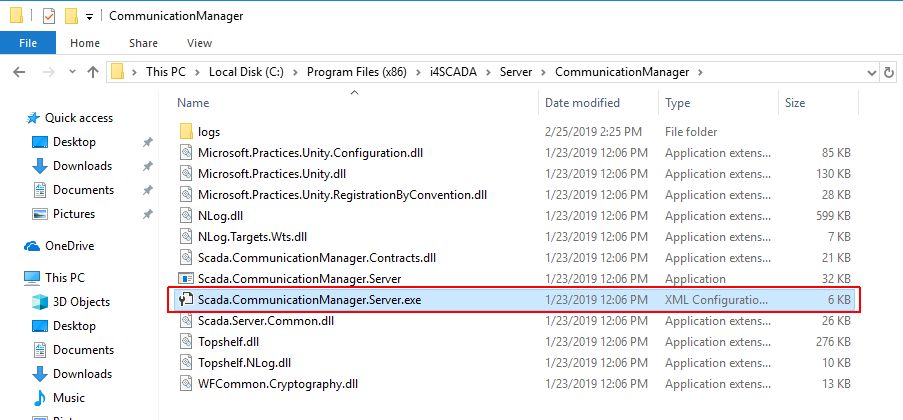
Locate the CommunicationWebClientService and the TraceContributorService services and enable (un-comment) the TcpEndpoints.

Tip
Optionally, the port 4600 exposed by the communication manager for web services can be modified. If so, the modification should be done for both CommunicationWebClientService and TraceContributorService services.
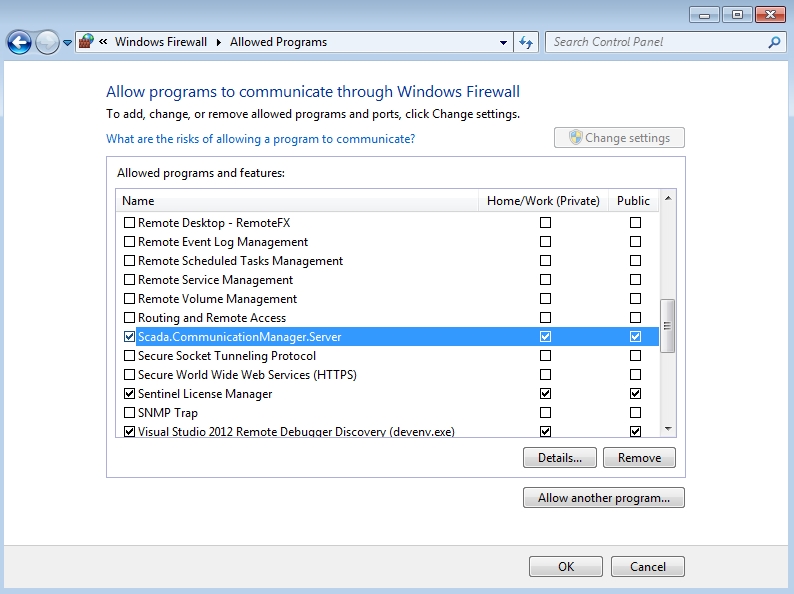
Allow the Scada.CommunicationManager.Server.exe located at C:\Program Files (x86)\i4scada\Server\CommunicationManager\ to communicate through the firewall, as it needs inbound connections to the default port (or to the custom port if modified above).
Copy the _SERVICES folder and clientaccesspolicy.xml from the wwwroot folder of the IIS to a shared network location so it can be transferred later to the Web Server.
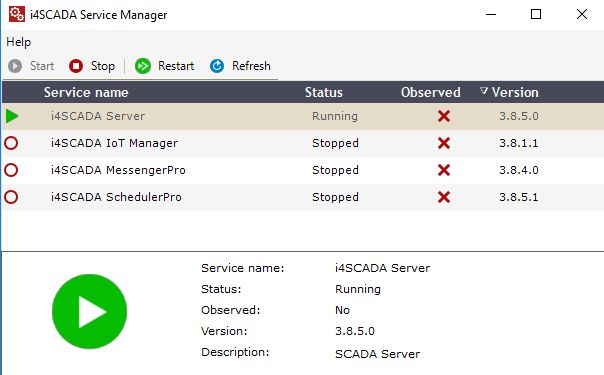
Start the SCADA Server using the i4scada Service Manager.
Last but not least, make sure that the Network Discovery is enabled for the network you are connected to, as follows:
Go to Control Panel and select the option Network and Internet.
Select the Network and Sharing Center and click on the Change advanced sharing settings.

In the Advanced Sharing settings make sure that the Network discovery and/or File and printer sharing are turned ON, for your current profile.

Tip
Changes at the level of Network discovery can be lost after saving them if the dependency services are disabled. Please make sure the following services are enabled and running:
DNS Client
Function Discovery Resource Publication
SSDP Discovery
UPnP Device Host.
Further details for troubleshooting such issues can be found on the forum linked here.
Setting up the Web Server (SCADA3)
The Web Server machine will run the IIS components of the i4scada setup, the web services. To wrap up the final part of this tutorial, please organize the following steps:
Make sure that the SCADA3 machine has the IIS with all its components available.
Install the .NET Framework 3.5 complete feature set.
Install .NET Framework 4.7 complete feature set.
Note
Make sure that the following IIS .NET Framework settings are fully installed:
HTTP Action
Non HTTP Action
HTTP Activation
Start the i4scada 3.8.X setup.
Note
The Web Server machine does not require all the i4scada applications, therefore you can decide to only install the SmartEditor, Studio, and Synchronization.
Copy the DSN registry key exported earlier (see step 4), execute it and add the key to the Web Server machine registry.
Note
In case you are using multiple projects, the DSN Registry Key needs to be updated on the web webserver to be in sync with the project used by the SCADA server. Therefore, please copy the DSN Registry Key from the server and update it on the web server machine.
Go to Web.config file inside the _SERVICES/WEBservices folder located at C:\inetpub\wwwroot\_SERVICES\WEBservices\ and perform the following actions:

Disable (comment out) the CommunicationWebClientService net.pipe endpoints.
Enable (uncomment) the CommunicationWebClientServicenet.tcp endpoints.
Note
Please note that it is also possible to use "HTTP" as a communication protocol. In order to enable it, please make sure to uncomment the CommunicationWebClientService HTTP endpoints.
In the two uncommented endpoints (net.tcp or HTTP) replace the “localhost” reference in the endpoint address with the computer name used by the machine where the SCADA server is installed.
Important
If the web services port was modified when configuring the i4scada Server communication, use the new port when configuring the net.tcp endpoints.
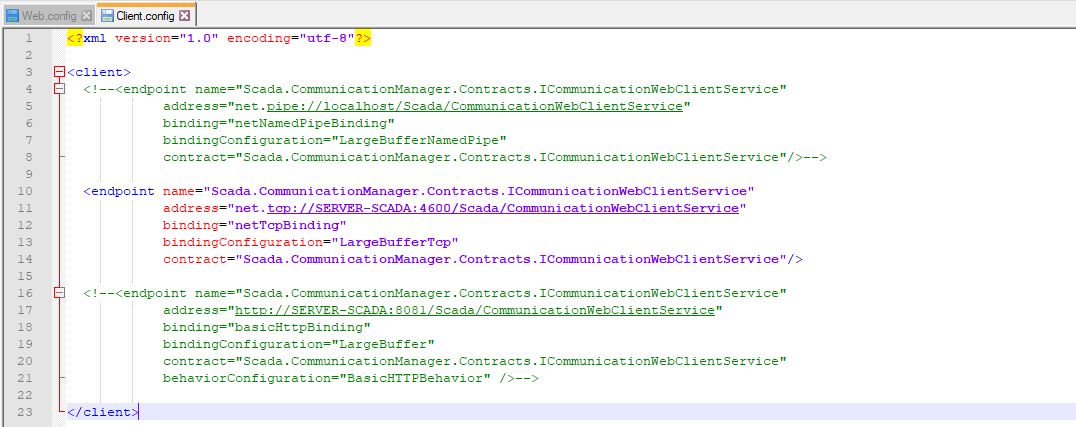
Next, open the Client.config file located at C:\inetpub\wwwroot\_SERVICES\WEBservices\WCF\ with a text editor and perform the following actions:
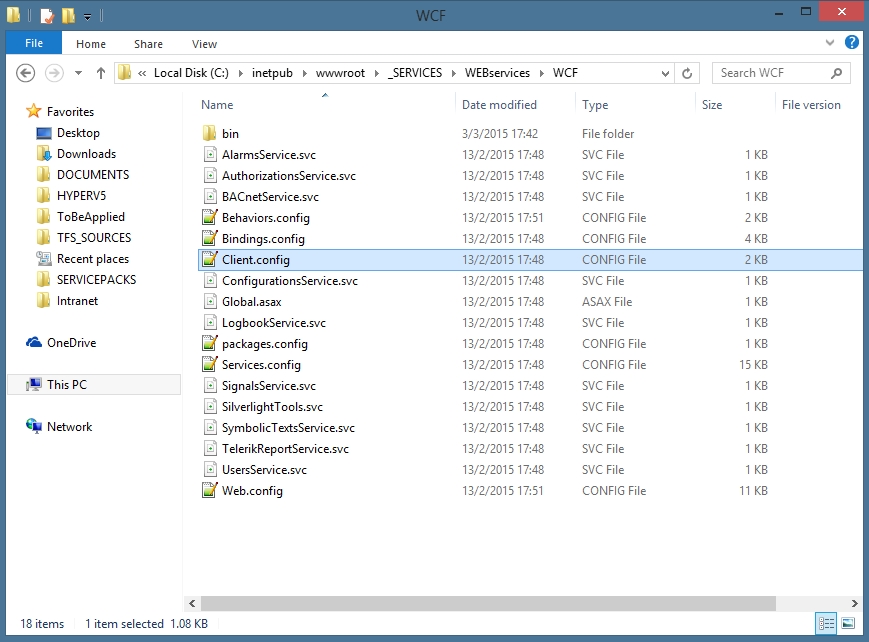
Disable (comment out) the CommunicationWebClientService net.pipe endpoint(s).
Enable (uncomment) the CommunicationWebClientService net.tcp endpoints. In the uncommented net.tcp endpoints, replace the “localhost” reference in the endpoint address with the name of the SCADA Server.
Note
Please note that it is also possible to use "HTTP" as a communication protocol. In order to enable it, please make sure to uncomment the CommunicationWebClientService HTTP endpoints.
Open a Command Prompt terminal using Administrator privileges and run the following commands one by one to disable the IIS logging:
%windir%\System32\inetsrv\appcmd unlock config /section:httpLogging

%windir%\System32\inetsrv\appcmd set config "Default Web Site/_services" /section:httpLogging /dontLog:true

iisreset
Last but not least, make sure that the Network Discovery is enabled for the network you are connected to, as follows:
Go to Control Panel and select the option Network and Internet.
Select the Network and Sharing Center and click on the Change advanced sharing settings.

In the Advanced Sharing settings make sure that the Network discovery and/or File and printer sharing are turned ON, for your current profile.

Tip
Changes at the level of Network discovery can be lost after saving them if the dependency services are disabled. Please make sure the following services are enabled and running:
DNS Client
Function Discovery Resource Publication
SSDP Discovery
UPnP Device Host.
Further details for troubleshooting such issues can be found on the forum linked here.
Testing an i4scada SmartEditor visualization on the three machine installation
Tip
If during the setup the listening port was changed, you might encounter some connectivity issues. Therefore, you might want to recheck and confirm that the port used for the TCP/UDP Inbound and Outbound rules is correct.
After processing all the above-described steps you can quickly check if the installation has been correctly organized, as follows:
Open the Machine where the i4scada Server is installed (SCADA2) and start the i4scada Server from the Service Manager application.
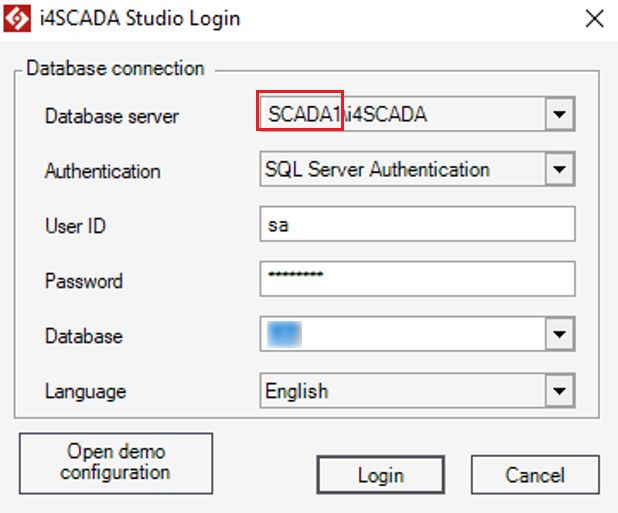
Open Studio and connect to the Database Server SQL database. (in our case the Data Base Server SQL was installed on the Machine named SCADA1).
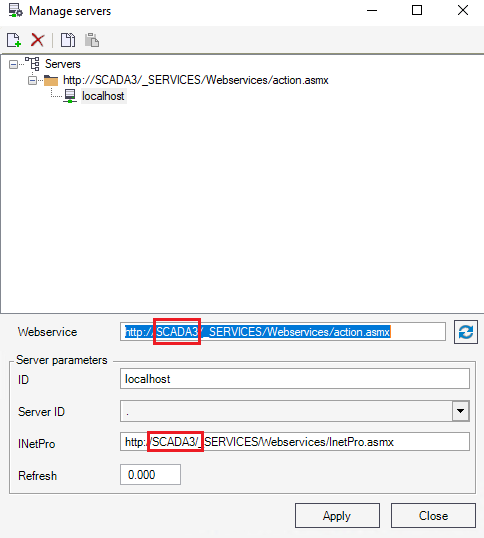
Open the Test Center application and connect to the Web Server (in our case this was installed on the Machine named SCADA3).
Tip
In case the Server is not visible or cannot be applied in the Test Center application, you can alternatively open the Web.config file inside the _SERVICES/WEBservices folder located at C:\inetpub\wwwroot\_SERVICES\WEBservices\, and comment the "Documentation" lines, as follows:
<webServices><protocols><!--Comment the next line to enable WSDL metadata output for *.asmx web services<remove name="Documentation" />--></protocols></webServices></system.web>
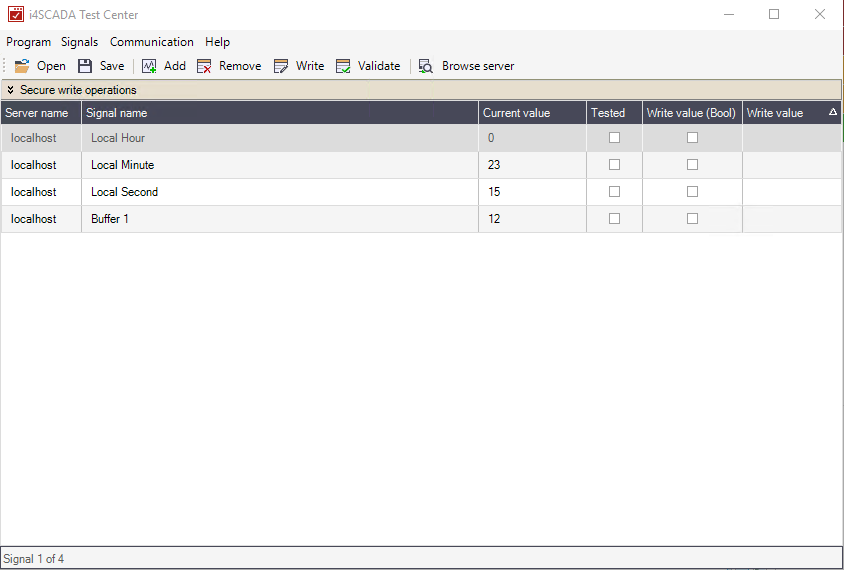
After applying these changes add some Signals in order to check the connection between IIS and Web Services available on the IIS Machine, named SCADA3.
You can further check the three-machine installation using the Smart Editor application by creating a new project. Add to the SmartEditor project page some extensions (e.g i4-core, wf-alarm-viewer, and wf-sensor).
Open the Object properties panel of the i4-core extension and organize the following changes:
Go to property “Remote IIS Server Url” and input the WEB Server (SCADA3) machine name.
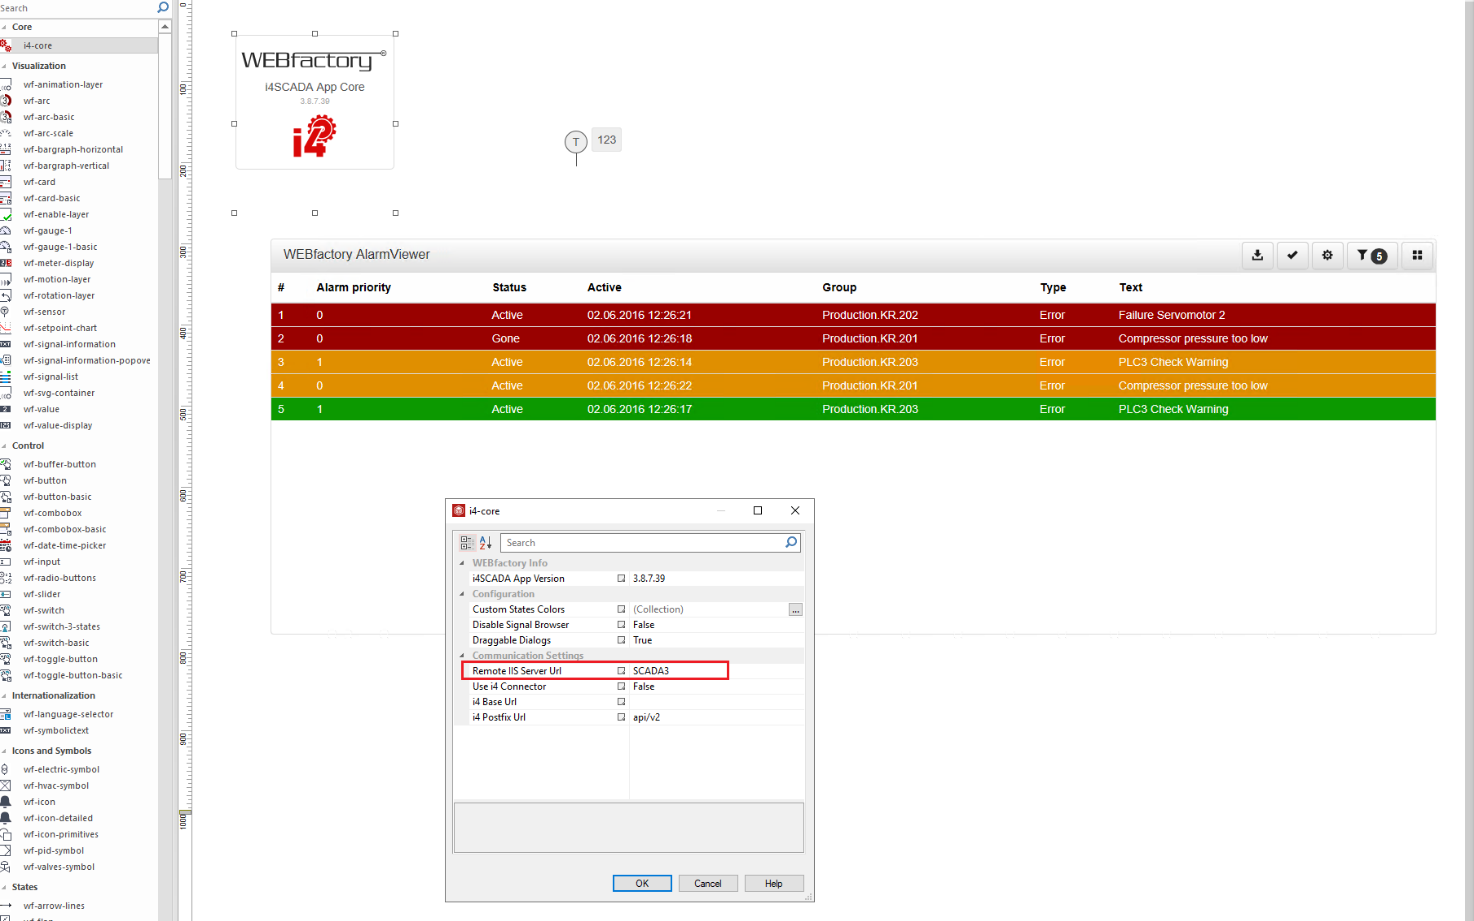
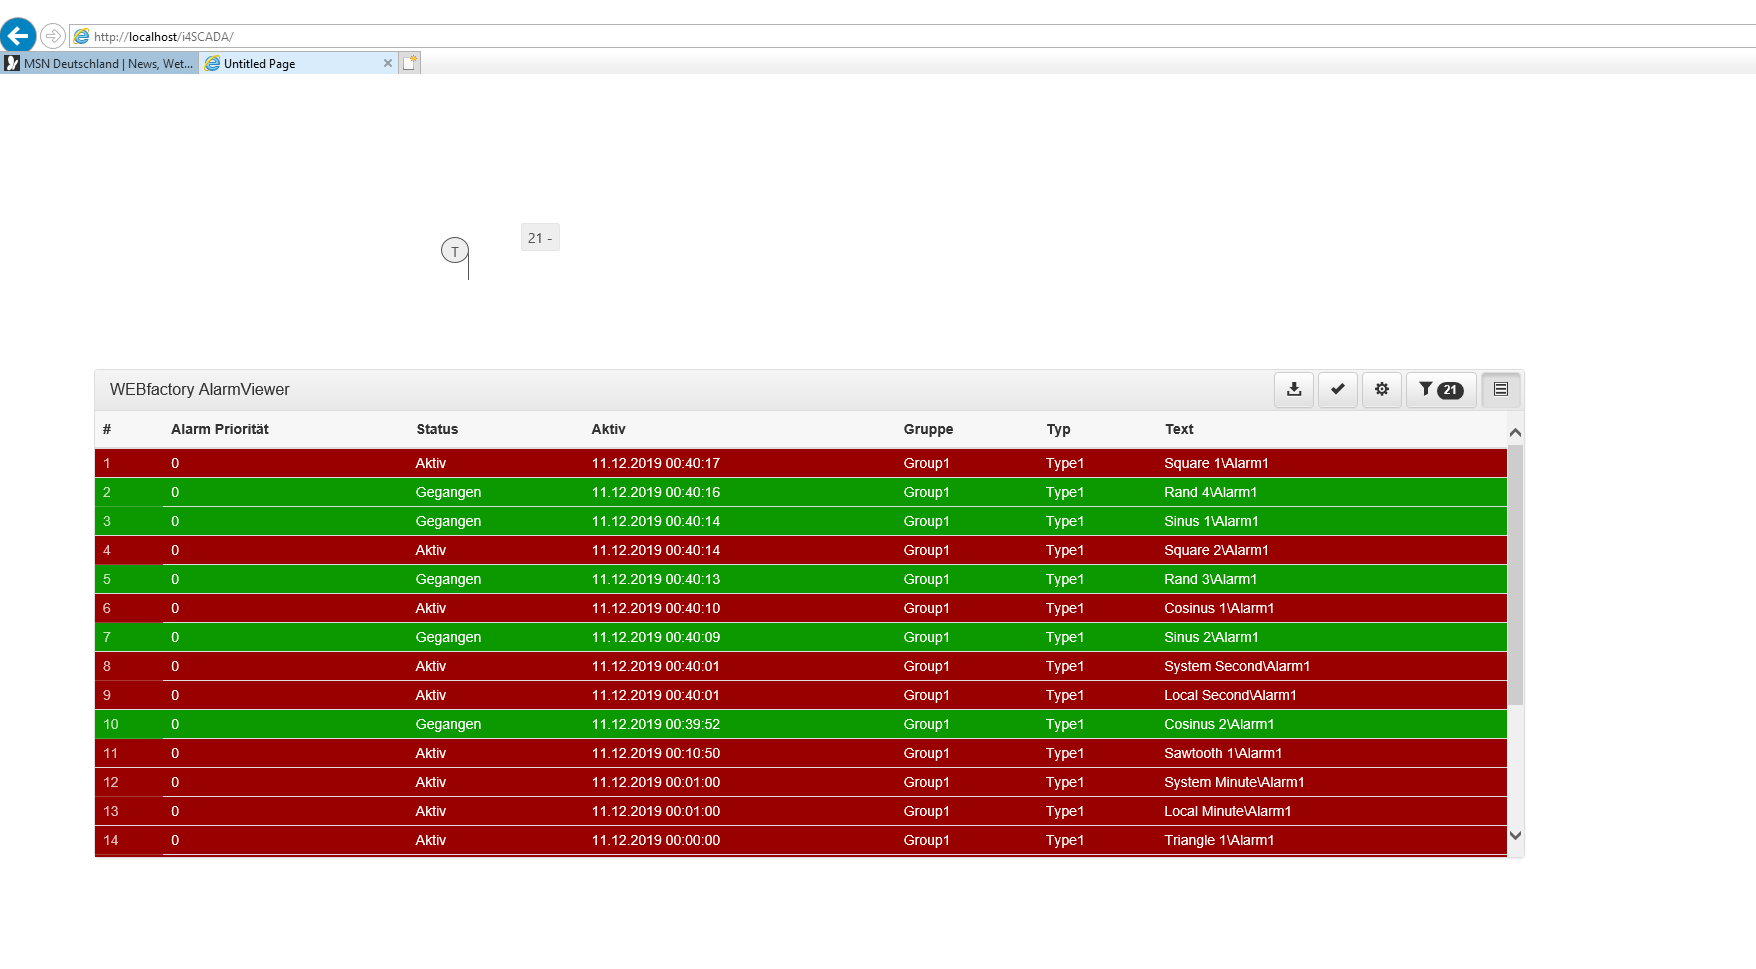
Publish the SmartEditor project. If all settings were correct the run-time project should be properly working.
Testing an i4designer visualization on the three machine installation
Tip
If during the setup the listening port was changed, you might encounter some connectivity issues. Therefore, you might want to recheck and confirm that the port used for the TCP/UDP Inbound and Outbound rules is correct.
To open an i4designer visualization on the three machine installation, please proceed as follows:
On the SCADA3 Machine where the i4scada WebServer is installed, open the Services application and make sure that the i4scada Synchronization Service is in status Running.
Next, create a new empty folder under inetpub/wwwroot.
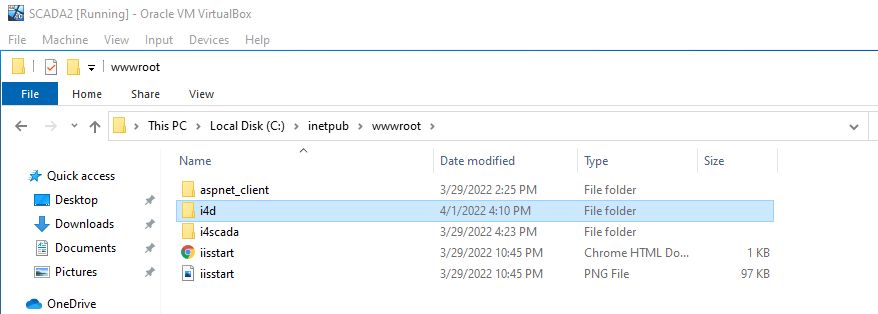
Open the new folder, and add a second empty folder.

Open i4scada Studio Application and define your i4designer Project settings, under the Settings section, as follows:

Fill in your Project Token copied from the respective i4designer project.
Select the second created empty folder as Project Path.
Tip
For more details about the i4designer Project Settings, please also visit i4designer Section.
Next, start the i4scada Server from the Service Manager application, on the i4scada Server Machine (SCADA2).
After all the above steps have been done, let's publish the linked i4designer project.
Now, check the inetpub/wwwroot folder on the SCADA3 Machine. The i4designer project contents were published here. You can now successfully open the i4designer visualization and proceed with further needed updates.
Method 2: Setting up the triple-machine environment
The following configuration must be applied to the trio of servers in order to distribute the i4scada installation properly.
Setting up the Database Server (SCADA1)
This Windows Server must be configured as an SQL Database server. For i4scada, the Microsoft SQL Server 2016 must be installed on this machine in order to host the SCADA database. SQL Management Tools must be installed along with the SQL Server, in order to provide access to the Microsoft SQL Server Management Studio.
Enable the TCP/IP protocol in the SQL Server Network Configuration section of the SQL Server Configuration Manager

Set the SQL Server Browser to Automatic start and make sure it’s running (in the SQL Server Services section of the SQL Server Configuration Manager, as follows:
Select the SQL Server Browser Properties option and set the Start Mode to Automatic, under TAB Service.

Check the SQL Server Browser status and make sure it is in status Running. In case it did not start, click right and select the option Start.

Restart the SQL Server service in the SQL Server Configuration Manager

Find out what ports are used by the SQL Server, as follows:
Open the SQL Server Management Studio
Open the Management folder
Open the SQL Server Logs folder
Select the Current log file and click right to open the Log Filter Viewer dialog.

In the Log Filter Viewer dialog select the Filter toolbar option or the View filter settings linkable field.
The Filter Settings dialog is opened allowing you to input the text “server is listening on” in the Message Contains Text field and Enable the Apply filter option.

Press the OK button. The SQL Server port number will be displayed in the logs as listened to.

Allow inbound and outbound port rules for port 1433 for both TCP and UDP protocols, as follows:
Open Windows Defender Firewall.
Click on the Advanced settings option.

The Windows Defender Firewall with Advanced Security dialog is opened.
Select the Inbound Rules menu entry and click on the New Rule option.

The New inbound Rule Wizard dialog is opened. In this view select the Port option and press the button Next.

Add in the "Specific local ports" field the TCP port number 1433. Click again the Next button.

Make sure that option Allow connection is selected and press the Next button.

In the next window select the desired location where the new rule should be applied (by default, all options are selected). Click again the Next button.
Define a Name and Description for the new Inbound TCP Rule and click the Finish button.

Next, add the Inbound UDP Rule for the 1433 port described above.

Repeat the steps described above, for the Outbound TCP and UDP Rules, under the Outbound Rules menu entry of Windows Defender Firewall.

Allow inbound and outbound port rules for port 1434 for both TCP and UDP protocols, as follows:
Open Windows Defender Firewall.
Click on the Advanced settings option.

The Windows Defender Firewall with Advanced Security dialog is opened.
Select the Inbound Rules menu entry and click on the New Rule option.

The New Inbound Rule Wizard dialog is opened. In this view select the Port option and press the button Next.

Add in the "Specific local ports" field the TCP port number 1434. Click again the Next button.

Make sure that option Allow connection is selected and press the Next button.

In the next window select the desired location where the new rule should be applied (by default, all options are selected). Click again the Next button.
Define a Name and Description for the new Inbound TCP Rule and click the Finish button.

Next, add the Inbound UDP Rule for the 1443 port, as described above.

Repeat the steps described above, for the Outbound TCP and UDP Rules, under the Outbound Rules menu entry of Windows Defender Firewall.

Allow inbound and outbound port rules for the SQL Server port (in our case, 49741) for both TCP and UDP protocols, as follows:
Open Windows Defender Firewall.
Click on the Advanced settings option.

The Windows Defender Firewall with Advanced Security dialog is opened.
Select the Inbound Rules menu entry and click on the New Rule option.

The New Inbound Rule Wizard dialog is opened. In this view select the Port option and press the button Next.

Add in the "Specific local ports" field the TCP port number 49741. Click again the Next button.

Make sure that option Allow the connection is selected and press the Next button.

In the next window select the desired location where the new rule should be applied (by default, all options are selected). Click again the Next button.
Define a Name and Description for the new Inbound TCP Rule and click the Finish button.

Next, add the Inbound UDP Rule for the 49741 port described above.

Repeat the steps described above, for the Outbound TCP and UDP Rules, under the Outbound Rules menu entry of Windows Defender Firewall.

Last but not least, make sure that the Network Discovery is enabled for the network you are connected to, as follows:
Go to Control Panel and select the option Network and Internet.
Select the Network and Sharing Center and click on the Change advanced sharing settings.

In the Advanced Sharing settings make sure that the Network discovery and/or File and printer sharing are turned ON, for your current profile.

Tip
Changes at the level of Network discovery can be lost after saving them if the dependency services are disabled. Please make sure the following services are enabled and running:
DNS Client
Function Discovery Resource Publication
SSDP Discovery
UPnP Device Host.
Further details for troubleshooting such issues can be found on the forum linked here.
Setting up the i4scada Server (SCADA2)
The SCADA server must be configured with the standard SCADA prerequisites. Some of those, like IIS, may not actually be used in the final three-way SCADA setup, but are still required by the i4scada Setup.
Tip
Please refer to the i4scada Setup tutorial for more details about the steps required for this installation.
To set up the SCADA Server the following steps should be processed:
Install i4scada as a normal installation, including all required prerequisites: Windows Roles and Features (IIS and .NET Framework 3.5 and 4.7). Some features may be available only after the initial installation.
Note
The SQL Server setup part of the i4scada installation can be skipped since we will use the Database Server’s SQL.
Make sure that the i4scada Studio can connect to the Database Server SQL database, as follows:

Open the Command Prompt application on the i4scada Server machine (SCADA2). and
Ping the IP of the DB server - e.g. Ping [database server ip].
Tip
The local IP can be identified using the Ipconfig command.
If there is a network communication between the 2 machines the ping command should output:
C:\Users\vagrant>ping 19x.16y.xx.yy (the IP of the Machine where the SQL is installed - SCADA1)
If the connection was successfully working the result should be something like:
Pinging 19x.16y.xx.yy with 32 bytes of data:
Reply from 19x.16y.xx.yy: bytes=32 time=2ms TTL=128
Reply from 19x.16y.xx.yy: bytes=32 time<1ms TTL=128
Note
Since i4scada was not installed on the Database Server, the Demo Project DB will not be present on the Database Server. Either restore a SCADA database on the Database Server and connect to it from the SCADA Server’s Studio or create a new SCADA DB using Studio’s interface.
Set the remote SCADA DB as the default Studio DB once connected to it (either via the initial dialog or from the Database Access section of the Settings area), as follows:
Copy the SCADA Database name.

Use it to replace the Database server so that we can connect to the newly created database.

Next, open the Registry Editor application and export the DSN registry key from HKEY_LOCAL_MACHINE\SOFTWARE\Wow6432Node\WEBFACTORY\WFSERVER\2.00\Settings and store it for later use.

Edit the Scada.CommunicationManager.Server.exe.config file with a text editor. This file can be found through the path [your-install-location]/i4scada\Server\CommunicationManager).

Locate the CommunicationWebClientService and the TraceContributorService services and enable (un-comment) the TcpEndpoints.

Tip
Optionally, the port 4600 exposed by the communication manager for web services can be modified. If so, the modification should be done for both CommunicationWebClientService and TraceContributorService services.
Allow the Scada.CommunicationManager.Server.exe located at C:\Program Files (x86)\i4scada\Server\CommunicationManager\ to communicate through the firewall, as it needs inbound connections to the default port (or to the custom port if modified above).

Copy the _SERVICES folder and clientaccesspolicy.xml from the wwwroot folder of the IIS to a shared network location so it can be transferred later to the Web Server.
Start the SCADA Server using the i4scada Service Manager.

Last but not least, make sure that the Network Discovery is enabled for the network you are connected to, as follows:
Go to Control Panel and select the option Network and Internet.
Select the Network and Sharing Center and click on the Change advanced sharing settings.

In the Advanced Sharing settings make sure that the Network discovery and/or File and printer sharing are turned ON, for your current profile.

Tip
Changes at the level of Network discovery can be lost after saving them if the dependency services are disabled. Please make sure the following services are enabled and running:
DNS Client
Function Discovery Resource Publication
SSDP Discovery
UPnP Device Host.
Further details for troubleshooting such issues can be found on the forum linked here.
Setting up the Web Server (SCADA3)
The Web Server machine will run the IIS components of the i4scada setup, the web services. To wrap up the final part of this tutorial, please organize the following steps:
Fully install the IIS with all its components on the machine.
Install the .NET Framework 3.5 complete feature set.
Install .NET Framework 4.7 complete feature set.
Note
Make sure that the following IIS .NET Framework settings are fully installed:
HTTP Action
Non HTTP Action
HTTP Activation
Copy the _SERVICES folder and the clientaccesspolicy.xml file that you saved on the i4scada Machine earlier (see step 8). Save them on the Web Server machine (SCADA3) under C:\inetpub\wwwroot.
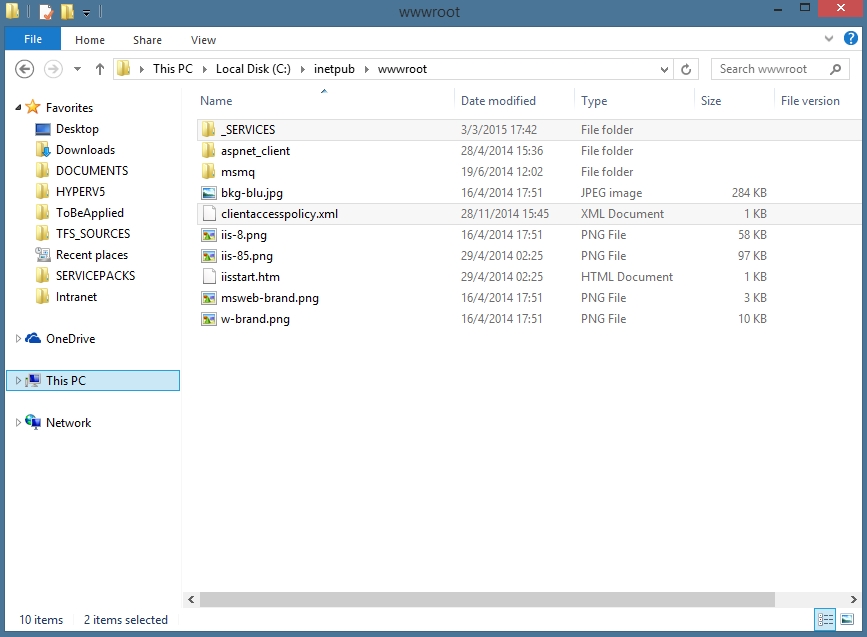
Copy the DSN registry key exported earlier (see step 4), execute it and add the key to the Web Server machine registry.

Note
In case you are using multiple projects, the DSN Registry Key needs to be updated on the web webserver to be in sync with the project used by the SCADA server. Therefore, please copy the DSN Registry Key from the server and update it on the web server machine.
In IIS create an i4scada app pool with .NET CLR Version v4.0.3xxx and Integrated pipeline mode. The i4scada Application Pool needs to be created in order to be used by the web services copied at the previous step.
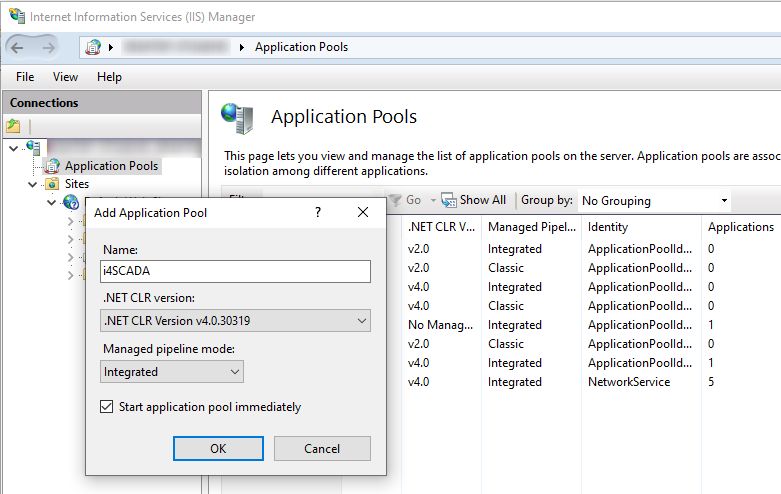
Back in the Application Pools page, select the new i4scada_AppPool and click the Advanced Settings... option from either the contextual menu or the Actions panel. Set the Enable 32-Bit Applications to True, the Queue Length to 4000 , and the Identity to NetworkService.

Click OK to confirm the application pool settings.
Now the new i4scada_AppPool needs to be applied on the Default Web Site. Select the Default Web Site from the Connections panel and click on the Basic Settings... option from the Actions panel.

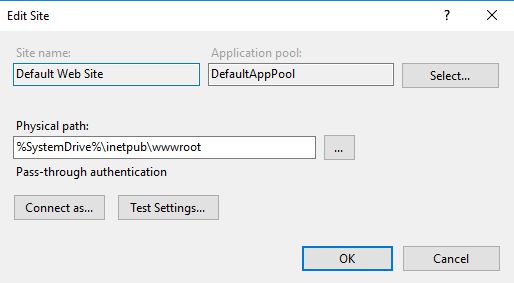
In the Edit Site dialog, click on the Select... button from the Application pool area to select the new application pool.
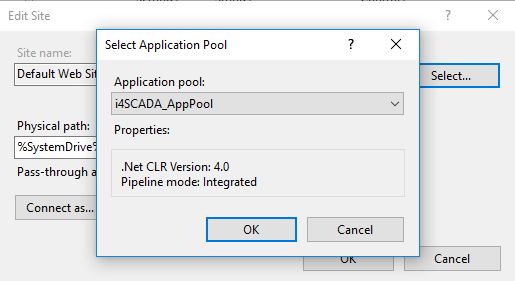
In the Select Application Pool dialog, select the i4scada_AppPool and confirm the two opened dialogs by clicking the OK buttons.
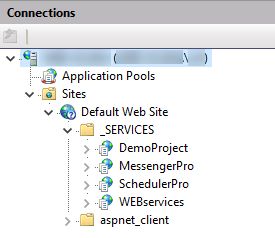
Expand the _SERVICES folder under the Default Web Site and convert to application these folders: DemoProject, MessengerPro, SchedulerPro, and WEBservices.
Go to Web.config file inside the _SERVICES/WEBservices folder located at C:\inetpub\wwwroot\_SERVICES\WEBservices\ and perform the following actions:

Disable (comment out) the CommunicationWebClientService net.pipe endpoints.
Enable (uncomment) the CommunicationWebClientServicenet.tcp endpoints.
Note
Please note that it is also possible to use "HTTP" as a communication protocol. In order to enable it, please make sure to uncomment the CommunicationWebClientService HTTP endpoints.
In the two uncommented endpoints (net.tcp or HTTP) replace the “localhost” reference in the endpoint address with the computer name used by the machine where the SCADA server is installed.
Important
If the web services port was modified when configuring the i4scada Server communication, use the new port when configuring the net.tcp endpoints.
Next, open the Client.config file located at C:\inetpub\wwwroot\_SERVICES\WEBservices\WCF\ with a text editor and perform the following actions:

Disable (comment out) the CommunicationWebClientService net.pipe endpoint(s).
Enable (uncomment) the CommunicationWebClientService net.tcp endpoints. In the uncommented net.tcp endpoints, replace the “localhost” reference in the endpoint address with the name of the SCADA Server.

Note
Please note that it is also possible to use "HTTP" as a communication protocol. In order to enable it, please make sure to uncomment the CommunicationWebClientService HTTP endpoints.
Open a Command Prompt terminal using Administrator privileges and run the following commands one by one to disable the IIS logging:
%windir%\System32\inetsrv\appcmd unlock config /section:httpLogging

%windir%\System32\inetsrv\appcmd set config "Default Web Site/_services" /section:httpLogging /dontLog:true

iisreset
Install the SQL2008NativeClient from the Prerequisites folder of the i4scada Setup. This is required in order for the web services to communicate with the SQL database.
Tip
The SQL2008NativeClient can be found under the i4scada Prerequisites folder.
Last but not least, make sure that the Network Discovery is enabled for the network you are connected to, as follows:
Go to Control Panel and select the option Network and Internet.
Select the Network and Sharing Center and click on the Change advanced sharing settings.

In the Advanced Sharing settings make sure that the Network discovery and/or File and printer sharing are turned ON, for your current profile.

Tip
Changes at the level of Network discovery can be lost after saving them if the dependency services are disabled. Please make sure the following services are enabled and running:
DNS Client
Function Discovery Resource Publication
SSDP Discovery
UPnP Device Host.
Further details for troubleshooting such issues can be found on the forum linked here.
Testing an i4scada SmartEditor visualization on the three machine installation
Tip
If during the setup the listening port was changed, you might encounter some connectivity issues. Therefore, you might want to recheck and confirm that the port used for the TCP/UDP Inbound and Outbound rules is correct.
After processing all the above-described steps you can quickly check if the installation has been correctly organized, as follows:
Open the Machine where the i4scada Server is installed (SCADA2) and start the i4scada Server from the Service Manager application.
Open Studio and connect to the Database Server SQL database. (in our case the Data Base Server SQL was installed on the Machine named SCADA1).

Open the Test Center application and connect to the Web Server (in our case this was installed on the Machine named SCADA3).

Tip
In case the Server is not visible or cannot be applied in the Test Center application, you can alternatively open the Web.config file inside the _SERVICES/WEBservices folder located at C:\inetpub\wwwroot\_SERVICES\WEBservices\, and comment the "Documentation" lines, as follows:
<webServices><protocols><!--Comment the next line to enable WSDL metadata output for *.asmx web services<remove name="Documentation" />--></protocols></webServices></system.web>
After applying these changes add some Signals in order to check the connection between IIS and Web Services available on the IIS Machine, named SCADA3.

You can further check the three-machine installation using the Smart Editor application by creating a new project. Add to the SmartEditor project page some extensions (e.g i4-core, wf-alarm-viewer, and wf-sensor).
Open the Object properties panel of the i4-core extension and organize the following changes:
Go to property “Remote IIS Server Url” and input the WEB Server (SCADA3) machine name.

Publish the SmartEditor project. If all settings were correct the run-time project should be properly working.

Testing an i4designer visualization on the three machine installation
Tip
If during the setup the listening port was changed, you might encounter some connectivity issues. Therefore, you might want to recheck and confirm that the port used for the TCP/UDP Inbound and Outbound rules is correct.
To open an i4designer visualization on the three machine installation, please proceed as follows:
Open the Machine where the i4scada Server is installed (SCADA2) and expose the i4scada Synchronization Service.
To do that, you can add the "Synchronization" folder, to a folder shared with other computers in the same network.
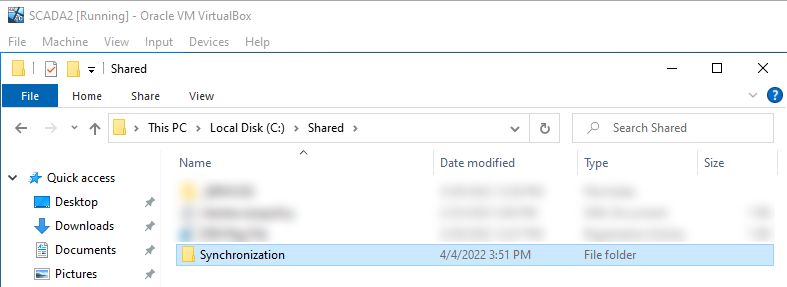
Next, open the Machine where the i4scada WebServer is installed (SCADA3) and copy the shared "Synchronization" folder, to a known location.
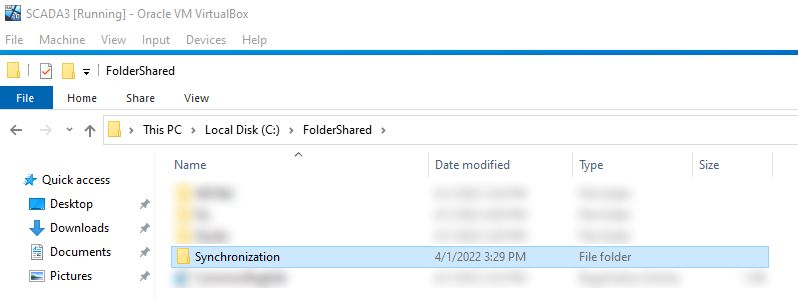
On the i4scada WebServer Machine (SCADA3), open the Windows Services application and find the "i4scada Synchronization Service". Make sure that it is in the status "Running".
Open the Machine where the i4scada Server is installed (SCADA2) and create a new empty folder under inetpub/wwwroot.

Open the new folder, and add a second empty folder.

Open i4scada Studio Application, on the SCADA2 Machine, and define your i4designer Project settings, under the Settings section, as follows:

Fill in your Project Token copied from the respective i4designer project.
Select the second created empty folder as Project Path.
Tip
For more details about the i4designer Project Settings, please also visit i4designer Section.
Next, start the i4scada Server from the Service Manager application, on the i4scada Server Machine (SCADA2).
After all the above steps have been done, let's publish the linked i4designer project.
Check the new folder on the SCADA2 Machine. The folder should be empty.
Now, check the inetpub/wwwroot folder on the SCADA3 Machine. The folders created on SCADA2 Machine were automatically cloned on the machine running the WebServices and the i4designer project contents were published here. You can now successfully open the i4designer visualization and proceed with further needed updates.