SmartEditor general functions tutorials
Check out this collection of technical and non-technical tutorials, seeking to teach you by example how to set up your SmartEditor project and use its functions.
Prerequisites for these guides:
i4scada 3.8 running the demo project
i4scada SmartEditor
Additionally, you can also check our video tutorial demonstrating how to use the i4scada Software suite, to directly control devices by writing values to their PLCs.
Writing Values to PLCs
Using SmartEditor on high-resolution screens
Check out this tutorial to learn how to adjust your view when using a high-DPI device, such as 4K or higher resolution monitors.
When using a high-DPI device such as a 4k and higher resolution monitor, one may encounter Smart Editor scaling issues (e.g.: elements are too small or too large, compared to the rest of the desktop). To resolve this issue, organize the following settings:
Install the i4scada application.
Go to This PC > Local Disc (C) > Program Files (x86) > i4scada > Smart Editor.
Scroll until reaching the SmartEditor application.
Click-right on the SmartEditor icon and select the Properties option from the contextual menu.
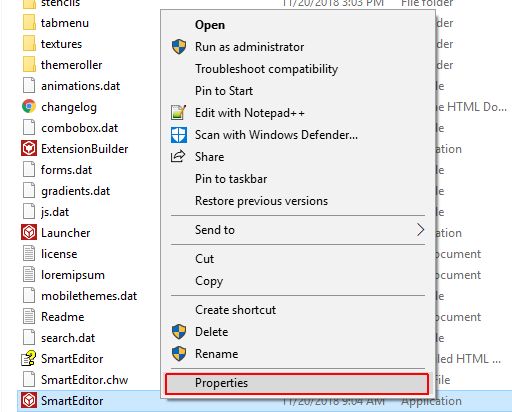
SmartEditor Properties
In the SmartEditor Properties window switch to TAB Compatibility.
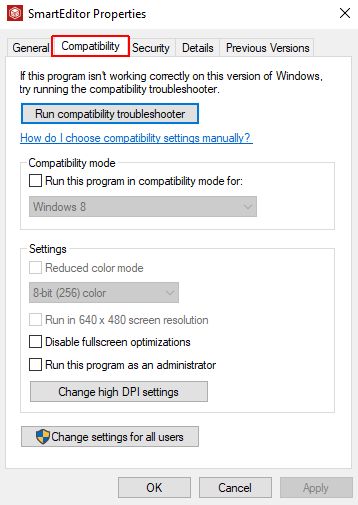
SmartEditor Compatibility
Click on the Change high DPI settings button.
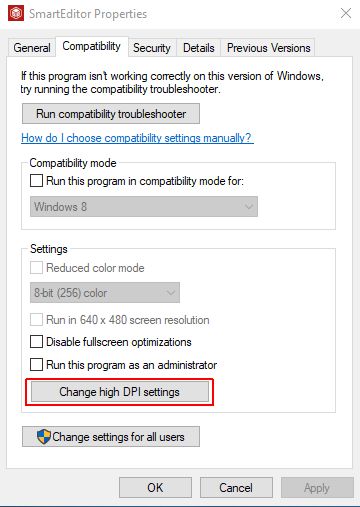
Change High DPI settings button
A new window is opened, which features the high DPI settings for the SmartEditor program. Mark the "Override high DPI scaling behavior" checkbox and select option "System" from the "Scaling performed by" drop-down list.
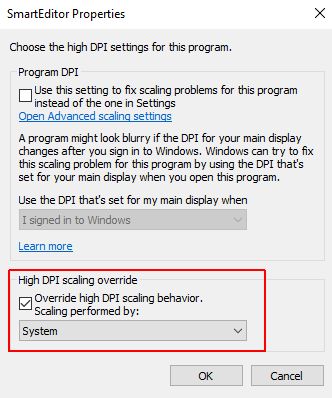
Override High DPI scaling
To preserve all changes click the button Ok. The high DPI settings for the SmartEditor program window are closed.
Select the button Apply and consequently Ok, in the SmartEditor Properties window.
Creating a simple HTML page navigation
Is this your first i4scada HTML page navigation? Check out this step-based tutorial and learn how to do it by yourself.
Follow the steps below to configure your first HTML5 visualization with page navigation:
Make sure that i4scada SmartEditor is opened with administrative privileges. This is required in order to be able to publish the project in IIS.
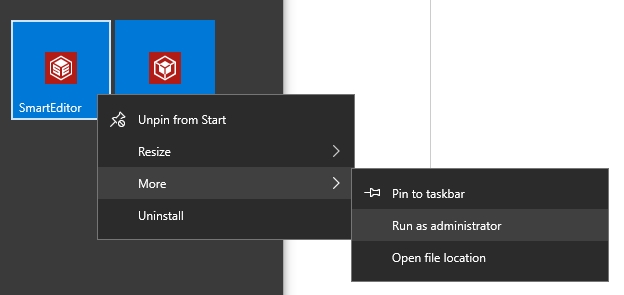
Run SmartEditor as Administrator
Using the Site Manager panel, add a new page on the same level as the default index page. This will be the first page to which we will navigate using the menu that will be added in the next steps.
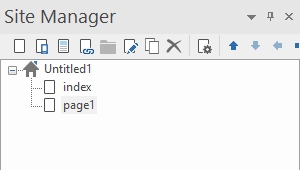
Site Manager panel
Open the previously added page and set it's Height and Width properties to 500 and 600 pixels.
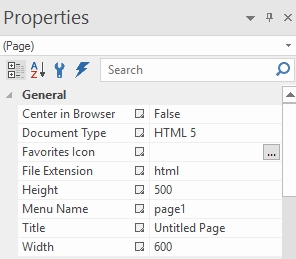
Page Properties panel
Add a Text extension on the page and set it as a title, so we can easily see on which page we are when navigating at run-time. Also add the wf-signal-information and wf-value-display extensions, to create a demo scenario for the navigation. Set both extensions to represent the Setpoint 1 signal (from the i4scada demo database). Set the wf-signal-information display to show the Name of the signal.
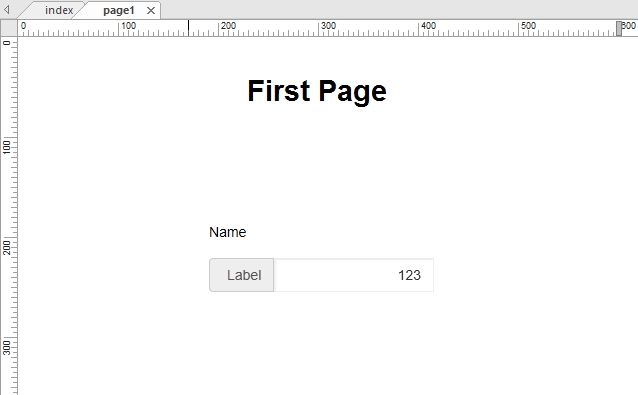
Setting i4scada extensions
Next we need to create the other two pages of our visualization, based on this first page. Using the Site Manager panel, select the page previously configured and click the Clone button from the panel's menu. Create 2 more pages by cloning the first one.
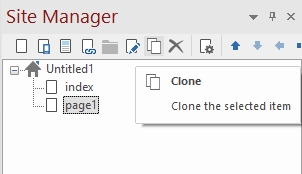
Clone page
Open the new pages and set their titles accordingly. Also modify the wf-signal-information and wf-value-display extensions to represent the signals Setpoint 2 for the second page and Setpoint 3 for the third page.
Now that we have our simple project created, we are ready to implement the navigation. Open the index page (the first page of the project) and add the Navigation Bar (the navigation menu), the Content Place Holder (the area in which the navigation pages will be displayed) and the wf-core extensions. The latter is required in order to make the connection to the WEBfactory 2010 Server and will be invisible at run-time.
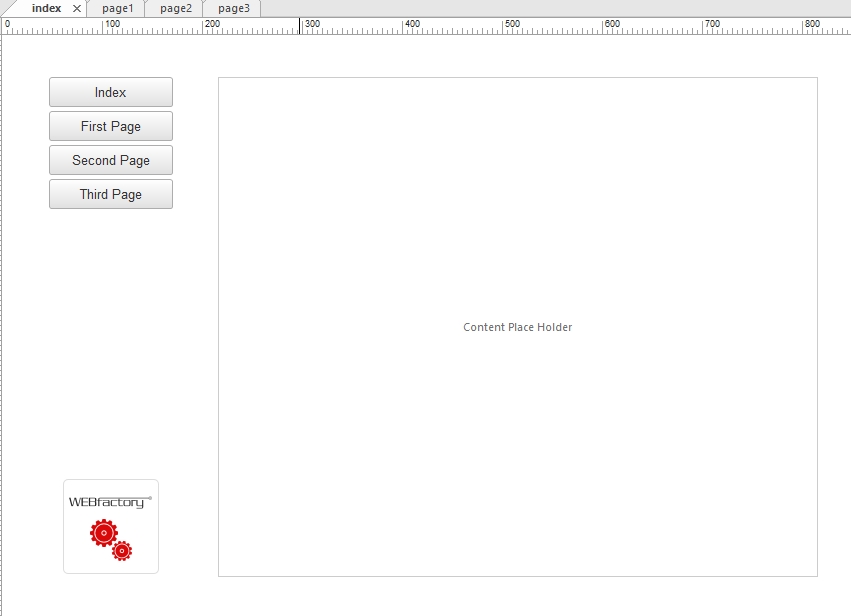
Setting up navigation
Using the Properties panel, set the Size of the Content Place Holder extension to be 600 pixels wide and 500 pixels high, just like we configured our navigation pages above.
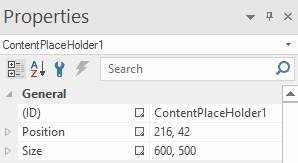
Configure the Content Placeholder extension Properties
To make the three navigation pages to be displayed in the Content Place Holder area, select each navigation page in the Site Manager panel, open the Page Properties panel using the dedicated Site Manager menu button, and set the Master Frame (Miscellaneous tab) option to use the index page (which contains the Content Place Holder extension).
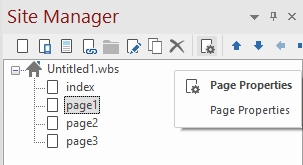
Open each Page Properties panel

Page Properties - setup Master Frame
Make sure to set the Master Frame option to the index page for each of the three navigation pages.
Next, we need to set up the navigation menu. Double click the Navigation Bar extension from the index page to open the properties window.
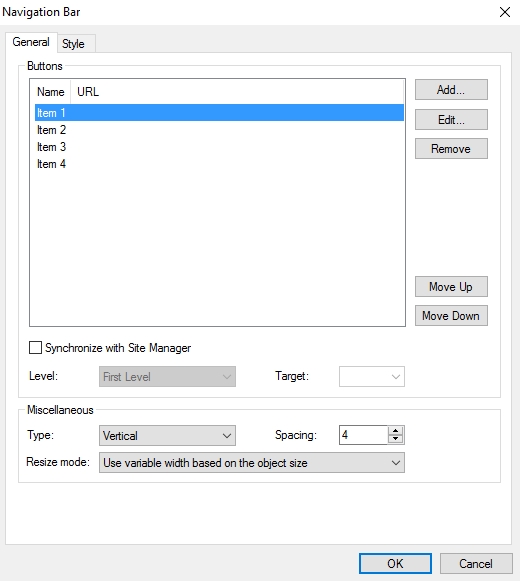
Navigation bar dialog
From the Navigation Bar Properties window, double-click the first button in the Buttons area to edit its properties. Set the Text property from the General area to Index. This will be the text displayed on the button for the homepage. Set the Page property from the Link area to our index page. This will create the link to the project's homepage.
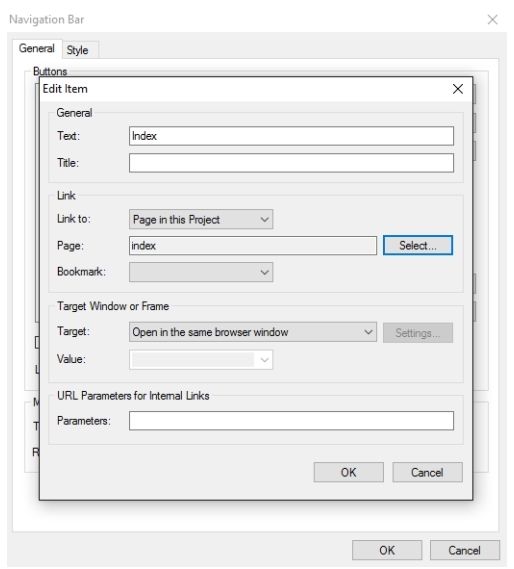
Navigation Bar - Setting up page properties
Repeat the same step for the other three buttons in the Navigation Bar properties window. Set each button to represent a navigation page. Optionally, you can check the User hover style to indicate the current page option in the Miscellaneous area of the Style tab, inside the Navigation Bar properties window.
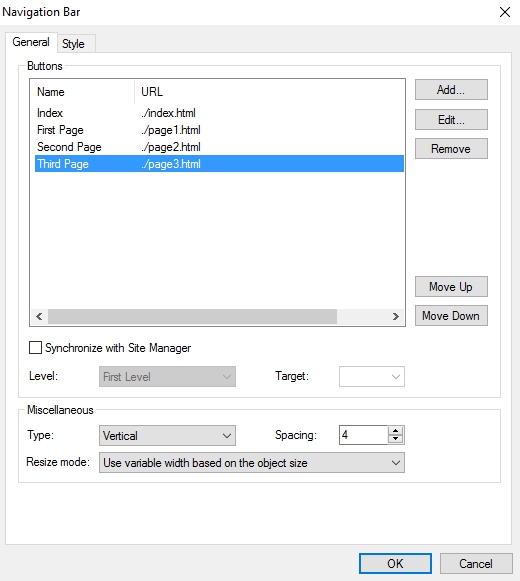
Navigation Bar - pages defined
The navigation setup is now complete. Publish the project to IIS using the Publish button from the ribbon menu. Note the URL displayed by the Publish Web Site dialog. This URL will be used to access the website. Click the Publish button to proceed.
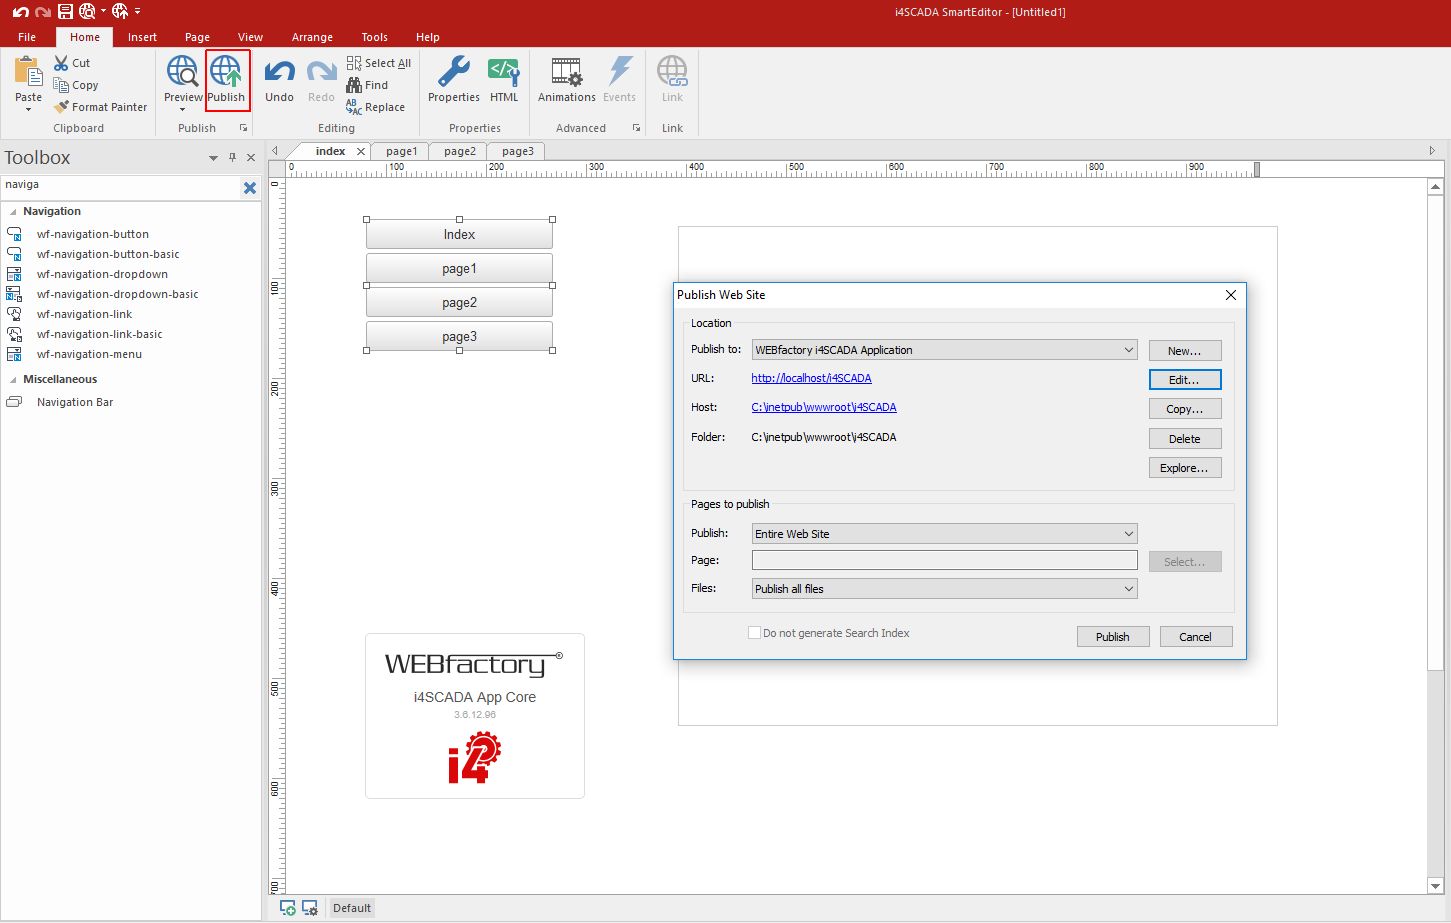
Publish Project to IIS
Important
If the i4scada SmartEditor was not opened as an Administrator, the site will not be published to IIS due to insufficient permissions.
Once the site is successfully published, access it in your browser of choice using the URL displayed in the Publish Web Site dialog. By default, the URL is http://localhost/i4scada/.
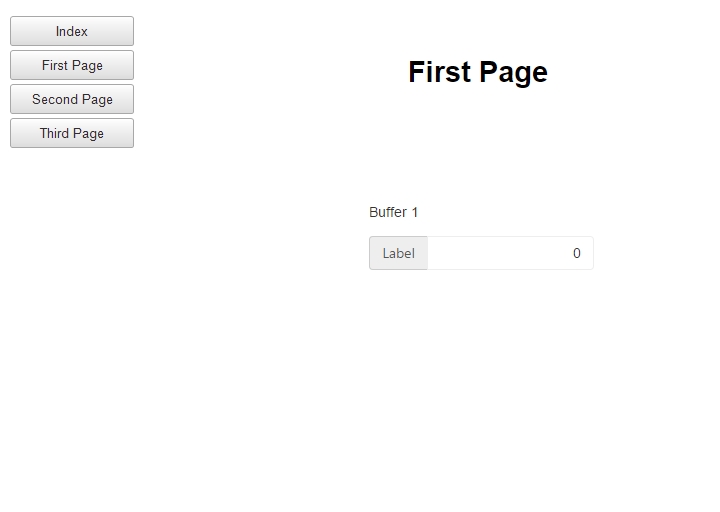
Published project (runtime view)
Creating a dynamic page navigation
Follow this guide to learn how to configure your navigation to use a single navigation page and pass parameters to it, to adjust its contents.
Now that you have the basic knowledge required to build navigation systems in i4scada SmartEditor, we can tap into more advanced features like dynamic page navigation and parameter passing. Follow the guide below to learn how to configure your navigation to use a single navigation page and pass parameters to it in order to adjust its contents.
To exemplify the parameters based navigation, we will use the project created above and modify it to fit the new requirements. The first step is to remove the second and third navigation pages using the Delete button from the Site Manager's menu. This will leave us with just the index page and one navigation page.
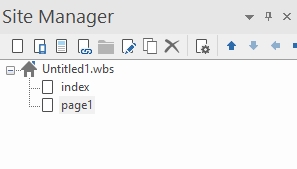
Starting new project with 2 navigation pages
This single navigation page will change its contents based on the parameters we are about to define. Double-click on the Navigation Bar extension from the index page to open the Navigation Bar properties window. As we have deleted the second and third navigation pages, we need to update the corresponding navigation buttons to point to our single navigation page.
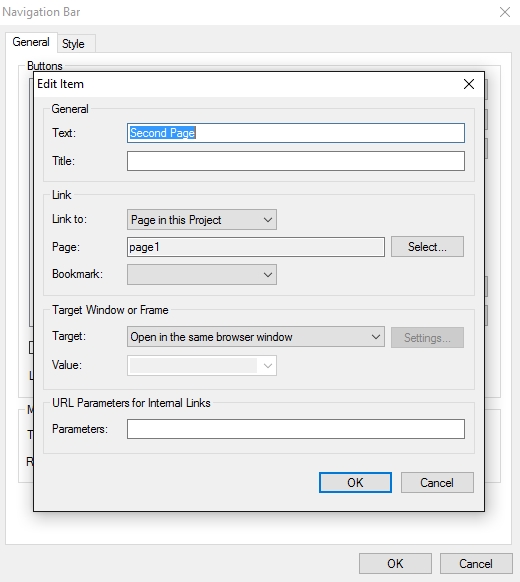
Adjust the Navigation Bar to fit new project (step 1)
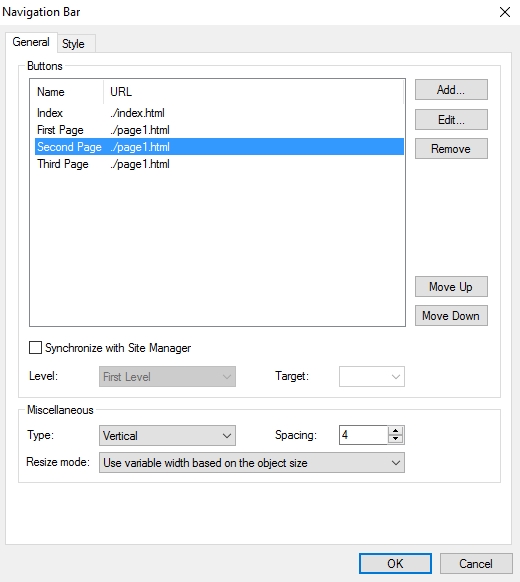
Adjust the Navigation Bar to fit new project (step 2)
Now all the navigation buttons (except the Index button) point to the same page. In order to have the correct content on this navigation page when accessed from each buttons, we need to configure the parameters to be passed by each navigation button. Double-click the First Page button to edit its settings. In the Parameters property from the URL Parameters for the Internal Links area, we will define the title and signal parameters. For this, we will use the standard HTTP request syntax:
title=First Page&signal=Setpoint 1.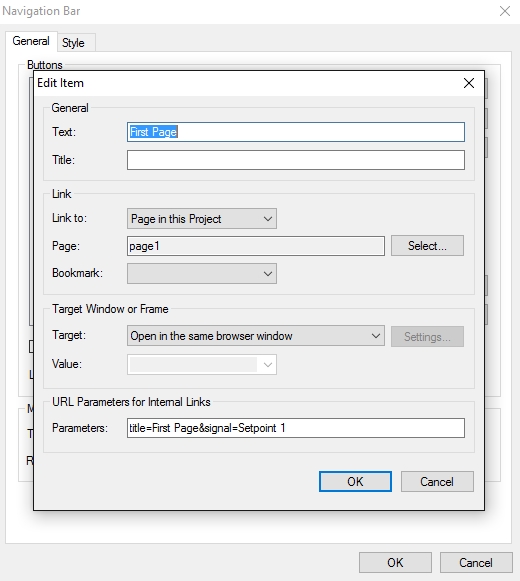
Configure Page Parameters
Repeat the same configuration for the other two navigation buttons, adjusting the values of the parameters as follows:
Second Page button:
title=Second Page&signal=Setpoint 2Third Page button:
title=Third Page&signal=Setpoint 3
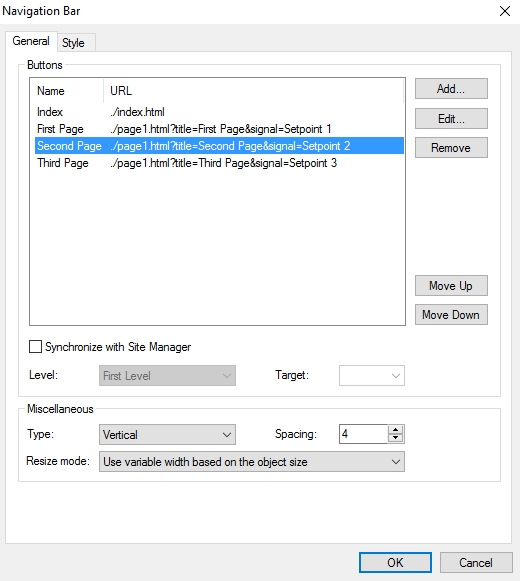
Navigation Bar pages configured
Now that the parameters are configured in our navigation buttons, we need to edit the navigation page and make it receive the parameters as expected. For this, we will use the parameter placeholder called Parameter Control [PC:ParameterName]. Edit the Text extension of the navigation page and change its contents to the placeholder for the title parameter: [PC:title].
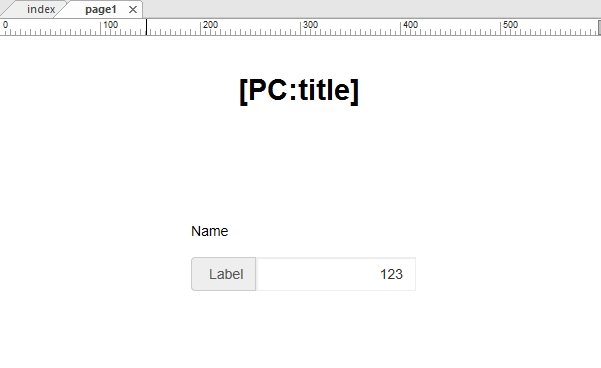
Edit Text extension
Next, change the Signal Name properties of both wf-signal-information and wf-value-display extensions to point to the parameter placeholder for our signal parameter:[PC: signal].
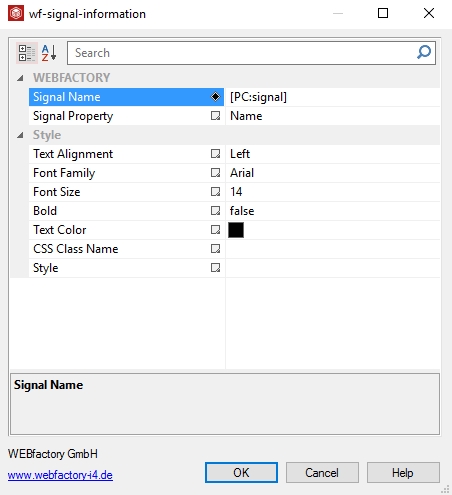
Edit wf-signal-information extension
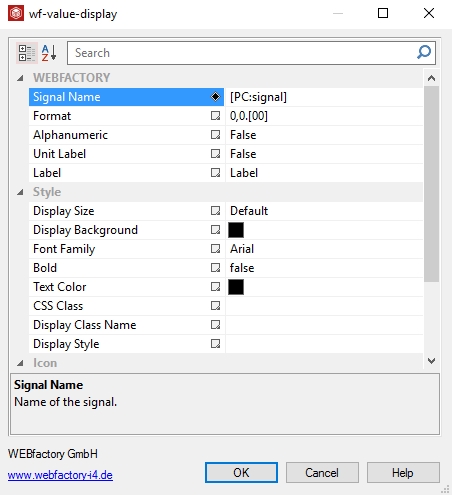
Edit wf-value-display extension
Publish the project and access it using the browser. The parameter placeholders will be automatically replaced by the values sent by the navigation buttons. The site will work just if each navigation button points to a different page, but will use only one navigation page, with only one set of configured extensions, to achieve this.
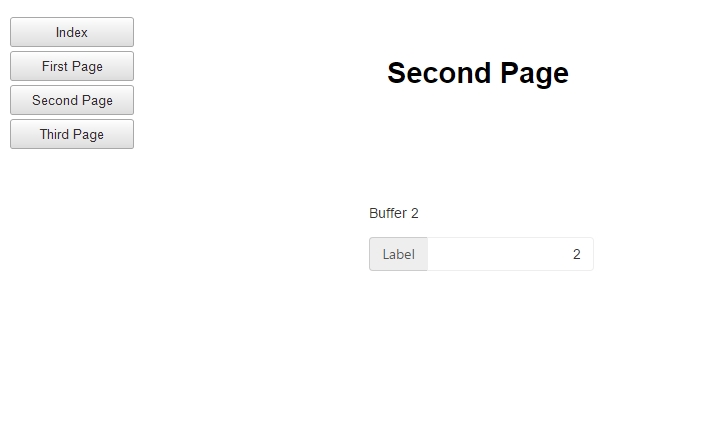
Published Project (runtime view)
Using Master Frames
Enhance your i4scada SmartEditor project with Master Frames, by following up this easy-6-steps tutorial.
In your new project, start by creating a new page and name it master-frame. This is just another top-level page in your project.
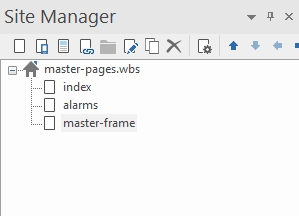
Add new page - master frame page
In the new master-frame page, add the header, footer, and any other persistent elements. The project's navigation should be set up here, in the master-frame. The wf-core extension, required by every WEBfactory SmartEditor extension, should be also placed here, in the master-frame. Since the wf-core is invisible at run-time, it can be placed anywhere on the page.
Important
Since the contents of the master-frame page will be merged with the other project pages when published, make sure to have unique IDs for each element in the master-frame page. One good advice would be to prefix each object ID with master_.
Add the Content Place Holder extension and position it where you want to show the content of the other project pages.
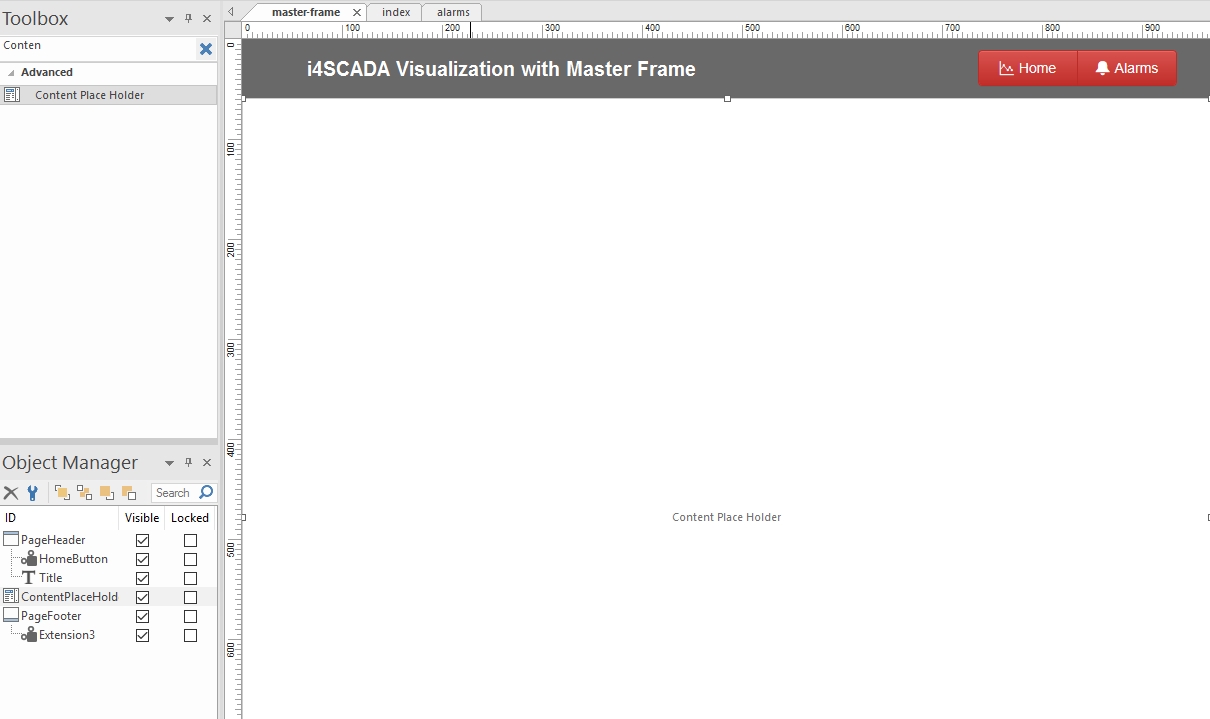
Master Frame - Content Place Holder
Tip
You can lock the Content Place Holder position once you placed it properly by right-clicking on the extension and selection Lock, or by pressing Ctrl + L.
Use the Content Place Holder properties dialog to set up how the content should be displayed. You can control properties like Overflow, Alignment, background and border styles as well as frame shadow.
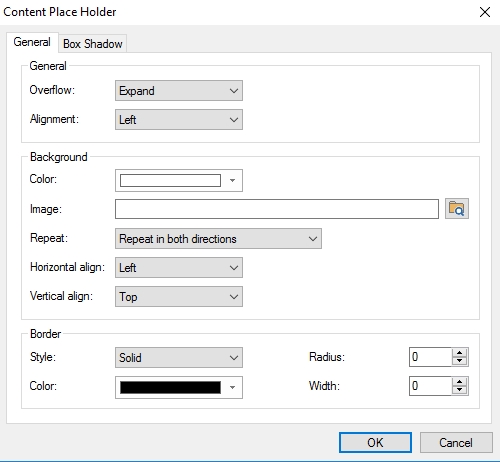
Content Place Holder Properties dialog
If using Layout grids in your project, make sure to set the Overflow option of the Content Place Holder to Floating. This will make the Content Place Holder and any content inside it to become a part of the floating layout.
The final step for setting up the Master Frame based project is to tell every page in the project which master to use. Use the Site Manager to access the page properties and navigate to the Miscellaneous tab. Set the Master frame option to point to the master-frame page from your project.
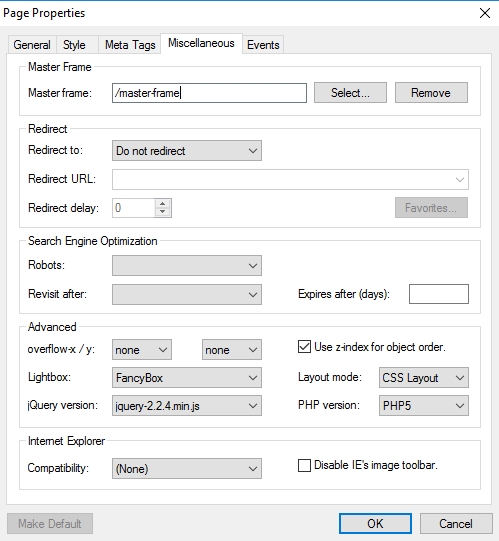
Add master-frame to other page properties
Publish your project as usual. All the persistent elements inside the master-frame will be displayed no matter which page you're navigating to.
Using Master Objects
Follow the easy steps in this tutorial to add Master Objects to your i4scada SmartEditor project.
In your SmartEditor project, create a new page to contain the objects you want to carry over to other project pages. Name it master objects.
Place the extensions in the new master-objects page in the top-left corner of the page. This way, the Master Objects extension won't display any padding when showing the objects on other pages.
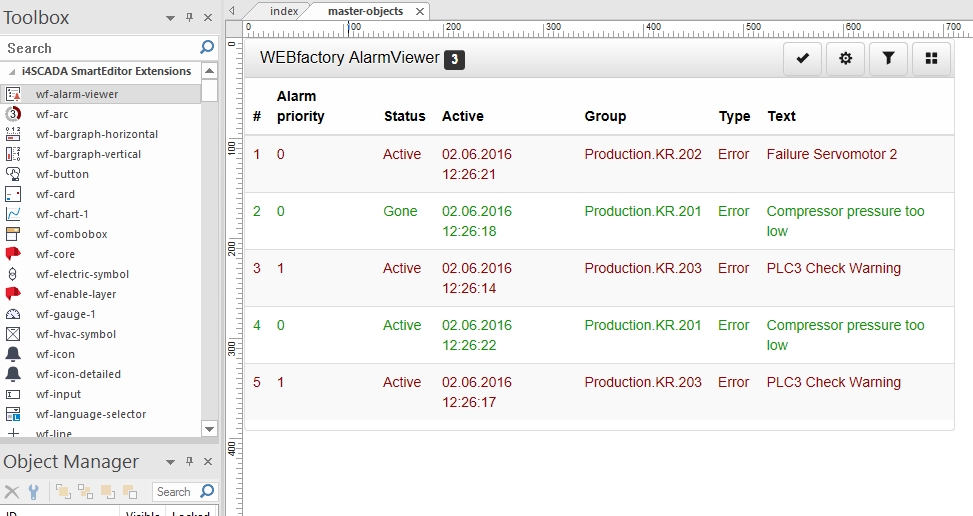
Master-objects page
Important
Since the extensions of the master-objects page will be merged with the pages where it will be displayed, make sure to have unique IDs for each element in the master-objects page. One good piece of advice would be to prefix each object ID with master_.
On a different project page, where the extension from the master-objects page should be displayed, add the Master Objects extension. Position it where you would like the original object to be displayed and double click on the extension to select the page holding the original object.
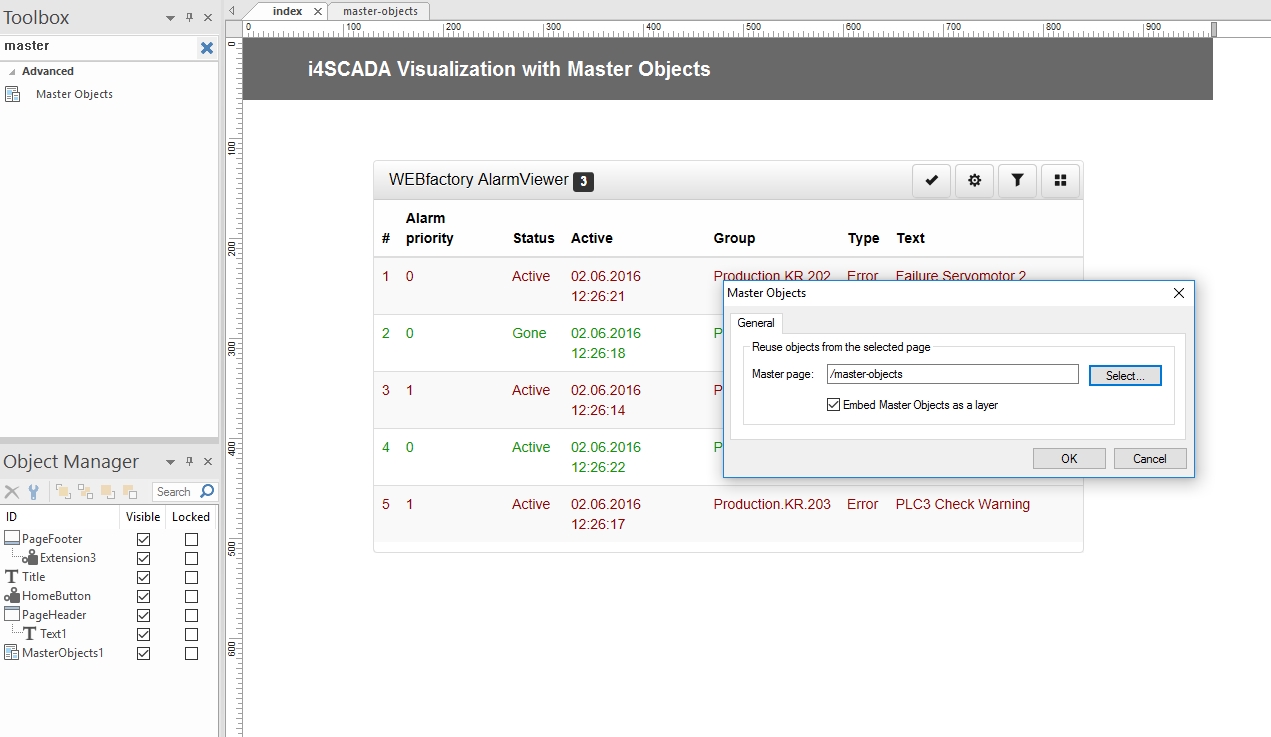
Add the Master-Objects extension
The extension inside the master-objects page is now displayed on the index page. The same procedure can be used to insert this extension on any project page. When editing the extension, only the master-objects page needs to be accessed.
The master-objects page can be excluded from publishing because its only purpose is to host the extensions displayed by the Master Object extension.
Using Parameters in Modal dialogs
This user-friendly tutorial guides you on how to pass parameters when setting up a simple project with modal dialogs.
SmartEditor allows you to pass parameters when using modal dialogs. This article describes how to set up a simple project with modal dialogs and parameters. Follow the next steps to learn how to master parameters in SmartEditor.
The base project
To showcase the modal dialogs and the power of parameters, we need to start with a project. Our simple project will feature two HVAC graphics representing two burners, each with its own wf-modal-dialog-button. As usual, the i4-core extension needs to be present on the main project page.
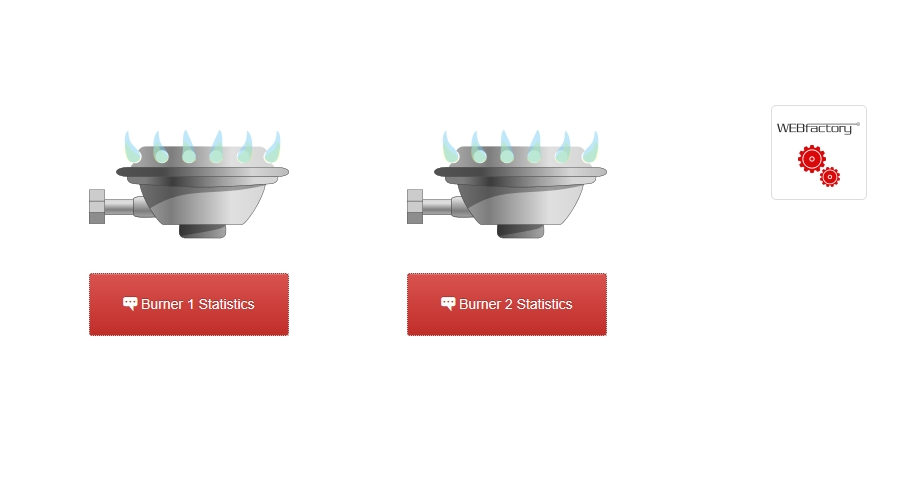
Base project for using Parameters in Modal Dialog
The modal dialog
Before configuring any of our extensions, let's create the modal dialog page, which will contain the extensions showing the statistics for our burners. Since we plan to use parameters to drive the modal dialog extensions, we only need to create one dialog page.
Create a new page at the root level of the project and name it dialog.
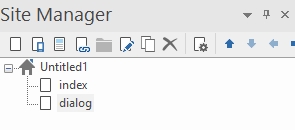
New project page - dialog
Open the Page Properties (right-click on the new page > Page Properties) and set the Page Width to 500 pixels and Page Height to 300 pixels.
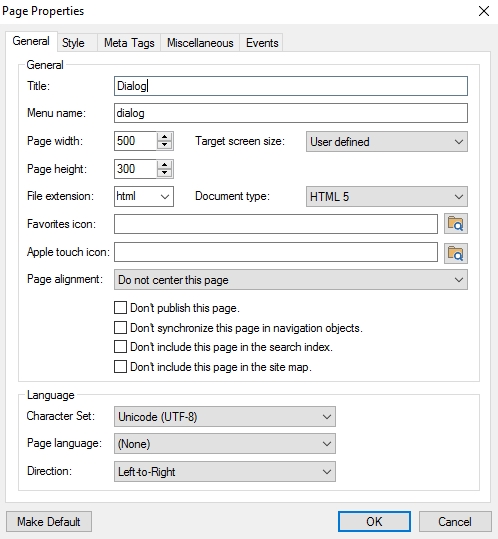
Page properties dialog
On the new dialog page, add the extensions that will display the burner's details:
a Text extension for the dialog's title
two wf-value-display extensions for showing the Temperature and Consumption of the burner
an HVAC graphic representing the burner.
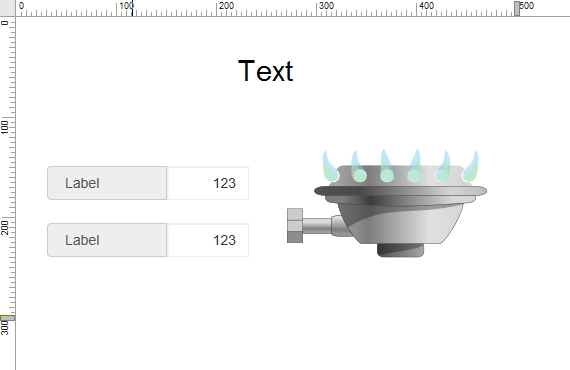
Populate the new Dialog page, with extensions
The modal dialog source page does not require the wf-core extension since it will use the one from the page calling the dialog (the main project page in our example).
Configuring the main page extensions
Now that our main project elements are created, we need to configure the extensions to make them work. We will start with the wf-modal-dialog-button extensions from the project's main page.
Open the properties dialog of the first wf-modal-dialog-button extension and modify the Button Text property to Burner 1 Statistics.
In the Modal Dialog Source property, make sure that the dialog.html page is selected. This means that the button will open our new dialog page when clicked.
Set the Content Width and Content Height properties to the same values as the dialog page width and height (width 500 pixels and height 300 pixels).
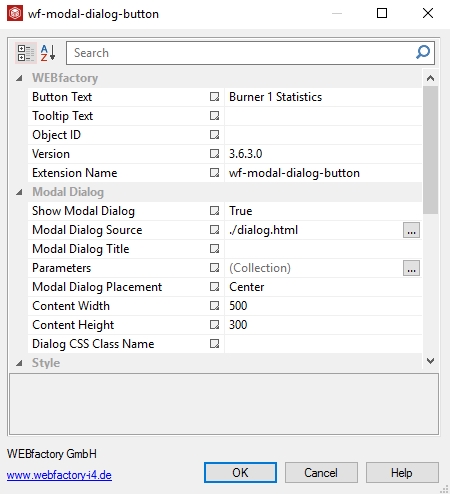
"wf-modal-dialog" Properties dialog
Next, we need to configure the parameters that we will be using on the dialog page. Click on the button corresponding to the Parameters property. This will open the Parameters dialog, allowing you to define the needed parameters.
Using the Add button from the top-right side of the dialog, add the following three parameters:
Parameter Name: Title, Value: Burner 1
Parameter Name: Temp, Value: 1
Parameter Name: Consumption, Value: 1
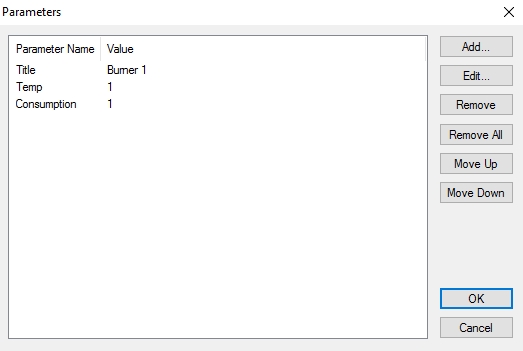
"wf-modal-dialog" Parameters
Note
The first parameter, named Title, will set the title of the modal dialog page and allow us to change it depending on the button that opens it. Given that the first wf-modal-dialog-button corresponds to the first burner, we will set the title to Burner 1.
The second parameter, named Temp, will define the suffix of the signal that will drive the temperature display inside the dialog page. Since we are using the Demo Database for this example, we will use the Temperature signals, thus the value of our first parameter will be 1.
The third parameter, named Consumption, will define the suffix of the signal that will drive the consumption display inside the dialog page. We will use the Setpoint signals for this extension, so for the first burner, the parameter will also have the value 1.
Next, we need to make a similar configuration to the second wf-modal-dialog-button extension, the one corresponding to the second burner. Since we already have the first button set up, we can simplify our work by duplicating the first button (that we have just configured) and removing the un-configured one. This way we only need to edit the properties of the duplicated button as follows:
Button Textt: Burner 2 Statistics
Title parameter: Burner 2
Temp parameter: 2
Consumption parameter: 2
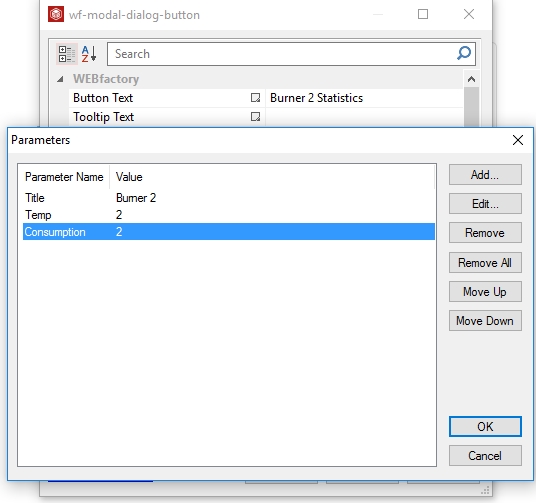
Second "wf-modal-dialog-button" configuration
Duplicating the already configured button is not mandatory but is considerably faster than configuring a new button from scratch. Especially while using a single modal dialog page source, modified by parameters. For example, the Modal Dialog Source and Content Width and Height are already configured.
Configuring the dialog page extensions
The only step remaining is making sure that the extensions from the dialog page will accept our parameters. Let's start configuring the extensions:
Edit the Text extension and input the parameter control placeholder for the Symbolic Text property: [PC:Title]. The placeholder is composed of two parts enclosed in square brackets:
the placeholder type, PC (parameter control)
the parameter name, Title in this case.
Next, double-click the first wf-value-display extension to open the extension properties dialog. We will need to set up the Signal Name property, taking into consideration the parameter we have defined as a signal name suffix. The name of the signal will be composed of a static prefix and the parameter placeholder for the Temp parameter: Temperature [PC: Temp]. While here, also edit the Label property to show Temperature.
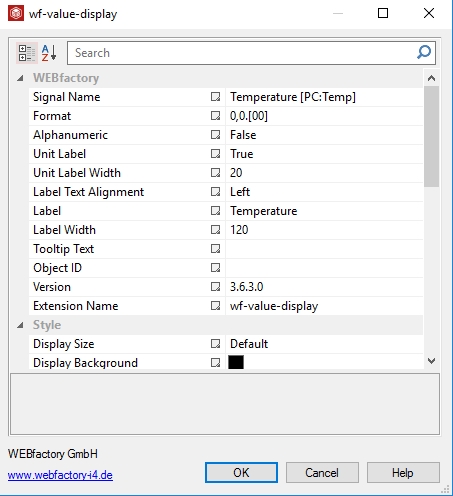
First "wf-value-display" extension configuration
We will configure the second wf-value-display extension in a similar way. Since this second value display will show the consumption of the burner, we will be using the Setpoint as a prefix for the Signal Name and the [PC: Consumption] placeholder for the Consumption parameter. Thus the value of the Signal name property of the second wf-value-display should be Setpoint [PC: Consumption]. Finally, set the Label property to Consumption.
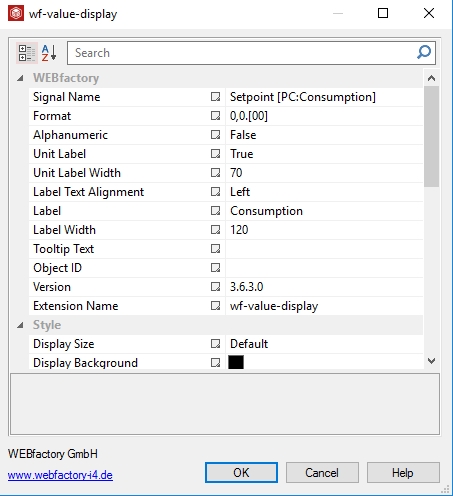
Second "wf-value-display" extension configuration
The configuration of our example project is now complete. Publish the project as usual and open the published visualization in the web browser of your choice. Clicking on the first button will open the dialog displaying the statistics for the first burner, while the second button will open the same dialog, this time showing the statistics for the second burner. All possible thanks to SmartEditor's powerful parameters.
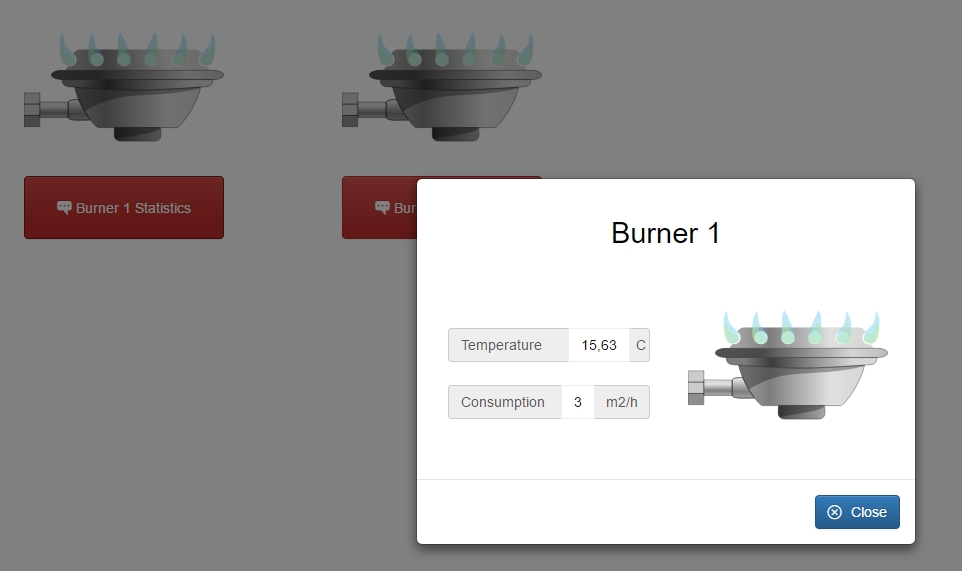
Published Project (Burner 1)
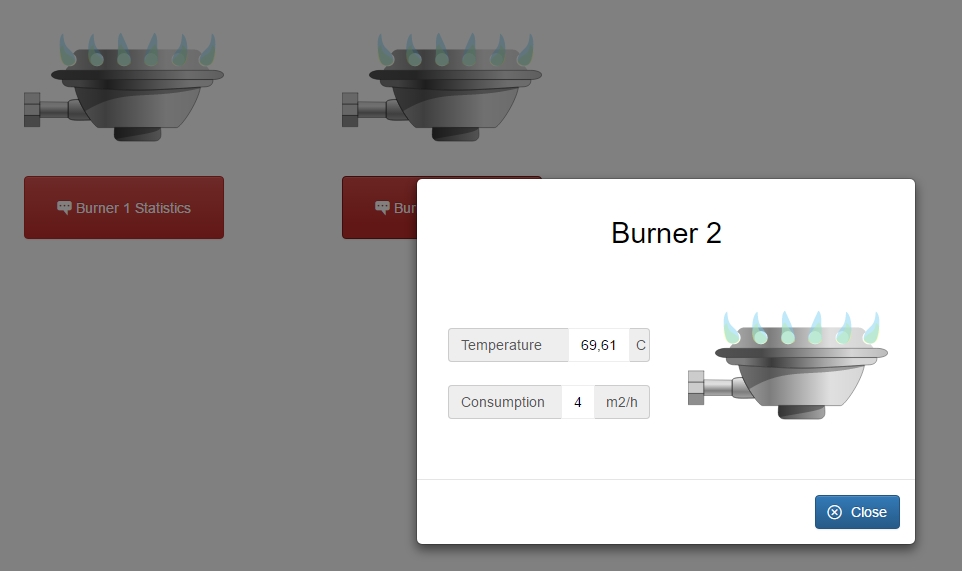
Published Project (Burner 2)
Using the Object ID [OID] parameter in Modal dialogs
Learn how to use an Object ID parameter to create a simple i4scada SmartEditor project using modal dialogs.
The scope of the present tutorial is to guide you through the necessary steps to create a simple i4scada SmartEditor project, using modal dialogs and the [OID] placeholder parameter.
Note
The present demonstration will use the "Level 1" Signal, included in the default WEBfactory i4scada Demo project.
The base project
Open the i4scada SmartEditor.
By default, the SmartEditor project features the index page.
Add the i4-core extension to the index page.
Add an HVAC graphic extension to the index page (for example, the wf-air-conditioner).
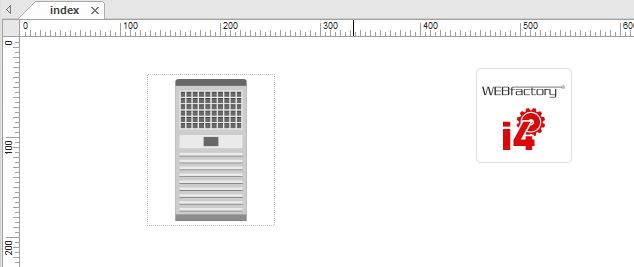
The modal dialog
The next part of our tutorial describes the steps to define a modal dialog page, for our project.
Create a new page at the root level of the project and name it dialog.

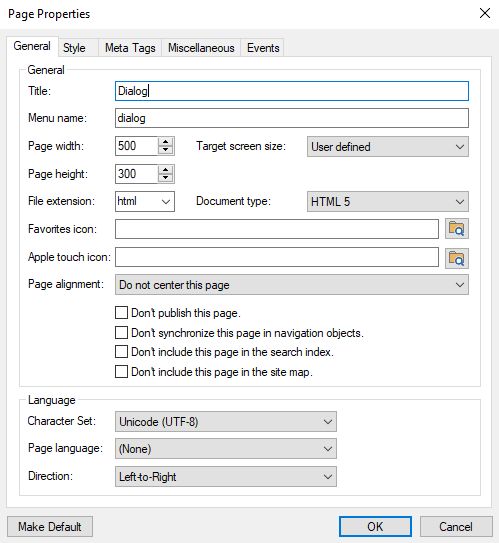
Open the Page Properties (right-click on the new page > Page Properties) and set the Page Width to 500 pixels and Page Height to 300 pixels.
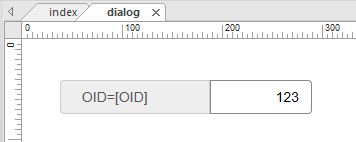
On the new dialog page, add a wf-value-display extension.
Configuring the main page extensions
As the main project page and the modal page have been defined, we can proceed with configuring the added extensions:
Open the index page.
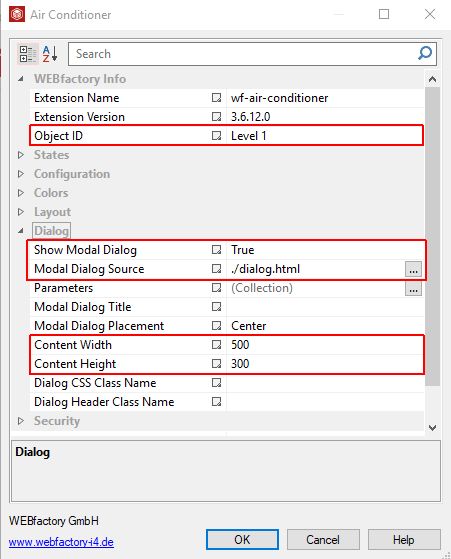
Open the Object Properties of the HVAC graphic extension.
Make the following changes:
Set value True for the Property Show Modal Dialog
Set the dialog.html page under the Modal Dialog Source property. This means that at run-time, the Air Conditioner extension will open our new dialog page when clicked.
Set value 500 for the Content Height property
Set value 300 for the Content Width property
Set the name of the signal, at property Object ID (in our case, we shall set the "Level 1" Signal).
Configuring the modal dialog page extensions
Switch to the dialog project page.
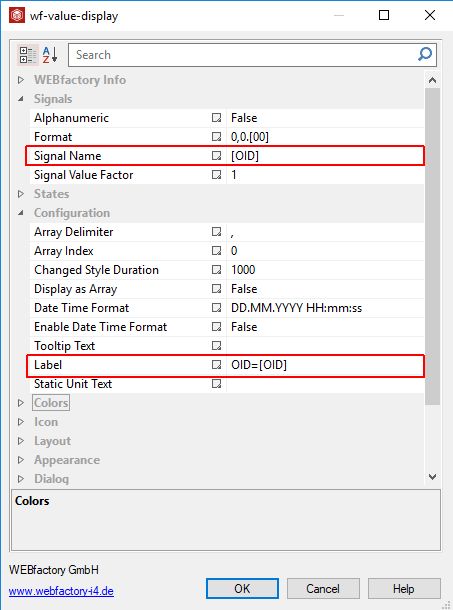
Open the Object Properties of the wf-value-display extension.
Make the following changes:
Set value [OID] for the Signal Name property.
Set value OID=[OID] for the Label property
Checking the project at run-time
Open the i4scada Service Manager and make sure that the i4scada Server is running.
Return to the SmartEditor and click the toolbar button Publish. The HTML output is processed.
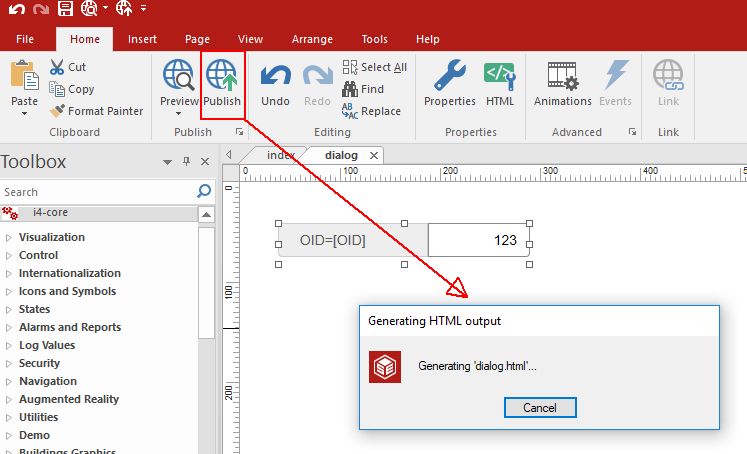
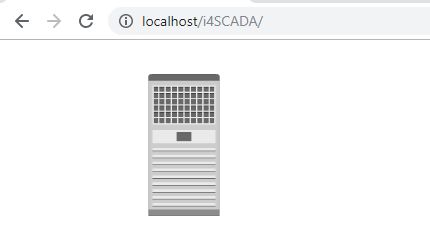
Open the published project in your preferred browser.
The published project displays the Air Conditioning extension.
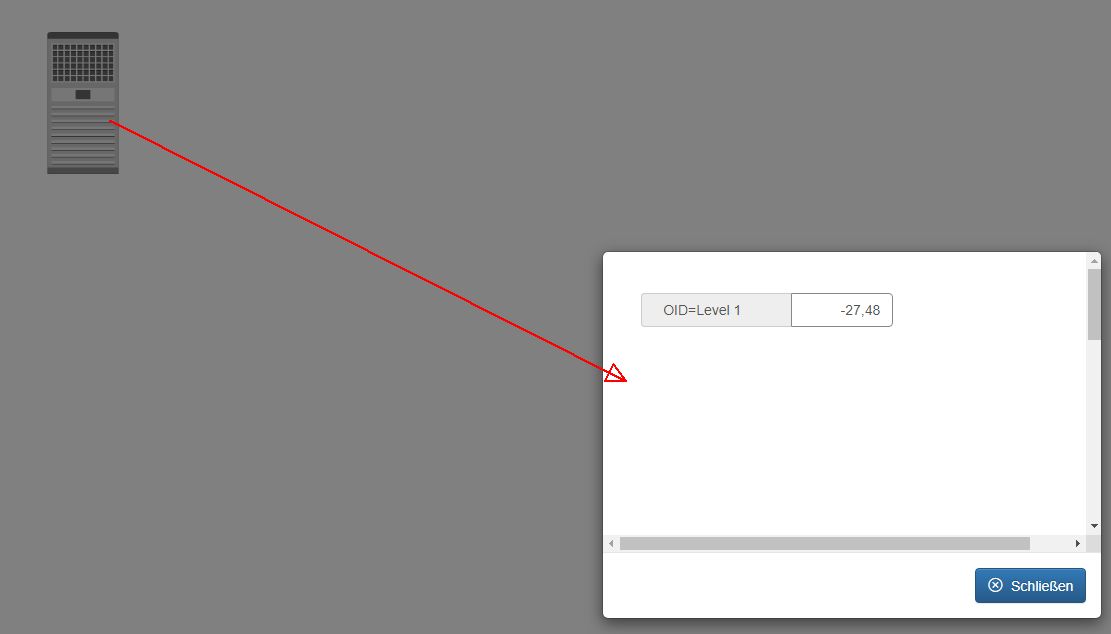
Click on the extension.
A modal dialog page is displayed. The label of the value display extension is replaced with the Air Conditioning extension Signal (Level 1). Also, the values are generated on basis of the set Signal (Level 1).
Using the Local Object ID [LocalOID] placeholder parameter
Check out this tutorial to understand the difference between the Local Object ID and the Object ID parameters.
The present tutorial has two scopes:
guide you through the steps of using the Local Object ID [LocalOID] placeholder, in modal dialogs;
demonstrate the difference between [LocalOID] and the Object ID [OID] placeholder.
NOTE
The present demonstration will use the "Level 1" and "Level 2" Signals, included in the default WEBfactory i4scada Demo project.
The base project
Open the i4scada SmartEditor.
By default, the SmartEditor project features the main project page (the index page).
Add the i4-core extension to the index page.
Add two HVAC graphic extensions to the index page (for example, the wf-air-conditioner).

The modal dialog
Create a new page at the root level of the project and name it dialog.

Open the Page Properties (right-click on the new page > Page Properties) and set the Page Width to 500 pixels and Page Height to 300 pixels.

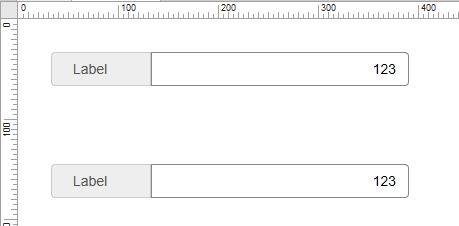
On the new dialog page, add two wf-value-display extension.
Configuring the main page extensions
Open the index page.
Open the Object Properties of the first HVAC graphic extension.
Make the following changes:
Set the name of the signal, at property Object ID (in our case, we shall set the "Level 1" Signal).
Set value True for the Property Show Modal Dialog.
Set the dialog.html page under the Modal Dialog Source property. This means that at run-time, the first Air Conditioner extension will open our new dialog page when clicked.
Set value 500 for the Content Height property.
Set value 300 for the Content Width property.
Add under the Parameters property, a new parameter named "LocalOID" with value "Level 2".
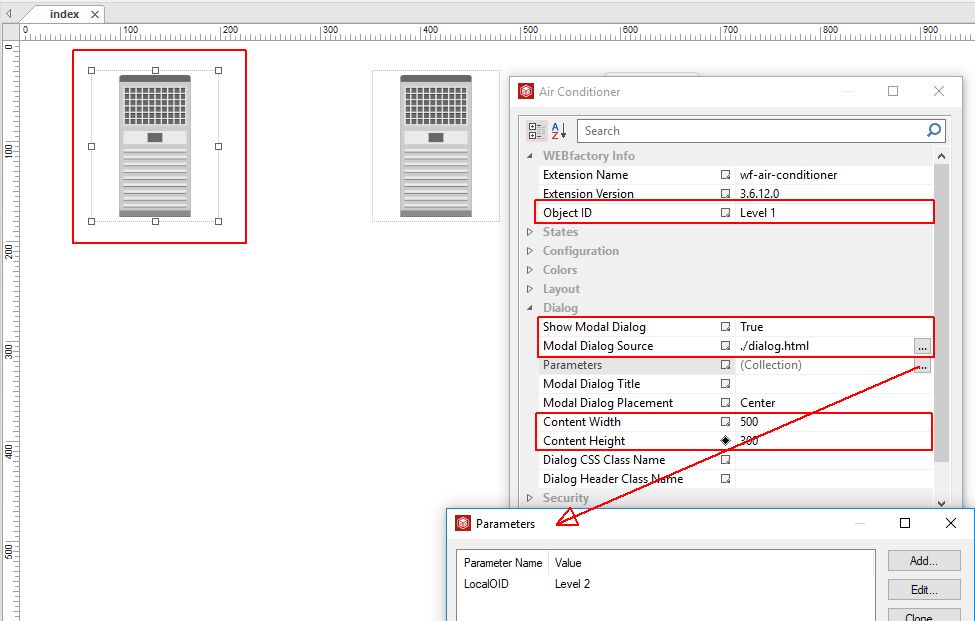
Confirm the changes and proceed, by opening the Object Properties of the second HVAC graphic extension.
Make the following changes:
Set value True for the Property Show Modal Dialog.
Set the dialog.html page under the Modal Dialog Source property. This means that at run-time, the second Air Conditioner extension will open our new dialog page when clicked.
Set value 500 for the Content Height property.
Set value 300 for the Content Width property.
Add under the Parameters property, a new parameter named "LocalOID" with value "Level 2".
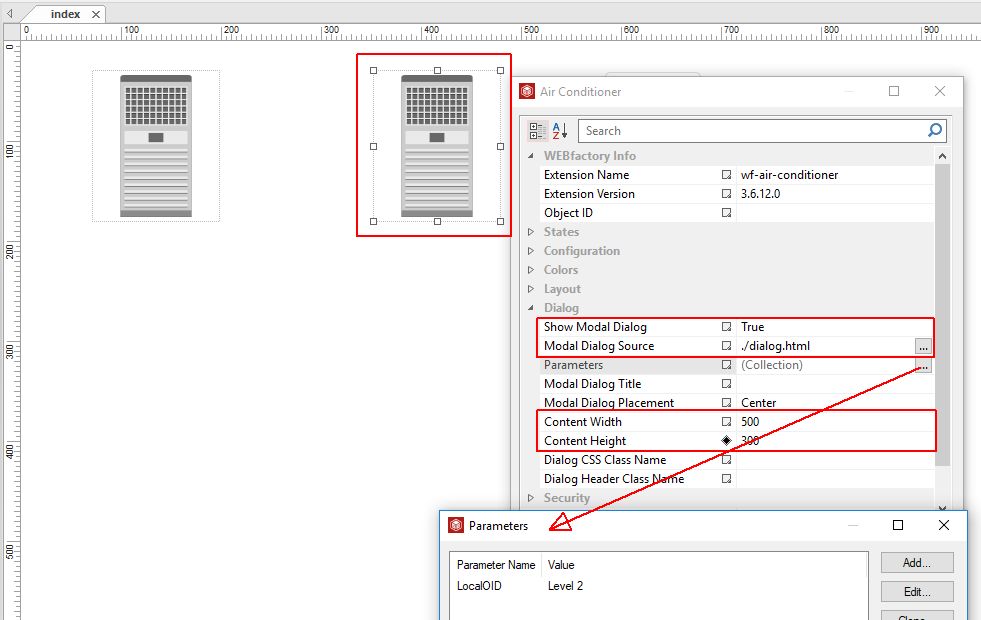
Configuring the modal dialog page extensions
Switch to the dialog project page.
Open the Object Properties of the first wf-value-display extension.
Make the following changes:
Set value [OID] for the Signal Name property.
Set value AC1OID=[OID] for the Label property.
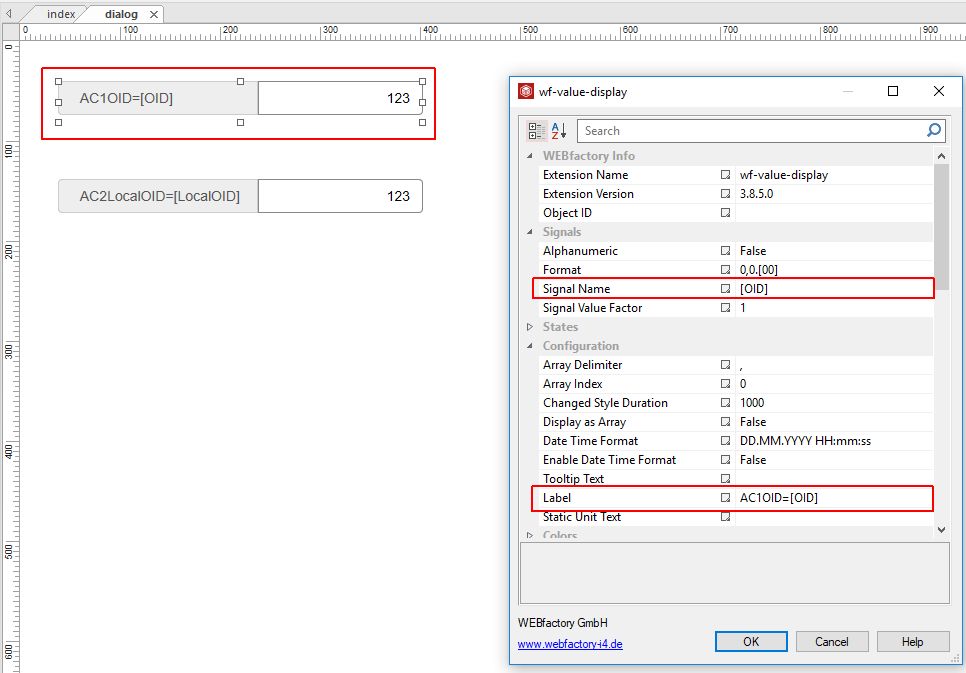
Confirm changes and open the Object Properties of the second wf-value-display extension.
Make the following changes:
Set value [LocalOID] for the Signal Name property.
Set value [PC:LocalOID] for the Object ID property.
Set value AC2LocalOID=[LocalOID] for the Label property.
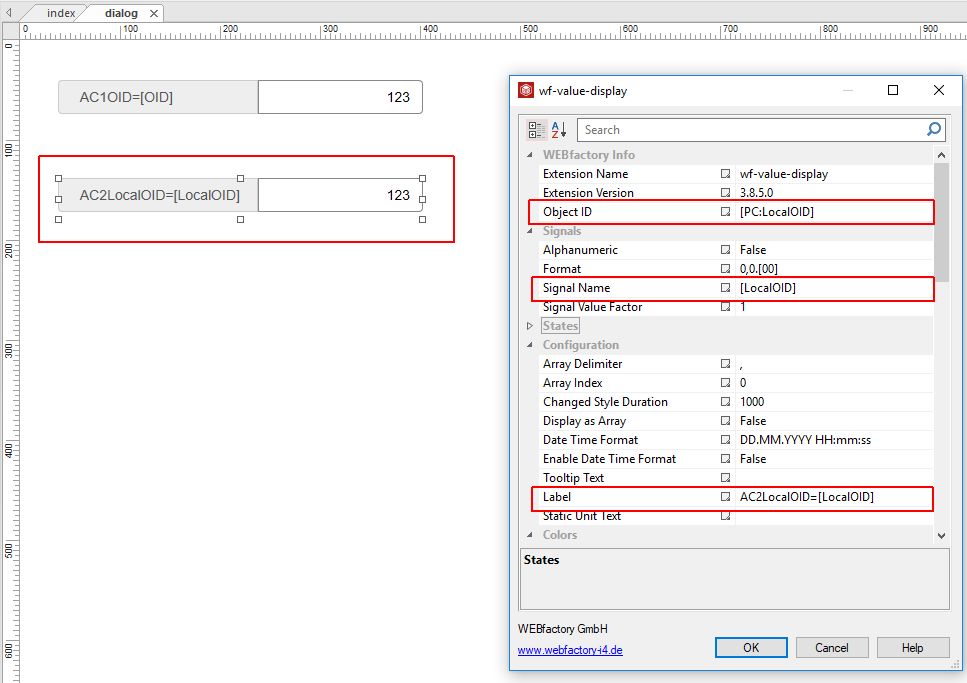
Checking the project at run-time
Open the i4scada Service Manager and make sure that the i4scada Server is running.
Return to the SmartEditor and click the toolbar button Publish. The HTML output is processed.
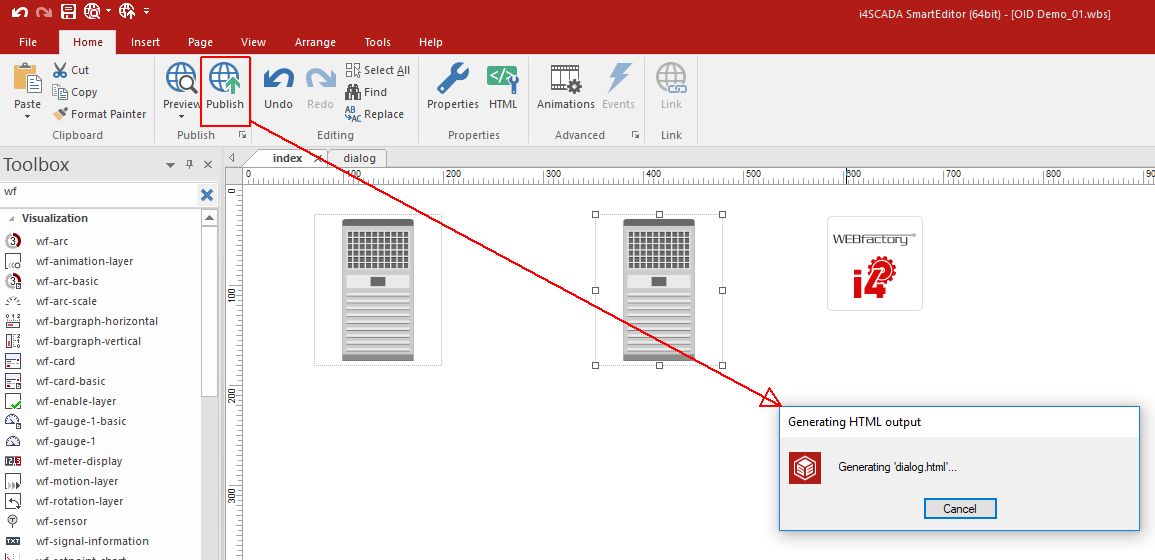
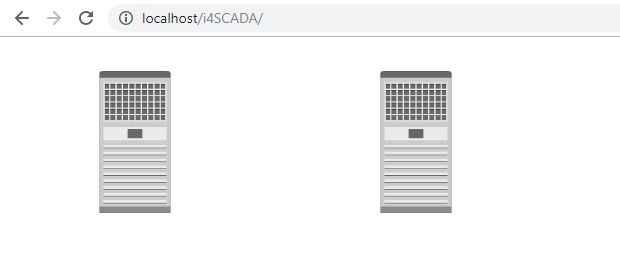
Open the published project in your preferred browser.
The published project displays the two Air Conditioning extensions.
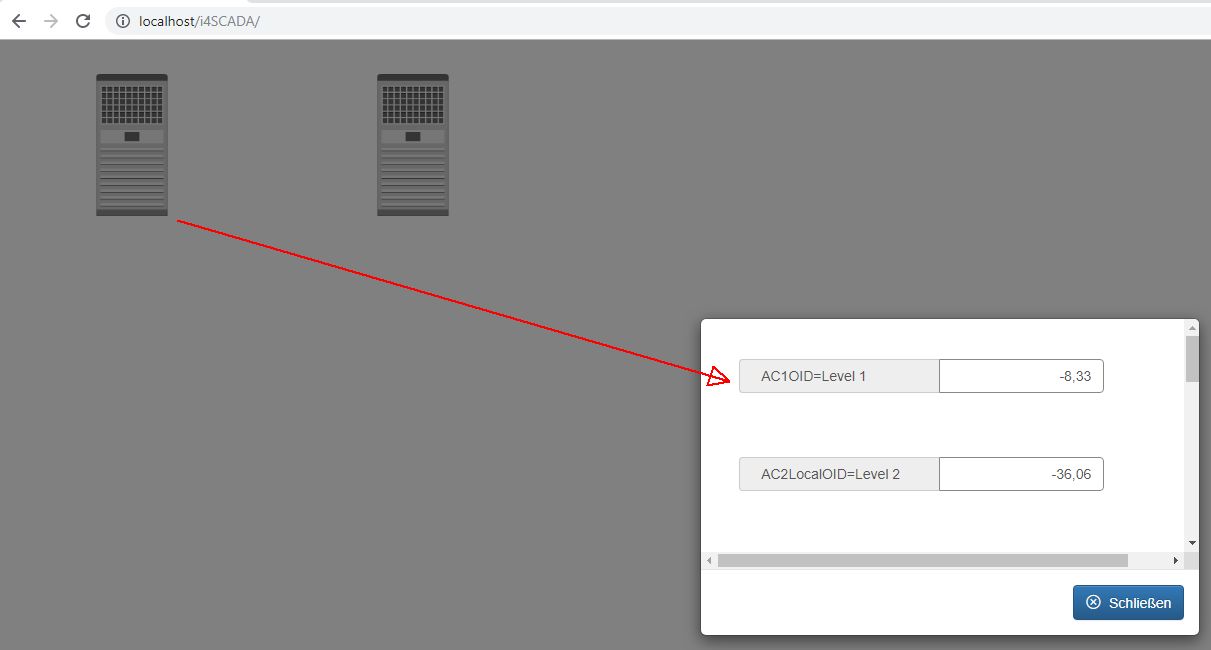
Click on the first Air Conditioning extension.
A modal dialog pops-up. The label and values of the first value display extension is replaced with the Air Conditioning extension Signal (Level 1). The label and values of the second value display extension is replaced with the Local Object ID Signal (Level 2).
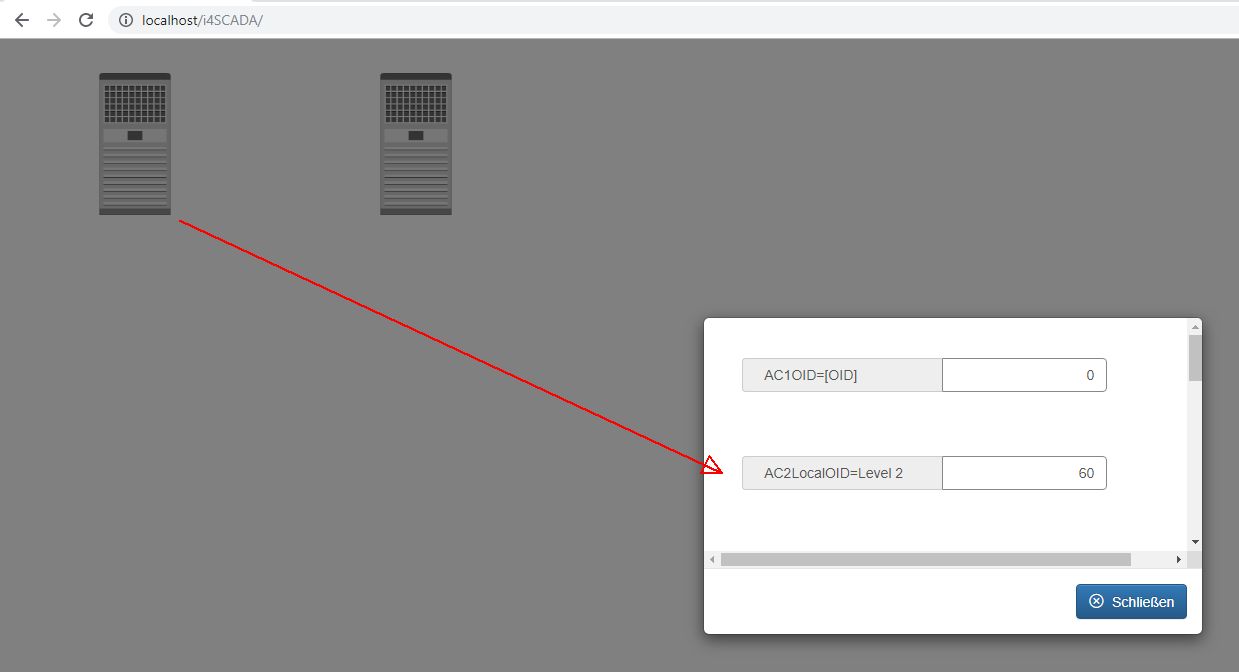
Click on the second Air Conditioning extension.
A modal dialog pops-up. Th same two value display extensions are visible, however, only the second one is able to retrieve data from the Local Object ID Signal (Level 2).
Using placeholders in the info popup dialogs
Check out these tutorials and learn how to use the wf-info-popup-layer placeholder parameters and the required settings.
Check out these tutorials and learn how to use the wf-info-popup-layer placeholder parameters.
Using the Signal Prefix [SP] parameter
Check out this article and learn how to use the Signal Prefix parameter of the wf-popup-info-layer extension by following these tutorial steps.
The Signal Prefix [SP] parameter of the wf-popup-info-layer SmartEditor extension can be used to fulfil the following use-cases:
use Signal Prefix value as placeholder for the static text properties of other extensions contained by the wf-popup-info-layer SmartEditor extension
Static Text placeholders
In order to use the Signal Prefix value of the wf-popup-info-layer SmartEditor extension to replace static texts for other extensions, follow the below steps:
Add to your SmartEditor project page the following extensions:
the i4-core extension
two wf-popup-info-layer extensions
inside each wf-popup-layer extension add two wf-sensor extensions
Open the Object Property panel of the first wf-sensor extension and set value 1 for Property Sensor Text.
Open the Object Property panel of the second wf-sensor extension and set value 2 for Property Sensor Text.
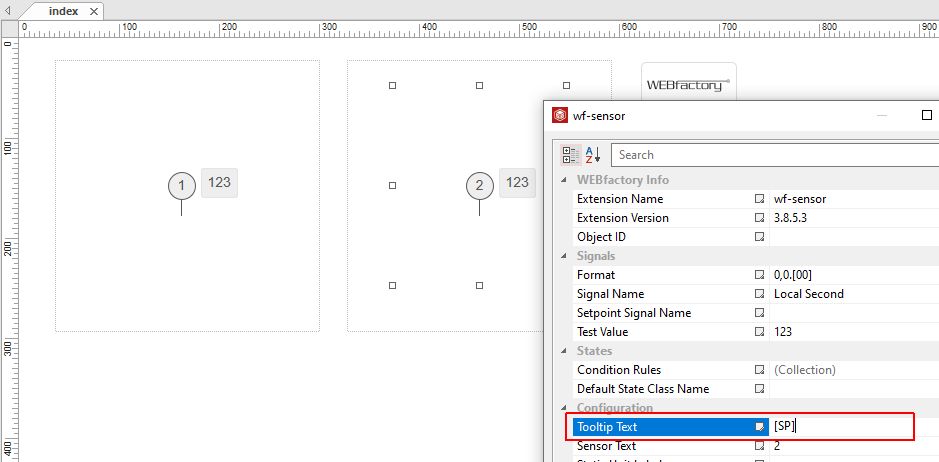
Your SmartEditor page should look like this:
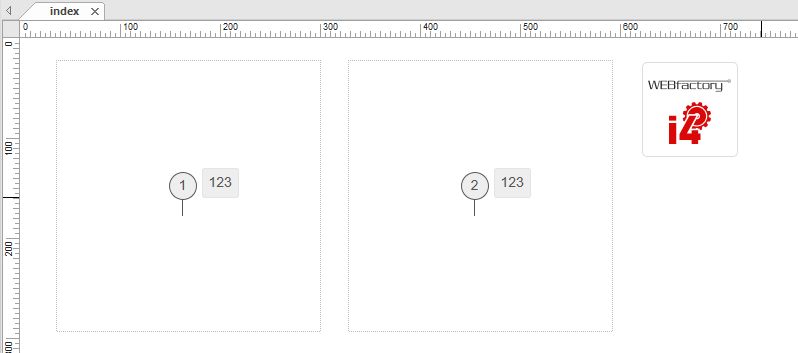
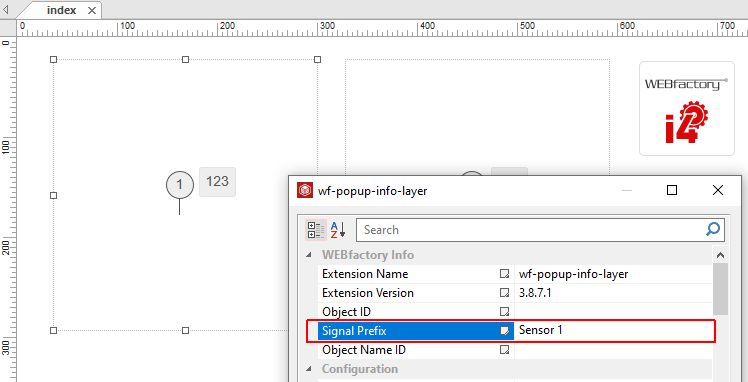
Open the Object Property panel of the firstwf-popup-info-layer extension and set value "Sensor 1" for the Signal Prefix property.
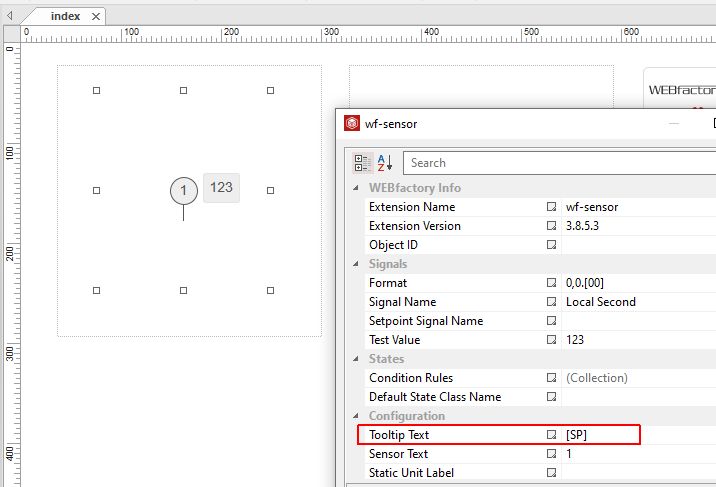
Open the Object Property panel of the firstwf-sensor extension and set value "[SP]" for a static text property (for example, the Tooltip Text).
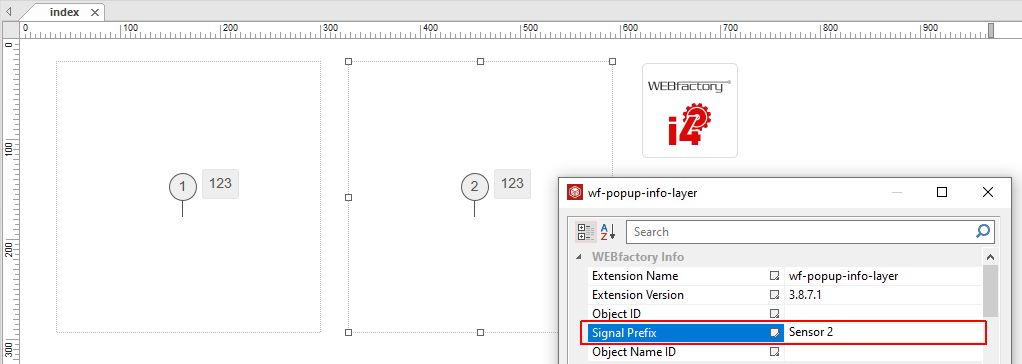
Open the Object Property panel of the secondwf-popup-info-layer extension and set value "Sensor 2" for the Signal Prefix property.
Open the Object Property panel of the secondwf-sensor extension and set value "[SP]" for the Tooltip Text property.
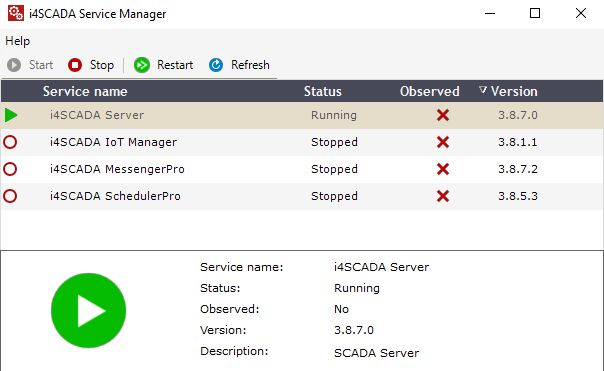
Make sure that the i4scada Server is in status Running using the Service Manager tool.
Publish the SmartEditor project.
Check the run-time project. The two sensor extensions are visible and the tooltips are accordingly displayed.
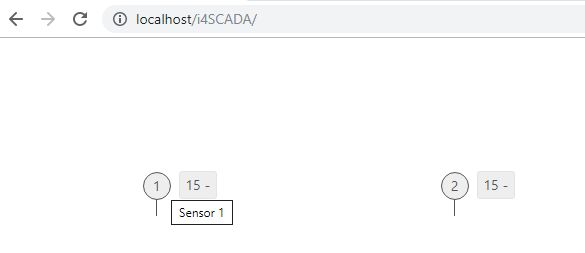
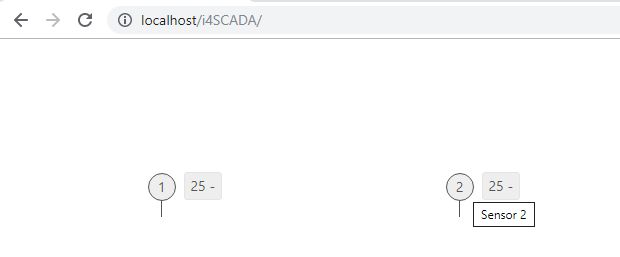
Sensors tooltips
Signal Names placeholders
Another use case that can be defined with the Signal Prefix property of the wf-popup-info-layer extension is the possibility to use Signal Name Prefixes as placeholders to display signals in the popup dialogs.
Add to your SmartEditor project page the following extensions:
the i4-core extension
the wf-popup-info-layer extension
a wf-sensor extension inside the popup layer
Open the Object Properties panel of the wf-popup-info-layer extension.
Go to the Signal Prefix property and input the prefix (first part) of your Signal.
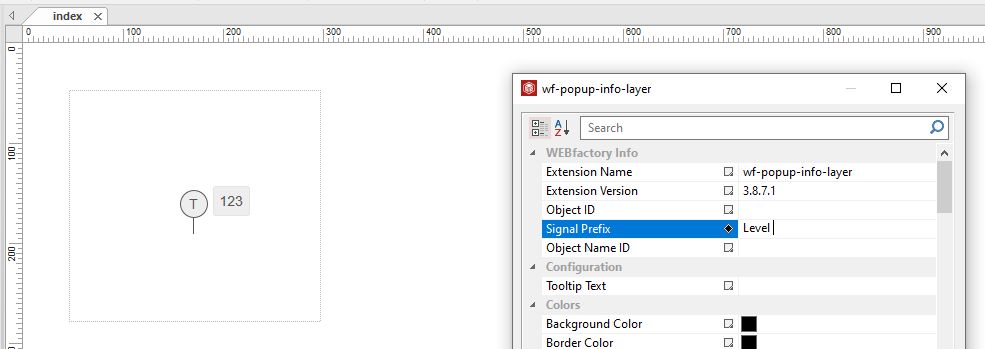
Note
For this tutorial we will use the i4scada Demo Project signals: Level 1 and Level 2. Hence, the Signal Prefix will be "Level " (notice the space).

Scroll down in the Object Properties of the wf-popup-info-layer extension and go to the Info Dialog properties. Here, set the Setpoint property to True and add the Setpoint Postfixes (last parts) of your Signals of interest.
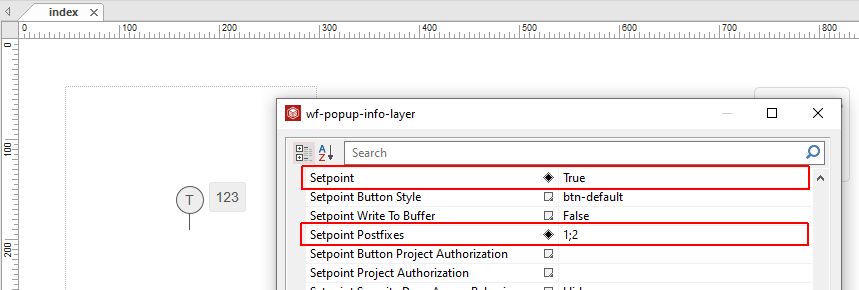
Note
As we are using the i4scada Demo Project signals: Level 1 and Level 2, the postfixes in this case will be 1 and 2. To add multiple values in this field, use the semicolon separator.
Next, publish the SmartEditor project.
By clicking the runtime sensor, the info dialogs are listed. Click on the Setpoint info dialog.
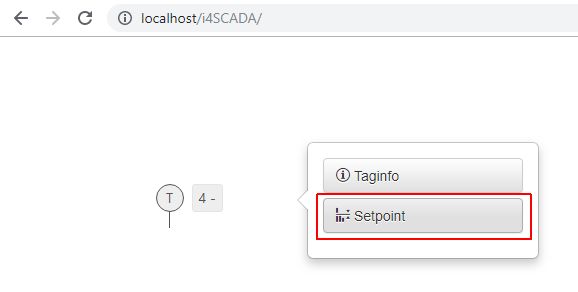
Based on the settings you organised, the Setpoint popup dialog displays the list of Signals, where only the configured Signals are displayed.

Note
This behaviour can be achieved for all the popup dialogs, allowing you to add Signal Postfixes: Setpoint (as described above), Control (expects ONE SINGLE postfix), Settings and Trend.
Using the Object Name ID [ONID] parameter
Check out this article and learn how to use the Object Name ID parameter of the wf-popup-info-layer extension by following these tutorial steps.
The Object Name ID [ONID] parameter of the wf-popup-info-layer extension can be used as a placeholder in order to fulfill the following use cases:
adding placeholders for static text properties of other extensions contained by the wf-popup-info-layer
Static Text placeholders
In order to use the Object Name ID value of the wf-popup-info-layer extension to replace static texts of other extensions, follow the below-described steps:
Add to your SmartEditor project page the following extensions:
the i4-core extension
two wf-popup-info-layer extensions
inside each wf-popup-layer extension add two wf-sensor extensions
Open the Object Property panel of the wf-popup-info-layer extension and set a description for the Object Name ID (for example, "Name of Level"
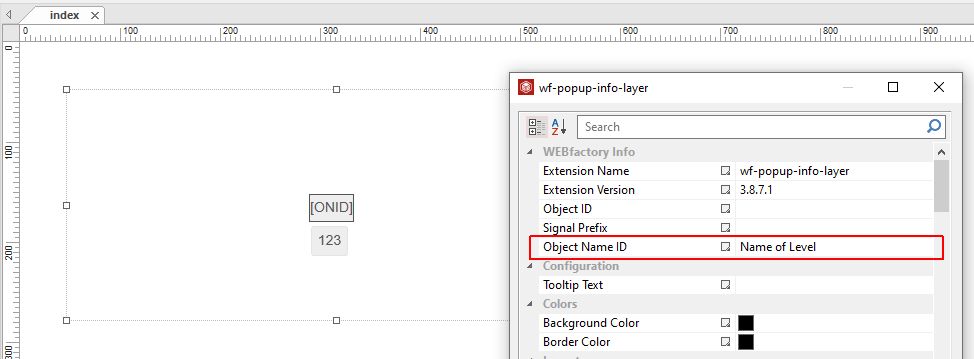
Open the Object Property panel of the wf-sensor extension and set the value [ONID] for a static text property, such as Sensor Text.

Publish the SmartEditor project and check it in browser.
The Sensor Text displays the value we added at Object Name ID property.
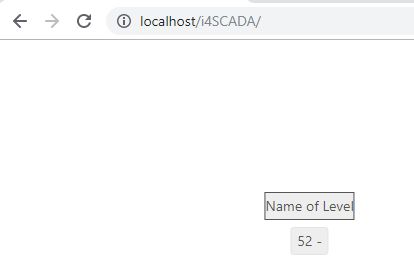
Adding Object Name ID descriptions
In order to use the Object Name ID parameter as a placeholder for descriptions of the Info pop-up dialog components, follow the below steps:
Add to your SmartEditor project page the following extensions:
the i4-core extension
the wf-popup-info-layer extension
a wf-sensor extension inside the popup layer
Open the Object Properties panel of the wf-popup-info-layer extension.
Go to the Object Name ID property and input a description.
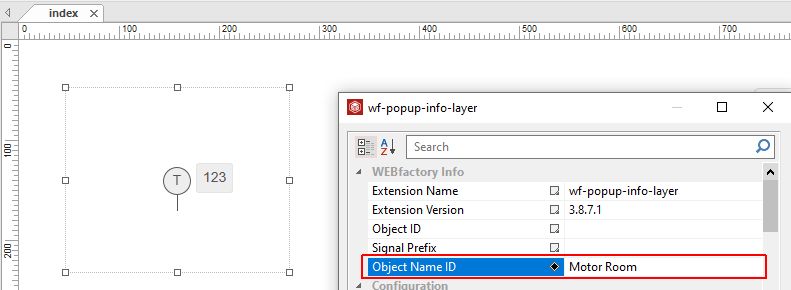
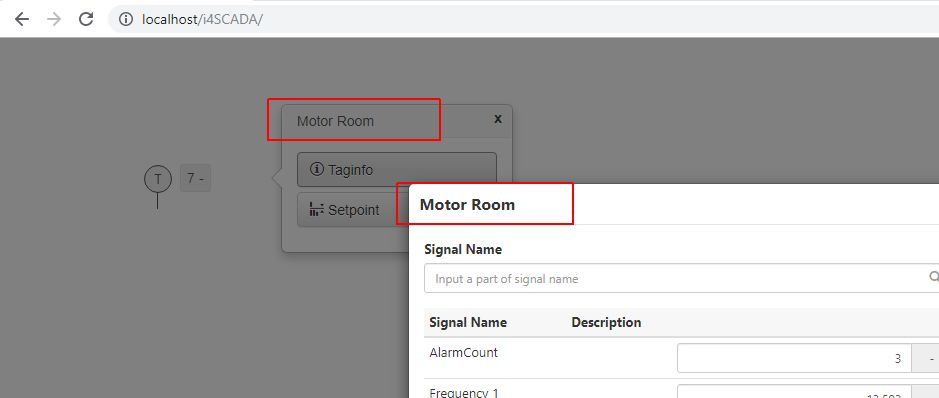
Publish the SmartEditor project and open it in the browser.
By clicking the sensor control, at run-time, will open the Info dialogs. The header in this view is parsed from the Object Name ID property.
Loading Pop-up Info Trend Configuration with parameter replacement
Learn how to load a pop-up info trend by configuring the parameters using placeholders with the wf-info-popup-layer SmartEditor extension.
It is possible to load Pop-up Info Trend charts using the placeholder parameters Signal Prefix, Object ID and Object Name ID. If parameters "Initial Configuration" or "Trend Configuration Namespace" are specified, the Trend dialog will load the configuration saved by the user in the Control Configurations table on the MS SQL Server Database.
Let's assume that you defined a chart that suits your needs and expectation and saved it, either with the wf-popup -info-layer Trend Chart control or with the wf-chart extension.
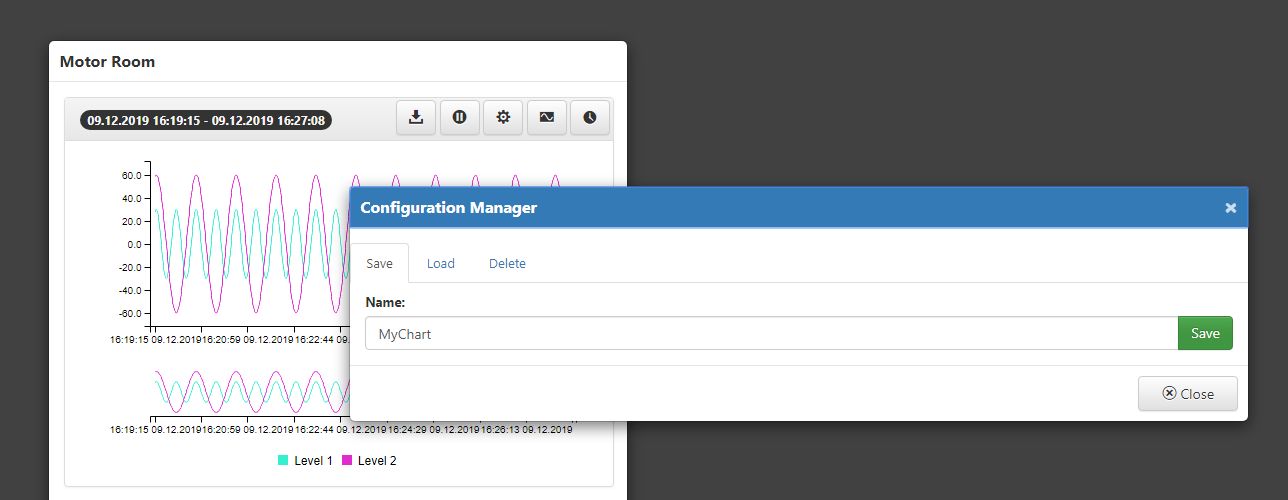
Your preferred chart
You can reuse this chart by organizing the following steps:
Open the Microsoft SQL Server Management Studio application.
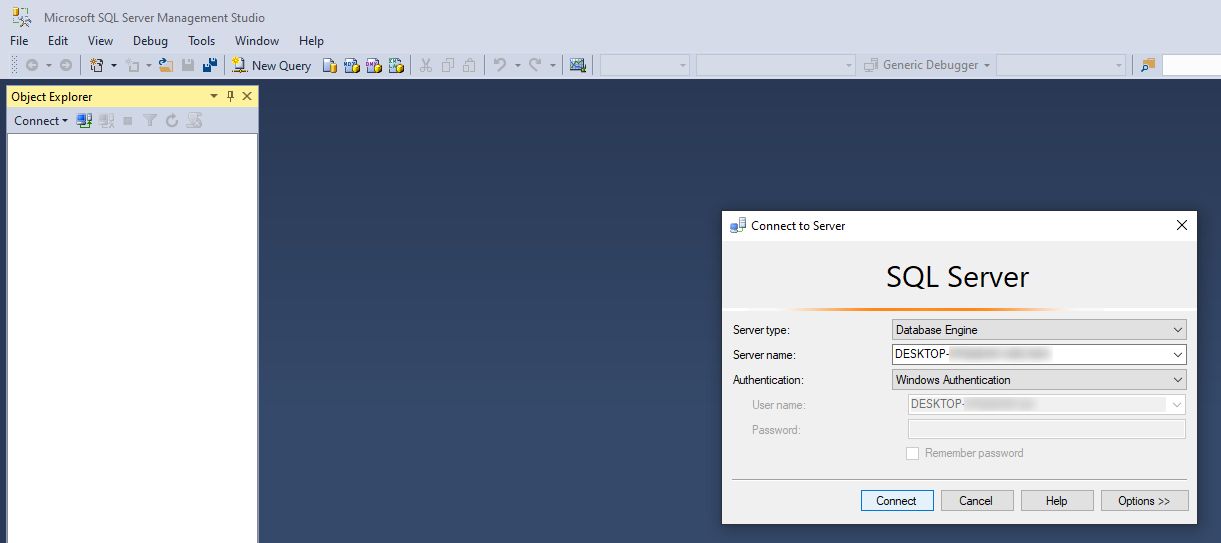
Go to the Tables list and open the ControlConfigurations table in Edit mode.
Find your chart configuration.
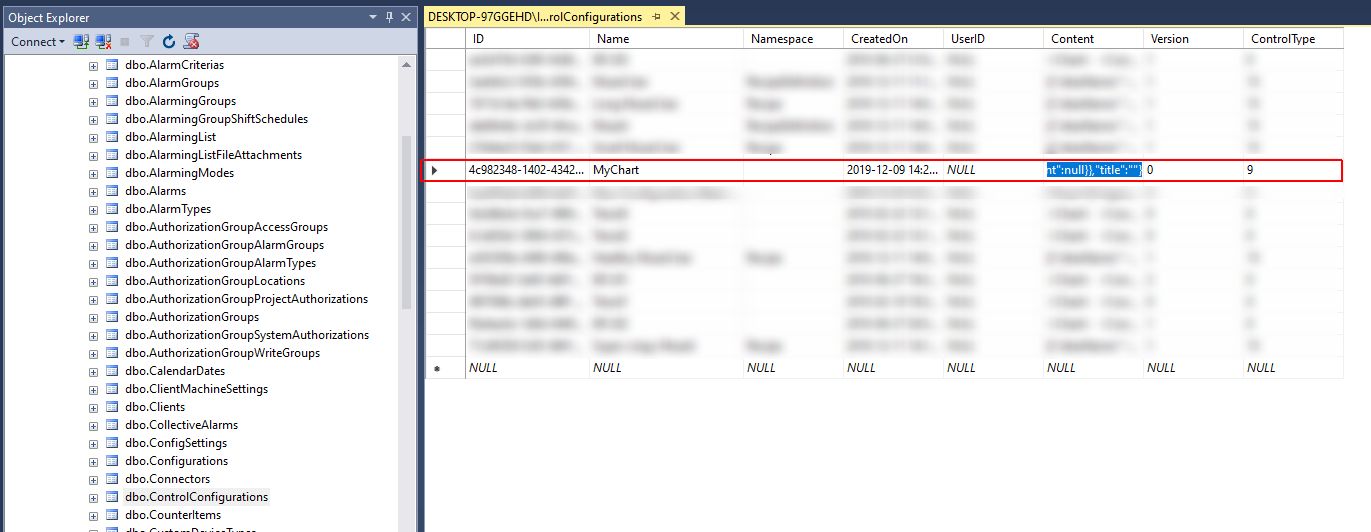
Copy the Content of your chart configuration, via Ctrl+C.
Paste the Content of the chart configuration in the preferred program.
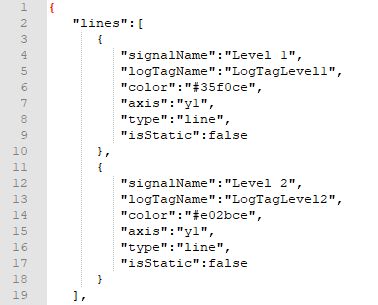
Tip
As the Content is written in JSON format, you should either use a program designed for this type of language or update its format.
Manually replace the Signal name value with your placeholder and copy it back to the Content of the ControlConfigurations table. make sure to save the changes.
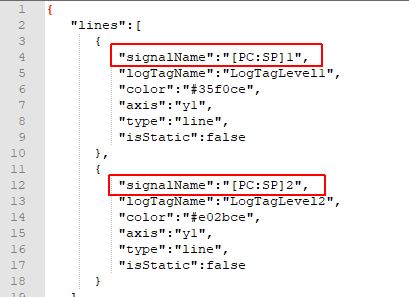
Tip
The Placeholders are used as follows:
[PC:SP]
[PC:OID]
[PC:ONID]
Return to the SmartEditor project and organize the following settings:
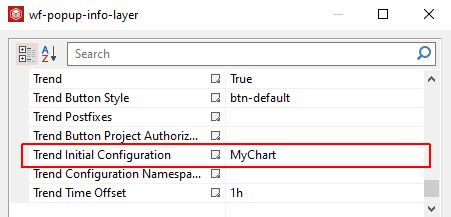
Set the Signal Prefix value: ex - "Level "
Set your chart configuration in field Trend Initial Configuration: ex - "MyChart"
Publish your project and check it in the browser.
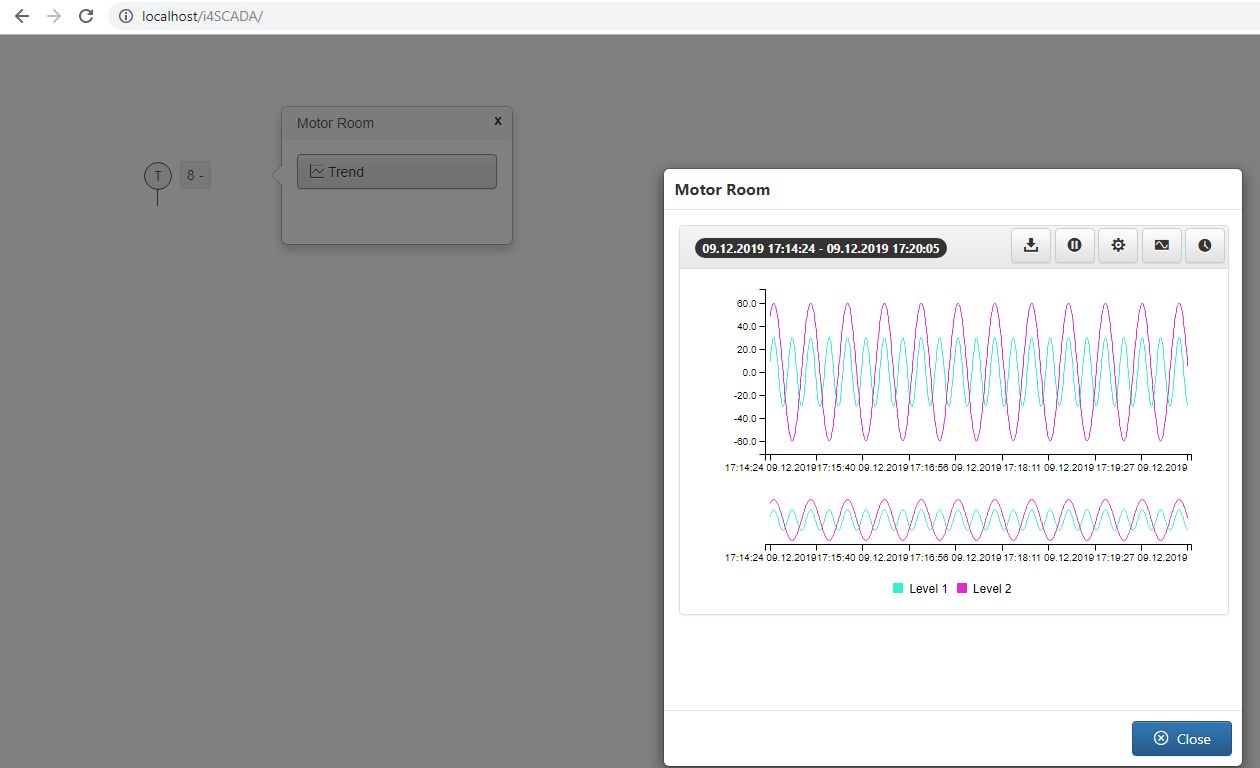
The Trend chart will display your chart set at the Trend Initial Configuration property.
Creating a responsive web page, using Anchored Layers
Check out this tutorial to learn how to use Anchored Layers, to create a responsive web page with the SmartEditor application.
The present article addresses the Anchored Layer mode to complement the Floating Layers in a responsive web page.
In a new SmartEditor project, set the width of the page to the minimum width you want to support in your application. In this example, we will make the page 570 pixels wide.
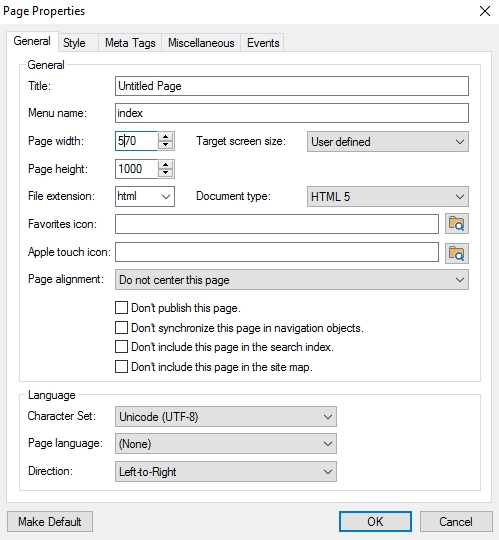
Change page width
Now create the page header. Place a Layer extension on the page and give it the desired background color. Double-click it to open its parameters dialog. Set the Mode property to Anchored Layer and anchor its top, left , and right.
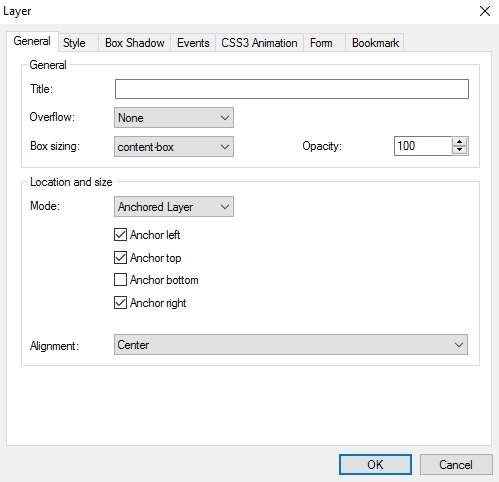
Manage Header Layer properties
Position the Layer at the top of the page, and stretch it to cover the entire width.
Add a Text extension as a header title.
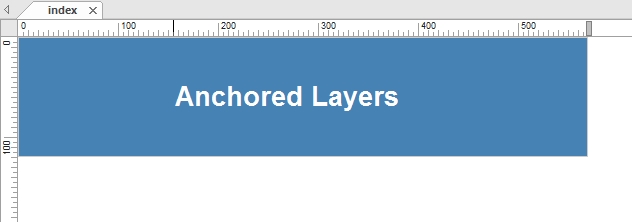
Add Text to the Layer
Next, create a left side bar using another Layer extension. Set the Mode to Anchored Layer and anchor it to top, left and bottom. Place it on the left side of the page.
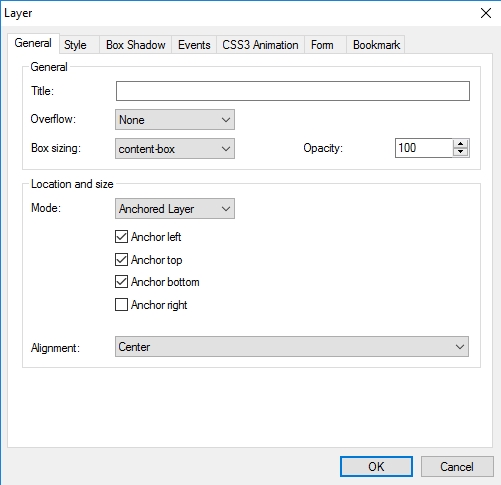
Manage Side-bar Layer properties
Using a new Layer, create a footer. Set the Mode to Anchored Layer and anchor it to right, left ,and bottom. Place it to the bottom side of the page, as a footer.
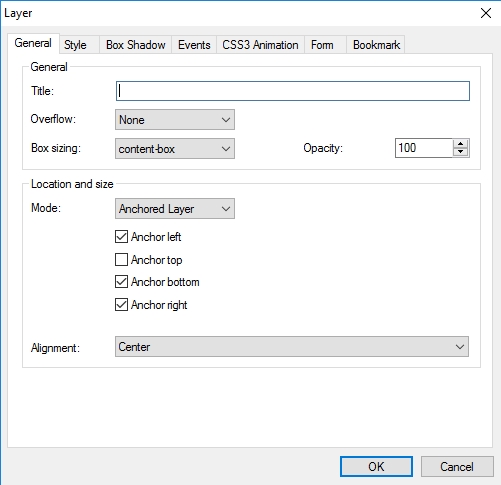
Manage Footer Layer Properties
Now let's add the content layer. Add a new Layer extension to the page and place it so that it covers the remaining area of the page. Set the Mode to Anchored Layer and anchor it to the top, right, left , and bottom.
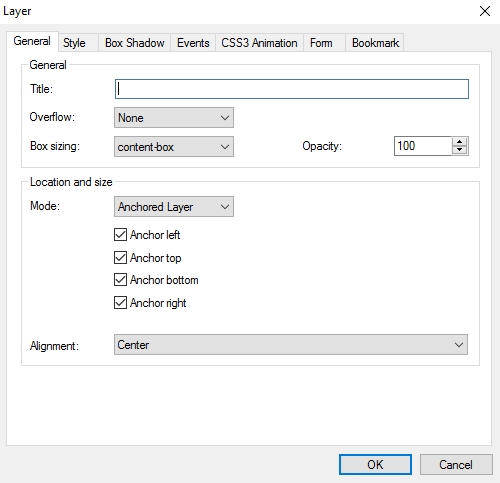
Manage Content Layer Properties
Let's add some content inside the content layer. To keep the fluidity of the layout we will use the Floating Layers technique for the contents of this page. Add another Layer extension inside the content layer and set its Mode property to Floating Layer. Set all Margin properties to 10 pixels.
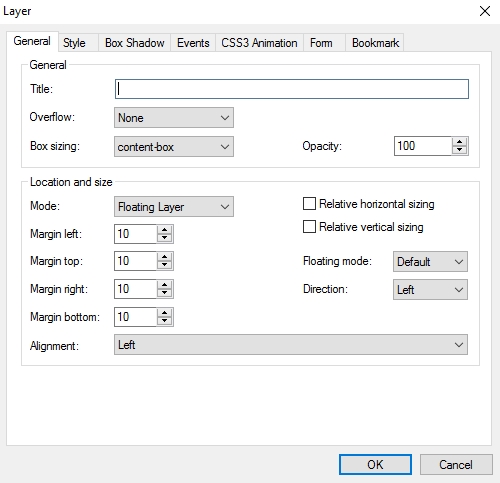
Manager Floating Layer Properties
Next, add some content to this new layer. Drop a wf-arc extension and place it into the new layer. Copy and paste the Layer containing the wf-arc extension several times on the page, to create more content. The duplicate layers will go below the previous ones. Although this might not look as expected, the run-time result is different.
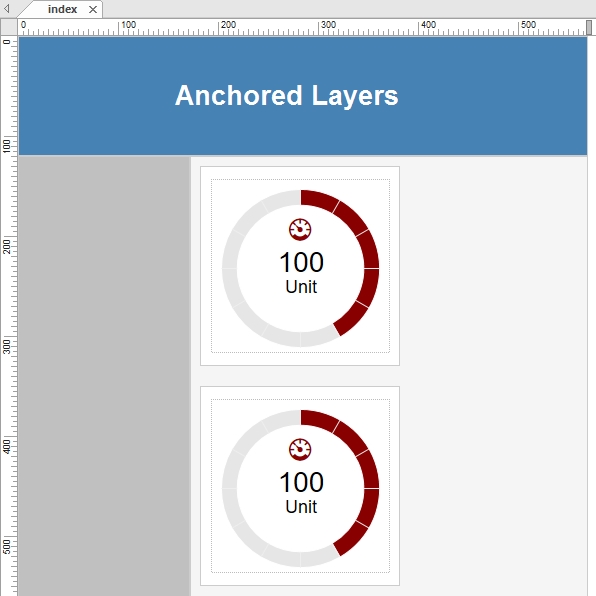
Add content to the Floating Layer
The last step is to add the wf-core extension, so that our content will reflect the data from the WEBfactory system.
Now publish the project and open the resulted website in the browser of your choice. Notice that the layout adjusts itself to any browser width, down to the minimum supported width that we set up in the first step.
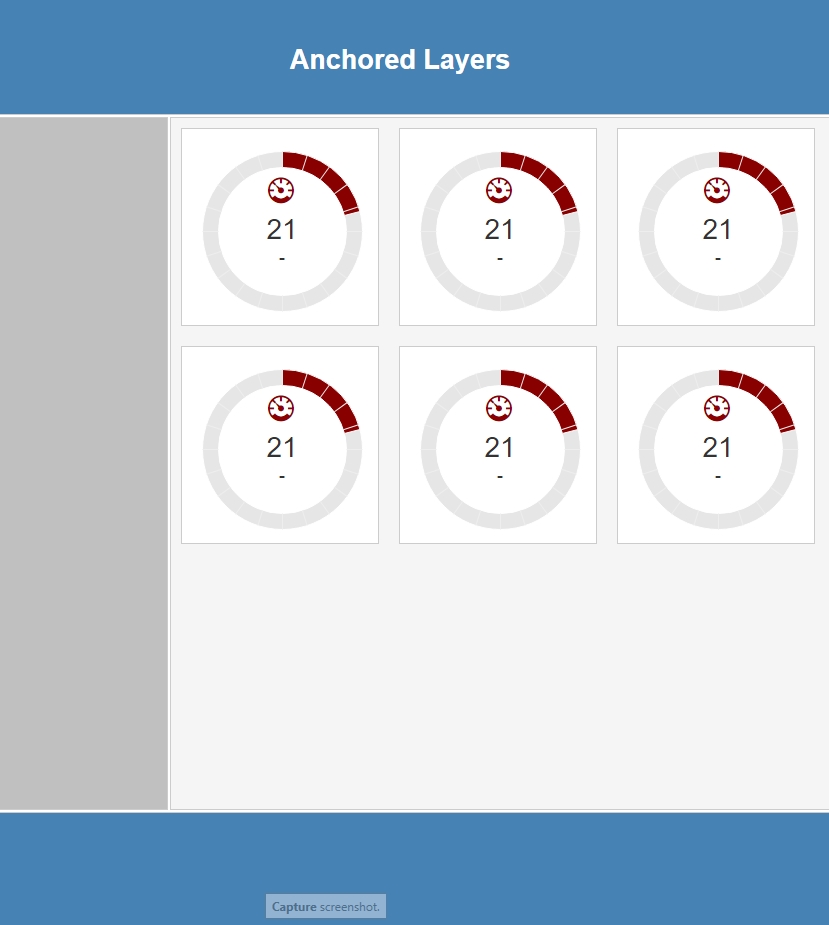
Published project - runtime view
Creating a fluid layout with Floating Layers
Follow these steps to create a fluid layout, using the i4scada SmartEditor Floating Layers functionality.
On a blank SmartEditor page, add the i4-core extension, anywhere on the page (the i4-core extension is invisible at run-time).
In the Page Properties dialog, set the width of the page to the minimum width you want to support (320 pixels is a standard minimum width).
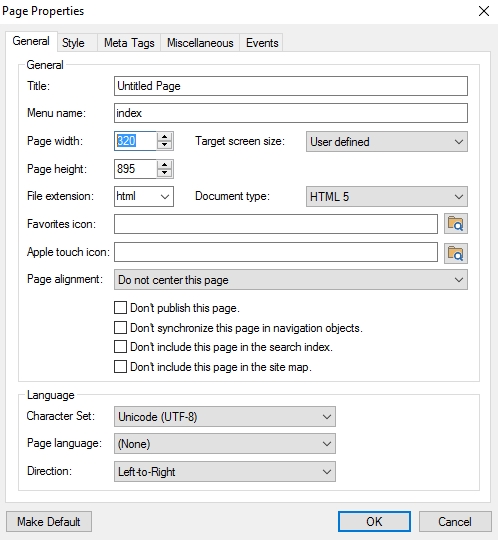
Set page width under Page Properties dialog
Now we will create a page header. Add a Layer extension. In the Properties panel, you can also choose a color for the header layer in the Background Color property.
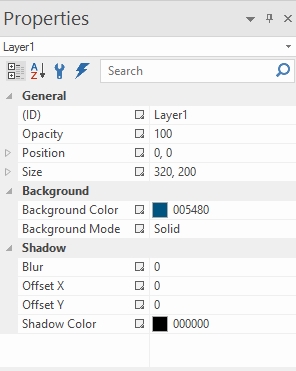
Layer Properties panel
Double-click the Layer to open the Layer dialog, exposing its parameters. In the Location and size section, set the Mode to Floating Layer and the Floating mode to Full Width. Set the Alignment to Center.
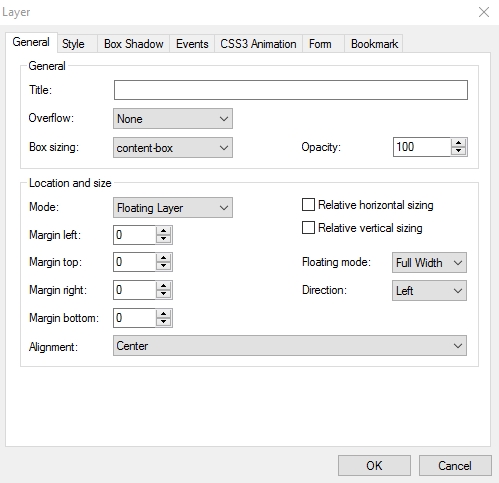
Layer dialog - edit parameters
After clicking OK, the Layer will be automatically positioned in the top-left corner of the page, spanning the whole width of the page.
Add a Text extension and create a title for the header.
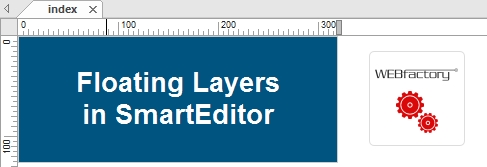
Insert text extension, in Header Layer
Now let's create some content. Add another Layer extension to the page and set its Width to 300 pixels.
Open the Layer parameters dialog (double-click on the extension) and set its Mode property to Floating Layer. Set all Margin properties to 10 pixels.
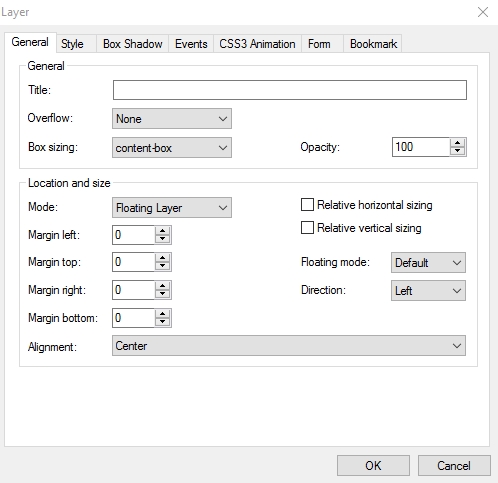
Content Layer properties
Since we have set the width of the new layer to 300 pixels and the margins to 10 pixels, the total occupied width of the new layer is exactly the minimum width supported by the header Layer, 320 pixels.
Next, add some content to this new layer. Drop a wf-arc extension and place it into the new layer.
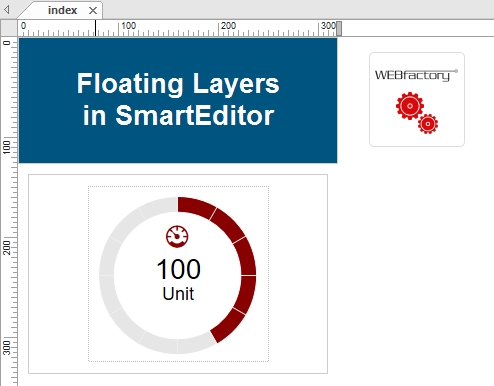
"wf-arc" extension
Copy and paste the Layer containing the wf-arc extension several times on the page, to create more content. The duplicate layers will go below the previous ones. Although this might not look as expected, the run-time result is different.
Publish the project and open the resulted site in a web browser. The layout will automatically adjust depending on the browser's width, thanks to the Floating Layers.
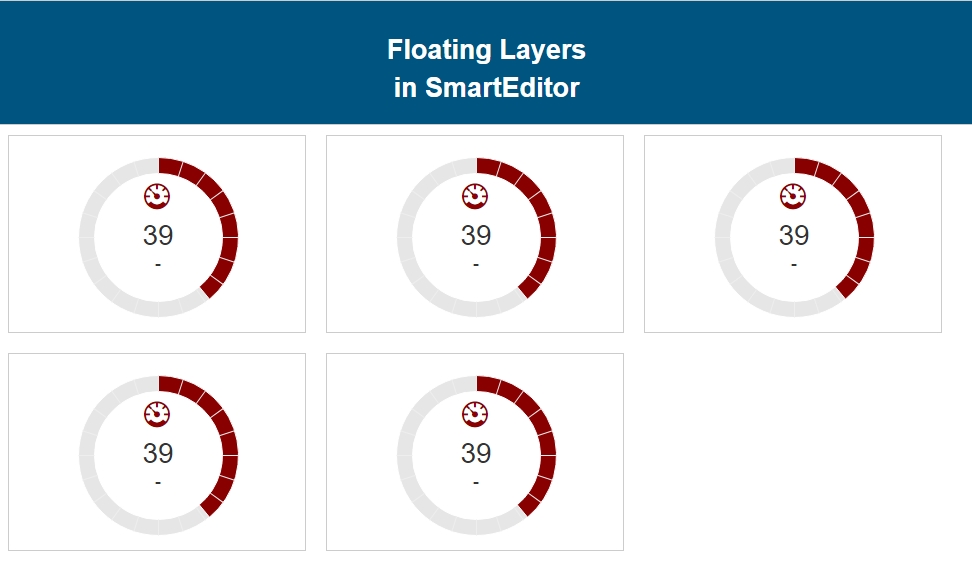
Published Project - runtime view
Creating Responsive Layers using breakpoints
This tutorial is just what you need to create responsive layers using the i4scada SmartEditor breakpoints functionality.
Create a new project and build a standard layout. You can also use the breakpoints in existing projects, but keep in mind that the additional breakpoint layouts will need individual care. The default layout demo used in this article contains the following extensions:
3 x text extensions
Panel 1
wf-navigation-button
wf-switch
wf-bargraph-horizontal
wf-alarm-viewer
i4-core
The extensions used in the demo application serve the purpose of demonstrating how some extensions are able to adapt to each breakpoint layout while others require individual instances for each breakpoint, along with visibility management.
The ID of the extensions is important as we will duplicate and hide some of the extensions used in the project. This is why it is crucial to name each extension so they can be identified quickly in the Object Manager.
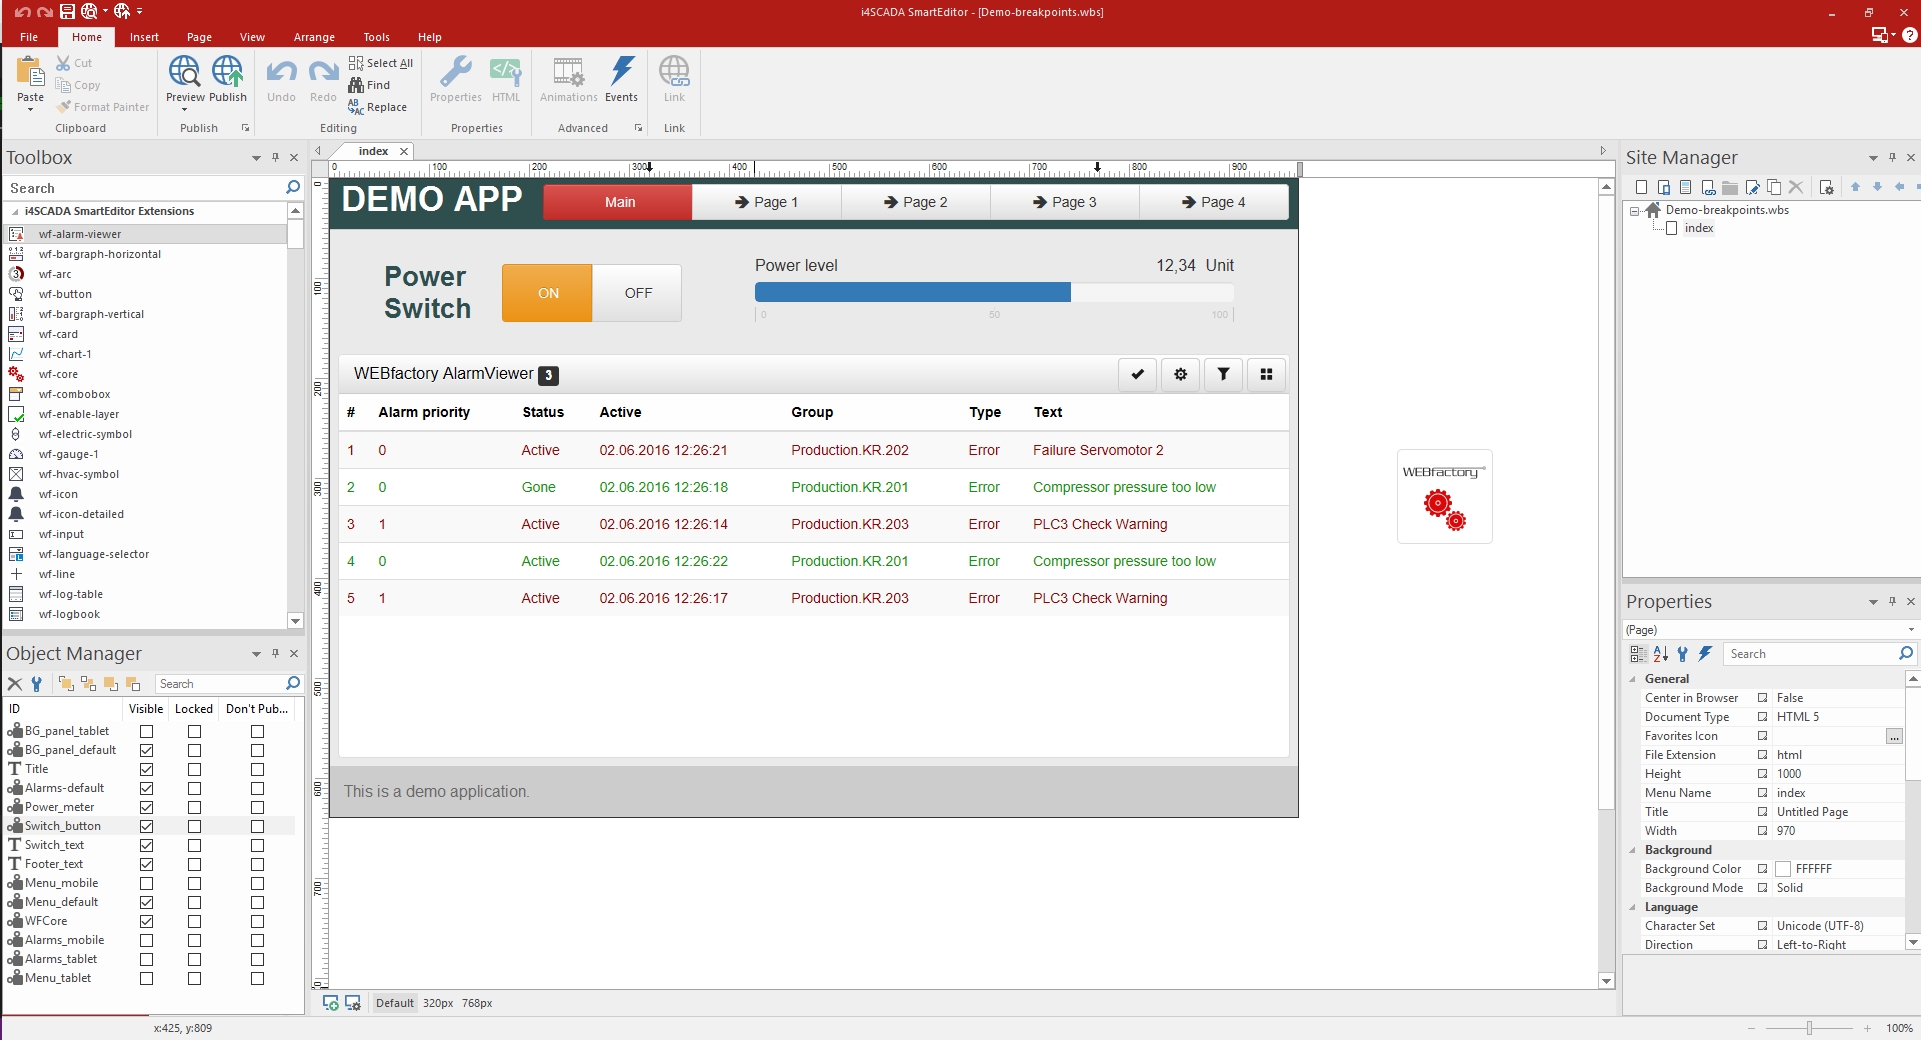
Object Manager populated with multiple extensions
Create the desired breakpoints using the Manage Breakpoints dialog (Page > Manage Breakpoints or the top-right button, next to the help button). The Manage Breakpoints dialog allows you to add, edit, duplicate, remove or rearrange breakpoints. Click Add to add your new breakpoints and select the desired maximum width and orientation.
Keep in mind that if the orientation is defined, the maximum width will be applied only for the selected orientation.
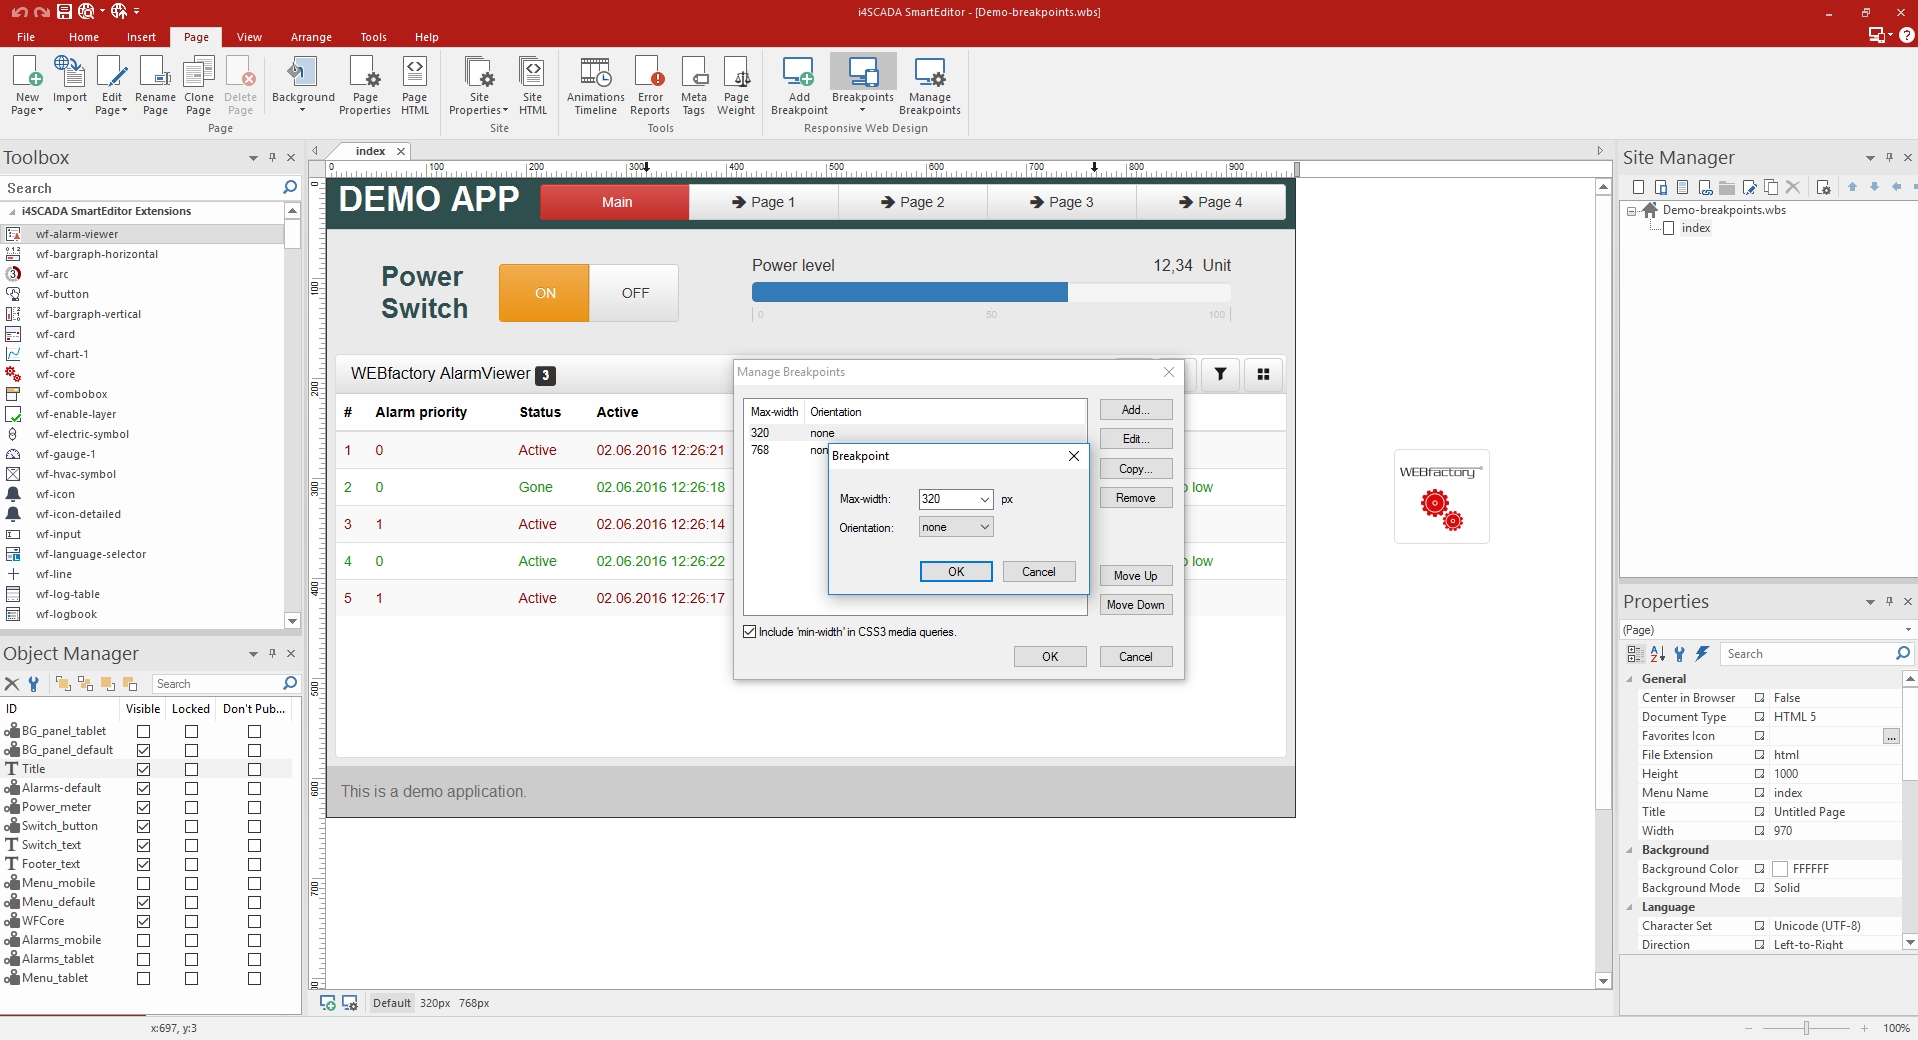
Manage Breakpoints of added extensions
Once defined, you can access your breakpoints from the Breakpoints drop-down in the Page section of the menu or from the top-right button next to the help button.
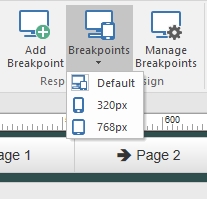
View defined Breakpoints (option 1)
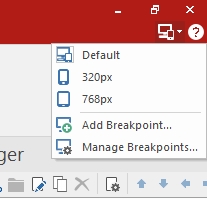
View defined Breakpoints (option 2)
Considering that your default layout is already set up for the default breakpoint, select the intermediate breakpoint (768px in our example). The project page name now indicates the breakpoint which it represents and the maximum width is also changed to the one set by the breakpoint.
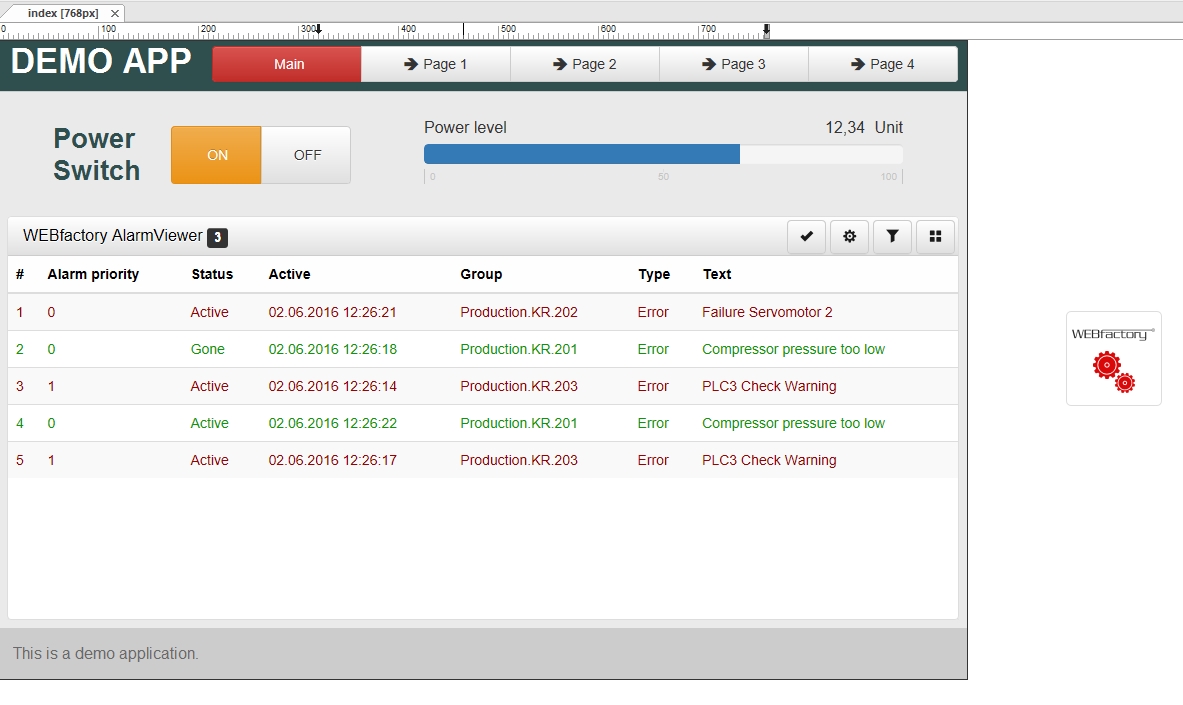
Demo Application
In our example project, we can adjust some of the extensions and they will retain their new layout in this breakpoint. We can resize and reposition the text and panel extensions, the wf-switch, and wf-bargraph-horizontal.
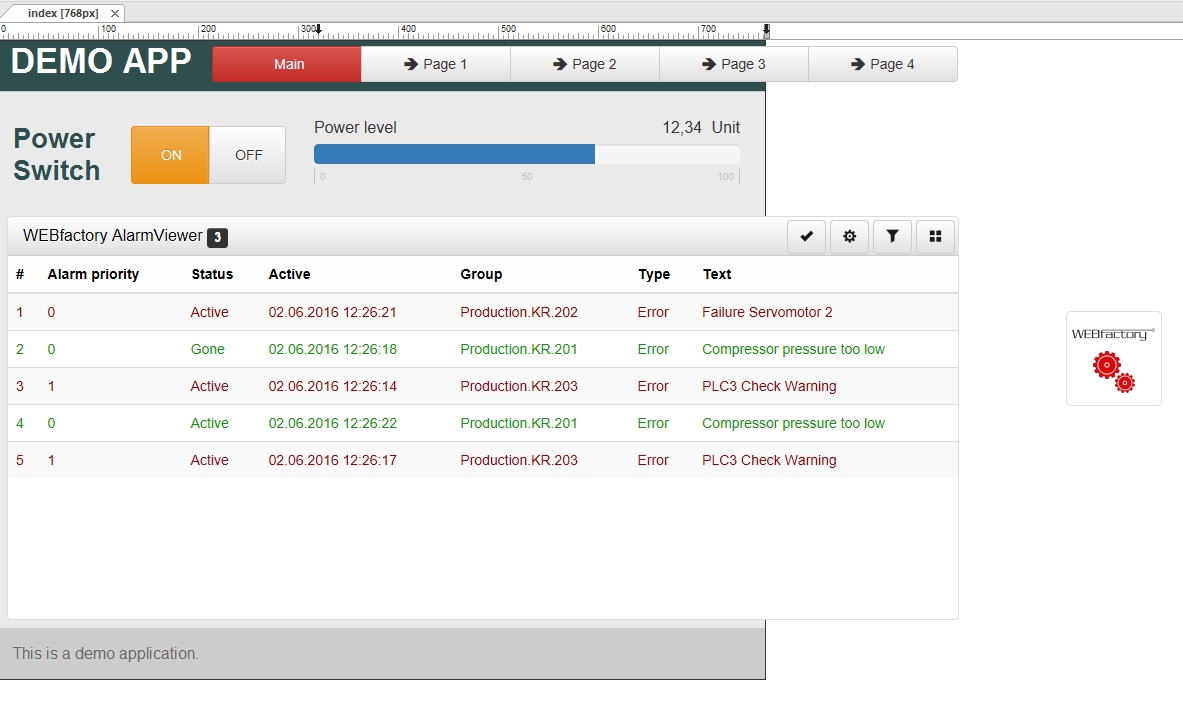
Demo Application
The wf-navigation-button and wf-alarm-viewer, however, will not retain any modifications we make in this particular breakpoint, so we need to duplicate them, hide the old instances and position the new instances as the current breakpoint requires.
Uncheck the Visible box from the Object Manager to hide the desired extensions. The extension's visibility is retained per breakpoint. If an extension is hidden in the 768px breakpoint, it won't retain the visibility setting of any other breakpoint.
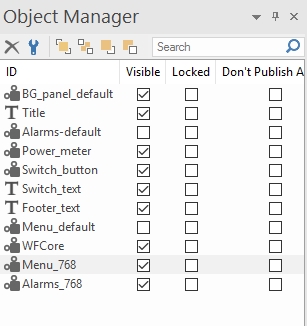
Object Manager
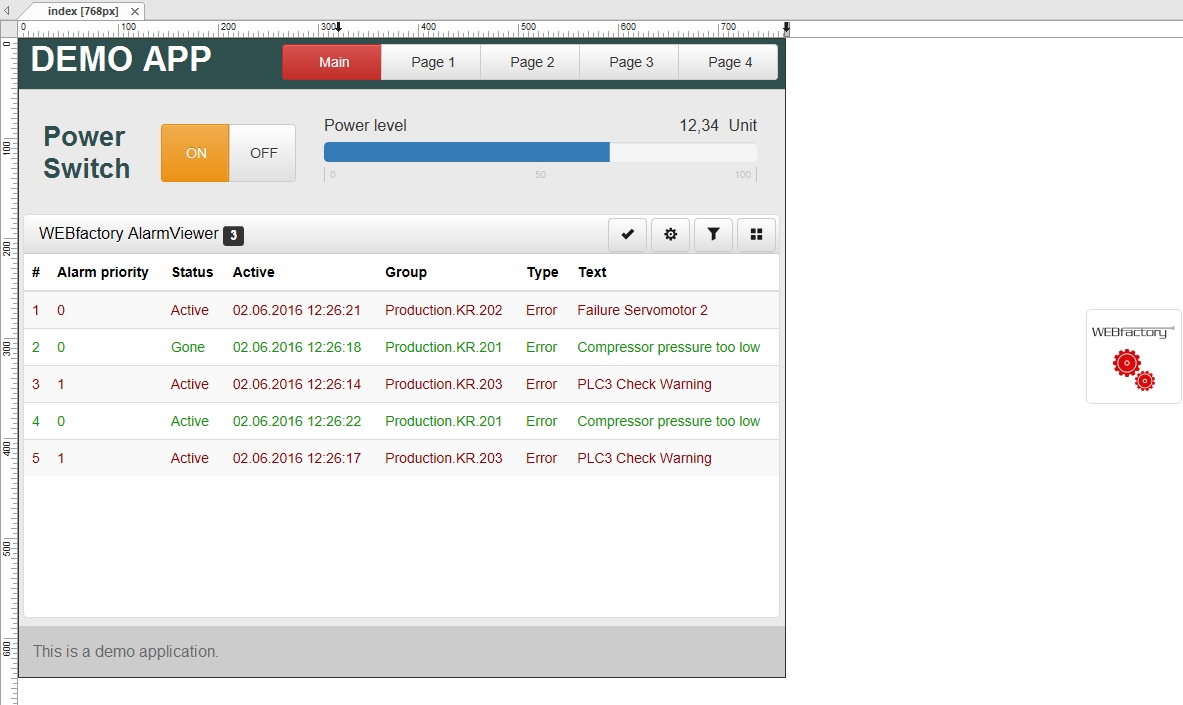
Demo Application
Since we have duplicated two of our extensions, those copies are visible in the other breakpoints too, including the Default breakpoint. Switch to the Default breakpoint and hide the new extensions that need to exist only in the 768px breakpoint.
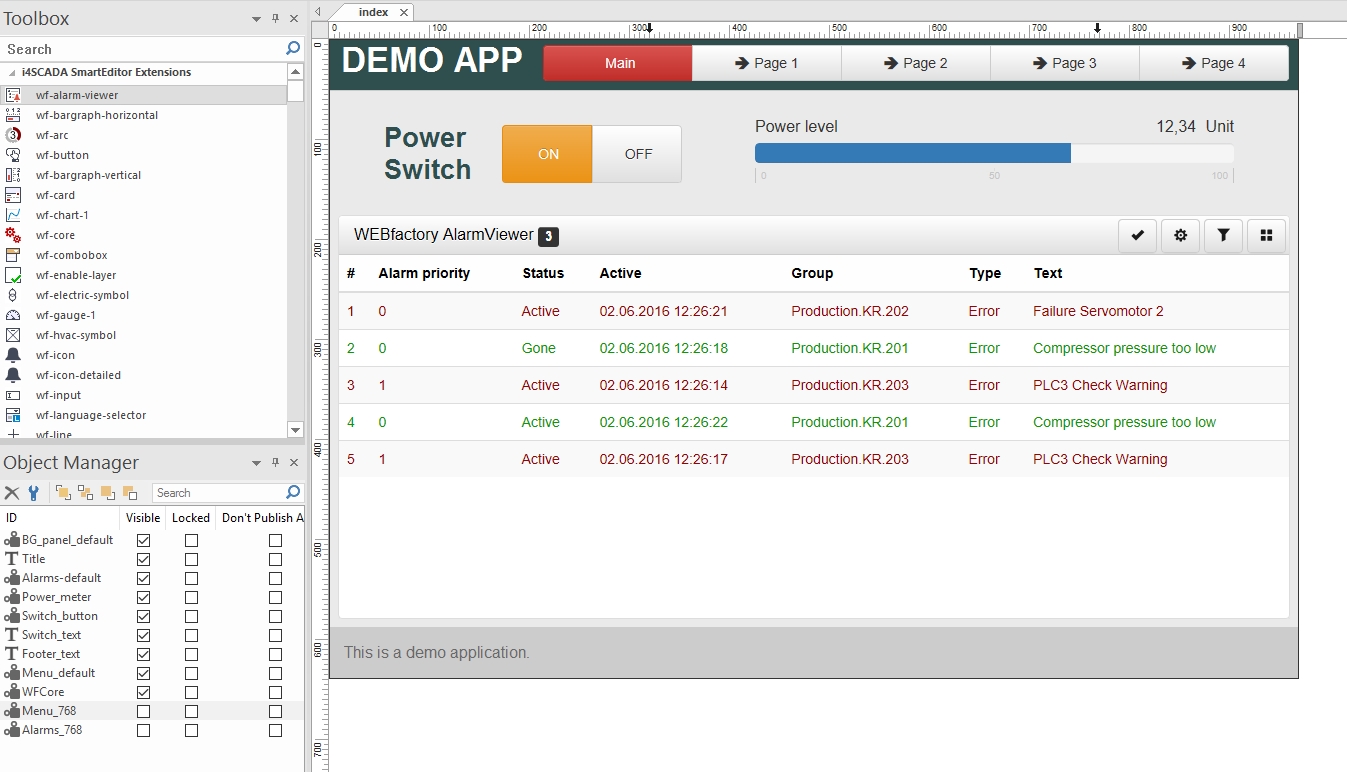
Demo Application in SmartEditor
Now we need to repeat the last four steps for the 320px breakpoint. Select it from the breakpoint drop-down list and start by hiding the extensions that should be visible only in the 768px breakpoint.
Adjust the extensions that are shared between all breakpoints.
Duplicate (or add a new) wf-alarm-viewer for this breakpoint only and hide the one that should not be visible here, without modifying it (any modification to an extension dedicated for another breakpoint will be visible)
Since we will use a different menu in the mobile breakpoint, remove the hide from the wf-navigation-button menu.
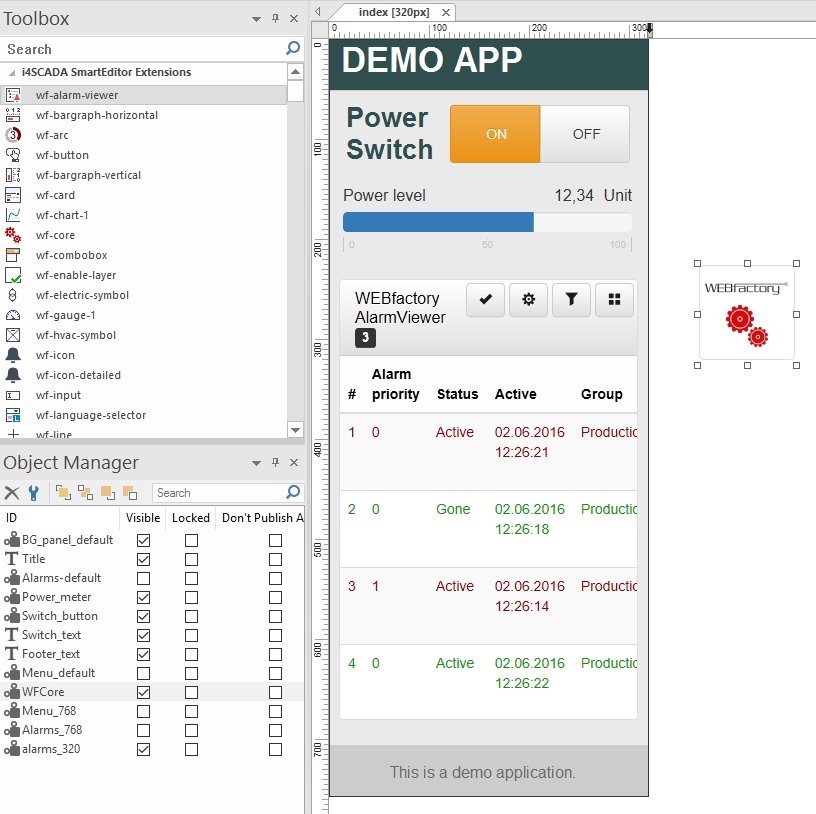
Demo Application
Add a new wf-navigation-menu dedicated to the 320px breakpoint and configure it.
And once again, go to the other two breakpoints and hide the extensions meant only for the 320px breakpoint.
Build and publish the project.
The built application will display the appropriate layout for each screen size. You can test this by resizing the browser window when viewing the application.
Building a complete custom extension
Amplify the power of i4scada SmartEditor by building a complete custom extension to the library. Do not hesitate, and check out these tutorials.
Custom extensions allow you to amplify the power of i4scada SmartEditor by adding your own extensions to the library and to your visualization. Custom extensions can be built upon existing i4scada App Template components, or can be built from scratch. This article describes how to build a new custom extension from the bottom up.
The development cycle of a custom i4scada SmartEditor extension:
Creating the i4scada App Template component - as with any other i4scada SmartEditor extension, your custom extension must be built upon an existing i4scada App Template component which will contain the HTML presentation and all the logic it needs. So the first step in building your own extensions will always be building the base components.
Building the wf-core extension with the new custom component - the new custom component must be integrated into the wf-core SmartEditor extension.
Creating the i4scada SmartEditor extension - the new SmartEditor extension needs to be built upon the custom component. More details on this topic may be found in the sub-chapter Business the custom-app-core extension with the new custom component.
Creating an i4scada App Template component
Open this article for a step-based tutorial on how to start building the base components for your i4scada SmartEditor custom extension.
The first step on the road to a custom i4scada SmartEditor extension is the i4scada App Template component. This component contains both the layout and the logic of our extension. As the extension built in this article is for demonstrative purposes only, we will start as simple as possible: the demo extension will display the value of a selected signal. So the component built here will do just that.
Create a new project in Visual Studio, using the i4scada App Template website template (File > New > Web Site... or Ctrl+Alt+N).
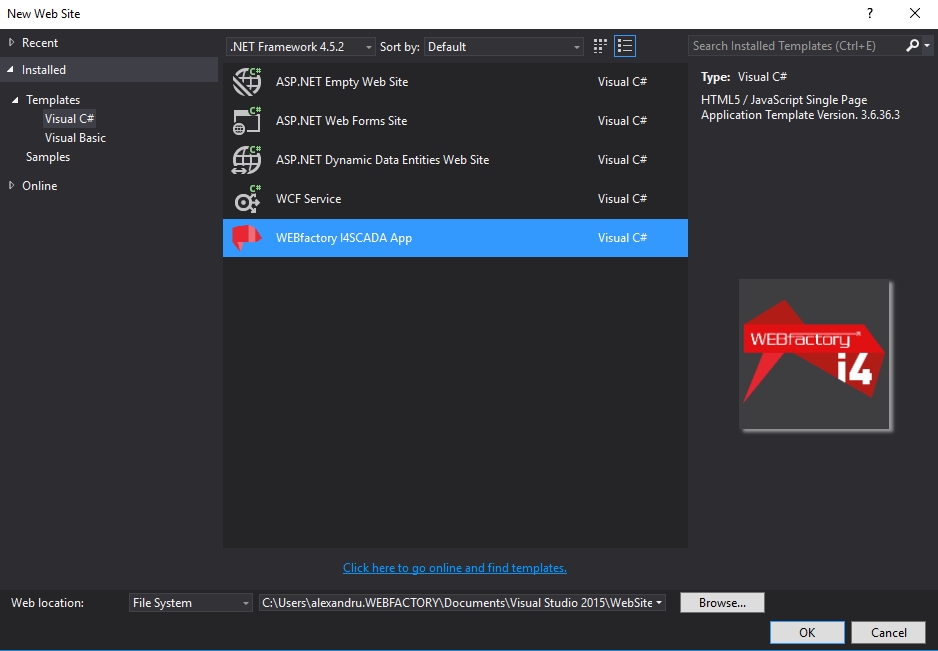
Website Template in Visual Studio
To create the custom component, we need to navigate the project structure up to the customComponents folder (App/src/customCompoenents) and create the two files that will define our component: the HTML and the JavaScript files (File > New > File... or Ctrl+N). In this sample project, we will call the new custom component demo-value-display. Following the naming convention, the two files that need to be created will be demo-value-display.html and demo-value-display.js.
Note
The customComponents folder already contains an example custom component named custom-value. You can notice the custom-value.html and custom-value.js files inside the folder. This custom component is very similar with the one we will build in this tutorial, and can be used as a starting point for future custom components.
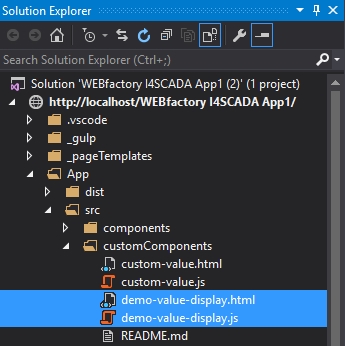
"demo-value-display.htm" / "demo-value-disply.js"
Let's create the component's logic. This demo component will display the value of a WEBfactory signal, along side with some text. Open the demo-value-display.js file and let's build the logic.
Start with the access to the connector service and the main function of the component:
define(['../services/connector', "../services/securedService"],
    function (signalsConnector, securedService) {

        var wfValue = function (params) {

        };

        return wfValue;

    });
Next, set the scope of the function, define the parameters and make sure that they are not null:
define(['../services/connector', "../services/securedService"],
    function (signalsConnector, securedService) {

        var wfValue = function (params) {
           var self = this;

           self.settings = params;

           self.signalName = ko.unwrap(self.settings.signalName);
           self.signalValue = '';

           if (!self.signalName) {
               return null;
           }
        };

        return wfValue;

    });
Instantiate the connector, get the signal value and handle the eventual errors:
define(['../services/connector', "../services/securedService"],
    function (signalsConnector, securedService) {

        var wfValue = function (params) {
           var self = this;

           self.settings = params;

           self.signalName = ko.unwrap(self.settings.signalName);
           self.signalValue = '';

           if (!self.signalName) {
               return null;
           }
           self.connector = new signalsConnector();
           self.signal = self.connector.getSignal(self.signalName);
           self.signalValue = self.signal.value;

           self.connector.getOnlineUpdates().fail(self.connector.handleError(self));
        };

        return wfValue;

    });
Finally we need to implement the dispose mechanism:
define(['../services/connector', "../services/securedService"],
    function (signalsConnector, securedService) {

        var wfValue = function (params) {
           var self = this;

           self.settings = params;

           self.signalName = ko.unwrap(self.settings.signalName);
           self.signalValue = '';

           if (!self.signalName) {
               return null;
           }
           self.connector = new signalsConnector();
           self.signal = self.connector.getSignal(self.signalName);
           self.signalValue = self.signal.value;

           self.connector.getOnlineUpdates().fail(self.connector.handleError(self));
        };

  	 wfValue.prototype.dispose = function () {
           var self = this;

           if (!self.signal)
               return;
           return self.connector.unregisterSignals(self.signal);
        };

        return wfValue;

    });
Now that the component's logic is done, we need to create the HTML presentation. Open the demo-value-display.html and add the following:
<div>
    <h3>Demo Value Display: <span data-bind="text: signalValue"></span></h3>
</div>
Note that we have used the data-bind attribute to bind the text property of our span to the signalValue variable created in the previous step.
The component is now ready to be registered. Locate and open the customComponentRegistry.ts file inside the src folder. Notice that the example custom-value component is already registered as a custom component. We will use the same procedure to register our new custom component.
import ComponentRegistry = require("./componentRegistry");

class CustomComponentRegistry {
    public static register() {
        // Add here custom component registrations following the pattern:
        // return new ComponentRegistry("src/customComponents")
        //              .mapComponent("componentName")

        return new ComponentRegistry("src/customComponents")
            .mapComponent("custom-value")
            .mapComponent("demo-value-display");
    }
}

export = CustomComponentRegistry;
To test the new custom component, it's enough to add it in any HTML view as follows:
<demo-value-display params="signalName: '[name-of-the-signal]'"></demo-value-display>
Building the custom-app-core extension with the new custom component
To build your custom extension, start building the solution, extract the bundles and pack them in a new app-core-extension. Here are the steps!
Our new custom component needs to be a part of the custom wf-core extension called custom-app-core. For this, we need to build the solution, extract the resulted bundles and pack them into an updated custom-app-core extension.
In Visual Studio, use the Task Runner Explorer to trigger the publish-standalone procedure, in order to create the new bundles containing our custom extension.

publish-standalone in Visual Studio
Once the procedure is complete, open the site folder (right-click on the site in Solution Explorer and select Open Folder in File Explorer). Navigate to releases > [version number] > standalone and copy the contents of the standalone folder somewhere safe. These files contain our custom component and will be integrated into the custom-app-core extension.

Open Site Folder
Use the i4scada SmartEditor Extension Builder to open the wf-core.xwb file (For more information about obtaining the wf-core.xwb file, please contact our support team at support@webfactory-world.de). The editable wf-core will become the custom-app-core extension. Select the Files tab inside the Extension Builder.
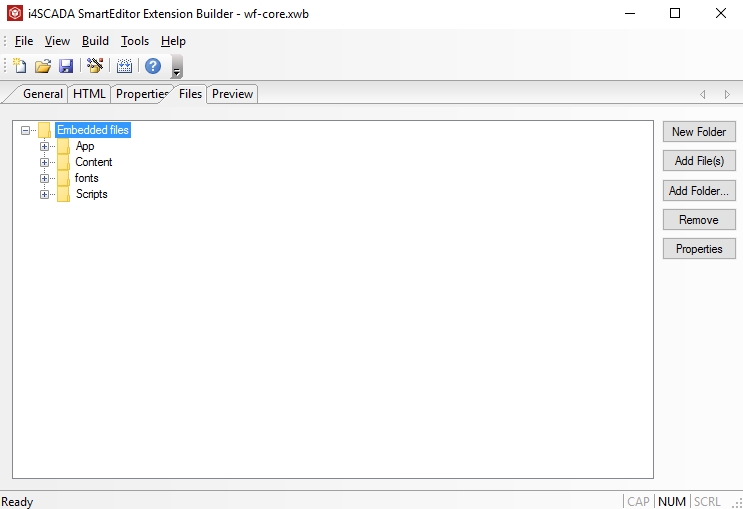
wf-core.xwb
Note that the contents of the Embedded files folder are the same with the contents of the standalone folder build in Visual Studio.
Remove the existing contents of the Embedded files folder and add the contents of the standalone folder, saved at step 2. Make sure to add all the folders directly under the Embedded files folder.
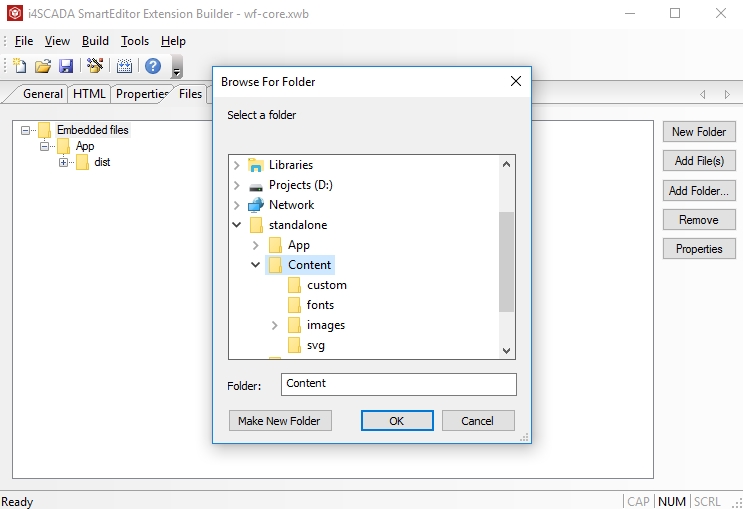
Add all folder in Embedded files folder
Important
The Version attribute of the editable wf-core extension can be used for custom purposes so make sure to use it if required. By default, it will reflect the App Template version.
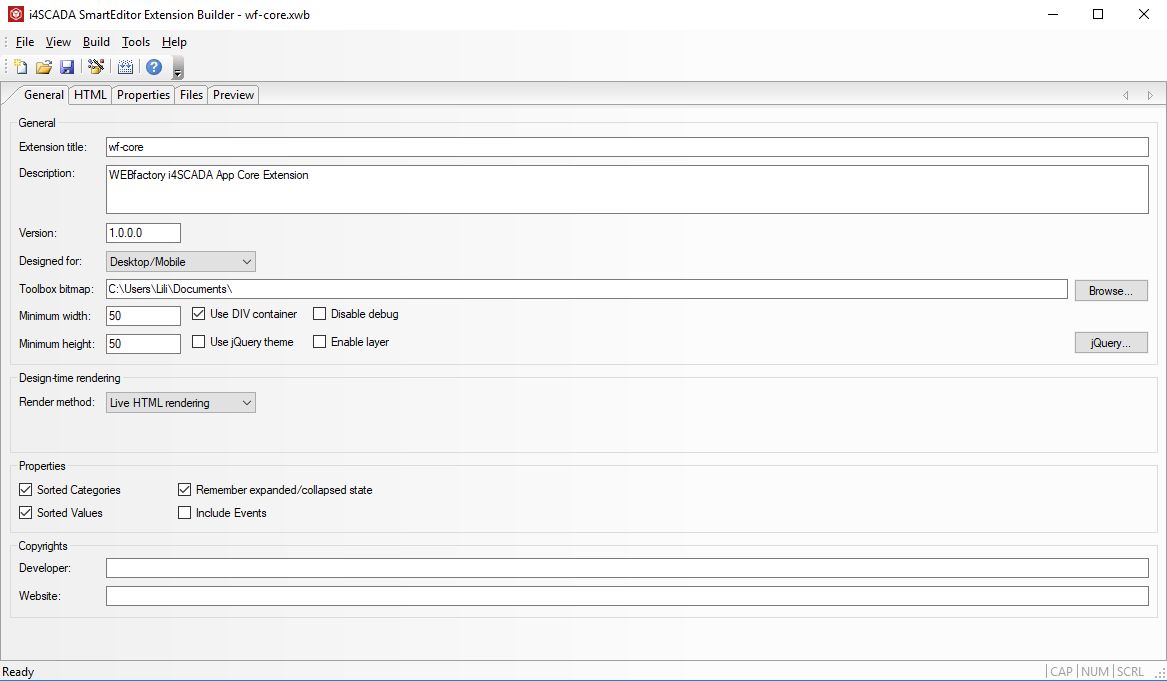
App Template version
Name the extenion custom-app-core. Save and build the custom-app-core extension. The output of the build process will be the custom-app-core.wbx file, which must be copied in the SmartEditor 's extensions folder.
Note that the output of the build process, the custom-app-core.wbx will be saved in the same location as the editable extension, wf-core.xwb.
Copy the new custom-app-core.wbx extension in the i4scada SmartEditor extensions folder (C:\Users\[user-name]\Documents\i4scada SmartEditor\system\extensions).
Remember to use the new custom-app-core extension on every page where the custom extensions are used!
Creating the i4scada SmartEditor custom extension
The new SmartEditor extension needs to be built upon the custom component. Check this article to follow up the steps.
The final step in building an i4scada SmartEditor custom extension is creating the actual extension file. Although the custom component is already integrated in SmartEditor, we also need the actual extension file which will allow us to use and configure the new extension inside SmartEditor.
Create a new project in i4scada SmartEditor Extension Builder. Choose the name of the extension in the Extension title field, set the Render method to image and choose a preview image at the Image option. Also set the desired size of the preview image to match the size of your actual iamge file, using the Minimum width and height options.
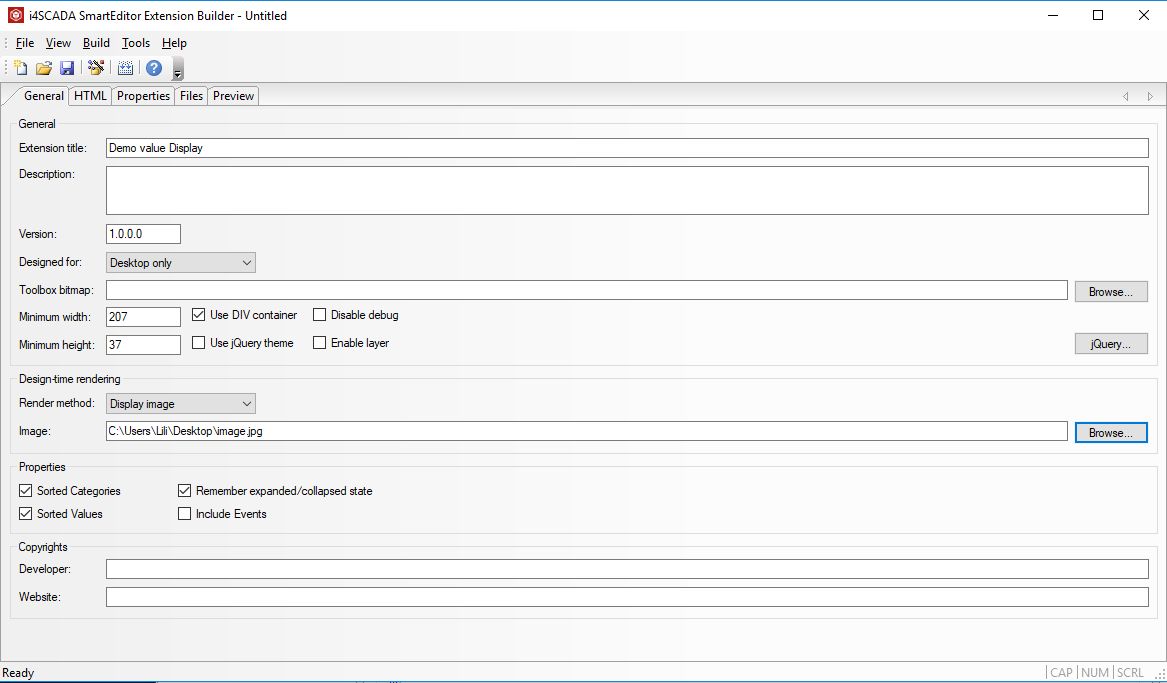
Smart Editor Extension Builder
Next we nee to create the property that allows us to input the name of the signal whose value we want to see. Head in the Properties tab and use the right-side buttons to create a new category for the property. Inside the new category, add a new property with the name SignalName. Note that the property variable is automatically created using the name (in this case $signalname$).
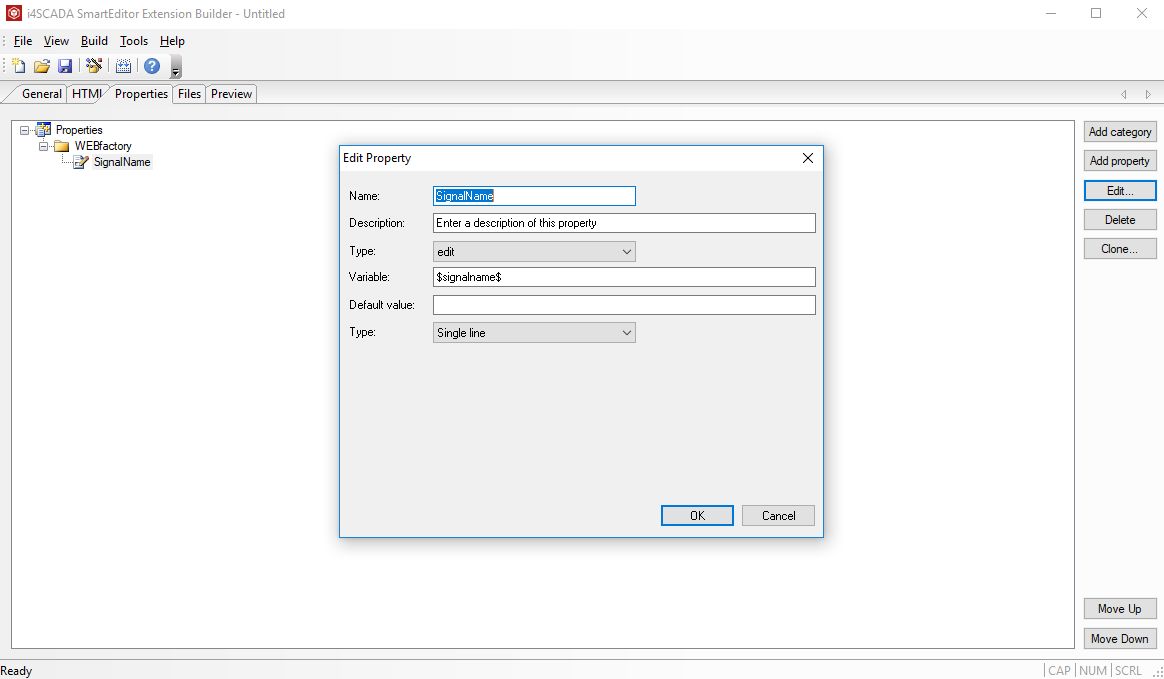
Edit Signal Name - Properties dialog
Now we need to create the HTML part of the extension. Select the HTML tab of the Extension Builder and, inside, select the Between <body></body> tags tab. Here we will place the HTML code that will display our component:
<demo-value-display params="signalName: '$signalname$'"></demo-value-display>
Note that the $signalname$ property variable created previously is used as the value of the signalName property.
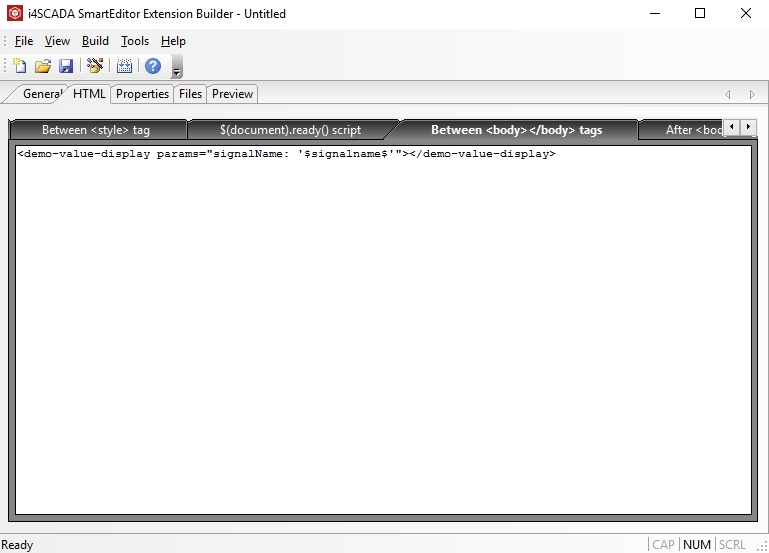
HTML TAB - Extension Builder
The next step is to save the new extension and export it as a WBX file. Save the extension project on the drive and export the SmartEditor extension afterward. The extension file will be exported in the same location where the extension project was saved and with the same name.
Using the custom extension in i4scada SmartEditor
Curious to see how your custom extension looks like after publishing the i4scada SmartEditor project? Follow these steps and see for yourself!
Follow the next steps to import your custom extension in i4scada SmartEditor:
Open i4scada SmartEditor with administrative privileges.
Access the Tools tab of the ribbon bar and open the Extension Manager.

Extension Manager - Tools TAB
Inside the Extension Manager, select the Manual Install option from the left-side panel. Browse to the folder where you have exported the custom extension and select it. Upon confirming the selection, a dialog will let you know that the extension was successfully installed.
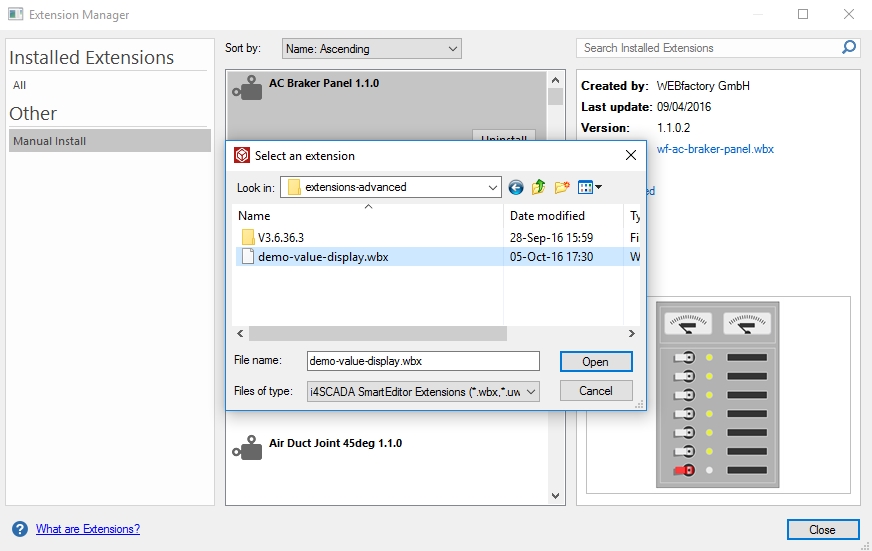
Add extension
Locate the custom extension (named Demo Value Display in this example) at the bottom of the Toolbox panel. Any newly installed extension will automatically be placed at the bottom of the extensions list.
To use it, drag it on the project page together with the custom-app-core extension (and the wf-core extension if using standard WEBfactory extensions on the same page). Configure its SignalName property and publish the project. The extension will work as expected.
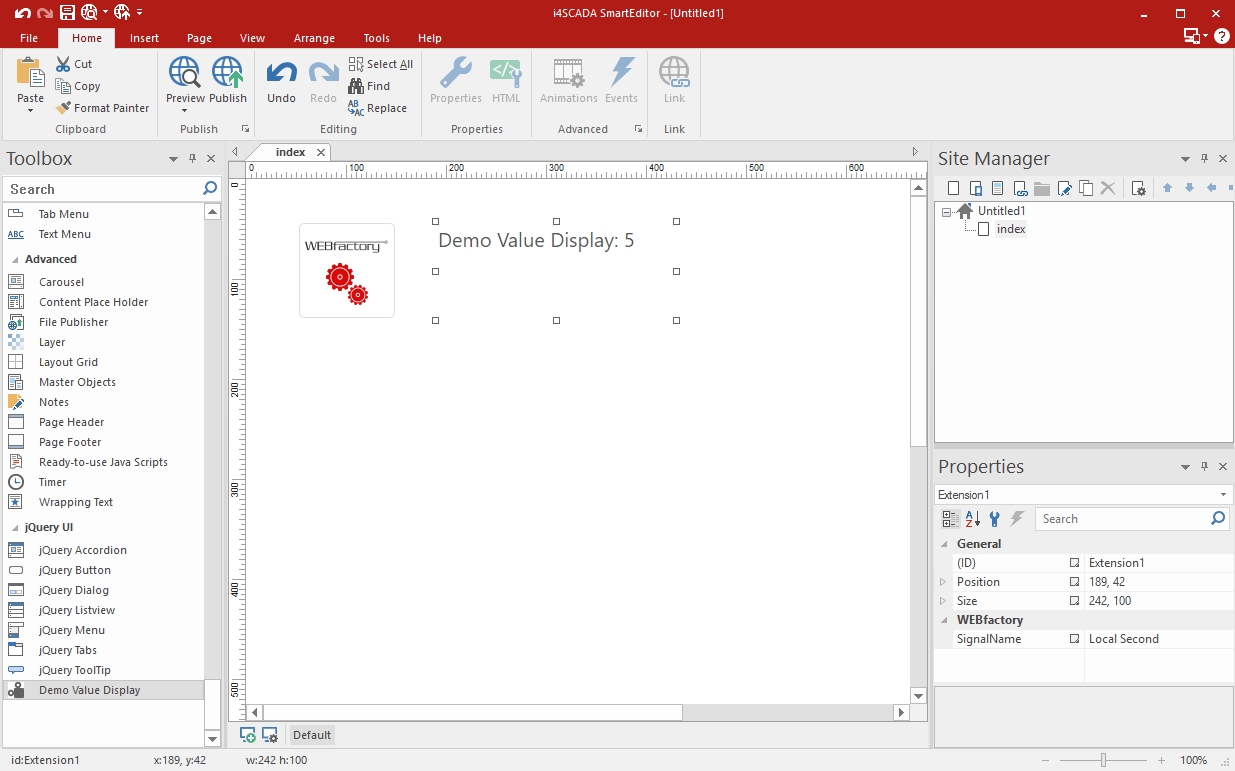
custom-app-core
Using a connector in a standalone application and do custom logic
Does using a connector in a standalone application with custom logic sound complicated? Check out this article and ease your work by following up the steps.
In this example we will describe a simple standalone framework integration, with the scope to require the connector to get signal updates and do custom logic on signal change.
Present demonstration will use the default WEBfactory i4scada signal "Local Second".
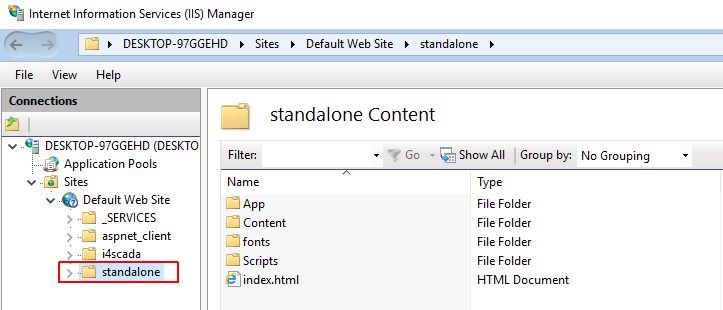
Make sure that the standalone Web Application framework is available in the IIS, as follows:
Copy the framework folder (with all its contents) under Local Disk (C) / inetpub / wwwroot.

Open IIS Manager and check under Default Web Site node.
The added standalone framework is available in IIS.
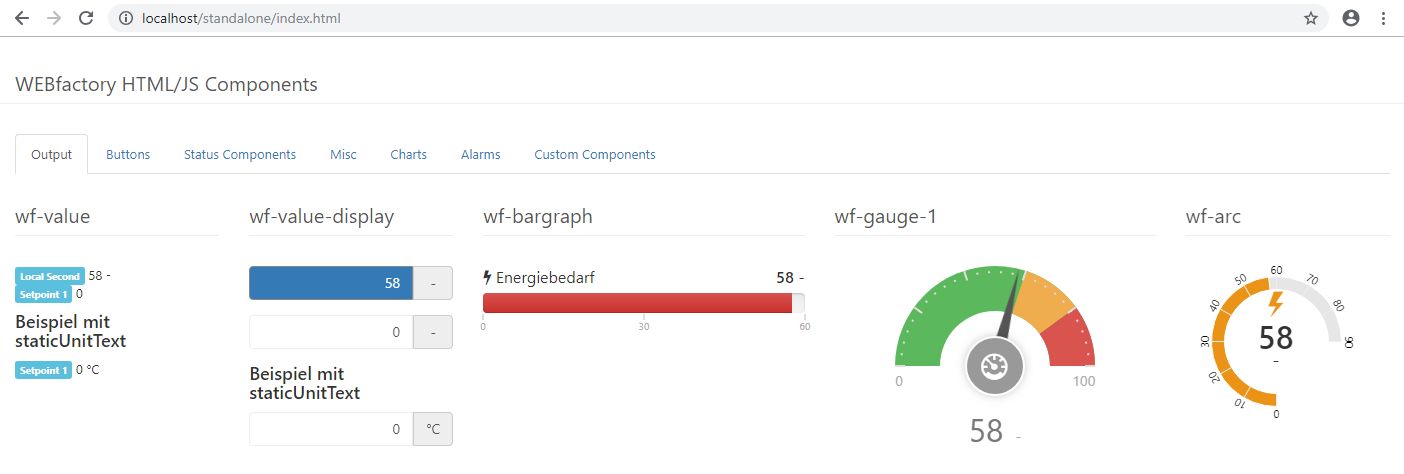
Open the index.html file in your preferred browser.
As the current tutorial will refer to the display of Signal changes in the web console, press the F12 button on your keyboard.
The Console is opened in the browser. Clear the redundant messages, by clicking the Clear console button.

After the console is cleared, no further messages are displayed.
Next, we shall open the index.html file with a text editor application (ex: Notepad ++).
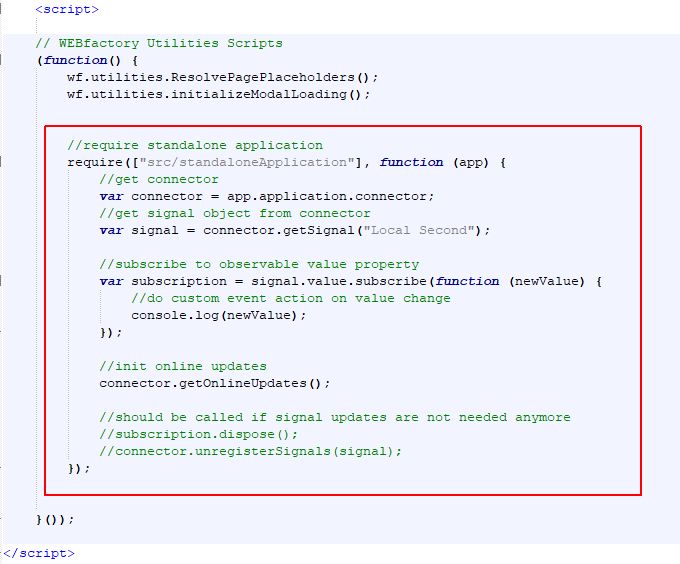
Add your custom logic snippet to the framework. For example:
//require standalone application
		require(["src/standaloneApplication"], function (app) {
			//get connector
			var connector = app.application.connector;
			//get signal object from connector
			var signal = connector.getSignal("Local Second");

			//subscribe to observable value property
			var subscription = signal.value.subscribe(function (newValue) {
				//do custom event action on value change
				console.log(newValue);
			});

			//init online updates
			connector.getOnlineUpdates();

			//should be called if signal updates are not needed anymore
			//subscription.dispose();
			//connector.unregisterSignals(signal);
		});
Return to your web application and refresh the browser.
The console displays the Signal value changes.
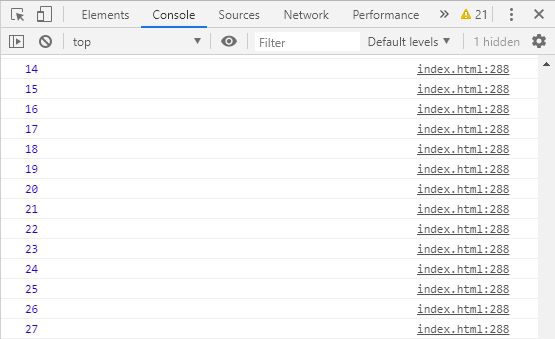
Further changes can be organized in the snippet. For example:
//require standalone application
		require(["src/standaloneApplication"], function (app) {
			//get connector
			var connector = app.application.connector;
			//get signal object from connector
			var signal = connector.getSignal("Local Second");

			//subscribe to observable value property
			var subscription = signal.value.subscribe(function (newValue) {
				//do custom event action on value change
				console.log("Do custom logic on Local Second signal" + newValue);
			});

			//init online updates
			connector.getOnlineUpdates();

			//should be called if signal updates are not needed anymore
			//subscription.dispose();
			//connector.unregisterSignals(signal);
		});
Refresh the browser where the web application is running. The console messages are updated as specified in the standalone framework.
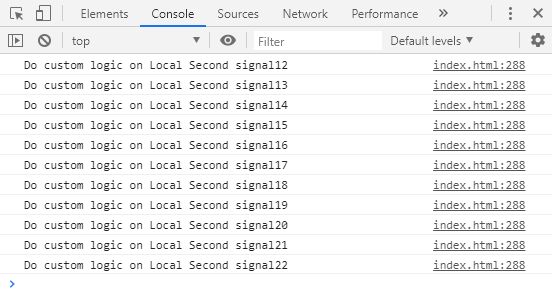
Creating a SmartEditor web application
Follow up these simple steps and dare to create your own i4scada SmartEditor web application!
Open the Internet Information Service (IIS).
Go to the Default Web Site folder and click right. Click on the Add Application option.
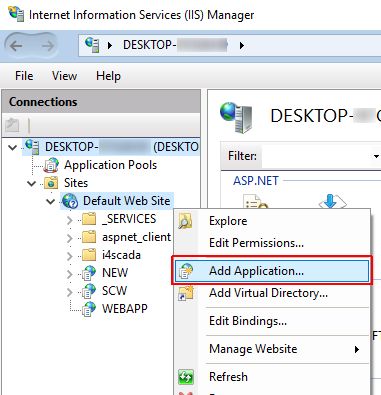
In the Add Application dialog, fill in the desired information for the new web application:
Add Alias
Add Physical path
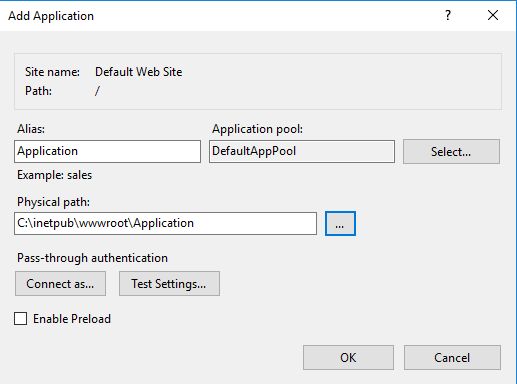
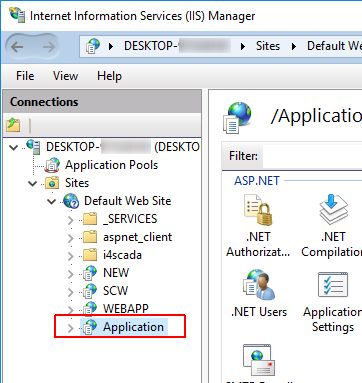
Click the OK button to confirm changes. The list of IIS Web Sites is updated with the new application.
Next, open the SmartEditor application, as Administrator.
By default, the SmartEditor project features the index page.
Add the i4-core extension to the index page.
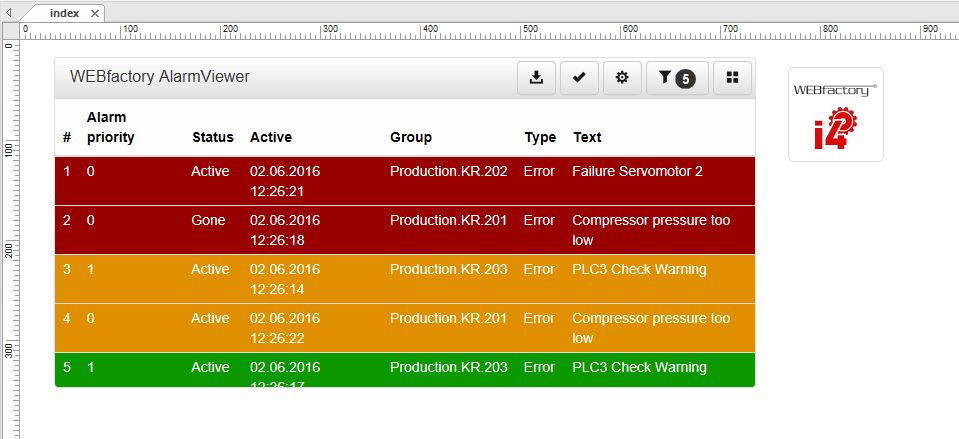
Add an extension to the index page (for example, the "wf-alarm-viewer").
Click on the Publish toolbar button.
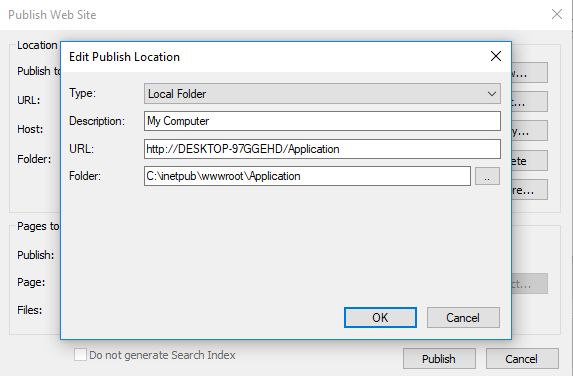
The Publish Web Site dialog pops up. Here, click on the Edit button.
Manually update the update the parameters for the publish location, to fit to the new application created in IIS.
Open the i4scada Service Manager and start the SCADA Server.
Publish the project and open it in the browser. The project is successfully opened on the configured location.
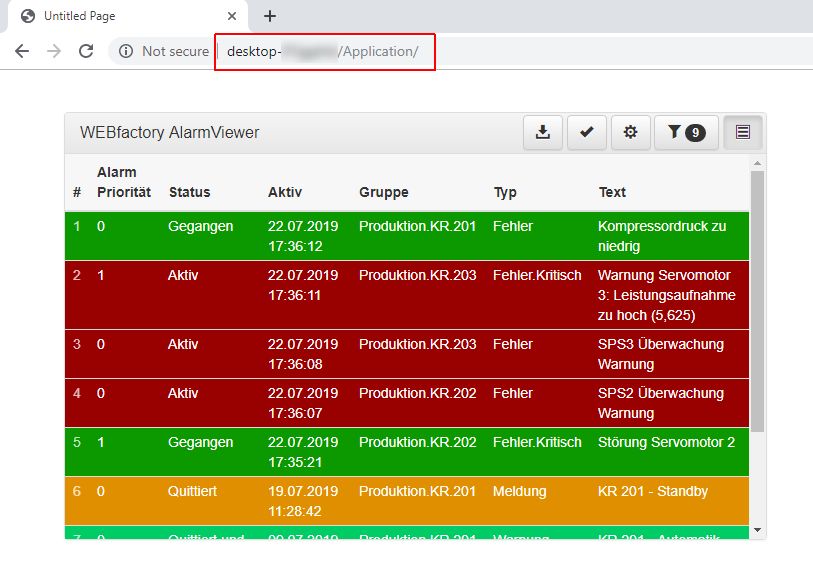
Accessing a web application via Windows Auto Login
Tired of typing your credentials? Learn how to access your i4scada SmartEditor project via Windows Auto Login.
To proceed with the present guide, we shall use the project created within the previous tutorial.
Open the i4scada Service Manager and start the i4scada Server.
Open the i4scada Studio and go to Settings / User Manager.
Add a new Domain user with your Windows credentials.
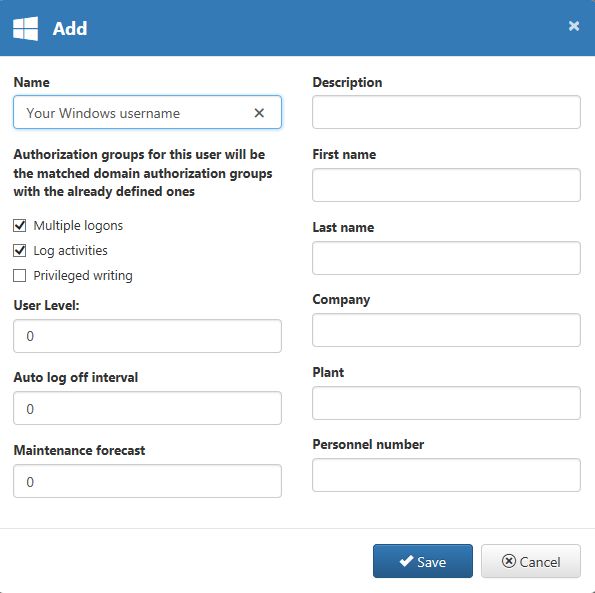
Press the button Save.
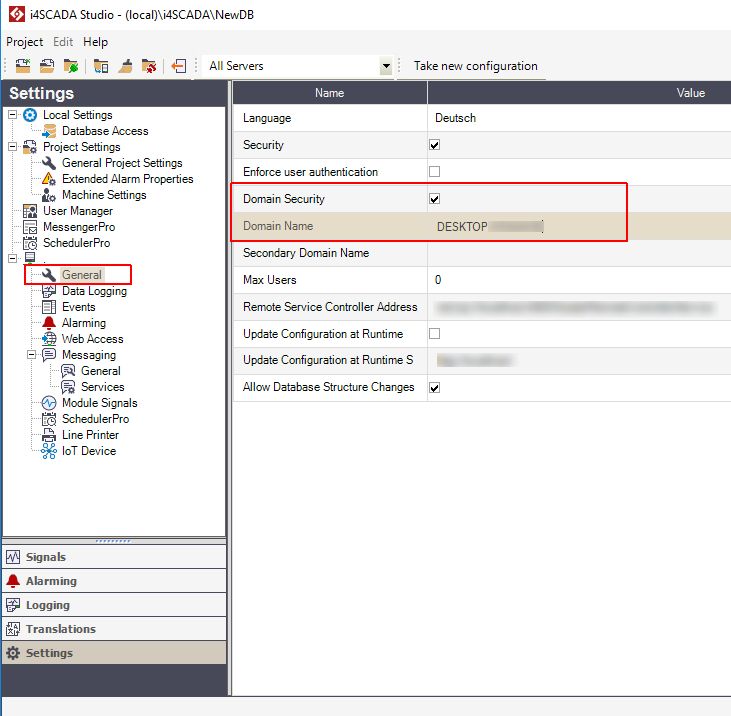
While in i4scada Studio, switch to Setting / [Database]/General and activate the Domain Security settings:
Mark Domain Security as TRUE
Add Domain Name
Open i4scada SmartEditor with administrative privileges.
Open the project you created within the previous tutorial.
Add to the index page, the wf-login-basic extension.
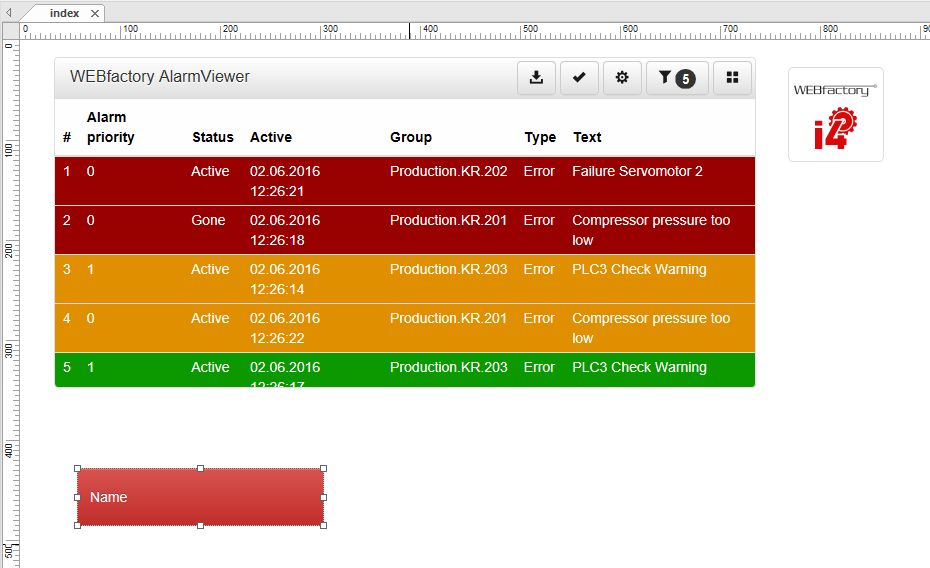
Open the Object Properties of the wf-login-basic extension.
Go to the Security properties and set the Auto Login Current Windows User option as TRUE.
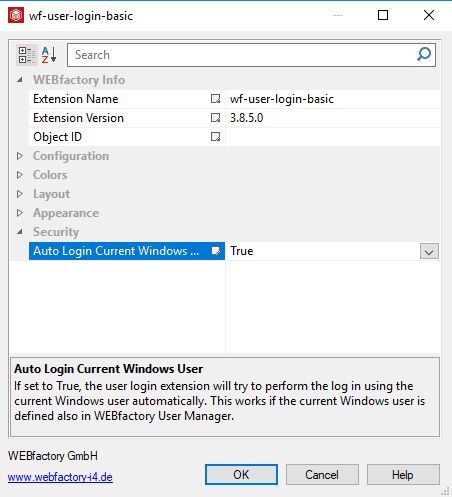
Publish the SmartEditor project and open it in the browser.
The auto login is automatically performed.
Note
Opening a SmartEditor project, with the Auto Login Current Windows User option set as true, with the Internet Edge browser, a prompt dialog will be displayed asking for the login credentials. This dialog will ONLY be displayed at the first Windows Login attempt.
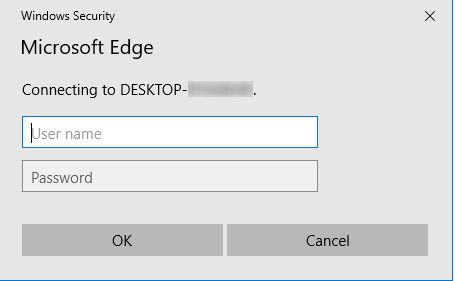
Tip
In order to open a foreign i4scada SmartEditor web application, using your own computer as host, please also visit the tutorial Accessing a web application using your computer as host via Windows Auto Login .
Accessing a web application using your computer as host via Windows Auto Login
Set up your computer as host for the i4scada SmartEditor web applications and open them via Windows Auto Login.
It might be the case that you need to open a foreign i4scada SmartEditor web application, using your own computer as host. Most probably, you will not have access to the web application creator credentials, hence, the best way to access such a project, at run-time, will be by means of Windows Auto Login:
Open the i4scada Service Manager and start the i4scada Server.
Next, open the i4scada Studio application.
Go to Settings / User Manager.
Add a new Domain user with your Windows credentials.

To preserve the changes made, press the button Save.
While in i4scada Studio, switch to Setting / [Database]/General and activate the Domain Security settings:
Mark Domain Security as TRUE
Add Domain Name

Next, open the Internet Information Service (IIS).
Go to the Default Web Site folder and click right. Click on the Add Application option.

In the Add Application dialog, fill in the desired information for the new web application:
Add Alias
Add Physical path

Click the OK button to confirm changes. The list of IIS Web Sites is updated with the new application.

Next, open the SmartEditor application, as Administrator.
By default, the SmartEditor project features the index page.
Go to the File Tab and click on the Open option.
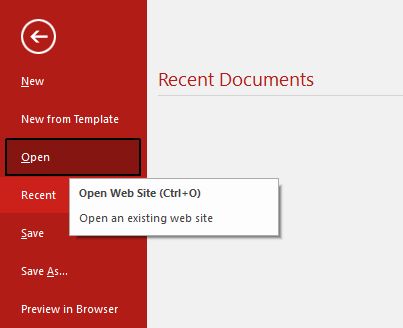
Browse for the i4scada SmartEditor web application (.wbs file) and open it.
The foreign web application is opened at design-time, in the i4scada SmartEditor application.
Click on the Publish toolbar button.
The Publish Web Site dialog pops up. Here, click on the Edit button.
Manually update the update the parameters for the publish location, to fit to the new application created in IIS.

Click button OK to confirm the changes. The Edit dialog is closed and your changes are available in the Publish Web Site dialog.
Return to SmartEditor and add a wf-user-login extension to the project (if one does not already exist).
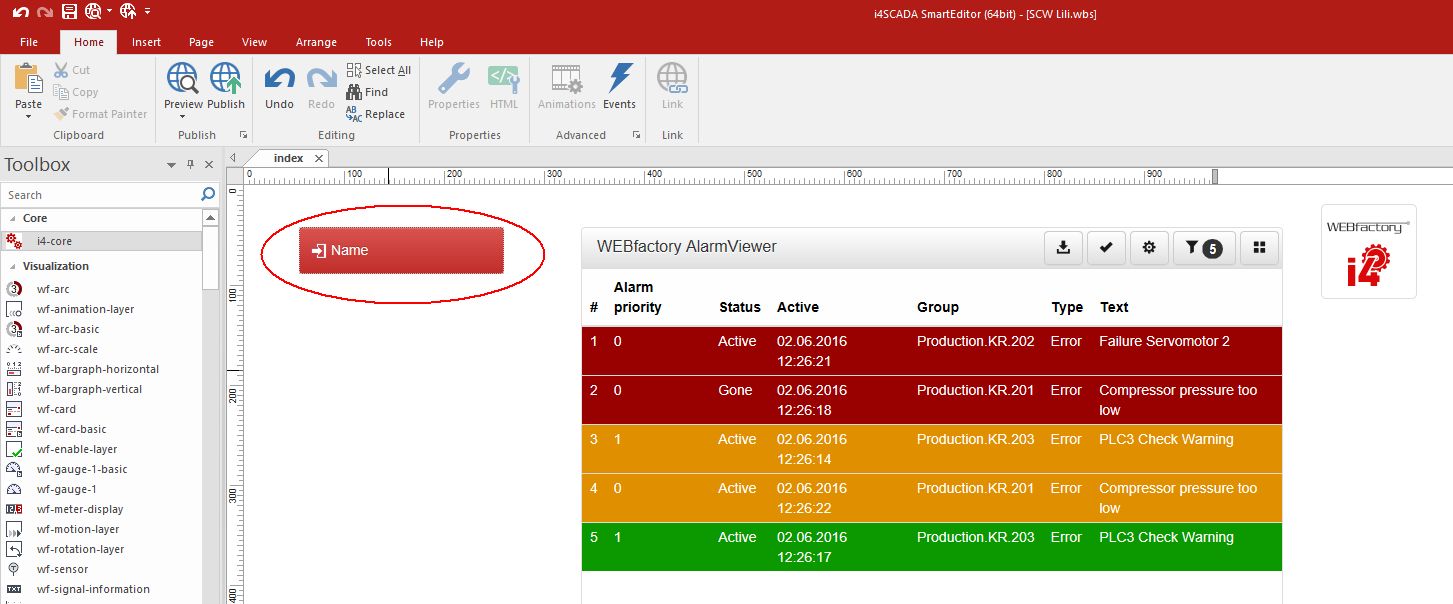
Open the Object Properties of the wf-login-basic extension.
Go to the Security properties and set the Auto Login Current Windows User option as TRUE.

Publish the SmartEditor project and open it in browser.
The auto login is automatically performed.
Note
Opening a SmartEditor project, with the Auto Login Current Windows User option set as true, with the Internet Edge browser, a prompt dialog will be displayed asking for the login credentials. This dialog will ONLY be displayed at the first Windows Login attempt.
