Installing the i4connected API
Check out this article and learn how to set up your i4connected API by going through the tutorials we have carefully prepared for you.
Setting up the i4connected API
Check out this article and learn how to deploy the i4connected portal on your working machine, by mapping the portal folder to IIS.
The first step when installing the i4connected application API consists of mapping the portal folder to IIS and converting to the application, through a custom application pool, by following the below-described steps:
Save the contents of the portal folder in the desired place on the hard drive. It is advisable not to use a very long folder path for storing the portal's files.
Open the Internet Information Services (IIS) Manager and expand the Connections tree structure in order to reach the Application Pools node.
Right-click on the node and select the Add Application Pool option.
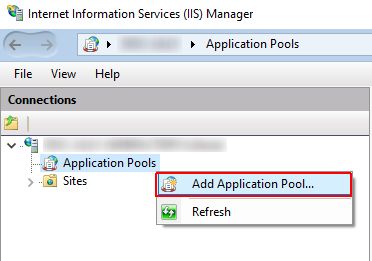
In the Add Application Pool dialog fill in the following settings:
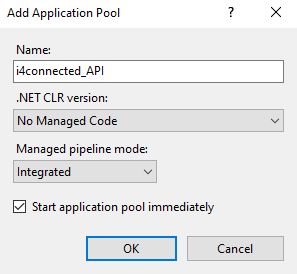
Name - Name of the new i4connected Application Pool. For the current tutorial, we will use the "ii4connected_API" name.
.NET CLR version - select the No Managed Code option.
Managed pipeline mode - select the Integrated option.
Click the OK button to save the new Application Pool.
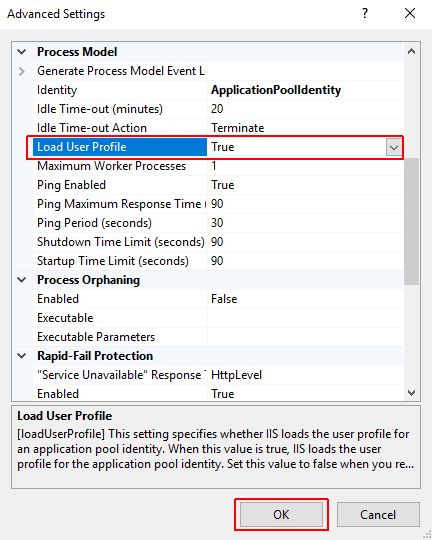
Select the new Application Pool in the list view via right-click. Select the Advanced Settings option.
In the Advanced Settings dialog set the Load User Profile option to TRUE.
Tip
If you access the SQL Server on a different server, then you need to set the Identity to a User that has access to the Analysis Services of the SQL Server. In our case, it’s the previously mentioned" ServiceUser” account.
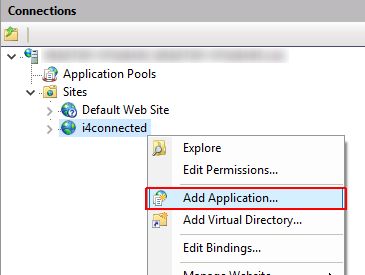
Next, select the i4connected Website and select the Add Application option.
Tip
API can be added as a separate application, not necessarily under the i4connected pool. However, in this case, the Site bindings should be properly updated.
In the Add Application dialog configure the new application as follows:
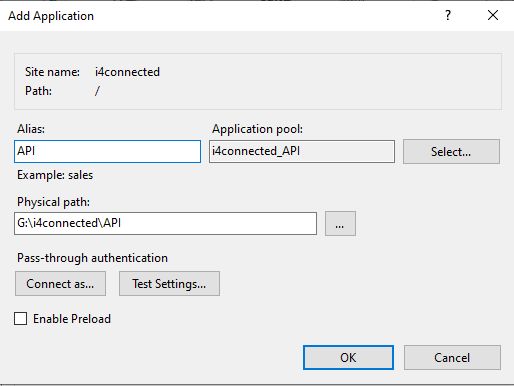
Alias - the alias of the IIS application (for example "API").
Application pool - click the Select button and add the Application Pool you created at step 4.
Physical path - use the Browse For Folder selector to apply the i4connected API folder.
Next, click the OK button to save your changes.
Setting up i4Identity
Check out these articles and learn how to set up the Single-Sign-On authentication scheme, via the i4Identity feature.
After setting up the i4connected WebApp and API, let's proceed with the i4Identity Application Pool and Site, as follows:
Open the Internet Information Services (IIS) Manager and expand the Connections tree structure in order to reach the Application Pools node.
Right-click on the node and select the Add Application Pool option.

In the Add Application Pool dialog fill in the following settings:
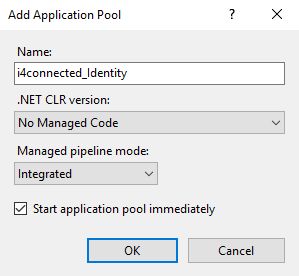
Name - Name of the new i4connected Application Pool. For the current tutorial, we will use the "i4connected_Identity" name.
.NET CLR version - select the No Managed Code option.
Managed pipeline mode - select the Integrated option.
Click the OK button to save the new Application Pool.
Select the new Application Pool in the list view via right-click. Select the Advanced Settings option.
In the Advanced Settings dialog set the Load User Profile option to TRUE.

Next, select the i4connected Website and click the Add Application option.

In the Add Application dialog configure the new application as follows:
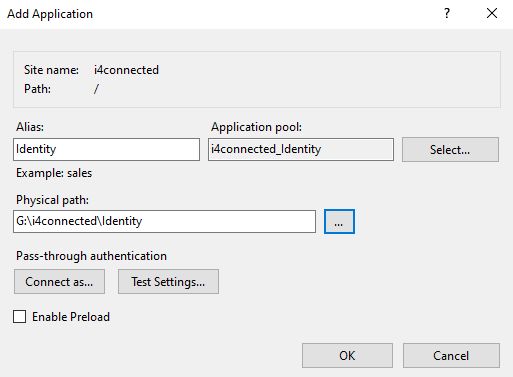
Alias - the alias of the IIS application (for example "Identity").
Application pool - click the Select button and add the Application Pool you created at step 4.
Physical path - use the Browse For Folder selector to apply the i4connected Identity folder.
Next, click the OK button to save your changes.
Editing the API configuration files
Check out this article and learn how to edit the i4connected API configuration files in just a few easy and fun steps.
After processing the changes at the level of the Internet Information Services (IIS) application, we need to edit the API configuration files to set up the correct endpoints, in order to communicate with the Analysis Services and the SQL Database, as follows:
Open the i4connected API folder, identify the WEBfactory.DWH.Web.Core.exe.config file and open it using an editor tool.

The WEBfactory.DWH.Web.Core.exe.config provides the Connection strings for the Analysis Service and SQL Database. Check if the connection strings are correct and if not, make the necessary updates.

Tip
Further on, if a proxy is needed to reach the internet you can add the following into the WEBfactory.DWH.Web.Core.exe.config file directly in front of the <runtime> definitions:
   <system.net>
        <defaultProxy
enabled="true">
        <proxy
bypassonlocal="true"
            proxyaddress="http://ip_oder_name:Port/" />
        </defaultProxy>
    </system.net>
Make sure to save your changes.
Next, open the i4connected Identity folder, identify the appsettings.json file and open it using an editor tool.

Check if the connection string is correct and if not, make the necessary changes so the connection String's Initial Catalog attribute points to the correct database.

Make sure to save your changes.
Last but not least, open the i4connected API folder, identify the appsettings.json file, and open it using an editor tool.

Make sure that the Authority Uri points to the Identity site, using the same protocol (HTTP or HTTPS).
Tip
The Authority Uri should point to the i4Identity site. The Uri should not end with the "/" character.
For example http://localhost/identity

In case your i4connected portal should be accessible by any other external services, you must also define the PublicUri.
Tip
In order to enable the Import Service function, the RabbitMQ settings need to be configured under the "appsettings.json" file under the identity folder.

Uri - amqp://localhost
ConfirmPublishTimeout - 30sec
Tip
If you desire to use your i4connected environment in association with the Swagger application, it is necessary to edit the redirect URL of the API in the database, as follows:
Open the Database in the SSMS and go to the table ClientRedirectUris.
Open the table in edit mode and change the row with the ClientId 3 to use the IP/name of the API.
Tip
For example http://192.168.0.xxx/api/docs/oauth2-redirect.html
Effective Permissions
In order that the i4connected effective permissions to be applied to your i4connected portal please follow the RabbitMQ installation and configuration guidelines.
Important
The Effective permissions feature is only available for i4connected 5.6 version. If your application version is lower, these steps are not needed.
The i4connected 5.6 runs on a security model that enforces a new set of permissions, also known as Effective Permissions.
The settings for them, are stored under the Identity appsettings.json file and can be customized by the user, as follows:
Open the i4connected Identity folder and locate the appsettings.json file.
Open the appsettings.json file with an editor tool and proceed with the following settings, under the Effective Permissions section:
Note
In case no custom changes are needed, RabbitMQ Server will take the default values for Effective Permissions, which are:

Uri - amqp://localhost
ConfirmPublishTimeout - 30sec
However, in case the RabbitMQ Server will be used for more than one i4connected installation, these settings need to be customized for each i4connected setup. In this case, we recommend the use of Virtual Hosts.
For more details about the RabbitMQ Virtual Hosts, please visit the dedicated article, here.
Uri - the Url pointing towards the RabbitMQ Server.
Tip
The Url will be formatted as follows: amqp://user:password@host:port/vh.
EffectivePermissionsExchange - the name of the RabbitMQ Exchange.
Important
In case you are using your own RabbitMQ server, please provide the WEBfactory team with the name of your RabbitMQ Exchange.
Please also make sure that yourRabbitMQ Exchange meets the following requirements:
Exchange Type - Direct
Exchange Durability - Durable
Exchange Auto delete - No
ConfirmPublishTimeout - the custom timeout value for confirming the data publishing.
ImportExchange - the name of the Importer Service Exchange, if the Importer tool should be enabled.
Make sure that the respective lines are enabled (uncommented).
Note
RabbitMQ also requires some settings at the level of the i4connected Server. For more details please also visitthe dedicated article, here