Installing the i4connected application
Check out these guides and learn how to install the i4connected Web App and API. Follow the steps rigorously and make sure that all the points are done.
As soon as the Windows Server, SQL Server, and the additional prerequisites have been installed, we can now proceed with the actual i4connected application installation.
The i4connected portal files will be delivered to you so that you can proceed with the necessary settings for the Web App, API, Server, SQL Database, and Analysis Cube. The i4connected installation pack will contain the following files:
migration.zip
server.zip
web.zip
api.zip
identity.zip
Tip
It may be the case that the i4connected files are delivered to you in a zip archive. After downloading them through HTTP, please make sure that they are unblocked before removing them from the archive.
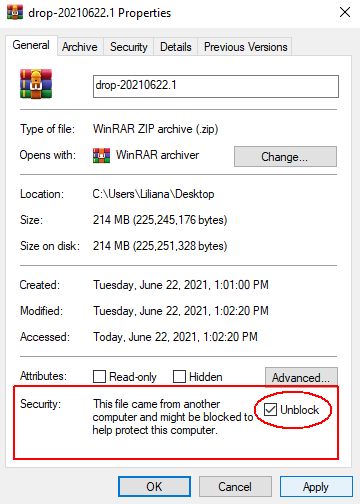
Unblocking a zip archive
Make sure that you save the contents of the portal folder in the desired place on your local hard drive.
Note
It is advisable not to use a very long folder path for storing the i4connected portal's files.
i4connected Architecture
For a better understanding of the i4connected application please check out this short article for a quick overview above the i4connected Architecture.
i4connected is a centralized data acquisition and analysis application, which provides both online and analytics data. Featuring extensible processing pipelines, uniform data handling, and heterogeneous data sources, target, and models, it enables the possibility to display web-based dashboards and SCADA / HMI presentations.

i4connected overview
Since the i4connected 5.6.15 version, the Single-Sign-On authentication scheme was introduced.
The i4connected Single-Sign-On implementation enables the users of i4connected systems to log in once and use all web applications with one login: e.g., i4designer SCADA web applications, i4connected web applications, and the swagger API page.
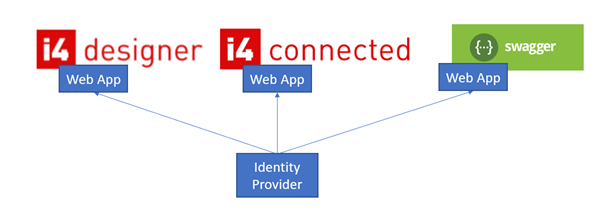
Web applications
The i4connected system API is split into two parts:
API for interaction with user data, metadata, field data, etc.
Identity API acts as an Identity Provider for the i4connected system.
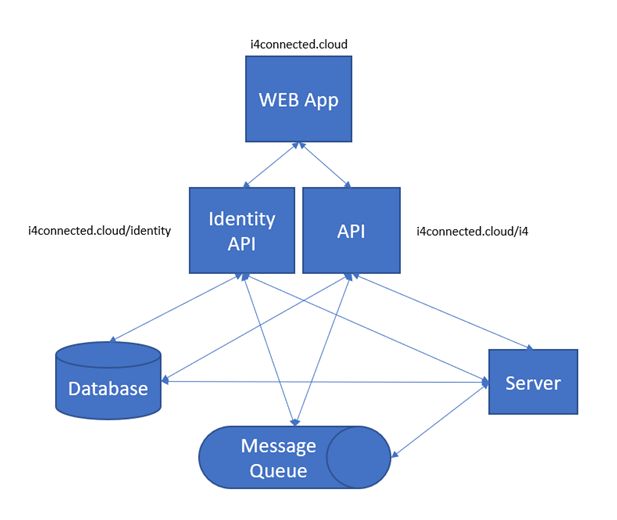
i4Identity Architecture
Configuring the SQL Database
The following article follows the steps required to properly set up the SQL database for using it with the i4connected portal or server.
The following article follows the steps required to properly set up the SQL database for using it with the i4connected portal and/or server.
For a new setup, deploy the i4connected version you need to configure, using any desired procedure.
Important
It is important to also deploy the Migration tool from the i4connected drop archive.
Next, open the i4connected Migrations folder and identify the WEBfactory.DWH.Data.Migrations.exe.config file.
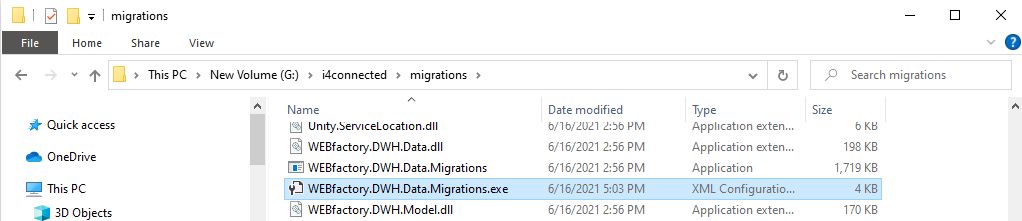
Open the file using an editor tool and edit the connection string by setting the value of the Initial Catalog to point to the new database you want to create.

Warning
If you use the name of an existing database, it means you won't create a new one, but update an existing one!
Run the migration tool to set up the initial Database, as follows:
Open the Command Prompt application with Administrative rights;
Run the standard migration command against a new database name.
Tip
For example WEBfactory.DWH.Data.Migrations.exe -b webfactory -u. The Migration tool will see that the database does not exist and create it from scratch.

Tip
As more than 200 migrations will be applied, the operation will last a while!
Once completed, the new database is created empty.
Important
If you try to start the Server or log in to the Web app, immediately after these steps, you will encounter critical errors, since no data is yet defined.
Using the addInitData.sql script to set up a basic i4conected database
Check out this article and learn how to set up a basic i4connected database having the minimum amount of data required to run the application.
Using the addInitData.sql script adds an initial set of data to a new i4connected database, created with the Migration tool (available in any i4connected built archive).
This script introduces the minimum amount of data required to run both the i4connected Server and the WebApp.
Tip
In case the files received from WEBfactory do not contain the addInitData.sql script, it should be requested from the WEBfactory Support team.
After running this script, a basic i4connected database will be available, with no other entities beyond a SuperAdministrator user and the Setup page with all the necessary tiles, allowing one to start the Server and log into the WebApplication. Upon login, the user can start customizing the installation as desired.
Important
This script is designed for i4connected version 5.6 (and later). This script WILL NOT WORK on earlier i4connected versions!
Edit and run the addInitData.sql script, as follows:
Open the addInitData.sql script with a text editor and locate the @DBNAME variable at the top of the script.
Replace the value of the @DBNAME variable with the name of your new database (the empty one created previously). Make sure to comply with the existing quoting in the script's @DBNAME variable.
Using your preferred method (SQL Management Studio, Azure Data Studio, command line, etc), run the addInitData.sql script against the SQL DB Server running your empty database.
Check the script output to see all the performed steps.
Configure the connection strings in your new i4connected deployment, using the new DB name as Initial Catalog.
Processing the Analysis Cube
Check out this article and learn more details on how to process the i4connected Analysis Cube using the xmla script directly in the SQL Management Studio.
Please follow these steps in order to process the Analysis Cube for the i4connected application:
Connect to the Analysis Services with Microsoft SQL Management Studio.
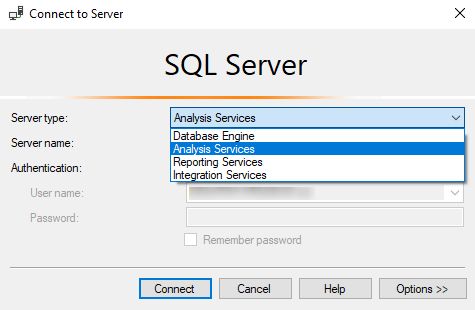
Right-click the Analysis Database node and select the Connect option.
Depending on the Database Server edition, use the CreateCube_Enterprise.xmla or the CreateCube_Standard.xmla to create the Analysis Database.
Click the Script button at the top of the window to create the xmla script which will process the database.
Important
Before executing the script, adapt the names of the database in the XMLA file.
Grant the Windows Account User (in our case the "ServiceUser") with Administrator rights for the Analysis Database.

Tip
For more details about the "ServiceUser" please refer to the SQL Server installation guide, here.
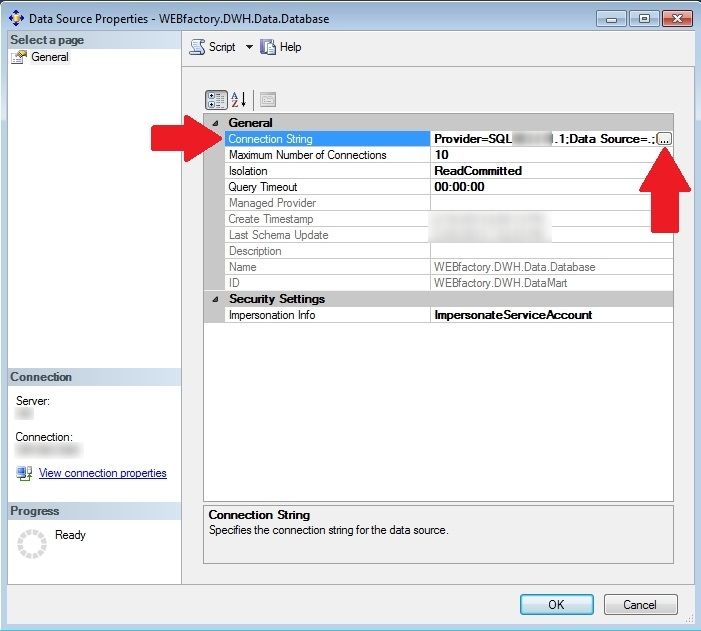
Set up the connection string in the Analysis Services database to point to your local SQL Database, created during the previous steps, and provide the correct credentials, as follows:
Go to the Analysis Services database > Data Sources > Connection string.

In the Data Source Properties, select the Connection String and press the browse (...) button to open the Connection Manager.
In the Connection Manager window fill in the correct server name.
Tip
You can use SQL Server Authentication in order to avoid security issues. This is not required but recommended.
Click OK to proceed. You can safely minimize the window as the process will run in the background without affecting your work on the machine.
Automatic Processing
Check out this article in order to learn how to proceed with the Automatic Processing for the Standard SQL Server Version.
Please follow the below steps, if you are using the Standard SQL Server version:
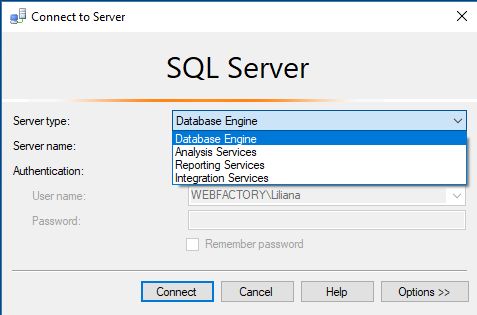
Connect to the SQL Database Server with the Microsoft SQL Management Studio application.
Check if the SQL Server Agent setting is active. If it is not, activate it.
Right-click the Jobs folder and select the New Job option.
Navigate to the Steps section, click on the New... option, and follow the below-described steps:
Enter a Step Name
Set SQL Server Analysis Services Command as Type
Copy the xmla script that was generated at the Processing the Analysis Cube section.
Check if the SQL Server Agent Service Account is selected for the Run as property.
Click the OK button to proceed.
Navigate to the Schedules section and click the option New... to set up a schedule to execute the process script.
To finalize the Job click the OK button at the bottom of the window.
Important
Go to Services and open the properties of the SQL Server Agent Service. Navigate to the Log On section, select the option This account and enter the credentials of the previously mentioned “ServiceUser” Account.
This step is needed to ensure that the Agent has sufficient rights to execute the script.

Setting up the Web App portal
Check out this article in order to build your i4connected Web App portal in order to store and manipulate data that will be used by you and your team.
The i4connected Web App portal is an interactive program built with web technologies (HTML, CSS, JS) storing and manipulating data that you and your team will be using, to perform tasks over the internet.
In order to set it up, please follow the below-described steps:
Open the i4connected WebApp folder and identify the Index.html file. Open the file using an editor tool and configure it as follows:

Set the window.remoteUrl.
Tip
The window.remoteUrl needs to end in the "/" character.
For example http://localhost/api/.
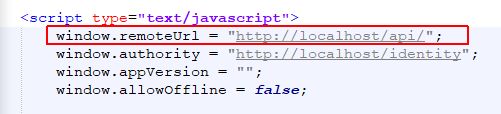
Set the window.authority, using the same address as for the window.remoteUrl, but ending in "/identity".
Tip
The window.authority does not require the ending "/" character.
For example http://localhost/identity.

Set the script src (source) for /signalr/hubs to the HTTP address of the API site.
Tip
The domain must fit the one used for the window.remoteUrl and window.authority.
For example http://localhost/api/signalr/hubs.

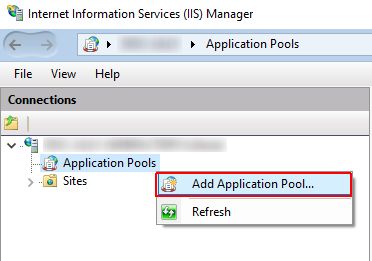
Next, open the Internet Information Services (IIS) application and expand the Connections tree structure in order to reach the Application Pools node.
Right-click on the node and select the Add Application Pool option.
In the Add Application Pool dialog, fill in the following settings: (Web Application nu server)

Name - the name of the new i4connected Application Pool, dedicated to the i4connected Web App.
.NET CLR version - select .NET CLR Version v4.0.30319.
Managed pipeline mode - select the Integrated option.
Click the OK button to save the new Application Pool.
In case the SQL Server will be accessed on a different Server, the Identity setting should be changed to point to a User that has access to the Analysis Services of the SQL Server. In our case, it’s the previously mentioned “ServiceUser” Account. To proceed with this change, please follow these steps:
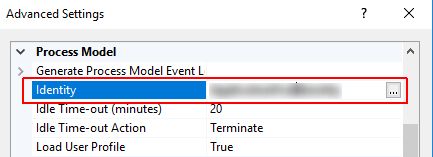
Select the new Application Pool in the list view via click-right. Select the Advanced Settings option.
In the Advanced Settings dialog set the respective user under the Identity setting.
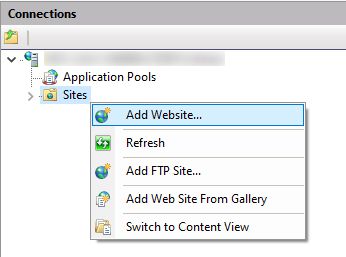
Also in the Internet Information Services application select the Sites node via click-right. Select the Add Website option.
In the Add Website dialog fill in the following settings:
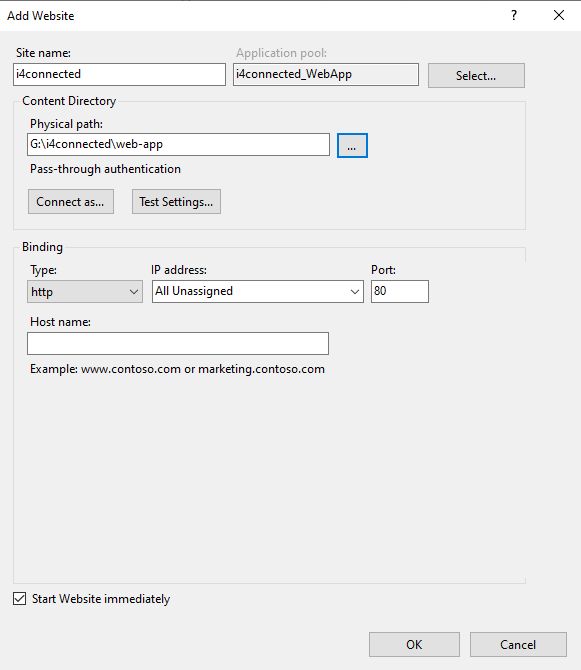
Site name - the name of the new Site.
Application Pool - click the Select button and add the Application Pool you created at step 4.
Physical path - use the Browse For Folder selector to apply the i4connected Web App folder.
Tip
The Add Website window allows you to manage the Site Binding. For more details about Site Bindings, please also visit this article, here.