Installing the User invitation system
Check out this article and learn how to install the User invitation system by setting up the database and the application portal.
As the Invitation system is an add-on to the i4connected platform, it will be delivered as a separate file of the installation pack (i4-invitation-app.zip).
Prerequisites
In order for the i4connected User invitation system to function properly, the following prerequisites must be met:
i4connected 5.6.15 or higher
ASP.NET Core Runtime 6.0 – Hosting Bundle - the application can be downloaded from here.
Database settings
The Database settings for the User invitation system can be found as follows:
Open Microsoft SQL Server manager Studio and connect to the database server. Open the Settings table by means of right-clicking and Edit Top 200 Rows.
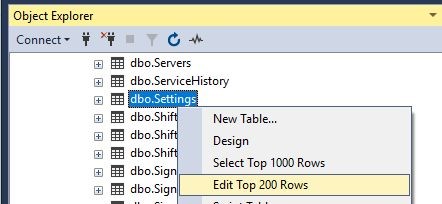
The User Invitation application settings are:
feature.inviteUsersByEmail.enabled: true
feature.inviteUsersByEmail.maxInvitationValidDays: 28
feature.inviteUsersByEmail.friendlyReminderDays: 14
feature.inviteUsersByEmail.activationProcessUrl: empty
feature.inviteUsersByEmail.maxRetryCount: 5
feature.inviteUsersByEmail.retryIntervalInMinutes: 5
feature.inviteUsersByEmail.maxEmailsPerHour: 60
Note
The above-listed values are the default ones, but they can be customized.
Invitation App settings
The User Invitation Application settings are split up into two sections:
Setting up Internet Information Services
In order to set up the IIS for the User Invitation app, please follow the below-described steps:
Save the contents of the i4-invitation-app folder in the desired place on the hard drive. It is advisable not to use a very long folder path for storing the files.
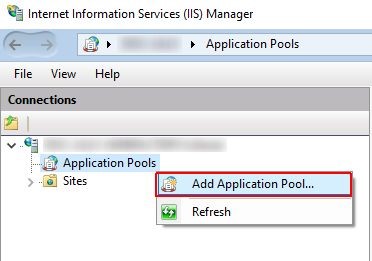
Open the Internet Information Services (IIS) Manager and expand the Connections tree structure in order to reach the Application Pools node.
Right-click on the node and select the Add Application Pool option.
In the Add Application Pool dialog fill in the following settings:
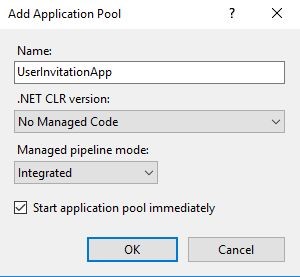
Name – Name of the User Invitation Application Pool.
.NET CLR version – select No Managed Code option
Managed pipeline mode – select the Integrated option
Click the OK button to save the new Application Pool.
Next, select the i4connected Website and select the Add Application option.
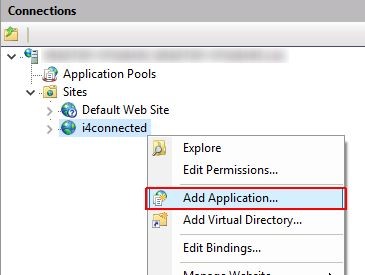
In the Add Application dialog organize the following settings:
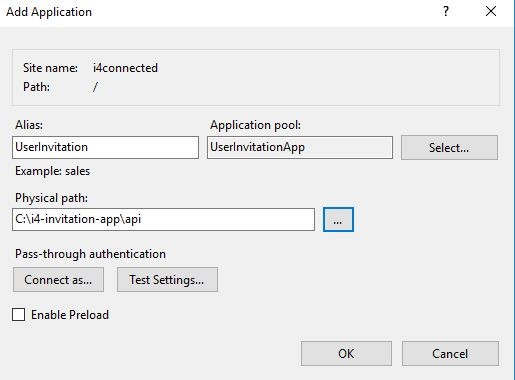
Alias – the alias of the IIS application (for example „UserInvitation“
Application pool: click the Select button and apply the UserInvitationApp Application Pool created at step 4.
Psychical path – use the Browse For Folder selector to apply the i4-invitation-app folder.
Next, click the OK button to save your changes.
Setting up the "i4connected.invitation" client
An entry for the "i4connected.invitation" client needs to be added to the Clients table when the Invitation ConnectedApi Native mode is enabled, as follows:
Connect to your i4connected database server, using either the Azure Data Studio or Microsoft SQL Server Manager Studio.
Open the Clients table in edit mode and add a new client for the i4connected.invitation app.

Make sure to save your changes.
To apply the above settings, please make sure to Restart Internet Information Services (IIS).

Setting up the User Invitation system app settings
In order to configure the User invitation application, please follow the below-described steps:
Open a File Explorer window and locate the appsettings.json file under the i4-invitation-app folder.
Open the appsettings.json file using an editor tool.
The following settings are listed:
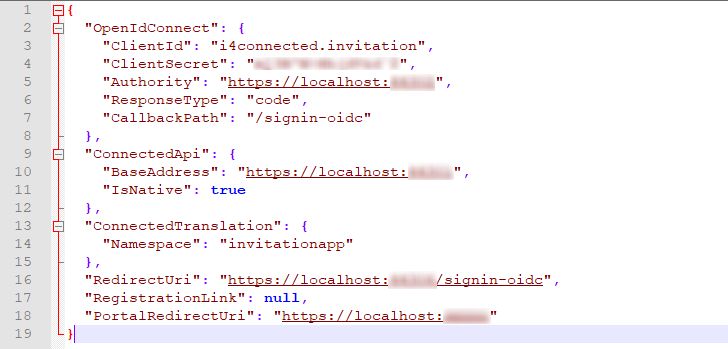
OpenIDConnect – lists the settings needed for the interaction/communication of the Invitation Application with the Identity and Access Management system (IAM):
ClientId - sets the i4connected invitation system client ID.
ClientSecret - sets the i4connected Invitation system client secret.
Authority - sets the i4connected authority URL.
ResponseType - sets the type of data contained in the response.
CallbackPath - sets the path where the server will redirect during authentication.
ConnectedApi
BaseAddress - sets the i4connected API endpoint address
IsNative - enables/disables the native mode.
In native mode, accepting an invitation will redirect the user to i4Identity, where he/she will be able to log in with an existing account or register a new account in the system. The new user will be created by the identity module, an email will be sent to the user for account confirmation, and the user will be able to log in with the credentials they’ve set up.
ConnectedTranslation
Namespace - describes which translation namespace should be used to translate the texts.
RedirectUri - sets the redirect URI, which is the callback entry point of the application. This setting will overwrite the RedirectUri of the OpenIdConnect provider.
RegistrationLink - sets an optional registration link.
PortalRedirectUri - sets the portal redirect URI, which occurs each time a user successfully accepts an invitation.
Note
The portal redirect URI should be different than the initial entry point of the application.
Fill in the custom values and save the appsettings.json file changes.