Installing the i4connected Import Service
This article describes the i4connected Import Service and the necessary configuration.
As the Import Service is an add-on to the i4connected platform, it will be delivered as a separate file of the installation pack: i4-import-service.zip.
To install the I4connected Import Service, please proceed as follows:
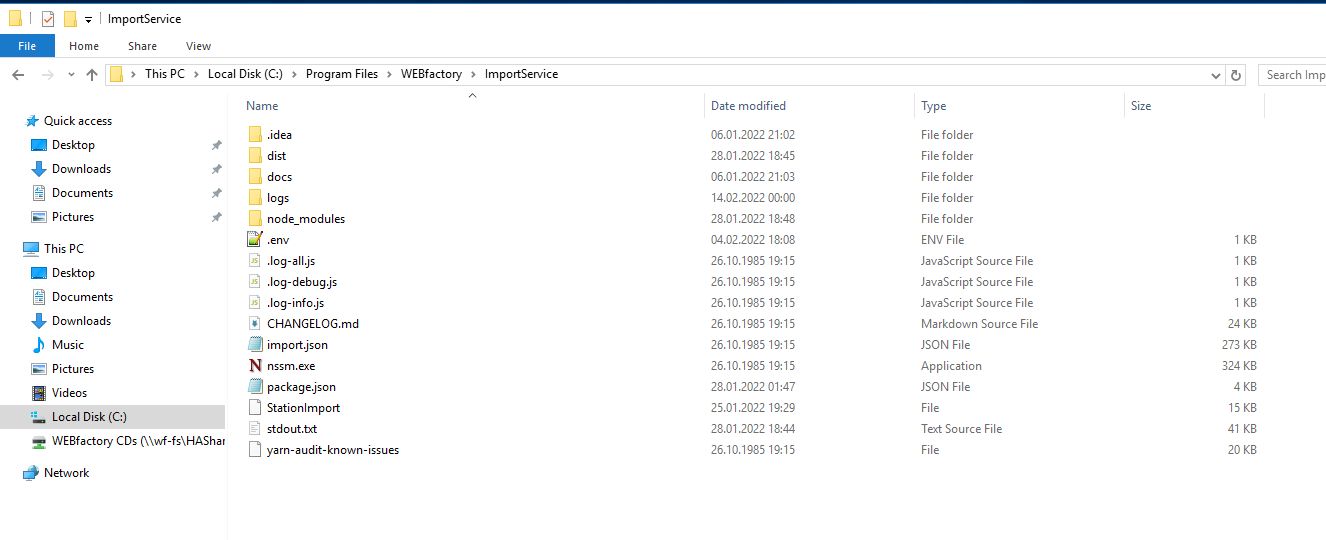
Copy the output for the Import Service and paste it to a known location.

Open the cmd console as Administrator and execute the following line, under the Node JS service:

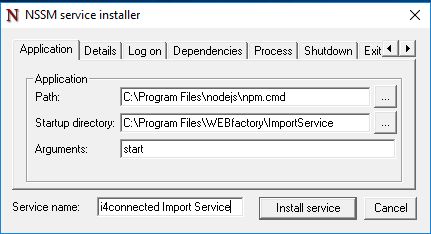
The NSSM Service installer dialog will be opened.
Fill in the following settings under the Application tab:

Path - select the path to the npm.cmd folder;
Startup directory - select the path to the importer folder;
Arguments - start;
Service name - name of the service.
Optionally, you can switch to the Details tab to fill in more detailed information.
Next, click the Install service button.
As soon as the installation is successfully done, start the i4connected Import Service Windows service. The logs will be saved in the output path.

Warning
Each time the Import Service settings are updated, the i4connected Import Service Windows Service needs to be restarted.
To uninstall the i4connected Import Service, please proceed as follows:
Stop the i4connected Import Service Windows service.

Open cmd as Administrator in the nodejs service directory.
Execute nssm.exe remove "window service name".
Configuring the Import Service
In order to configure the Importer the following .env settings need to be processed:
PORT= 8002
VITALS_PORT= 9002
SERVER_SHUTDOWN_WAIT_TIME= 0
I4CORE_BASE_URL= https://localhost:44301/
I4AUTHORITY_URL= https://localhost:44302/
I4CORE_USER= username
I4CORE_PASSWORD= password
CLIENT_ID= importer
CLIENT_SECRET= client secret
RABBITMQ_URI= amqp://localhost:5672
RABBITMQ_EXCHANGE= import.requests
RABBITMQ_QUEUE= importrequests
RETRY_COUNT=5
REQUEST_TIMEOUT=180000
Important
The user and password used for the Importer Service should have global administrator permissions in the system, since it will be used to execute the imports.
Configuring the Database for Importer
The following settings are necessary so that the service can connect to the API. The following settings are made by the migration tool.
Id | 4 |
|---|---|
Enabled | 1 |
ClientId | importer |
ProtocolType | oidc |
RequireClientSecret | 1 |
ClientName | Importer Tool |
Description | NULL |
ClientUri | NULL |
LogoUri | NULL |
RequireConsent | 0 |
AllowRememberConsent | 1 |
AlwaysIncludeUserClaimsInIdToken | 0 |
RequirePkce | 0 |
AllowPlainTextPkce | 0 |
RequireRequestObject | 0 |
AllowAccessTokensViaBrowser | 0 |
FrontChannelLogoutUri | NULL |
FrontChannelLogoutSessionRequired | 1 |
BackChannelLogoutUri | NULL |
BackChannelLogoutSessionRequired | 1 |
AllowOfflineAccess | 1 |
IdentityTokenLifetime | 300 |
AllowedIdentityTokenSigningAlgorithms | NULL |
AccessTokenLifetime | 3600 |
AuthorizationCodeLifetime | 300 |
ConsentLifetime | NULL |
AbsoluteRefreshTokenLifetime | 2592000 |
SlidingRefreshTokenLifetime | 1296000 |
RefreshTokenUsage | 1 |
UpdateAccessTokenClaimsOnRefresh | 0 |
RefreshTokenExpiration | 1 |
AccessTokenType | 0 |
EnableLocalLogin | 1 |
IncludeJwtId | 1 |
AlwaysSendClientClaims | 0 |
ClientClaimsPrefix | client_ |
PairWiseSubjectSalt | NULL |
Created | 1900-01-01 00:00:00.0000000 |
Updated | NULL |
LastAccessed | NULL |
UserSsoLifetime | NULL |
UserCodeType | NULL |
DeviceCodeLifetime | 300 |
NonEditable | 0 |
ID | ClientId | Description | Value | Expiration | Type | Created |
|---|---|---|---|---|---|---|
4 | 4 | NULL | **** | NULL | SharedSecret | 1900-01-01 00:00:00.0000000 |