AlarmViewer
AlarmViewer Customization
In order to build custom AlarmViewer functionality in a Ewon by HMS Networks AlarmViewer visualization, some basic coding is needed. The recommended tool for achieving this is Microsoft Visual Studio.
By accessing the AlarmViewer properties using code, custom functionality can be created.
It is highly recommended to follow the tutorials using the sample solution provided below!
This sample solution is intended to be used as an example for the tutorial steps.
IMPORTANT: The solution uses the Silverlight Ewon by HMS Networks dll files stored on the local machine.
For the sample solution to work out of the box, the referenced dll files must be stored in the default location: C:\Program Files (x86)\WEBfactory 2010 \\Standard.
If your installation directory at a different location, please reference the correct dll files.
IMPORTANT: Translations and Project Authorizations will not work unless the translation texts and project authorizations are defined in Ewon by HMS NetworksStudio.
The AlarmViewer control supports bindings to its properties. Example:
GroupsFilter="{Binding GroupsFilter}"
The following tutorials will guide you through the process of creating custom buttons for Alarm Viewer, creating custom menus for Alarm Viewer and using translations and project authorizations for the custom buttons and menus.
Creating Custom Buttons in Alarm Viewer
In order to build custom AlarmViewer functionality in a Ewon by HMS Networks AlarmViewer visualization, some basic coding is needed. The recommended tool for achieving this is Microsoft Visual Studio.
By accessing the AlarmViewer properties using code, custom functionality can be created.
It is highly recommended to follow the tutorials using the sample solution provided below!
This sample solution is intended to be used as an example for the tutorial steps.
IMPORTANT: The solution uses the Silverlight Ewon by HMS Networks dll files stored on the local machine.
For the sample solution to work out of the box, the referenced dll files must be stored in the default location: C:\Program Files (x86)\WEBfactory 2010 \\Standard.
If your installation directory at a different location, please reference the correct dll files.
IMPORTANT: Translations and Project Authorizations will not work unless the translation texts and project authorizations are defined in Ewon by HMS NetworksStudio.
Creating the Custom Buttons
In order to add custom buttons to a AlarmViewer visualization and make them interact with AlarmViewer properties, only the code source and the XAML code for the desired buttons need to be inserted.
This is possible because the data context set is passed automatically to the added buttons.
A custom button code example:
	private void uxRefreshButton_Click(object sender, System.Windows.RoutedEventArgs e)
        {
            alarmViewer.RefreshAlarms();
        }
The XAML code for the button:
<Button
                x:Name="uxRefreshButton" Height="25" Margin="0,0,10,10"
                Content="{Binding ElementName=alarmViewer, Path=ViewModel.TranslationsManager.Refresh}"
                IsEnabled="{Binding ElementName=alarmViewer, Path=ViewModel.MenuActionsAvailability.CanRefresh}"
				Visibility="{Binding ElementName=alarmViewer, Path=ViewModel.MenuActionsAvailability.IsRefreshVisible, Converter={StaticResource booleanVisibilityConverter}}"
                Click="uxRefreshButton_Click" />
Like in the custom menu example, the bindings need to be set up in XAML. This time, there is no need for passing manually the data context set, so the bindings would work without any other code.
NOTE
The buttons should be placed in a Grid element inside the XAML.
IMPORTANT
Use the ViewModel property of the Alarm Viewer instead of casting the DataContext property to either IWFAlarmViewerViewModel interface or WFAlarmViewerViewModel class.
Code example:
Next:
Creating Custom Menus in Alarm Viewer
Using Translations with Alarm Viewer Custom Menus and Buttons
Using Project Authorizations with Alarm Viewer Custom Menus and Buttons
Creating Custom Buttons in Alarm Viewer
In order to build custom AlarmViewer functionality in a Ewon by HMS Networks AlarmViewer visualization, some basic coding is needed. The recommended tool for achieving this is Microsoft Visual Studio.
By accessing the AlarmViewer properties using code, custom functionality can be created.
It is highly recommended to follow the tutorials using the sample solution provided below!
This sample solution is intended to be used as an example for the tutorial steps.
IMPORTANT: The solution uses the Silverlight Ewon by HMS Networks dll files stored on the local machine.
For the sample solution to work out of the box, the referenced dll files must be stored in the default location: C:\Program Files (x86)\WEBfactory 2010 \\Standard.
If your installation directory at a different location, please reference the correct dll files.
IMPORTANT: Translations and Project Authorizations will not work unless the translation texts and project authorizations are defined in Ewon by HMS NetworksStudio.
IMPORTANT:
Use the ViewModel property of the Alarm Viewer instead of casting the DataContext property to either IWFAlarmViewerViewModel interface or WFAlarmViewerViewModel class.
Creating the Custom Menu
In order to add a custom menu to the AlarmViewer visualization, we first need to prepare the code.
A custom menu will have the functionality based on the controls data context: a menu item can change states from enabled to disabled, from visible to invisible or can change the display text based on the controls logic.
For example, the AlarmViewer control has built in user manager interaction. A user might not have privileges to access one option, so the control will pass this setting to the custom menu, making that item invisible or inactive for that user.
Another example is the language of the text - the language will change in the custom menu depending on the LanguageSelector control.
This important functionality is added using bindings in XAML code. Each menu item or button will be bound to its specific states.
Because the menu items don't automatically inherit the data context (for this particular menu control used in the Alarm Viewer), we will need to set the data context in each menu item.
For setting the data context in each menu item, we need to initialize the method that will do this, when the layout is generated:
	public MainPage()
        {
            // Required to initialize variables
            InitializeComponent();

            // We need to register to this event because the menu items rely on having the data context set to the same data context as the Alarm Viewer
            alarmViewer.LayoutUpdated += alarmViewer_LayoutUpdated;
        }

        private void alarmViewer_LayoutUpdated(object sender, EventArgs e)
        {
            alarmViewer.LayoutUpdated -= alarmViewer_LayoutUpdated;

            // Now we can set the data context of the menu items to the data context of AlarmViewer;
            // this way, the texts and the automatic enabling/disabling of the actions are available
            SetMenuItemsDataContext(myMenu.Items);
        }
The method used to set the data context in each menu item is:
	private void SetMenuItemsDataContext(ItemCollection items)
        {
            // Normally, this shouldn't be necessary, but it seems the menu items don't inherit the data context for this particular type of menu control.
            // For other menu controls it could work the same way as it is implemented for the buttons (directly binding from XAML)
            foreach (var item in items)
            {
                AgMenuItem menuItem = item as AgMenuItem;
                if (menuItem != null)
                {
                    menuItem.DataContext = alarmViewer.ViewModel;
                    if (menuItem.Items.Count > 0)
                    {
                        SetMenuItemsDataContext(menuItem.Items);
                    }
                }
            }
        }
Now that the data context is passed to each menu item, the next method will display the menu as a popup:
	 private void WFAlarmViewer_AlarmViewerRightClick(object sender, WFSilverlight.Alarms.AlarmViewerRightClickEventArgs e)
        {
            // Show the popup menu
            myMenu.Popup(alarmViewer, e.Position);
        }
All the setup is done, now all that is left is to add the custom menu item(s):
	private void uxMenuRefresh_Click(object sender, EventArgs e)
        {
            alarmViewer.RefreshAlarms();
        }
This is the code source part of the custom item, but the item itself has not been yet created. For this, some XAML code needs to be added:
  <!-- Custom Menu -->
        <DevExpress_AgMenu:AgPopupMenu x:Name="myMenu" ItemsCheckShowing="ShowCheckAreaIfChecked" >

            <DevExpress_AgMenu:AgMenuItem
                x:Name="uxMenuRefresh" ClosePopupsOnClick="True"
                Header="{Binding TranslationsManager.Refresh}"
                Visibility="{Binding MenuActionsAvailability.IsRefreshVisible, Converter={StaticResource booleanVisibilityConverter}}"
                IsEnabled="{Binding MenuActionsAvailability.CanRefresh}"
                Click="uxMenuRefresh_Click"/>

	</DevExpress_AgMenu:AgMenuItem>
As the menu item is created, the Header, Visibility and IsEnabled bindings are set up to interact with the TranslationManager and with the Alarm Viewer.
The Header binding allows the text of the menu item to be translated in to the selected language.
The Visibility binding allows the menu item to be visible only for authorized users
The IsEnabled binding allows the menu item to be enabled only for authorized users
Apart from the bindings, the Click event handler is declared in the XAML structure.
Using Translations with Alarm Viewer Custom Menus and Buttons
In order to build custom AlarmViewer functionality in a Ewon by HMS Networks AlarmViewer visualization, some basic coding is needed. The recommended tool for achieving this is Microsoft Visual Studio.
By accessing the AlarmViewer properties using code, custom functionality can be created.
It is highly recommended to follow the tutorials using the sample solution provided below!
This sample solution is intended to be used as an example for the tutorial steps.
IMPORTANT: The solution uses the Silverlight Ewon by HMS Networks dll files stored on the local machine.
For the sample solution to work out of the box, the referenced dll files must be stored in the default location: C:\Program Files (x86)\WEBfactory 2010 \\Standard.
If your installation directory at a different location, please reference the correct dll files.
IMPORTANT: Translations and Project Authorizations will not work unless the translation texts and project authorizations are defined in Ewon by HMS NetworksStudio.
IMPORTANT:
Use the ViewModel property of the Alarm Viewer instead of casting the DataContext property to either IWFAlarmViewerViewModel interface or WFAlarmViewerViewModel class.
In order to use translations in Alarm Viewer's custom menus and buttons, the symbolic texts for the required translations must be defined in Ewon by HMS NetworksStudio.
Defining symbolic texts in Ewon by HMS NetworksStudio
The needed symbolic texts defined in the Translations section of the Ewon by HMS NetworksStudio
This example uses the Custom Menu in Alarm Viewer and Custom Buttons in Alarm Viewer tutorials as references.
1. Connector and Symbolic Text list
The first step is to create an instance of the Connector and declare a list of symbolic texts. The symbolic texts must be defined in the database using Ewon by HMS NetworksStudio.
Before the constructor, initialize the connector:
private IWFConnector connector;
and define the list of symbolic texts for translations:
private readonly string[] symbolicTexts = new[]
                                             {
                                                 "AlarmViewer_CustomProject_MyCustomAction_Menu",
                                                 "AlarmViewer_CustomProject_MyCustomAction_Button"
                                             };
2. Initializing the connector instance and register the symbolic text
Next, the connector instance must be initialized, and the symbolic texts must be registered to the connector with a callback method that is called every time the WF Language changes. This method will provide the registered symbolic text with the translations for the current language.
 private void InitilizeWFConnector()
        {
            connector = new WFConnector(false); //the connector is not in design time
            connector.RegisterLanguageChangedHandler(symbolicTexts, OnLanguageChangedHandler);
//register the symbolic texts to the connector with a callback method that is called every time the WF Language changes.
This method will provide the symbolic text registered with the translations of those in the current language
}3. The OnLanguageChangedHandler method
The this method we will specify which translatable symbolic text goes where. The desired control will be called with the correct property (the property that displays the text on the screen). In this example, we will add translatable texts to a custom menu and a custom button defined in the previous tutorials (uxMenuCustomAction and uxCustomButtonAction):
private void OnLanguageChangedHandler(string[] symbolicNames, string[] translationTexts)
        {
            uxMenuCustomAction.Header = translationTexts[0];    //the property that displays the text on the screen is Header.
            uxCustomButtonAction.Content = translationTexts[1];  //the property that displays the text on the screen is Content.
        }
When assigning the translationTexts to the controls, it is important to follow the items order in the list. The first item is always number 0.
It is always recommended to use IDisposable in order to free unused memory:
#region IDisposable

        public void Dispose()
        {
            DisposeConnector();
        }

        private void DisposeConnector()
        {
            if (connector != null)
            {
                connector.UnregisterLanguageChangedHandler(null, OnLanguageChangedHandler);
            }
        }

        #endregion
Code example:
Below you have the possibility to see the complete code of the project. The code that was added in this tutorial is marked in red. The same code is available in the downloadable solution. Check the top of this page for the download link.
When running the project, the controls that have translatable symbolic texts will adjust depending on the selected language:
English language
German language
Next:
Using Project Authorizations with Alarm Viewer Custom Menus and Buttons
Using Project Authorizations with Alarm Viewer Custom Menus and Buttons
In order to build custom AlarmViewer functionality in a Ewon by HMS Networks AlarmViewer visualization, some basic coding is needed. The recommended tool for achieving this is Microsoft Visual Studio.
By accessing the AlarmViewer properties using code, custom functionality can be created.
It is highly recommended to follow the tutorials using the sample solution provided below!
This sample solution is intended to be used as an example for the tutorial steps.
IMPORTANT: The solution uses the Silverlight Ewon by HMS Networks dll files stored on the local machine.
For the sample solution to work out of the box, the referenced dll files must be stored in the default location: C:\Program Files (x86)\WEBfactory 2010 \\Standard.
If your installation directory at a different location, please reference the correct dll files.
IMPORTANT: Translations and Project Authorizations will not work unless the translation texts and project authorizations are defined in Ewon by HMS NetworksStudio.
IMPORTANT:
Use the ViewModel property of the Alarm Viewer instead of casting the DataContext property to either IWFAlarmViewerViewModel interface or WFAlarmViewerViewModel class.
In order to continue with this tutorial, the project authorizations must be defined in Ewon by HMS Networks User Manager and users must be assigned to the defined project authorizations.
The project authorizations defined in User Manager
Click here for more information on using the Ewon by HMS Networks User Manager.
1. Defining the project authorizations
Define the list that will contain the project authorizations:
private readonly string[] projectAuthorizations = new[]
                                             {
                                                 "Menu_ProjectAuthorization",
                                                 "Button_ProjectAuthorization"
                                             };
2. Registering to the UserContextChanged
Next we need to register to the UserContectChanged when the connector is initialized. This way we will be notified when the user has been changed, and we can apply the correct project authorizations:
private void InitilizeWFConnector()
        {
            connector.UserContextChanged += connector_UserContextChanged;
        }
As we have initialized the connector in the previous tutorial (Using Translations with Alarm Viewer Custom Menus and Buttons), we will only need to add the code that will register to the UserContextChanged event. The code will shall look like this (the new code is marked in red):
private void InitilizeWFConnector()
        {
            connector = new WFConnector(false); //not in design time
            connector.RegisterLanguageChangedHandler(symbolicTexts, OnLanguageChangedHandler);
//register the symbolic texts to the connector with a callback method that is called every time the WF Language changes.
This method will provide the symbolic text registered with the translations of those in the current languageconnector.UserContextChanged += connector_UserContextChanged;
}3. Handling the UserContextChanged event
Now that we will know when the current user is changed, we can check for the project authorizations for the new user and react accordingly. In this example, we will use the uxMenuCustomAction and uxCustomButtonAction controls.
private void connector_UserContextChanged(string userName)
        {
            var hasMenuProjectAuthorization = connector.CheckProjectAuthorization(projectAuthorizations[0]);
            var hasButtonProjectAuthorization = connector.CheckProjectAuthorization(projectAuthorizations[1]);

            uxMenuCustomAction.IsEnabled = hasMenuProjectAuthorization;
            uxCustomButtonAction.IsEnabled = hasButtonProjectAuthorization;
            //uxCustomButtonAction.Visibility = hasButtonProjectAuthorization ? Visibility.Visible : Visibility.Collapsed;
        }
The above method checks for the project authorizations defined in the first step of this tutorial. If the project authorizations are found (the logged user belongs to a authorization group that has the needed project authorizations), the custom button and menu are enabled:
uxMenuCustomAction.IsEnabled = hasMenuProjectAuthorization;
uxCustomButtonAction.IsEnabled = hasButtonProjectAuthorization;
If the project authorizations are not found, the custom menu and button will be disabled.
The commented line is an example of how the visibility can be toggled if the user has the proper project authorizations. If the project authorization is found, the control is visible; else, the control is not visible:
uxCustomButtonAction.Visibility = hasButtonProjectAuthorization ? Visibility.Visible : Visibility.Collapsed;
It is always recommended to use IDisposable in order to free unused memory:
#region IDisposable

        public void Dispose()
        {
            DisposeConnector();
        }

        private void DisposeConnector()
        {
            if (connector != null)
            {
                connector.UnregisterLanguageChangedHandler(null, OnLanguageChangedHandler);
                connector.UserContextChanged -= connector_UserContextChanged;
            }
        }

        #endregion
Code example:
Below you have the possibility to see the complete code of the project. The code that was added in this tutorial is marked in red. The same code is available in the downloadable solution. Check the top of this page for the download link.
AlarmViewer Custom Counters
In order to build custom AlarmViewer functionality in a Ewon by HMS Networks AlarmViewer visualization, some basic coding is needed. The recommended tool for achieving this is Microsoft Visual Studio.
By accessing the AlarmViewer properties using code, custom functionality can be created.
It is highly recommended to follow the tutorials using the sample solution provided below!
This sample solution is intended to be used as an example for the tutorial steps.
IMPORTANT: The solution uses the Silverlight Ewon by HMS Networks dll files stored on the local machine.
For the sample solution to work out of the box, the referenced dll files must be stored in the default location: C:\Program Files (x86)\WEBfactory 2010 \\Standard.
If your installation directory at a different location, please reference the correct dll files.
IMPORTANT: Translations and Project Authorizations will not work unless the translation texts and project authorizations are defined in Ewon by HMS NetworksStudio.
IMPORTANT:
Use the ViewModel property of the Alarm Viewer instead of casting the DataContext property to either IWFAlarmViewerViewModel interface or WFAlarmViewerViewModel class.
This tutorial will guide you through the process of creating custom counters for Alarm Viewer. The counters will display the following data:
Active alarm count
Active filtered alarm count
Active or unacknowledged alarm count
Active or unacknowledged filtered alarm count
Unacknowledged alarm count
Unacknowledged filtered alarm count
There are two options for creating custom counters for Alarm Viewer:
Using bindings in XAML
Programmatically, in code and XAML
In both cases, we will use the TextBlock control as our labels and data holders.
1. Creating custom counters using XAML and data bindings
1.1 Defining the grid
Using the data binding method, we need to create the required TextBlock controls and bind them to AlarmViewer's data. In our example, the bound text blocks are placed in a grid, along with the labels indicating the data designations:
   	    <Grid>
                <Grid.RowDefinitions>
                    <RowDefinition Height="Auto"/>
                    <RowDefinition Height="Auto"/>
                    <RowDefinition Height="Auto"/>
                    <RowDefinition Height="Auto"/>
                </Grid.RowDefinitions>
                <Grid.ColumnDefinitions>
                    <ColumnDefinition Width="Auto"/>
                    <ColumnDefinition Width="60"/>
                    <ColumnDefinition Width="60"/>
                </Grid.ColumnDefinitions>
            </Grid>
As seen in the code above, our grid will contain 4 rows and 3 columns. The five rows hold the header and the three main counters (Active, Active or unacknowledged and Unacknowledged). The three columns will hold the name of the counter, the filtered count and the total count.
1.2 Placing the TextBlock controls
Inside the grid, first we will place the header text blocks which will indicate the type of the counter (filtered or total):
<TextBlock Grid.Row="0" Grid.Column="1" Text="Filtered" HorizontalAlignment="Center"/>
<TextBlock Grid.Row="0" Grid.Column="2" Text="Total" HorizontalAlignment="Center"/>
The header text blocks will occupy the second and third columns of the first row.
Next, we will populate the grid with the required TextBlock controls:
                <TextBlock Grid.Row="1" Grid.Column="0" Text="Active" HorizontalAlignment="Left"/>
                <TextBlock Grid.Row="1" Grid.Column="1" Text="" HorizontalAlignment="Center"/>
                <TextBlock Grid.Row="1" Grid.Column="2" Text="" HorizontalAlignment="Center"/>

                <TextBlock Grid.Row="2" Grid.Column="0" Text="ActiveOrUnacknowledged" HorizontalAlignment="Left"/>
                <TextBlock Grid.Row="2" Grid.Column="1" Text="" HorizontalAlignment="Center"/>
                <TextBlock Grid.Row="2" Grid.Column="2" Text="" HorizontalAlignment="Center"/>

                <TextBlock Grid.Row="3" Grid.Column="0" Text="Unacknowledged" HorizontalAlignment="Left"/>
                <TextBlock Grid.Row="3" Grid.Column="1" Text="" HorizontalAlignment="Center"/>
                <TextBlock Grid.Row="3" Grid.Column="2" Text="" HorizontalAlignment="Center"/>
Note that the text blocks from the second and third columns have the Text property empty. This is because the Text property will be bound to the AlarmViewer's data.
1.3 Creating the data bindings
To create the bindings, we will need to specify an element name (the element to which we bind to) and the path (the path to the desired data of that element). The binding syntax will look like this:
{Binding ElementName=Example, Path=ViewModel.ExampleData}In our case, the element will be alarmViewer, and the path will point to the necessary data for each counter:
                <TextBlock Grid.Row="1" Grid.Column="0" Text="Active" HorizontalAlignment="Left"/>
                <TextBlock Grid.Row="1" Grid.Column="1" Text="{Binding ElementName=alarmViewer, Path=ViewModel.ActiveFilterCount}" HorizontalAlignment="Center"/>
                <TextBlock Grid.Row="1" Grid.Column="2" Text="{Binding ElementName=alarmViewer, Path=ViewModel.ActiveCount}" HorizontalAlignment="Center"/>

                <TextBlock Grid.Row="2" Grid.Column="0" Text="ActiveOrUnacknowledged" HorizontalAlignment="Left"/>
                <TextBlock Grid.Row="2" Grid.Column="1" Text="{Binding ElementName=alarmViewer, Path=ViewModel.ActiveOrUnacknowledgedFilterCount}" HorizontalAlignment="Center"/>
                <TextBlock Grid.Row="2" Grid.Column="2" Text="{Binding ElementName=alarmViewer, Path=ViewModel.ActiveOrUnacknowledgedCount}" HorizontalAlignment="Center"/>

                <TextBlock Grid.Row="3" Grid.Column="0" Text="Unacknowledged" HorizontalAlignment="Left"/>
                <TextBlock Grid.Row="3" Grid.Column="1" Text="{Binding ElementName=alarmViewer, Path=ViewModel.UnacknowledgedFilterCount}" HorizontalAlignment="Center"/>
                <TextBlock Grid.Row="3" Grid.Column="2" Text="{Binding ElementName=alarmViewer, Path=ViewModel.UnacknowledgedCount}" HorizontalAlignment="Center"/>
The complete code should look like this:
	     <Grid>
                <Grid.RowDefinitions>
                    <RowDefinition Height="Auto"/>
                    <RowDefinition Height="Auto"/>
                    <RowDefinition Height="Auto"/>
                    <RowDefinition Height="Auto"/>
                    <RowDefinition Height="Auto"/>
                </Grid.RowDefinitions>
                <Grid.ColumnDefinitions>
                    <ColumnDefinition Width="Auto"/>
                    <ColumnDefinition Width="60"/>
                    <ColumnDefinition Width="60"/>
                </Grid.ColumnDefinitions>

                <TextBlock Grid.Row="0" Grid.Column="1" Text="Filtered" HorizontalAlignment="Center"/>
                <TextBlock Grid.Row="0" Grid.Column="2" Text="Total" HorizontalAlignment="Center"/>

                <TextBlock Grid.Row="1" Grid.Column="0" Text="Active" HorizontalAlignment="Left"/>
                <TextBlock Grid.Row="1" Grid.Column="1" Text="{Binding ElementName=alarmViewer, Path=ViewModel.ActiveFilterCount}" HorizontalAlignment="Center"/>
                <TextBlock Grid.Row="1" Grid.Column="2" Text="{Binding ElementName=alarmViewer, Path=ViewModel.ActiveCount}" HorizontalAlignment="Center"/>

                <TextBlock Grid.Row="2" Grid.Column="0" Text="ActiveOrUnacknowledged" HorizontalAlignment="Left"/>
                <TextBlock Grid.Row="2" Grid.Column="1" Text="{Binding ElementName=alarmViewer, Path=ViewModel.ActiveOrUnacknowledgedFilterCount}" HorizontalAlignment="Center"/>
                <TextBlock Grid.Row="2" Grid.Column="2" Text="{Binding ElementName=alarmViewer, Path=ViewModel.ActiveOrUnacknowledgedCount}" HorizontalAlignment="Center"/>

                <TextBlock Grid.Row="3" Grid.Column="0" Text="Unacknowledged" HorizontalAlignment="Left"/>
                <TextBlock Grid.Row="3" Grid.Column="1" Text="{Binding ElementName=alarmViewer, Path=ViewModel.UnacknowledgedFilterCount}" HorizontalAlignment="Center"/>
                <TextBlock Grid.Row="3" Grid.Column="2" Text="{Binding ElementName=alarmViewer, Path=ViewModel.UnacknowledgedCount}" HorizontalAlignment="Center"/>

                <TextBlock Grid.Row="4" Grid.Column="0" Text="Programatic Active" HorizontalAlignment="Left"/>
                <TextBlock Grid.Row="4" Grid.Column="1" x:Name="uxProgramaticActiveFiltered" Text="" HorizontalAlignment="Center"/>
                <TextBlock Grid.Row="4" Grid.Column="2" x:Name="uxProgramaticActiveTotal" Text="" HorizontalAlignment="Center"/>

            </Grid>
2. Creating custom counters programmatically
2.1 Creating the XAML
The XAML for this second method will be similar with the one from the previous method, the only differences being the empty content of the Text properties of the TextBlock controls, and the presence of names in the TextBlock controls. Names are required for reference in code.
            <Grid>
                <Grid.RowDefinitions>
                    <RowDefinition Height="Auto"/>
                    <RowDefinition Height="Auto"/>
                    <RowDefinition Height="Auto"/>
                    <RowDefinition Height="Auto"/>
                </Grid.RowDefinitions>
                <Grid.ColumnDefinitions>
                    <ColumnDefinition Width="Auto"/>
                    <ColumnDefinition Width="60"/>
                    <ColumnDefinition Width="60"/>
                </Grid.ColumnDefinitions>

                <TextBlock Grid.Row="0" Grid.Column="1" Text="Filtered" HorizontalAlignment="Center"/>
                <TextBlock Grid.Row="0" Grid.Column="2" Text="Total" HorizontalAlignment="Center"/>

                <TextBlock Grid.Row="1" Grid.Column="0" Text="Active" HorizontalAlignment="Left"/>
                <TextBlock Grid.Row="1" Grid.Column="1" x:Name="uxProgramaticActiveFiltered" Text="" HorizontalAlignment="Center"/>
                <TextBlock Grid.Row="1" Grid.Column="2" x:Name="uxProgramaticActiveTotal" Text="" HorizontalAlignment="Center"/>

                <TextBlock Grid.Row="2" Grid.Column="0" Text="ActiveOrUnacknowledged" HorizontalAlignment="Left"/>
                <TextBlock Grid.Row="2" Grid.Column="1" x:Name="uxProgramaticActiveOrUnacknowledgedFiltered" Text="" HorizontalAlignment="Center"/>
                <TextBlock Grid.Row="2" Grid.Column="2" x:Name="uxProgramaticActiveOrUnacknowledgedTotal" Text="" HorizontalAlignment="Center"/>

                <TextBlock Grid.Row="3" Grid.Column="0" Text="Unacknowledged" HorizontalAlignment="Left"/>
                <TextBlock Grid.Row="3" Grid.Column="1" x:Name="uxProgramaticUnacknowledgedFiltered" Text="" HorizontalAlignment="Center"/>
                <TextBlock Grid.Row="3" Grid.Column="2" x:Name="uxProgramaticUnacknowledgedTotal" Text="" HorizontalAlignment="Center"/>

	    </Grid>
2.2 Creating the code behind the custom counters
The coding of the custom counters will be split in two steps:
Creating the method that will programmatically bind the TextBlock controls to the data context of the AlarmViewer. This method will be defined in the contructor:
SetProgramaticActiveBindings();
Binding the TextBlock controls inside the SetProgramaticActiveBindings() method:
 private void SetProgramaticActiveBindings()
        {
            BindingOperations.SetBinding(uxProgramaticActiveFiltered,
                                         TextBlock.TextProperty,
                                         new Binding
                                             {
                                                 ElementName = "alarmViewer",
                                                 Path = new PropertyPath("ViewModel.ActiveFilterCount")
                                             });

            BindingOperations.SetBinding(uxProgramaticActiveTotal,
                                         TextBlock.TextProperty,
                                         new Binding
                                             {
                                                 ElementName = "alarmViewer",
                                                 Path = new PropertyPath("ViewModel.ActiveCount")
                                             });

            BindingOperations.SetBinding(uxProgramaticActiveOrUnacknowledgedTotal,
                                         TextBlock.TextProperty,
                                         new Binding
                                         {
                                             ElementName = "alarmViewer",
                                             Path = new PropertyPath("ViewModel.ActiveOrUnacknowledgedCount")
                                         });

            BindingOperations.SetBinding(uxProgramaticActiveOrUnacknowledgedFiltered,
                                         TextBlock.TextProperty,
                                         new Binding
                                         {
                                             ElementName = "alarmViewer",
                                             Path = new PropertyPath("ViewModel.ActiveOrUnacknowledgedFilterCount")
                                         });

            BindingOperations.SetBinding(uxProgramaticUnacknowledgedTotal,
                                         TextBlock.TextProperty,
                                         new Binding
                                         {
                                             ElementName = "alarmViewer",
                                             Path = new PropertyPath("ViewModel.UnacknowledgedCount")
                                         });

            BindingOperations.SetBinding(uxProgramaticUnacknowledgedFiltered,
                                         TextBlock.TextProperty,
                                         new Binding
                                         {
                                             ElementName = "alarmViewer",
                                             Path = new PropertyPath("ViewModel.UnacknowledgedFilterCount")
                                         });

        }
Notice the importance of naming when using the programmatic method!
Custom Query support in Alarm Viewer
For a step by step guide on Custom Query in Alarm Viewer, go to Using Custom Query in Alarm Viewer tutorial.
The Alarm Viewer control is able to show not only the standard online and offline alarm view. It is also able to display alarm data based on a custom data base query.
Therefore the control is extended by two additional properties:
CustomQuery
CustomQueryParameters
Due to security issues (> SQL injection) the project engineer cannot specify at design time a SQL statement in clear words inside the property CustomQuery. Instead he can specify a qualifier that points to a specific stored procedure inside the database. Via the property CustomQueryParameters he can specify parameters of type NVARCHAR(MAX) with which the declared stored procedure will be called inside the data base at execution time. The property CustomQueryParameters is a collection of type CustomQueryParameter, so the project engineer has to specify the name and the value for each parameter there.
In order to link a custom query qualifier to an existing stored procedure inside the data base the project engineer must adapt the web.config file of the Ewon by HMS Networks WCF web service (C:\inetpub\wwwroot\_Ewon by HMS Networks \WebServices\WCF).
In order to do so he must add for each custom query qualifier an <add> entry below the customAlarmQueryMappings section like shown in the sample below:
<alarmConfiguration>
	<customAlarmQueryMappings>
		<add queryName="myFirstCustomQuery" spName="spWFCustQuery1" />
		<add queryName="mySecondCustomQuery" spName="spWFCustQuery2" />
	</customAlarmQueryMappings>
</alarmConfiguration>
The control will only be able to display those attributes of a stored procedure result set that have the following names:
LanguageID | language ID | AlarmTypeSymbolicText | the alarm type name not translated |
AlarmLogID | alarm Log ID | AlarmTypeSymbolicTextTranslation | the alarm type name translated in the defined language |
DateOn | the DateTime when alarm was triggered | Priority | the alarm priority |
DateOff | the DateTime when alarm was closed | AckUserID | the unique ID of the user that acknowledged the alarm |
DateAck | the DateTime when alarm was acknowledged | AckText | the acknowledgement text |
SysTime | the DateTime of the OCP server | AlarmLinkURL | the URL attached to the alarm |
AlarmID | the global unique identifier for the alarm | Value1 ... Value20 | replacement values |
AlarmTag | the name of the alarm | AlarmComment | the general comment of the alarm |
SignalName | the name of the attached signal in the OCP server | OccurrenceComment | the comment at the alarm occurrence |
SignalAliasName | the name of the attached signal in the WEBfactory server | ExtendedProperty1 ... ExtendedProperty32 | the extended properties of the alarm |
OPCQuality | the quality of the signal attached to the alarm | HelpCause | the cause of the alarm |
AlarmConstant | the constant used in alarm condition. The value of the attached signal can be bigger, equal or smaller than the constant. | HelpEffect | the effect of the alarm |
AlarmConstantTo | the constants used in alarm condition. The value of the attached signal can be between the two constants. | HelpRepair | the fixing method for the alarm |
ReplaceON | the flag that activates the replacement of placeholders | NavigationSource | the NavigationSource for navigation at runtime |
AlarmSymbolicText | the original alarm name not translated | NavigationTarget | the NavigationTarget for navigation at runtime |
AlarmSymbolicTextTranslation | the translation of the alarm name in the defined language | AckUserName | the user name of the user that acknowledged the alarm |
AlarmGroupSymbolicText | the alarm group name not translated | Active | the status of the alarm |
AlarmGroupSymbolicTextTranslation | the translation of the alarm group name in the defined language |
If the CustomQuery property contains a corresponding qualifier then the control will initially display the results of the linked stored procedure. If not prohibited by control’s security policies the SCADA user can afterwards switch between the custom query views, the online alarm view and the offline alarm view.
Within the custom query view the standard filter dialog will not be supported at runtime. When using custom query view, there is no automatic refresh.
Continue to Using Custom Query in Alarm Viewer tutorial.
Using Custom Query in Alarm Viewer
For more information about Custom Query support in Alarm Viewer, go to Custom Query support in Alarm Viewer article, in the Development section.
Creating a custom query for Alarm Viewer requires three steps:
For tutorial purposes, we will create a custom query that will filter the alarms based on the signal names. This example query will display the alarms with the signal name (the signal name of the attached signal) beginning with the string Rand.
Editing the Web.config file
The query and the procedure must be defined in the Web.config file. In order to do this, go to C:\inetpub\wwwroot\_Ewon by HMS Networks \WebServices\WCF and open the Web.config file.
Define the query and the procedure by adding:
  <alarmConfiguration>
    	<customAlarmQueryMappings>
      		<add queryName="testQuery" spName="testProcedure" /> <!--where testQuery and testProcedure are example names-->
    	</customAlarmQueryMappings>
  </alarmConfiguration>
Editing the Web.config file
At the bottom of the Web.config file there is a commented example of alarm configuration. This example can be copied, uncommented and used with the desired query and procedure names.
Save and close the document.
Defining the query and parameter in Alarm Viewer at design time
Open the Alarm Viewer project in Expression Blend. Select the Alarm Viewer control and go to the Filter tab, under Ewon by HMS Networks, in the Properties panel.
Filter settings
At the bottom of the Filter settings are the two options we are interested in:
CustomQuery - enter the name of the custom query defined in the Web.config file;
CustomQueryParameter - define a parameter for the custom query.
After the CustomQuery field is completed with the name of the query, open the Custom Query Parameter Collection Editor by clicking on the three dots button.
Defining parameters for the custom query
In the Custom Query Parameter Collection Editor, create the new parameter. Enter a Name and a Value for it.
In our example, we will create a parameter named signalNameStart with the value Rand. Using this parameter, our custom query will filter the signals, displaying only the signals which names begin with Rand. Any other parameter can be defined here.
Click OK to close the Custom Query Parameter Collection Editor.
Creating the query in Microsoft SQL Server Management Studio
Open the Microsoft SQL Server Management Studio and connect to the database.
Go to Databases > CustomQueryTesting > Programmability and right click on the Stored Procedures. Select New Stored Procedure.
Creating the new procedure
Write the desired procedure. In our example, the procedure will be named testProcedure (as defined in Web.config) and will select from OnlineAlarmsView the alarms that have the LanguageID = 7 and the SignalName like we defined in the parameter set from Expression Blend:
	SELECT Distinct * FROM OnlineAlarmsView
	WHERE LanguageID = 7 AND SignalName LIKE @signalNameStart + '%'
The procedure will look like this:
USE [CustomQueryTesting]
GO
/****** Object:  StoredProcedure [dbo].[testProcedure]    Script Date: 03/13/2012 15:58:44 ******/
SET ANSI_NULLS ON
GO
SET QUOTED_IDENTIFIER ON
GO
-- =============================================
-- Author:		<Author,,Name>
-- Create date: <Create Date,,>
-- Description:	<Description,,>
-- =============================================
CREATE PROCEDURE [dbo].[testProcedure]
	@signalNameStart nvarchar(max)
AS
BEGIN
    SELECT Distinct * FROM OnlineAlarmsView
    WHERE LanguageID = 7 AND SignalName LIKE @signalNameStart + '%'
END
Click on Execute to execute the query and test it.
If the stored procedure already exists, replace CREATE PROCEDURE with ALTER PROCEDURE to modify the existing stored procedure.
Return to Expression Blend and run the project.
The Alarm View control will start with the Custom alarm view by default. It will display only the alarms that have attached signals named Rand * (where * can be any other string in the signal name).
Alarm Viewer in Custom alarm view
Using the contextual menu, the view can be changed to Online alarm view or Offline alarm view and back to Custom alarm view.
Using Custom Alarms in WEBfactory 2010
Custom alarms are external events (coming from non-WEBfactory software) which are logged and displayed by the Ewon by HMS Networks Silverlight controls as alarms. The custom alarms are inserted in the Ewon by HMS Networks system using the Ewon by HMS Networks Server SDK, bypassing the processing and validation in the Ewon by HMS Networks Server.
Example use case and default limitations
A third party software (non Ewon by HMS Networks) is sending, using a TCP/IP socket connection, an event with up to 20 parameters, used to deliver additional information. The user needs to log the event and the additional information contained in the parameters as a single Ewon by HMS Networks alarm event. This way, it can be displayed in visualizations using the Ewon by HMS Networks Silverlight controls (e.g. WFAlarmOnline, WFAlarmViewer and WFOperationDiary).
Using the standard WEBfactory 2010 alarm events for the above use case is not possible due to the following limitations:
The WEBfactory 2010 system cannot log other signals than Ewon by HMS Networks signals.
Due to the fact that Ewon by HMS Networks Alarm Manager logs additional parameters values when it detects the alarm event, the data acquisition for the additional parameters will have a delay.
The Ewon by HMS Networks Alarm Manager does not allow to have multiple active alarm events using a single alarm definition in online mode.
The above limitations can be avoided by using custom alarms.
Using custom alarms
To use custom alarms with WEBfactory 2010, the following procedure needs to be followed:
The custom alarm needs to have a corresponding alarm definition, marked as custom alarm, in Ewon by HMS NetworksStudio.
The custom alarm must be inserted in the Ewon by HMS Networks system using the Ewon by HMS Networks Server SDK.
Ewon by HMS NetworksStudio alarm definitions for custom alarms
Each custom alarm needs to have a corresponding alarm definition in Ewon by HMS NetworksStudio. As with all Ewon by HMS Networks alarm definitions, an alarm condition must be defined for each custom alarm definition. The alarm condition will be ignored, as well as the alarm definition parametrization, other than the Custom alarm flag, the Alarm name and the Signal name.
A custom alarm is defined just like a normal Ewon by HMS Networks alarm but it must be flagged as custom alarm using the Custom alarm checkbox.
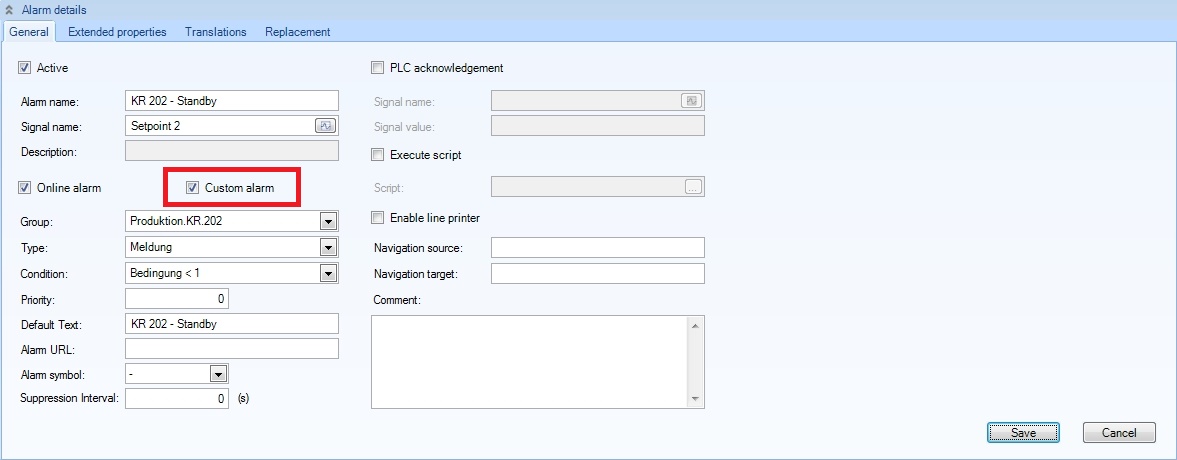
The signal name associated with the alarm definition can be of any type (OPC item, V-Channel or connector signal). The signal name is only needed to identify the alarm definition.
The alarm text can contain replacement texts, just like Ewon by HMS Networks alarms. The replacement texts will act as placeholders for the parameters provided in the alarmParameters list, when raising the alarm through the Ewon by HMS Networks Server SDK. For example, the ##1## replacement text will include the first item of the alarmParameters list, the ##2## replacement text will include the second item of the alarmParameters list, and so on, up to the 20th item.
When the Custom Alarm flag is set for an alarm definition, the alarm will not be observed by Ewon by HMS Networks Alarm Manager, but it will be displayed in WFAlarmOnline, WFAlarmViewer and WFOperationDiary controls at run time. The event must be inserted through the Ewon by HMS Networks Server SDK interface.
Ewon by HMS Networks Server SDK methods custom alarms
The Ewon by HMS Networks Server SDK has the following two methods available for raising and deactivating custom alarms:
The RaiseCustomAlarm method
int RaiseCustomAlarm(string serverName, string signalName, string alarmTag, DateTime activationTime, List<object> alarmParameters);
The RaiseCustomAlarm method allows the user to insert a new alarm event with all its additional information (contained in up to 20 alarm parameters) with a single method call. Multiple calls of this method with the same parameters will cause multiple events of the same alarm, visible in historical view. The events don't have a DateOff timestamp.
The calling parameter available for the RaiseCustomAlarm method are described below:
Parameter
Can be null
Description
serverName
yes
The name of the server. A null or empty value stands for . (local server)
signalName
no
The name of the signal associated with the corresponding alarm definition in Ewon by HMS Networks Studio, used to identify the alarm definition in Ewon by HMS Networks system.
alarmTag
no
The name of the alarm used in the corresponding alarm definition in Ewon by HMS Networks Studio, used to identify the alarm definition in Ewon by HMS Networks system.
activationTime
yes
The time when the alarm event occurred.
alarmParameters
yes
The list of alarm parameters, up to 20, that can contain additional information for the alarm event.
The DeactivateCustomAlarm method
int DeactivateCustomAlarm(string serverName, string signalName, string alarmTag, DateTime deactivationTime);
The DeactivateCustomAlarm method allows the user to deactivate all the active events for an alarm. If the RaiseCustomAlarm method was called multiple times for the same alarm (with the same parameters), the calling DeactivateCustomAlarm method with the same
serverName,signalNameandalarmTagwill deactivate all the events of that alarm.The calling parameters available for the DeactivateCustomAlarm method are described below:
Parameter
Can be null
Description
serverName
yes
The name of the server. A null or empty value stands for . (local server)
signalName
no
The name of the signal associated with the corresponding alarm definition in Ewon by HMS Networks Studio, used to identify the alarm definition in Ewon by HMS Networks system.
alarmTag
no
The name of the alarm used in the corresponding alarm definition in Ewon by HMS Networks Studio, used to identify the alarm definition in Ewon by HMS Networks system.
deactivationTime
yes
The time when the alarm event was deactivated.
Custom Alarms at run time
Even if the Ewon by HMS Networks Server ignores custom alarms, it still notifies the clients when a custom alarm changed. This way, the AlarmViewer, WFAlarmOnline and WFOperationDiary controls will include any custom alarm updates.
When in online mode, the WFAlarmViewer or WFAlarmOnline controls will display the latest active event of a custom alarm.
When in historical mode, the WFAlarmViewer or WFOperationDiary will display all the events of a custom alarm.
Since custom alarms are defined like normal Ewon by HMS Networks alarms, there are no differences in filtering, multi-language support, alarm hide support and additional alarm properties.
Custom Visual Sorting in AlarmViewer
While the Ewon by HMS Networks's AlarmViewer control offers two different server sorting options for alarms, there is also the possibility for custom visual sorting the alarms. The following article describes how to create a custom visual storing for the AlarmViewer control using Expression Blend.
In order to successfully follow the steps presented in this article, minimal programming knowledge is recommended.
The creation of custom visual sorting for AlarmViewer in Expression Blend is based on the principle of inserting an object that supports visual sorting between the AlarmViewer's ItemsSource property and the alarms source. This process is summarized in three important steps:
Adding a new CollectionViewSource object, which is bound to the alarms and supports the visual sorting;
Bind the AlarmViewer's ItemsSource to the new CollectionViewSource;
Create the custom sorting in the code behind.
IMPORTANT: This method allows only a visual sorting of the alarms. The alarms will be received from the server using one of the two server sort options selected in the AlarmViewer's configuration and will be visually sorted using the custom style.
Creating the CollectionViewSource object
Create a new project in Expression Blend.
Add the DLL files from the WEBfactory 2010\\Standard directory as references to the new project. Also add the System.Windows.dll (C:\Program Files (x86)\Reference Assemblies\Microsoft\Framework\Silverlight\v4.0).
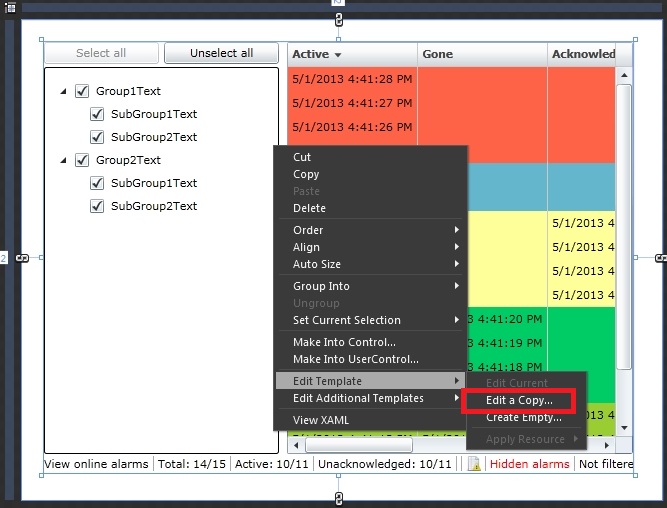
Place the AlarmViewer control on the MainPage. Name the control uxAlarmViewer (using the Name property from the Properties panel). Right-click it and select Edit Template > Edit a Copy... .
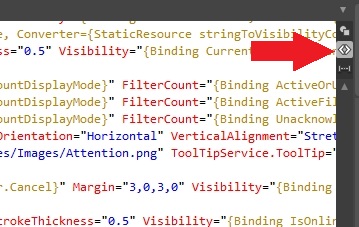
In the Create Style Resource, define the style in the same document. Confirm the dialog and switch to XAML view.
Add the CollectionViewSource object under the <UserControl.Resources> tag and bind it to the ViewModel.Alarms. In the binding declaration, specify the ElementName as uxAlarmViewer (the name of our AlarmViewer control). Add a Name (uxAlarmsCollection) and a Key (AlarmsCollection) for the object.
<CollectionViewSource Source="{Binding ViewModel.Alarms, ElementName=uxAlarmViewer}" x:Key="AlarmsCollection" x:Name="uxAlarmsCollection"/>The AlarmsCollection (the CollectionViewSource object) is bound to the ViewModel of the Alarms, just like the ItemsSource of the AlarmViewer control would normally be. This allows the AlarmsCollection to receive the alarms from the server (using the server sort order). The custom visual sort order can be applied to the AlarmsCollection object.
Bind the AlarmViewer's ItemsSource to the new CollectionViewSource
Locate in the XAML document the uxAlarmGrid DataGrid.
Bind the uxAlarmGrid's ItemsSource property to the AlarmsCollection static resource created in the previous step.
ItemsSource="{Binding Source={StaticResource AlarmsCollection}}"
Create the custom sorting
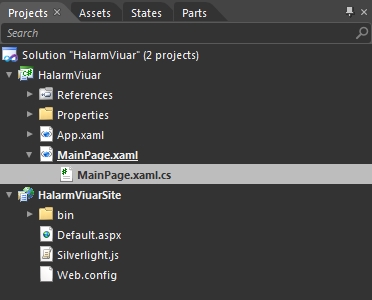
Open the MainPage.xaml.cs from the Projects panel.
Add the
using System.ComponentModel;using at the bottom of the using declarations list.Add a new CreateCustomSorting() method after the InitializeComponent() method:
using System;
using System.Windows;
using System.Windows.Controls;
using System.Windows.Documents;
using System.Windows.Ink;
using System.Windows.Input;
using System.Windows.Media;
using System.Windows.Media.Animation;
using System.Windows.Shapes;
using System.ComponentModel;

namespace AlarmViewer
{
	public partial class MainPage : UserControl
	{
		public MainPage()
		{
			// Required to initialize variables
			InitializeComponent();

			CreateCustomSorting();
		}
	}
}
Define the new CreateCustomSorting() method and add the desired sorting criteria:
private void CreateCustomSorting()
        {
            uxAlarmsCollection.SortDescriptions.Add(new SortDescription("Priority", ListSortDirection.Descending));
            uxAlarmsCollection.SortDescriptions.Add(new SortDescription("StatusText", ListSortDirection.Ascending));
            uxAlarmsCollection.SortDescriptions.Add(new SortDescription("DateOn", ListSortDirection.Ascending));
        }
In this example, the alarms will be visually sorted descending based on their priority, ascending based on their status and again ascending based on their date of appearance.
The complete code should look like this:
using System;
using System.Windows;
using System.Windows.Controls;
using System.Windows.Documents;
using System.Windows.Ink;
using System.Windows.Input;
using System.Windows.Media;
using System.Windows.Media.Animation;
using System.Windows.Shapes;
using System.ComponentModel;

namespace AlarmViewer
{
	public partial class MainPage : UserControl
	{
		public MainPage()
		{
			// Required to initialize variables
			InitializeComponent();

			CreateCustomSorting();
		}

		private void CreateCustomSorting()
        {
            uxAlarmsCollection.SortDescriptions.Add(new SortDescription("Priority", ListSortDirection.Descending));
            uxAlarmsCollection.SortDescriptions.Add(new SortDescription("StatusText", ListSortDirection.Ascending));
            uxAlarmsCollection.SortDescriptions.Add(new SortDescription("DateOn", ListSortDirection.Ascending));
        }
	}
}
The AlarmViewer custom style will now sort visually the alarms at run time.
Setting up the AlarmViewer Control at designtime
AlarmViewer exposes a list of important properties when setting it up at designtime. This properties are common for Expression Blend and <MadCap:variable name="MyVariables.WFSmartEditor" />.
To access the AlarmViewers properties, go to Properties > Ewon by HMS Networks(Expression Blend) or Property Inspector (<MadCap:variable name="MyVariables.WFSmartEditor" />). Although the properties are divided in different categories in <MadCap:variable name="MyVariables.WFSmartEditor" /> then Expression Blend, they are the same.
When using AlarmViewer in Expression Blend, the properties of the control are divided in three main categories:
Default
Default AlarmViewer properties in Expression Blend
The Default tab contains the following properites:
Columns (collection) - allows the user to set additional custom columns to the AlarmViewer grid.
Setting additional collumns to the AlarmViewer grid
Clicking on the ... button corresponding to the Columns property will open the ColumnSettings Collection Editor window.
To add a new column, click on the Add another item button in the bottom left side of the window.
The new item will display four properties:
IsAutoSize - allows the column to resize itself automatically depending of the content
IsVisible - makes the column visible in the grid
Type - sets the type of the column. The Type property contains a drop-down list with specific properties and also Extended Properties. This contents of the columns are set up in Ewon by HMS NetworksStudio for each alarm:
PriorityColor - color priority code
Active - status flag if alarm is active or inactive
SystemTime - the time at which the alarm was thrown
Gone - the time at which the alarm disappeared
Acknowledged - acknowledged alarm time
AcknowledgedWithComment - acknowledged alarm time with comment
Text - alarm text
Name - alarm name
Group - alarm group name
Type - alarm type code
SignalName - signal name
OpcItem - OPC item name
Priority - priority code
HttpLink - URL to display extended information
OccurenceCount - number of alarm events have occurred since the last acknowledgment
Duration - total duration of the alarm event since last acknowledgment
StatusText - text display of the current status
HelpCause - parameterized text (alarm cause) of the alarm
HelpEffect - parameterized text (alarm effect) of to the alarm
HelpRepair - parameterized text (alarm Remedy) for the alarm
GeneralComment - general alarm comment
AcknowledgeComment - comment for aknowledgement
NavigationSource - navigation source to call in the XAML page
NavigationTarget - navigation target to call in the XAML page
ExtendedProperty 1- 32 - additional alarm properties.
Width - the default width of the column.
One or more columns can be added depending on the projects needs.
RefreshInterval - the time interval (in seconds) of refreshing the alarms. The default value is 5 seconds. When dealing with a big list of alarms, a small value might generate huge network traffic.
HornPath - allows the user to select a .wma or .mp3 file to be used as horn when an alarm appears. There are two methods of addressing a sound file:
The file is located in any directory in IIS. It can be accessed using the path: http://servername/folder/subfolder/HornAlarm.wma(.mp3). Insert the http path in the HornPath property.
The file is located in the same folder as the Silverlight project (Expression Blend only). The file can be accessed using the path: /foldername/HornAlarm.wma(.mp3). Insert the path in the HornPath property.
HornPath in <MadCap:variable name="MyVariables.WFSmartEditor" />
HornPath in Expression Blend
Loop - plays the sound file in a loop as long as the alarm is active.
WriteSecure - displays a separate confirmation dialog for alarm acknowledgement.
EnableNavigation - allows the user to navigate to another page from the Navigate function of the AlarmViewer. The proper settings needs to be done.
EnablePopup - enables the pop-ups at runtime, such as the contextual menu.
ShowAlarmGroupsFilterTree - displays the filter are for alarm groups.
ShowAlarmTypeFilterTree - displays the filter area for alarm types.
ShowStatusBar - displays the status bar from the bottom of AlarmViewer at runtime.
ShowHeader - displays the herder of the AlarmViewer at runtime.
ShowScrollBars - display scrollbars at runtime.
ShowDateTimeMilliseconds - determines whether to display (or not) the time of alarms in milliseconds.
ShowMultilineTextValues - enables the grid to display multi-line text.
ShowTotalAlarmCount - displays in the status bar the sum of active or unacknowledged alarms.
ShowActiveAlarmCount - displays in the status bar the sum of the active alarms.
ShowUnacknowledgedAlarmCount - displays in the status bar the sum of not acknowledged alarms.
AlarmCountDisplayMode - sets how the status bar displays the alarm counts, based on the overall alarms and on the ones related to the filters applied.
FilterAndProject - displays the alarm statistics related to all alarms in the project and to all current filtered alarms
Filter - displays the alarm statistics related to the current filter settings
Project - displays the alarm statistics related to the current alarms from the project.
When AlarmViewer is in Offline mode, it will show only the Filter option regardless of the selection at design time.
SecurityPolicies (WFAlarmViewerSecurityPolicies) - this settings control the context menu options at runtime.
AlarmViewer Security Policies
SecurityPolicies options:
Visibility - controls the overall visibility in the context menu
SecurityAuthorizationName - checks the project authorization which has been stored in the user management
SecurityDenyAccessBehaviour - Hidden or Disabled (visible but not executable)
This settings can be applied for any parameters from the list.
Filter
AlarmViewer options, Filter tab
The Filter tab contains the following options:
Offline - Enables the historical alarms view. All historical alarms are displayed and can be filtered.
ShowGroupsInRuntimeFilter - enables the alarm group filter options
GroupFilter - pre-selection of alarm groups to display. It supports wildcard for "all".
FilterGroupByUser - if this option is active, AlarmViewer will display only the alarms assigned to the logged user. If this option is used, user management must be used.
ShowTypesInRuntimeFilter - enables the alarm type filtering options
TypesFilter - pre-selection of alarm types to display. It supports wildcard for "all".
ShowMaximumCountInRuntimeFilter - enables the filter for maximum alarms displayed
MaximumCount - pre-selection for the maximum number of alarms to display. If more alarms are available, the scrollbars appear.
ShowServerSortOrderInRuntimeFilter - enables the sort order option.
ServerSortOrder - pre-selection for server sort order:
DateDescending - date descending order
PriorityDescending - priority descending order
ShowAlarmVisibilityInRuntimeFilter - enables the alarm visibility filtering option.
AlarmVisibility - pre-selection of alarms to be displayed:
All - all alarms are displayed when active, acknowledged and not gone
ActiveOrNotAcknowledged - displays active and not acknowledged alarms
NotAcknowledged - all not acknowledged alarms are displayed
Active - only active alarms are displayed
Gone - only gone alarms are displayed
ShowPriorityInRuntimeFilter - enables the alarm priority filtering.
MinimumPriority - only alarms with priority greater than or equal to this value are displayed.
MaximumPriority - only alarms with priority less or equal to this value are displayed.
ShowTextFilterInRuntimeFilter - enables the alarm text filtering.
TextFilterColumn - pre-selection of the text filter criteria.
TextFilter - a string that is used for filtering.
CustomQuery - custom query.
CustomQueryParameters (collection) - the parameter set for CustomQuery.
Colors
AlarmViewer options, Colors tab
The Colors tab contain options that allow the user cu customize the colors for each alarm state:
ActiveAlarmBackground - background color of active alarms.
ActiveAlarmForeground - foreground color of active alarms.
InactiveAlarmBackground - background color of not longer active alarms.
InactiveAlarmForeground - foreground color of not longer active alarms.
AcknowledgedAlarmBackground - background color of acknowledged alarms.
AcknowledgedAlarmForeground - foreground color of acknowledged alarms.
AcknowledgedAndGoneAlarmBackground - background color of acknowledged and no longer active alarms
AcknowledgedAndGoneAlarmForeground - foreground color of acknowledged and no longer active alarms
BadQualityAlarmBackground - background color of an alarm when the OPC signal quality is low.
BadQualityAlarmForeground - foreground color of an alarm when the OPC signal quality is low.
RowColorDefinitions (Collection) - color settings for a specific alarms are set here. This color settings are identical to the above ones, but are applied only for the selected alarm types and groups. This settings override the default parameters.
RowColorDefinitions
PriorityColorDefinitions (Collection) - color settings for specific alarm priorities are set here. This color settings are identical to the above ones, but are applied only for the selected priority. For example, alarms with priority 1 can have different colors than alarms with priority 2. This settings override the default parameters.
PriorityColorDefinitions
DialogStyle - intended for internal use.
MessageBoxStyle - intended for internal use.
Using Extended Properties in Ewon by HMS NetworksStudio and Alarm Viewer control
The Extended Properties are additional customizable properties of the alarms, that can be used in various ways. The Extended Properties can be configured from Ewon by HMS NetworksStudio and can have three different data types: String, Integer or Double. Choosing the right data type depends on what the user will want to store in the Extended Properties.
Once configured, the Extended Properties can be displayed by Ewon by HMS Networks controls. In the following tutorial you will learn how to set up the Extended Properties and use them to display data in Alarm Viewer.
WEBfactory 2010 allows users to configure up to 32 Extended Properties. In the following tutorial there will be used 3, one for each supported data type.
For this tutorial, the Ewon by HMS Networks Demo Project database will be used.
Set up Extended Properties in Ewon by HMS NetworksStudio
The first step to be done is enabling the Extended Properties in Ewon by HMS NetworksStudio's Settings tab:
In Ewon by HMS NetworksStudio, click on the Settings tab from the lower-left corner of the window.
In the Settings tab, expand the Project settings and select Extended Alarm Properties.
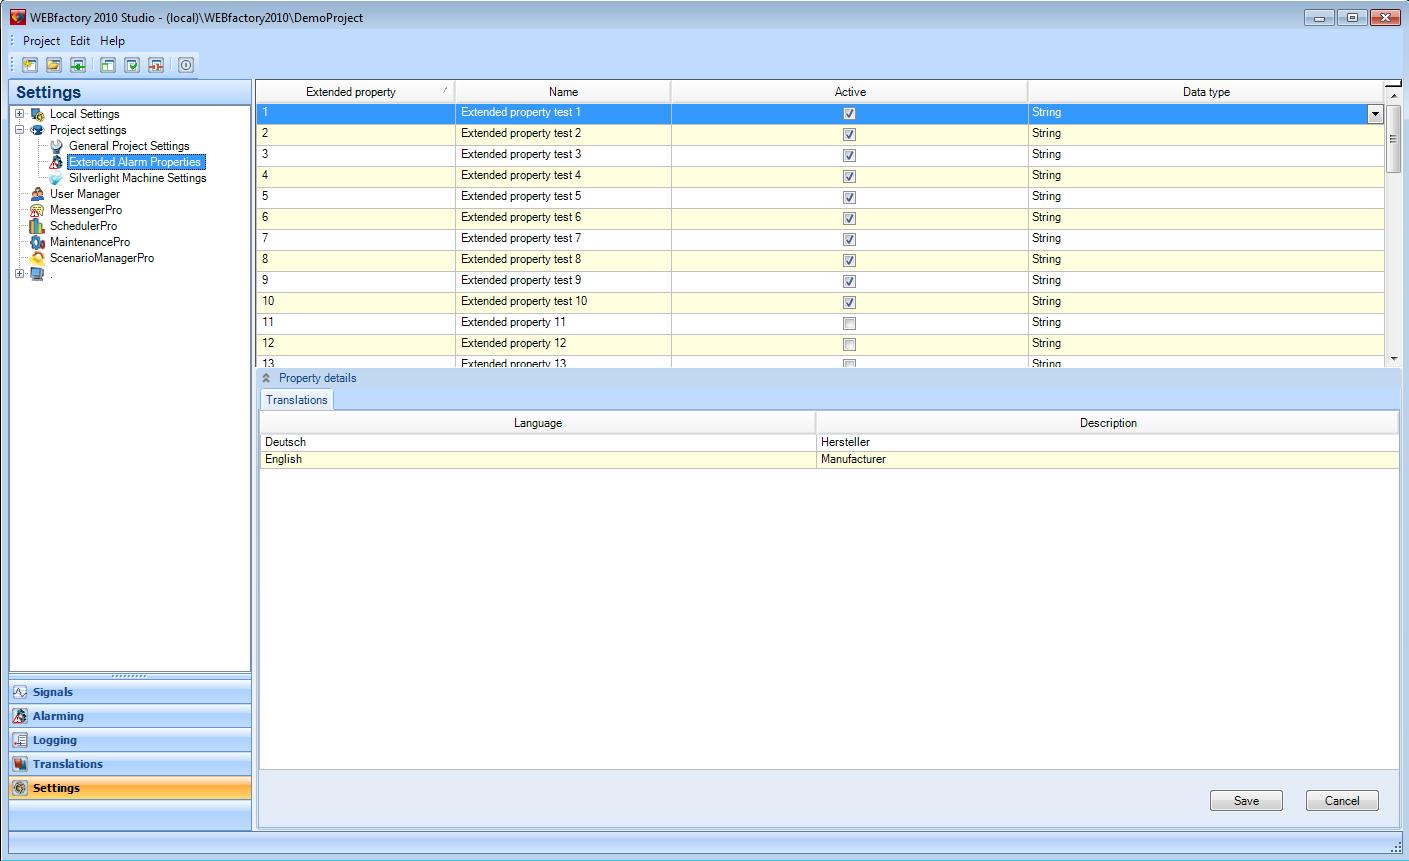
Extended Alarm Properties in Ewon by HMS NetworksStudio
Enable the first three (3) Extended Properties, and name them accordingly to your needs.
To enable an Extended Property, place a check mark in the checkbox listed in the Active column of the Extended Alarm Properties table.
To rename an Extended Property, double-click in the Name field of the desired Extended Property and write the desired name.
The number of Extended Properties activated is limited to 32. In this example, 3 of the Extended Properties are used.
Set the Data Type of the Extended Properties as String for the first one, Integer for the second and Double for the third Extended Property.
In the Property details view, add descriptions for each extended property. In our example, we will set as description the selected data type.
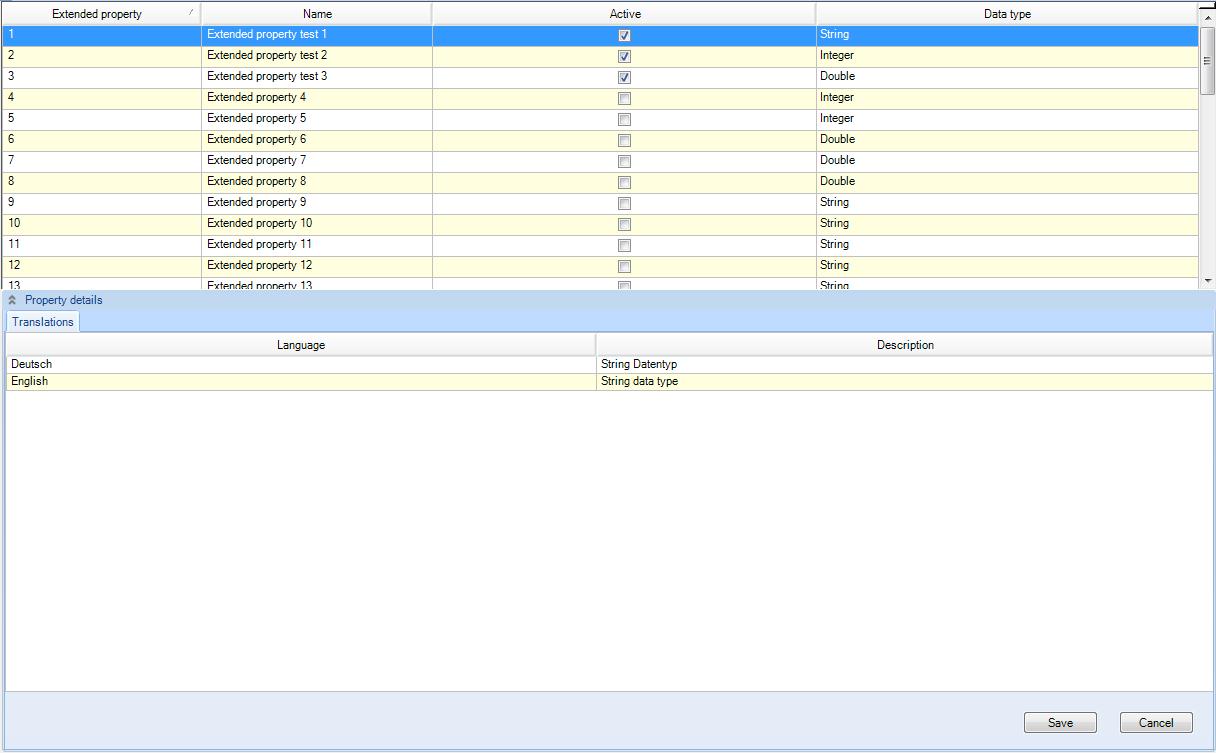
Setting up the Extended Properties description and their translations
IMPORTANT: The Extended Properties description is translatable. Fill the description with the appropriate text for each language.
IMPORTANT: The descriptions added here will be used as column headers in Alarm Viewer.
Click on the Save button to save the settings.
Now that the Extended Properties are enabled, we will set up the Extended Properties for the desired alarms:
In Ewon by HMS NetworksStudio, click on the Alarming tab.
Expand the Alarms option and click on the server icon. The alarms will be displayed in the main view of the Studio.
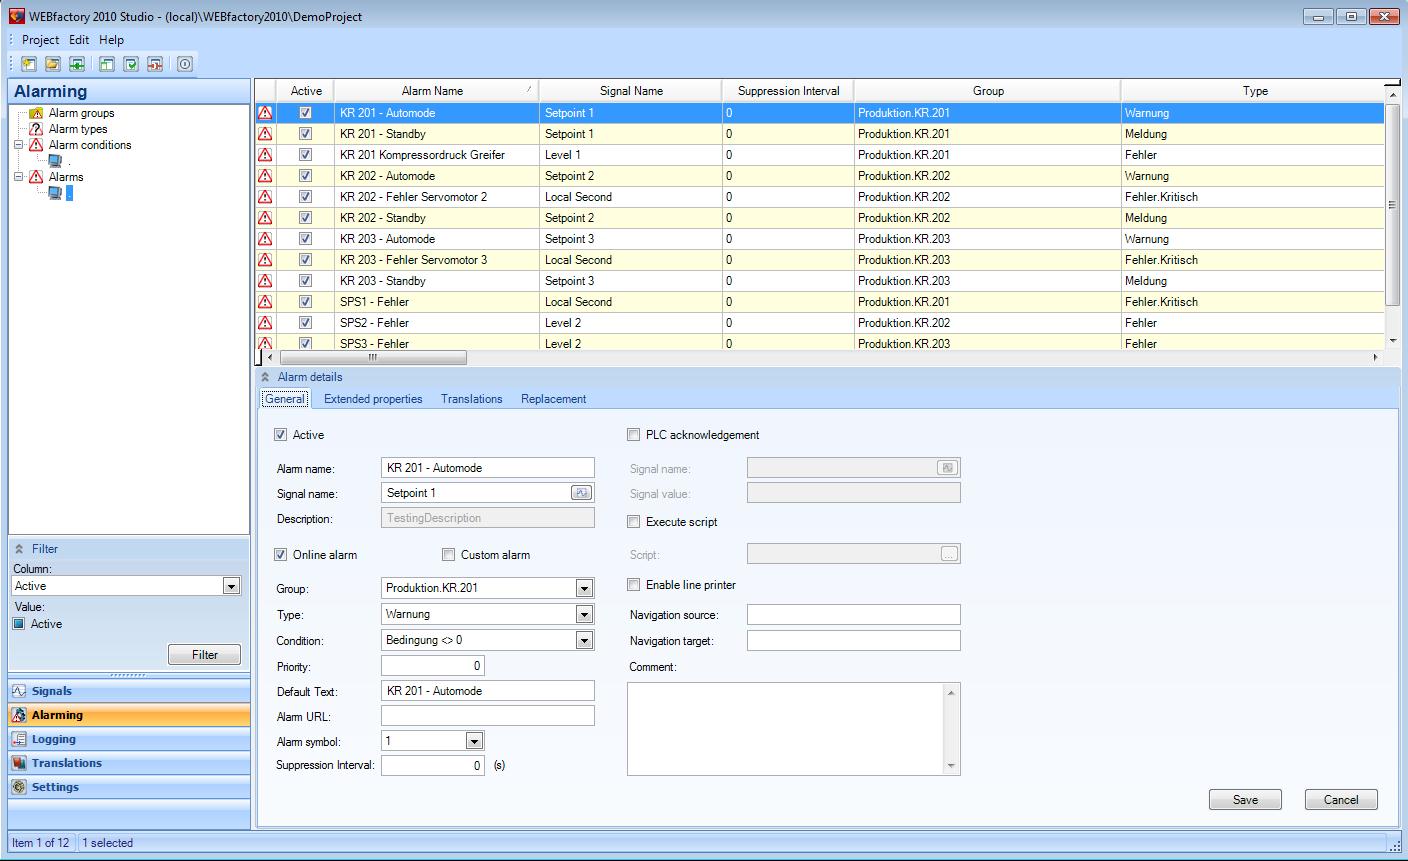
The list of defined alarms in Ewon by HMS NetworksStudio
To view the Extended Properties of an alarm, select the desired alarm from the list and click on the Extended Properties tab in the Alarm details view.
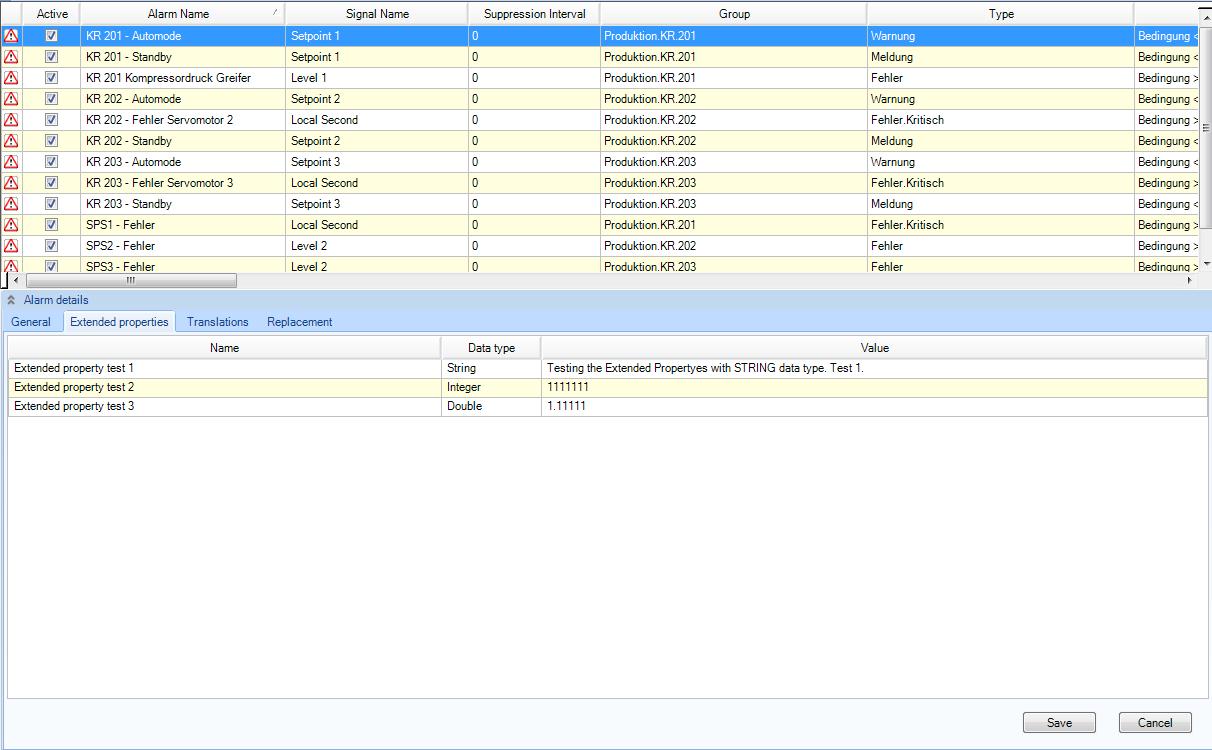
The Extended Properties of the selected alarm
The Extended Properties are listed in the Alarm details view. The name and data type will be just like were set before in the Extended Alarm Properties section of the Ewon by HMS NetworksStudio's Settings tab.
To set the value of an Extended Property, double-click in the Value field of the desired property and enter the correct data type. In our example, the values will be demonstrative. Fill in the Value field for each Extended Property.
IMPORTANT: The double data type needs to be written in the correct language. The precision separator may vary from culture to culture. Make sure that you use the appropriate precision separator for the selected language. The precision separator will be translated too.
For English language, the precision separator for double data type is . (dot).
For German language, the precision separator for double data type is , (comma).
Repeat the above step for each desired alarm in order to add values for the Extended Properties. Make sure to save the settings for each alarm. In our example, we will use extended properties for all the alarms belonging to the Production.KR.201 alarm group.
Set up the Alarm Viewer to display the Extended Properties
In order to make the Alarm Viewer display the Extended Properties, we will need to add the appropriate columns in design-time:
Create a new <MadCap:variable name="MyVariables.WFSmartEditor" /> project. Place the Alarm Viewer control on the page.
The Alarm Viewer control can be found under the Alarming category, in the Toolbox panel.
Select the Alarm Viewer control and click on the Columns button, under the Configuration category, in the Property Inspector panel.
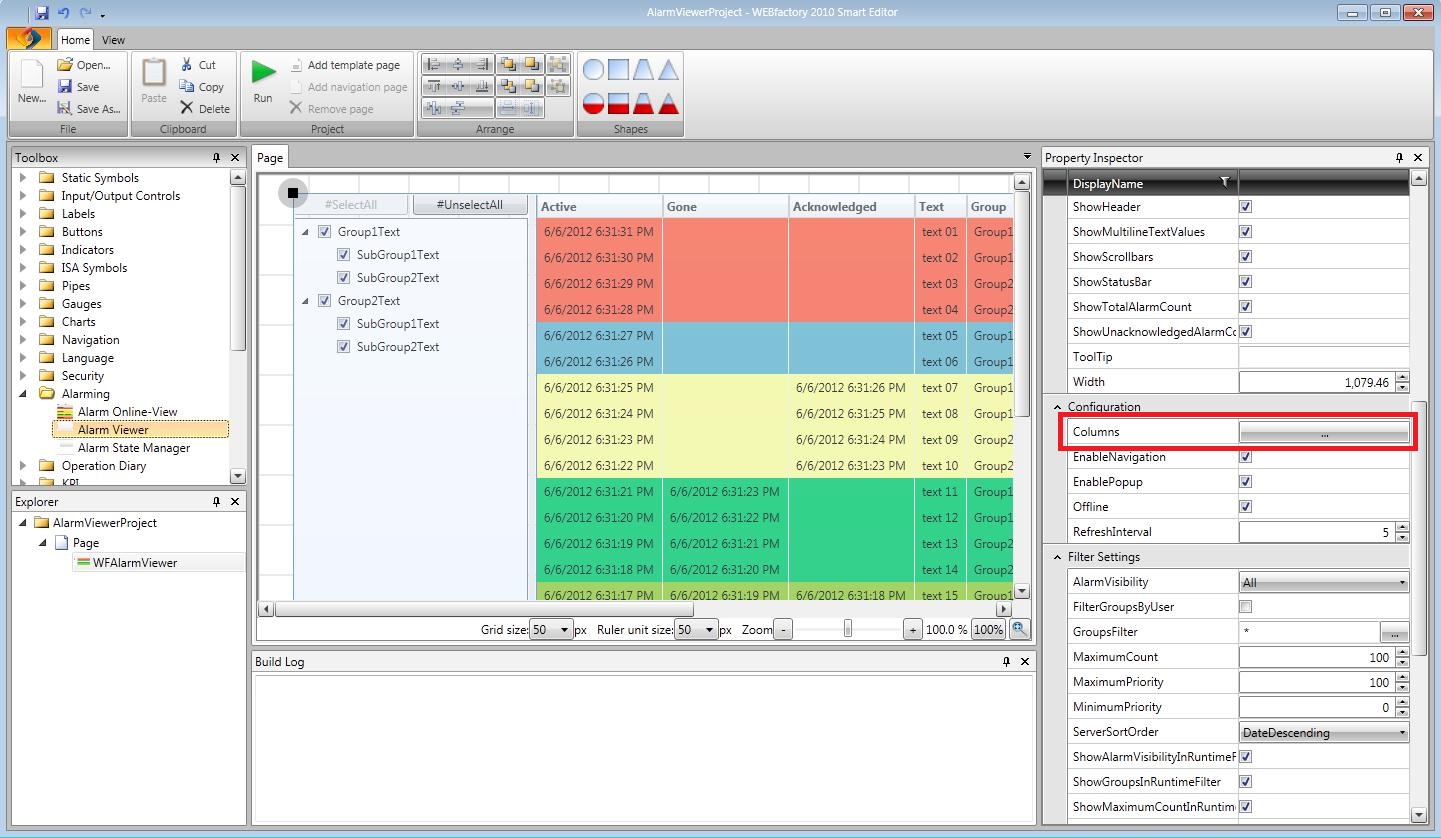
Setting up the Extended Properties columns in Alarm Viewer
The columns editor window will open, allowing you to edit the columns that will be displayed by the Alarm Viewer control at run-time. Some columns are defined by default. We will add other three columns, one for each Extended Property that we have defined in Ewon by HMS NetworksStudio.
Click on the Add AlarmColumnSettings button from the bottom-left corner of the Edit items window.
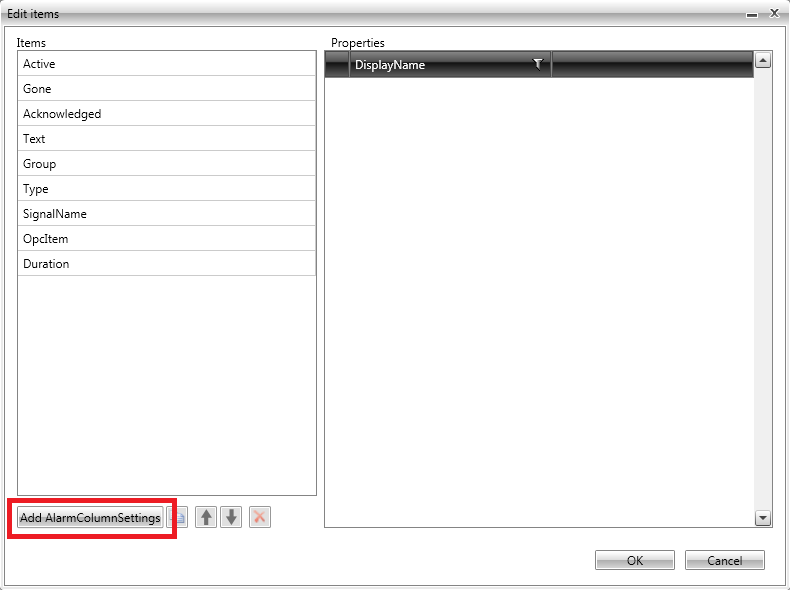
Adding the Extended Properties columns
In the Properties panel, set the Type for the new column as ExtendedProperty1.
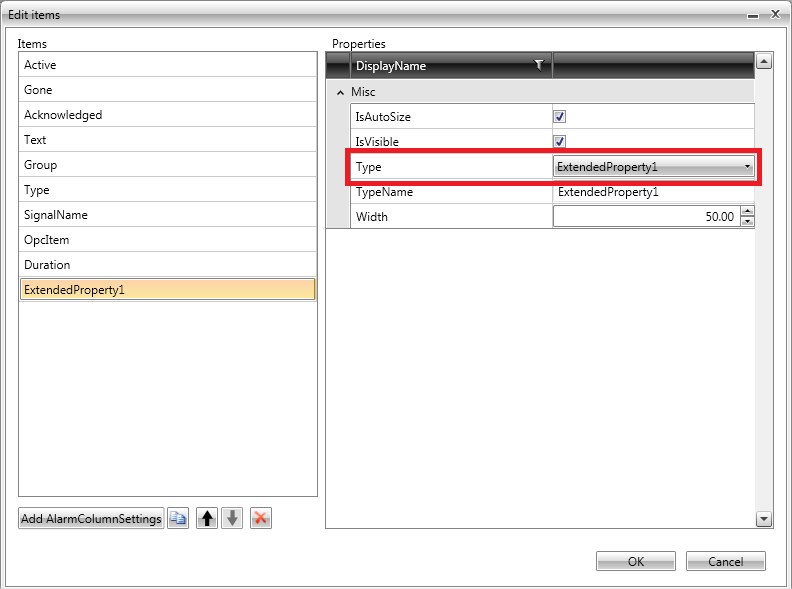
Setting the column type as Extended Property
Repeat the procedure in order to add another two columns. Select ExtendedProperty2 for the second added column and ExtendedProperty3 for the third one.
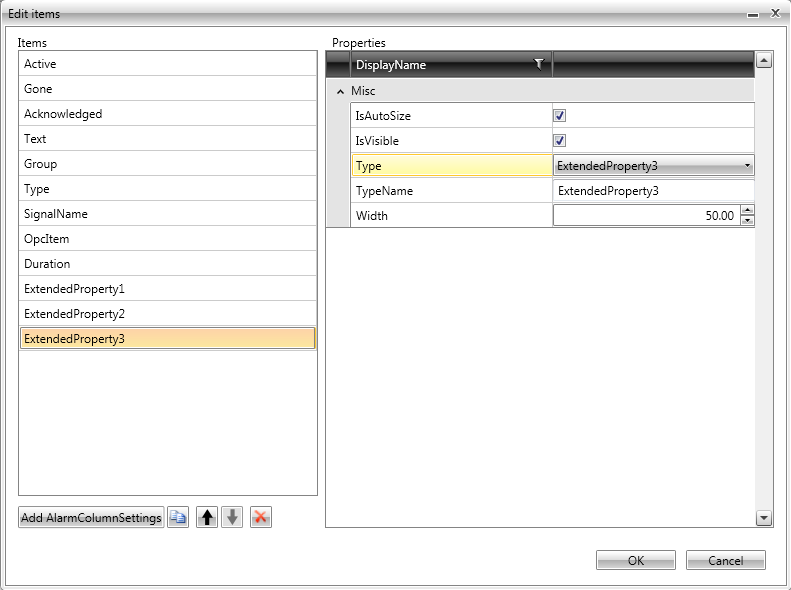
The three Extended Property columns
The columns can be moved up or down in the Items list.
Click OK to confirm the columns addition and click on the Run button to build the project. Alternatively press F5 to build the project.
At runtime, the Alarm Viewer control will display the Extended Properties columns (using the descriptions provided in Ewon by HMS NetworksStudio as column headers), like in the image below:
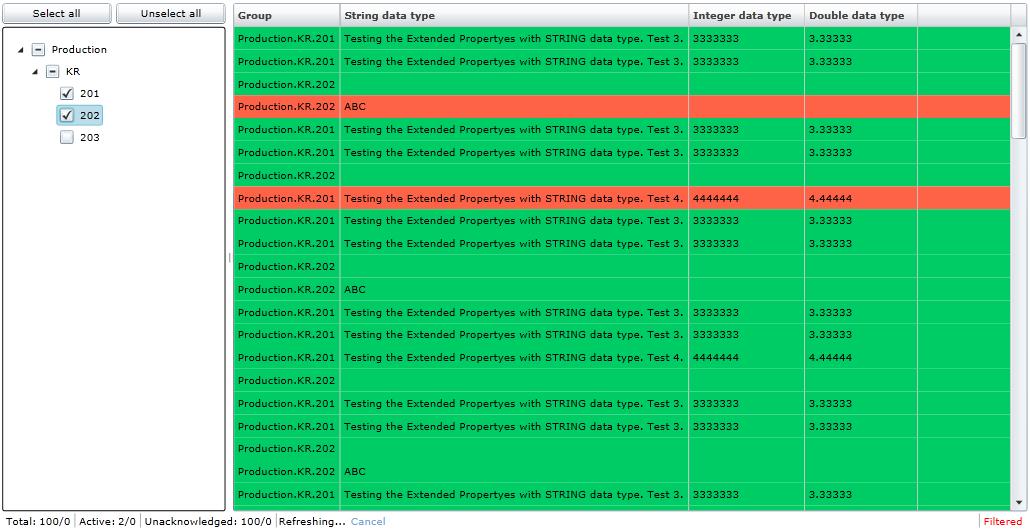
The Alarm Viewer displaying the Extended Properties
Using Ewon by HMS Networks Alarm Viewer Control at runtime
Ewon by HMS Networks AlarmViewer is a Ewon by HMS Networks control responsible with displaying and managing alarms.
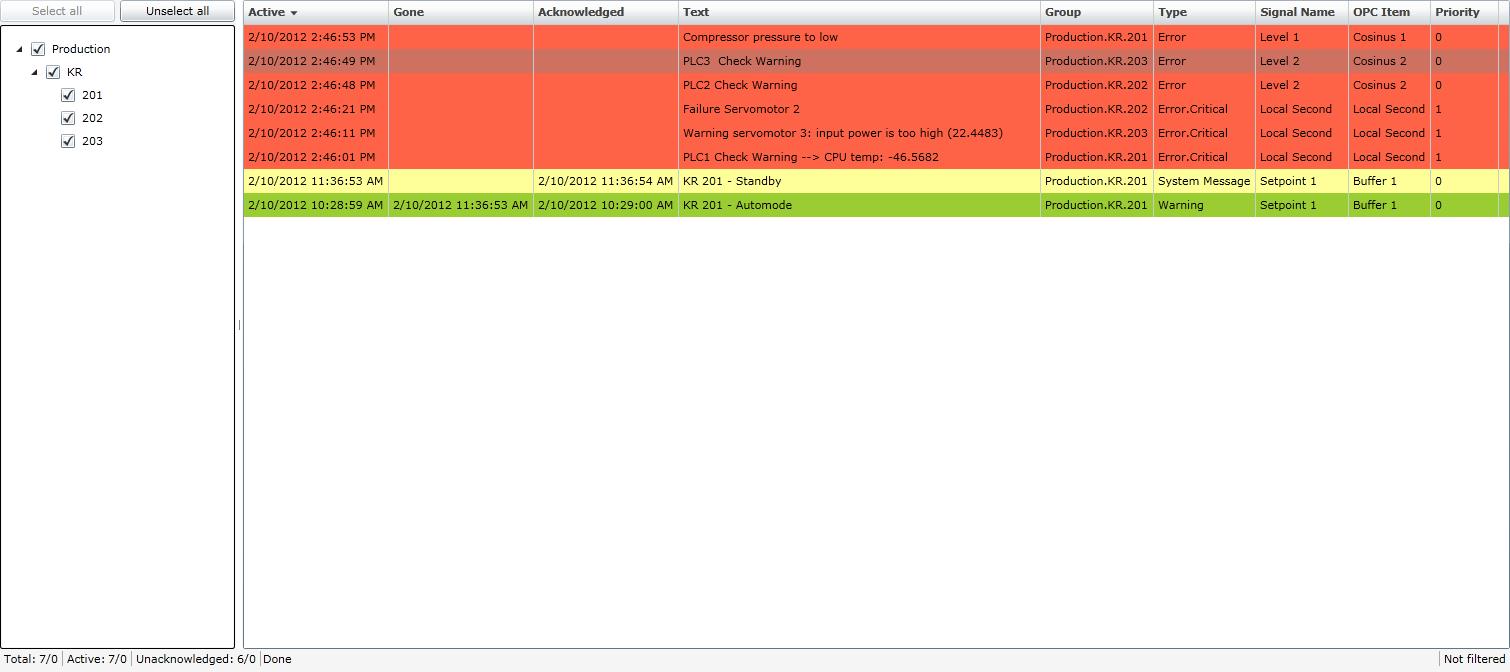
AlarmViewer Control
AlarmViewer Usage
The AlarmViewer can be used to view, filter, acknowledge and comment alarms. This functionality is split between the two panels of the control:
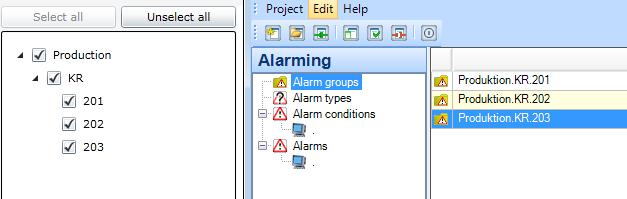
the navigation panel - allows the user to navigate between alarm groups and display either all alarms or only those belonging to a specific alarm group. Above the tree navigation there are two buttons: Select all and Unselect all, for an easier selection in the tree navigation.
the alarm grid panel - lists the alarms and hosts the functionality of filtering, acknowledging, commenting, processing and displaying alarms. This functionality is accessed via the contextual menu (right-click on the selected alarm(s) to open the contextual menu). The alarm grid also supports multiple alarm selection (ctrl + click and shift + click).
AlarmViewer Filtering Options
The Filter menu can be accessed using the contextual menu.
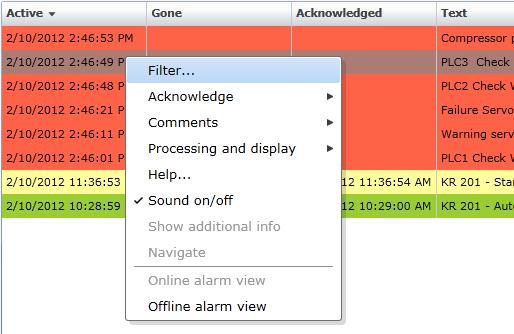
The Filter... option in the AlarmViewer contextual menu
The Filter window is displayed as a pop-up window, and it offers the functionality of loading filtering configurations, saving filtering configurations or manually setting the filtering options.
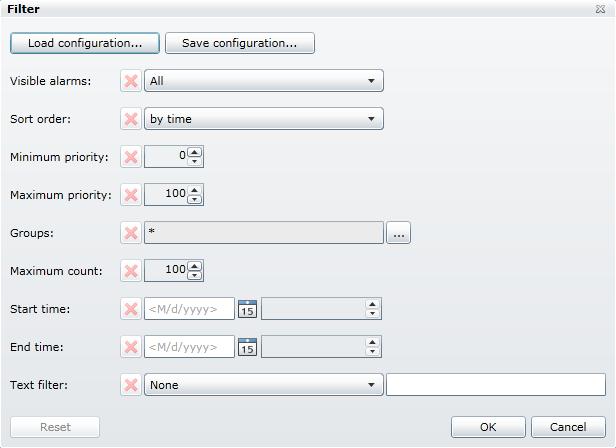
AlarmViewer Filter window
Filtering options:
Visible alarms - filter the alarms by their visibility: Active or not acknowledged, Not acknowledged, Gone, Active and All.
Sort order - filter the alarms by time or by priority.
Minimum priority - filters the alarms based on the priority, displaying only the alarms with a higher or equal priority than the value set here.
Maximum priority - filters the alarm based on the priority, displaying only the alarms with a lower or equal priority than the value set here.
Groups - filters the alarms based on the alarm groups they belong to. This option supports the * wildcard for selecting all the groups. Similar functionality can be achieved using the navigation panel.
Maximum count - the maximum number of displayed alarms.
Start time - filters the alarms based on the date and time. Displays alarms between the time set here and the End time.
End time - filters the alarms based on the date and time. Displays alarms between Start time and the value set here.
Text filter - filters the alarms based on the texts existing in one of the columns. It supports the * wildcard.
For example:
Text filtering using wildcard
The above example of text filtering will display the alarms that have the content of the Text column starting with PLC, whatever the following content is.
Text filtering using two wildcards
The above example will display the alarms that have PLC in the content of the Text column, whatever content is before or after.


The Filter window also has the possibility to reset all the filters by clicking the Reset button at the bottom-left corner of the window.
Acknowledging, commenting and alarm states
Besides the filtering options, the contextual menu also features Acknowledge, Comments and Processing and display:
Acknowledge - gives the possibility to acknowledge alarms with different options.
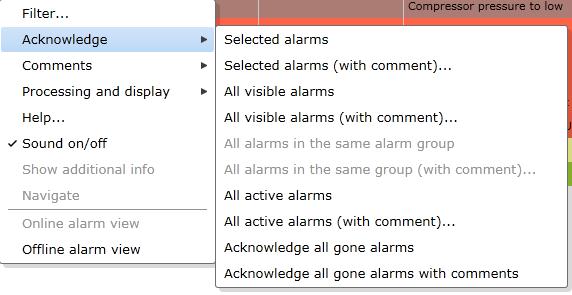
Acknowledging alarms
Comments - gives the possibility to add a general comment or occurrence comment to selected alarms.
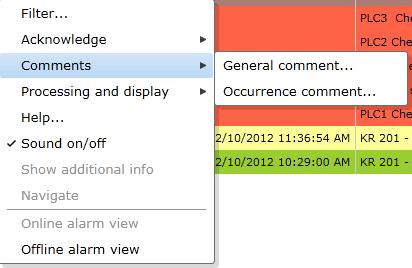
Commenting alarms
It also displays the General Comments added in Ewon by HMS NetworksStudio > Alarm Details > Comment text field of the selected alarm.
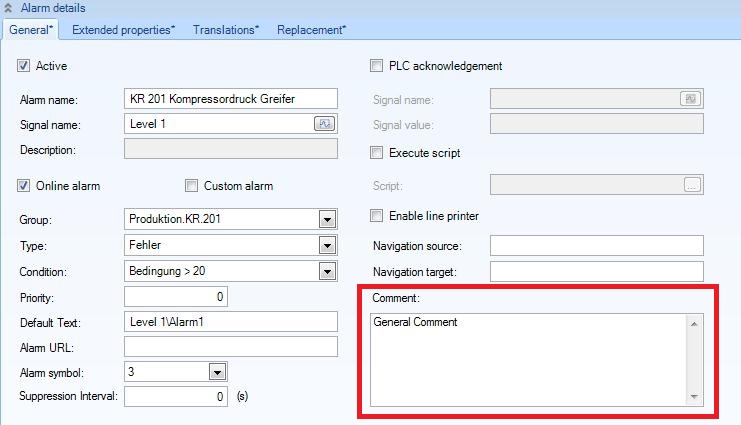
Comment added to an alarm from Ewon by HMS NetworksStudio
Processing and display - allows the user to change the state of the selected alarms.
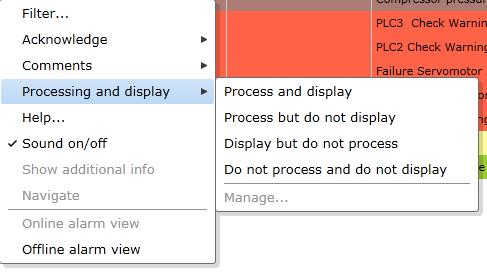
Changing the state of alarms
The Manage option will list all the alarms and filter them by their state, and allowing the user to change the state of the alarm (process, display) easier. It is useful when dealing with many alarms.
Help, Sound and Additional Info
When clicked on, the Help option will display a popup window containing the Cause of the alarm, the Effect of the alarm and the Repair method for the selected alarm.
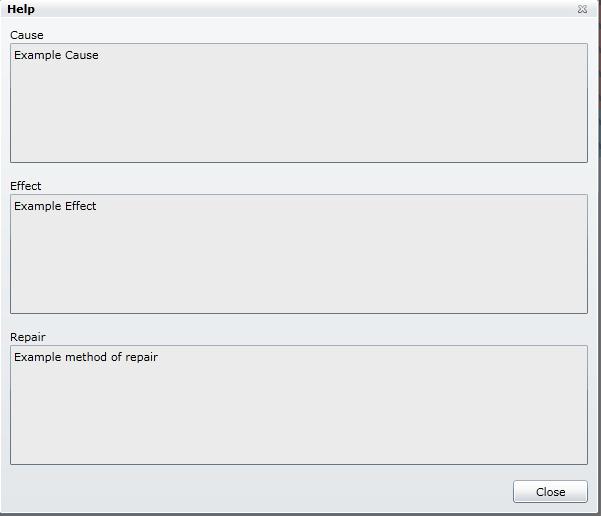
The Help information for a selected alarm
The information displayed in the Help window is added in Ewon by HMS NetworksStudio, in the Translation section of the alarm.
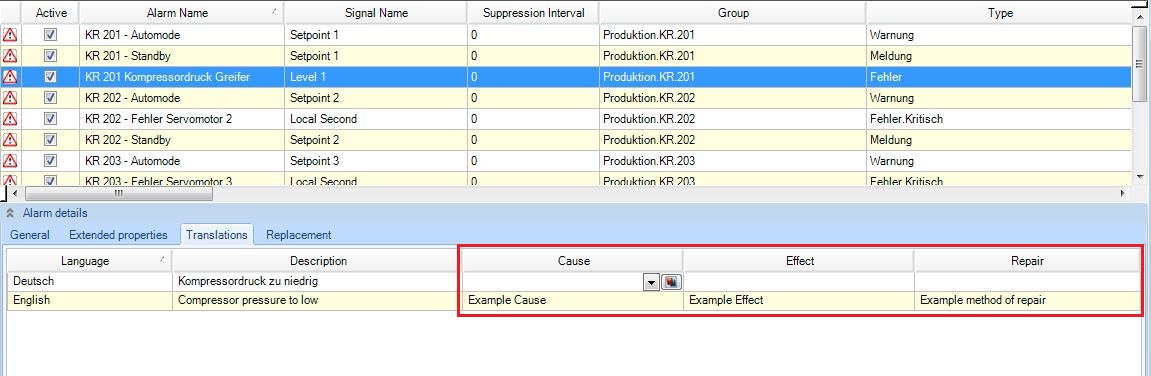
Adding the Help details
Sound on/off allows the user to turn the sound on or off, if the sounds are set to the alarms.
The Additional Info button executes a link previously set in Ewon by HMS NetworksStudio > Alarm Details > Alarm URL text field.
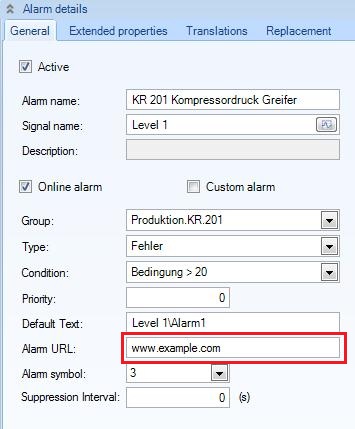
Setting the Additional Info (Alarm URL) for an alarm
Navigation and alarm groups
Navigation is supported by AlarmViewer. If the project is created with navigation, and the alarm settings from Ewon by HMS NetworksStudio are made so it uses navigation, the Navigate option will take the user to a specific page from the project.
To use the Navigate function, make sure your project has navigation. Click here for more details about navigation in a Expression Blend project.
Place the WFAlarmViewer control on the Page1, and set the Page1 as DefaultPage in the WFNavigationTarget.
In Ewon by HMS NetworksStudio, select the desired alarm, and go to Alarm Details > Navigation source. Enter the desired page from your project. For demonstrative purpose, we will use Page2, as in Page1 we placed the AlarmViewer control.
In the Navigation target enter name of your WFNavigationTarget. If the above mentioned guide was followed to create the navigation, the name will be NavTarget.
Save and return to the visualization project. Run the project (F5).
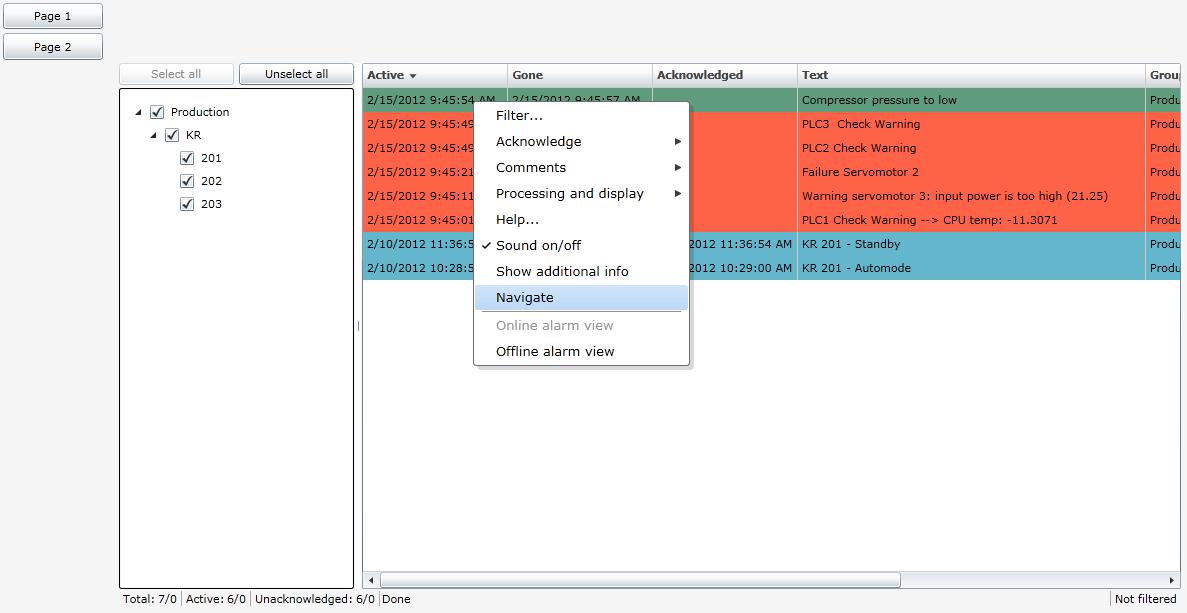
Using the Navigate function
Right-click on the desired alarm to open the contextual menu. Select Navigate. As the settings from Ewon by HMS NetworksStudio point to Page2 for this alarm, the NavTarget will display the Page2.
Alarm groups offer another method of filtering the alarms from the navigation panel. The checked alarm groups will be displayed in the alarm grid.
The groups displayed in the navigation panel are in fact the alarm groups created in Ewon by HMS NetworksStudio. In our example, the list from the navigation panel corresponds with the alarm groups from the Alarming section in Ewon by HMS NetworksStudio.
The alarm groups displayed in the AlarmViewer navigation panel
The alarm groups are visible in the Group filtering option (contextual menu > Filter...) too.
Online/Offline alarm view
Located last in the contextual menu, the Online alarm view and Offline alarm view enables the user to view current alarms (online) or historical alarms (offline).
The historical alarms support the same operations as the current online alarms.
NOTE
While the list of historical alarms (Offline alarms) can be quite big, it may take several seconds for the page to complete the loading
The Status Bar
The Status Bar is located at the bottom of the AlarmViewer control.

AlarmViewer status bar
The Status Bar displays:
in the left side the Alarm Count Display Mode, which can be set at design time from Expression Blend or <MadCap:variable name="MyVariables.WFSmartEditor" />.
By default, the Alarm Count Display Mode is set to FilterAndProject, meaning that it counts:
the number of Total alarms that are filtered from the entire number of alarms in the project;
the number of Active alams from the entire number of alarms in the project;
the number of Unacknowledged alarms from the number of total alarms in the project;
in the center the status of the AlarmViewer;
in the right the filtering status: Not Filtered and Filtered. Clicking on this section of the status bar will open the Filter window.
Also the right side of the Status Bar displays the tag Hidden alarms if the case.