Using the Security Features in SmartEditor
WEBfactory 2010 provides a complex set of security features that are available at design-time in SmartEditor, Blend and Visual Studio. Although this article will focus on using the security features in SmartEditor, the same approach is used when designing visualization in Blend or Visual Studio.
To demonstrate the usage of the security features, we will create a SmartEditor project using three Silverlight controls. We will set up these controls to demonstrate the available security options:
Building the project
In WEBfactory 2010SmartEditor, create a new project.
Head in the Toolbox panel and place the following controls on the page:
the WFUserLogin1 control (Security category). This control will allow us to log in the visualization using an existing user. We will also use the user's Authorization Group to grant access to the controls.
the WFInput1 control (Input/Output Controls > Input category). This control will allow us to showcase the security features and also to control the availability of the WFOutput1 control via a signal.
the WFOutput1 control (Input/Output Controls > Output category). This control will allow us to showcase the security features.
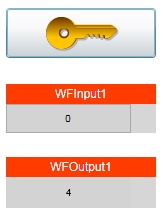
In our example project, we have set the WFInput1 and WFOutput1 labels to display the names of the controls in order to improve the visual reference.

SmartEditor project
Select the WFInput1 control and assign the Setpoint 1 signal. We will use this signal to control the visibility of the WFOutput1 control.
Select the WFOutput1 control and assign the Local Second signal, for demo purpose.
Setting up the security features
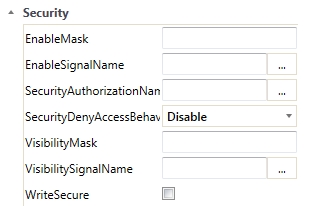
Now that the project has all the required elements, we will proceed with configuring the security for the WFInput1 and WFOutput1 controls. The security properties of the two controls are available in the Property Inspector panel, under the Security category.
User-dependent security
The first security feature to be demonstrated is the SecurityAuthorizationName. Using this property, we can set the Project Authorization whose users can have access to the control. The SecurityDenyAccessBehaviour property will allow us to specify the control's behavior when the Project Authorization requirement is not met.
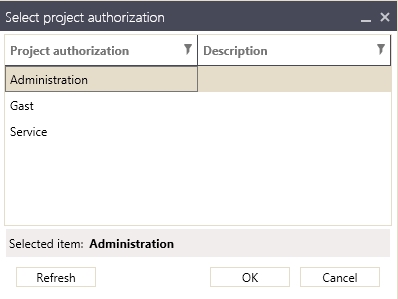
For this example, we will use the Administration project authorization available in the Ewon by HMS Networks demo project, and the default webfactory user which is a member of the Administrators project authorization. The WFInput1 and WFOutput1 control will not be usable until the proper user is logged in.
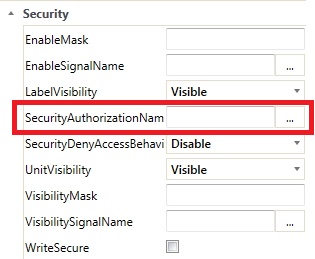
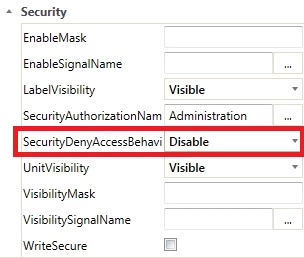
Select the WFInput1 control, head in the Property Inspector panel and expand the Security properties. Click on the ellipsis button next to the SecurityAuthorizationName property.
In the Select project authorization dialog, select the Administration project authorization and click OK to confirm.
In the SecurityDenyAccessBehavior property, select the desired behavior that will manifest when the expected user (member of the Administration project authorization) is not logged in. For the WFInput1 control, select Disable. This means that the control will be visible but disabled until the expected user has logged in.
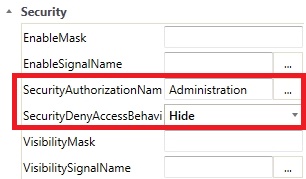
Now select the WFOutpu1 control and assign the Administration project authorization for the SecurityAuthorizationName property, like before.
Set the SecurityDenyAccessBehavior property to Hide, so this control will not be visible until the expected user logs in.
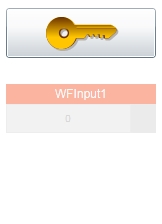
Run the project by pressing F5 or the Run button from the Build section of the Home ribbon menu. Notice that by default, the WFInput1 control is disabled and the WFOutput1 control is not visible.
Now click the log-in button and enter the default webfactory user's credentials. Click Login to proceed.
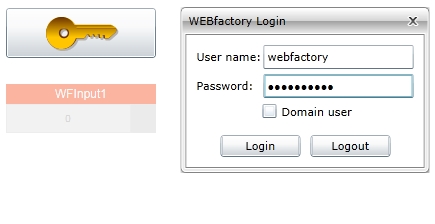
Once the webfactory user is logged in, considering that it is a member of the Administration project authorization, both WFInput1 and WFOutput1 controls are visible and working properly.
Signal-dependent security
The binary mask based security options allow the user to configure the behavior of a control based on the value of a signal. In this section we will demonstrate how a control can be configured and its run-time behavior controlled using the Setpoint 1 signal assigned to the WFInput1 control.
How binary masks work?
When using binary masks, the assessment of the value is done at binary level. This means that for the decimal mask value of 2 (binary 10), the interpretation is that the second bit (the bit order starts with the most right bit, the first bit, which is on position 0), occupying the position 1 must be 1. This interpretation is the result of the AND logical operations that is applied on the mask value and signal value, in binary base.
Also, if the binary mask is enabled and used, the signal value 0 will satisfy any condition and always trigger the corresponding behavior.
In the case of EnableMask/VisibilityMask, if the mask value is decimal 2 (binary 10), any signal value that has the second bit as 1 (position 1 = 1) will satisfy the condition and will disable/hide the control. For example, if EnableMask is set to decimal 2, the signal values that will satisfy the condition and disable/hide the control are: 0, 2, 3, 6, 7, etc.
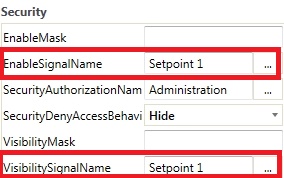
Select the WFOutput1 control. This control's run-time behavior will be manipulated by the Setpoint 1 signal. In the Security properties, assign the Setpoint 1 signal name to both EnableSignalName and VisibilitySignalName properties. This will link our signal to the Enable and Visibility behaviors and will allow us to set up mask values for both behaviors. The EnableSignalName and VisibilitySignalName properties can be also controlled using different signals.
Now let's configure the binary masks for both the Enable and Visibility behaviors. The mask will be set using decimal values but will be treated as binary values when applying it to the value of the Setpoint 1 signal. The comparison is done using the AND logical operation. When this operation results true, the behavior for which the mask was applied will be activated.
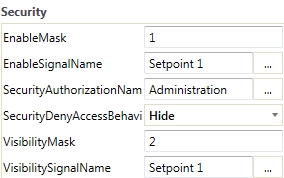
Set the EnableMaks value to 1 (binary 001) and the VisibilityMask value to 2 (binary 010).
Run the project by pressing F5 or the Run button from the Build section of the Home ribbon menu. Let's discuss the run-time behaviors now:
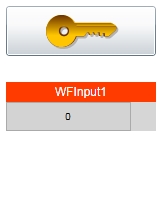
When the Setpoint 1 value is 0, the WFOutput1 control is not visible. This is expected considering that the value 0 always satisfies the mask condition. Technically, for signal value 0 the control is hidden and disabled, as both EnableMask and VisibilityMask conditions are satisfied.
When the Setpoint 1 value is 1 (binary 001), the WFOutput1 control is visible but disabled. That is because the VisibilityMask condition is not satisfied (the second bit is not 1) but the EnableMask condition is satisfied (the first bit is 1).

When the Setpoint 1 value is 2 (binary 010), the WFOutput1 control is hidden. This is because the VisibilityMask condition is satisfied (the second bit is 1).

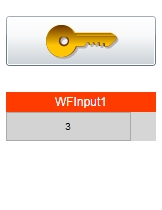
When the Setpoint 1 value is 3 (binary 011), the WFOutput1 control is hidden again, because the VisibilityMask condition is still satisfied. Technically, the EnableMask condition is also satisfied, because both the first and the second bits are 1.
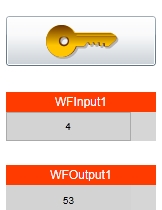
When the Setpoint 1 value is 4 (binary 100), the WFOutput1 control is visible and enabled, because neither VisibilityMask or EnableMask conditions are satisfied (the first and second bits are both 0).
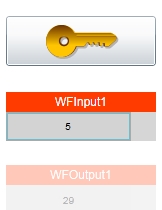
When the Setpoint 1 value is 5 (binary 101), the WFOutput1 control is again visible but disabled, as the VisibilityMask condition is not satisfied (the second bit is 0) but the EnableMask condition is satisfied (the first bit is 1). This binary mask is applied for all the possible values of Setpoint 1.
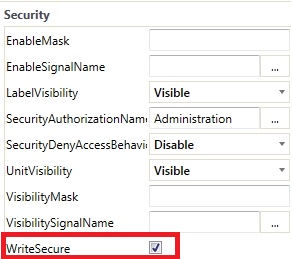
Writing security
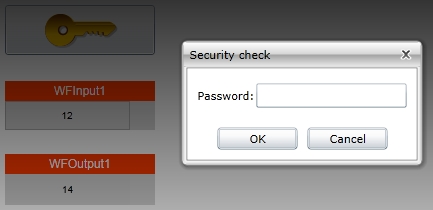
WEBfactory 2010 security system also provides the option to check for rights confirmation before performing a write operation. This confirmation means that the user must input its password in order to be able to write any value, even if the user has already logged in the visualization.
Select the WFInput1 control, head into the Property Inspector and check the WriteSecure option from the Security properties.
Run the project by pressing F5 or the Run button from the Build section of the Home ribbon menu.
At run-time, log in with the webfactory user in order to activate the WFInput1 control. Write any value using the WFInput1 control. The system will prompt for the user's password before making the write operation.