Service Manager Tutorials
Check out these tutorials and learn how to use the WEBfactory2010 Service Manager tool by following the described steps.
Adding an additional service in Ewon by HMS NetworksService Manager
Check out this article and learn how to add an additional service in WEBfactory2010 Service Manager.
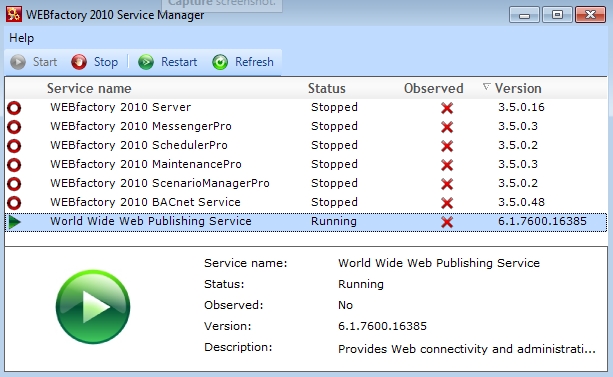
WEBfactory 2010Service Manager displays, by default, the Ewon by HMS Networks services installed on the machine. That doesn't mean it is limited at Ewon by HMS Networks services only. WEBfactory 2010Service Manager can display any service running on the same machine. Follow the guide bellow to find out how to set up a new service in WEBfactory 2010Service Manager.
Configure the Service Manager
WEBfactory 2010Service Manager relies on a configuration file to display the services. To add a new service, simply add the service name to the configuration file.
Navigate to the Service Manager folder from the WEBfactory installation folder. By default, the path should be C:\Program Files (x86)\WEBfactory 2010\Tools\Service Manager\.
Locate the WFServiceManager.exe.config and open it with your preferred text editor.
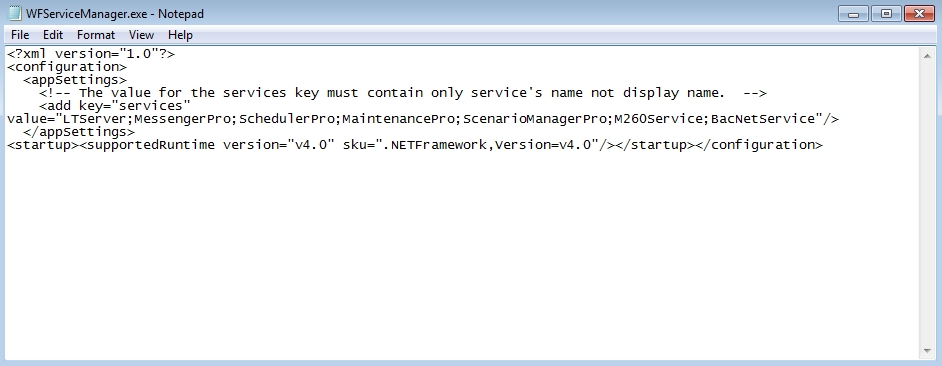
The new service name must be added at the end of the services list. Locate the line containing the services list.
<add key="services" value="LTServer;MessengerPro;SchedulerPro;MaintenancePro;ScenarioManagerPro;M260Service;BacNetService"/>
Add the new service name at the end of the line, making sure that it is separated by the previous service name by a semicolon. For demonstration purposes, we will use the IIS service, W3SVC. Any service installed on the same machine can be listed in Service Manager.
<add key="services" value="LTServer;MessengerPro;SchedulerPro;MaintenancePro;ScenarioManagerPro;M260Service;BacNetService;W3SVC"/>Save the configuration. The new service will be available inside Service Manager but won't work just yet. In order to function properly, the same service must be also added to the RemoteController service.
Configure the RemoteController
Navigate to the RemoteController folder from the WEBfactory installation folder. By default, the path should be C:\Program Files (x86)\WEBfactory 2010\Server\RemoteController.
Locate the Scada.RemoteController.Server.exe.config and open it with your preferred text editor.
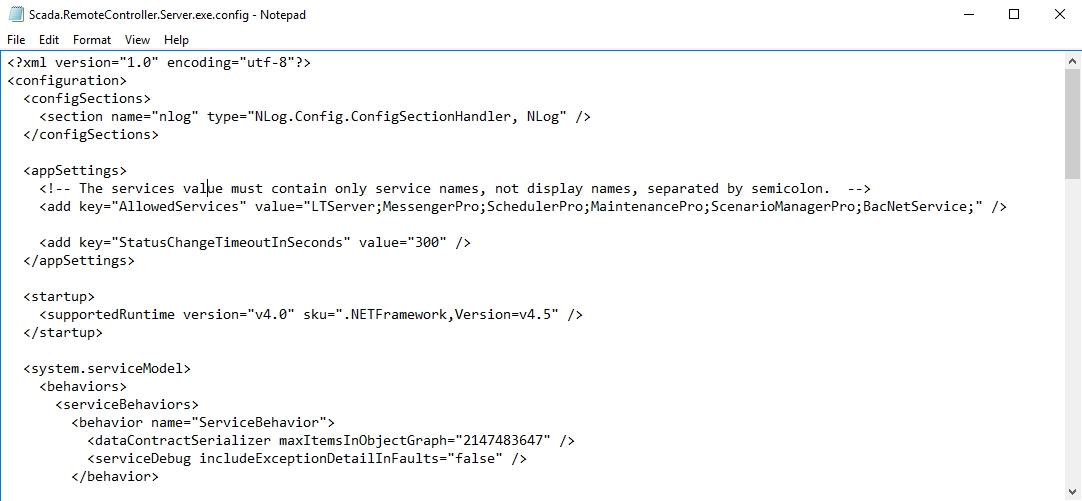
The same service name must be added at the end of the services list, just like in Service Manager's configuration. Locate the line containing the services list.
<add key="AllowedServices" value="LTServer;MessengerPro;SchedulerPro;MaintenancePro;ScenarioManagerPro;BacNetService;" />
Add the new service name at the end of the line, making sure that it is separated by the previous service name by a semicolon.
<add key="AllowedServices" value="LTServer;MessengerPro;SchedulerPro;MaintenancePro;ScenarioManagerPro;BacNetService;W3SVC" />Save the configuration file and start the WEBfactory 2010Service Manager. The new service will be available. Now the service can be controlled just like a default WEBfactory 2010 service.