MessengerPro
Check out this article and learn more details about the WEBfactory 2010 MessengerPro.
MessengerPro is an optional software module used for the distribution of event messages, faults and alarms.
The monitoring of the process and the generation of alarms is done by the Server. After the occurrence of a reportable event, MessengerPro initializes a predefined alarm sequence in order to notify the relevant persons.
The module is divided into two parts. The first part consists in a Web application and the second part consists in a service application. The Web application is used to configure MessengerPro during the design phase and at runtime.
The service application monitors the active alarms and sends messages to the appropriate people. The service application is not normally visible.
Differences between Messanger Standard and MessengerPro
Messenger Standard | MessengerPro | |
|---|---|---|
Availability | Included in 2010 | Optional |
Email delivery | X | X |
SMS delivery | X | X |
Fax delivery | X | X |
Voice messages delivery | X | |
Remote acknowledgement | X | |
Direct alarm delivery | X | X |
Alarm delivery using escalation table | X | |
Scheduled alarm delivery | X | |
Alarm delivery using alarm groups | X | |
Communication log | X |
MessengerPro Visual Structure
Check out this article ad learn more details about the WEBfactory 2010 MessengerPro Visual Structure.
The structure of the MessengerPro is the same for the Web Application and for the Ewon by HMS NetworksStudio.
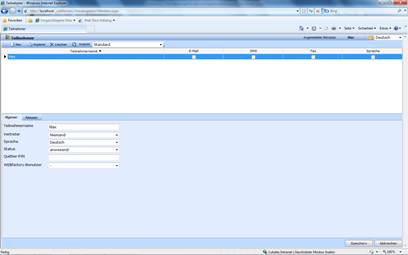
MessengerPro Web Application
Language
By selecting the language from the upper-right drop down box, the user is able to change the language of the MessengerPro visualization at run time. The languages must be defined in Ewon by HMS NetworksStudio.
The languages can be added and marked as active in the Internationalization section of Ewon by HMS NetworksStudio.
The translation labels for Ewon by HMS Networks MessengerPro start with the “WFSN_MSGPW_” string.
Visual Structure
Main Menu
The main menu allows the user to switch between MessengerPro’s different sections:
Members
Escalation tables
Shift schedules
Alarming groups
Alarming lists
Call archive

MessengerPro Sections entry list
Toolbar
The MessengerPro toolbar is context sensitive. Depending on the selected view, the toolbar will render active or inactive the available options.
By default, the following options are available:
UI Option | Description | |
|---|---|---|
 | New | Create new data |
 | Copy | Copy to clipboard |
 | Delete | Deletes the current selection |
 | View | Switch between the search mode and the standard mode |
Search View
When in Search view, the search options are available above the Toolbar.

MessengerPro Toolbar
UI Option | Description |
|---|---|
Column | Select the column of the table (from the Main view) as the search location. |
Value | The value to be searched for in the selected column. |
Filter | Start the filtering |
Main View
The main view of the MessengerPro application is the central part that displays the items, depending on the selected section. For example, in the Members section, the main view will display a table with the available members.

MessengerPro - Members section view
Details Panel
The details panel lists the available details for the selected item in MessengerPro. The item details are listed under category tabs. For example, in the Members section, the details panel will display the General tab, containing the general details for the selected member, and the Addresses tab, containing the address details for the selected member.
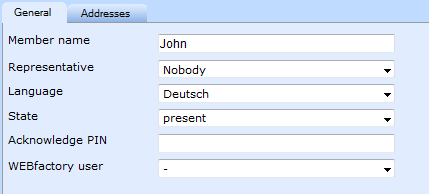
MessengerPro - Members detail panel
The Members Section
Check out this article and learn more details about the WEBfactory 2010 MessengerPro Members section.
The Members section of MessengerPro, is the main entry of this module. As soon as clicking on the MessangerPro entry, in Settings area of Studio, the list of available members is displayed.
The Members section, allows the user to create new members and add addresses to the existing or new members.
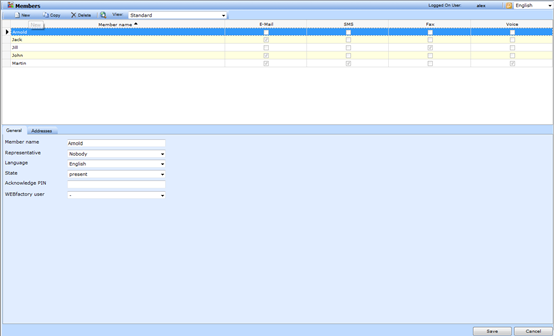
MessengerPro Members section
Members Main View
The main view displays the table with the existing MessengerPro members and the active communication services for each member.

Members panel
The toolbar allows the user to add, copy or delete a member from the members table.
To add a new member to MessengerPro, click on the New button from the toolbar. The new member will be added to the list of existing members. The default name will be Member1. Edit the general details and the addresses and click the Save button.
Members Details Panel
The details panel will list the Members details under two tabs: General and Addresses.
General tab
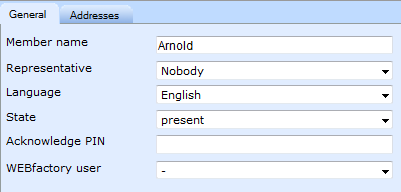
TAB General of Members details panel
UI Option | Description |
|---|---|
Member name | The name of the MessengerPro member. |
Representative | The representative is selected from the already available members. If the status of a member is set to Away, the notifications will be forwarded to the representative. |
Language | The language used for notifying the selected member. |
State | The member can either be Present or Not present. |
Acknowledge PIN | The number used for the identification of the member. It is required when acknowledging alarms via phone. |
i4scada Use | When remotely acknowledging alarms, a i4scada user with acknowledgement rights must be selected. |
IMPORTANT
When using a modem for sending SMS messages using the Swissphone pager service, the subscriber phone number has to be entered WITHOUT the area code!
Addresses Tab
The Addresses tab hosts the table of addresses for the selected member. Each member can have multiple addresses defined.

TAB Addresses of members detail panel
Each address has the following properties:
UI Option | Description |
|---|---|
Active | The status of the current address. |
Service | The notification service selected for the current address. Notification services, may be selected from: E-Mail, SMS, Fax, Voice, PLC. |
Number/E-mail address | The phone number (for SMS, Fax and Voice) or the e-mail address. When using SMS messages over GSM all phone numbers have to be configured with international number coding “+ country code”; ex: +49123456789. When using analog or ISDN modem, the “+ country code” notation MUST NOT be used. |
To save any modification, press on the Save button.
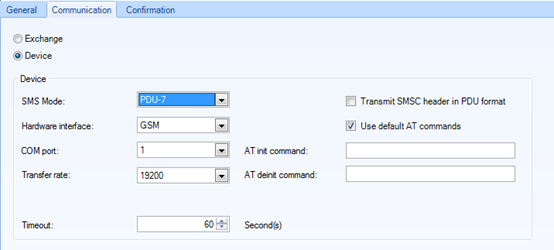
When using SMS messaging via GSM modem and the D1 or D2 providers, the SMS mode must be set to PDU-7 in .
The provider number for D1 network is +491710760000 (Hardware interface GSM).
When using SMS messaging via GSM modem and the D2 provider, the SMS mode must be set to PDU-7 in Ewon by HMS NetworksStudio.
The provider number for D2 network is +491722270000 (Hardware interface GSM).
SMS Communication - GSM
The Escalation Tables Section
Check out this article and learn more details about the WEBfactory 2010 MessengerPro Escalation Tables section.
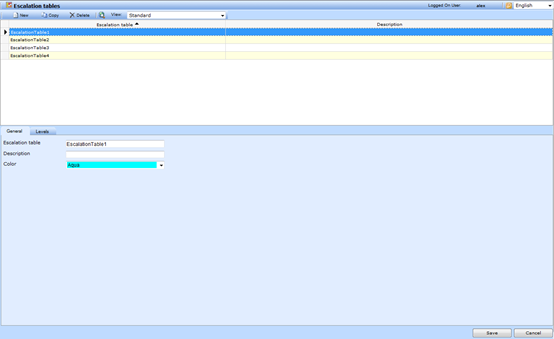
The Escalation tables section displays the list of defined escalation tables. Using the Toolbar options, the user is able to create a new escalation table, copy or delete an already existing one.
Go to Escalation Tables
Escalation Tables Main View
The list of escalation tables is available in the main view.

Escalation tables list
UI Option | Description |
|---|---|
Escalation table | The name of the escalation table |
Description | The description of the escalation table |
The Escalation table column can also be used for sorting the table.
Escalation Tables Details Panel
The details panel of the Escalation tables section hosts the escalation table details, separated in two tabs: General and Levels.
General tab

Escalation Tables - General TAB
UI Option | Description |
|---|---|
Escalation table | The name of the escalation table. |
Description | The description of the description table. |
Color | The color associated with the selected escalation table. |
Levels tab
The Levels tab lists the members that are part of the selected escalation table. The user is able to add a new member or delete an existing one by using the New or Delete buttons.

Escalation Tables - Level TAB
Each member has the following properties:
UI Option | Description |
|---|---|
Member name | The name of the member |
Time out (min)_ | The time period in which MessengerPro will notify the member. If the Time out period expires, the next member in the escalation table will be notified. |
Acknowledge right | Allows the user to decide if a member of the escalation table has the acknowledge rights. This setting can either be Yes or No. |
The escalation table’s names must be unique. The amount of escalation tables and members is not limited.
Colors make it easier to find escalation tables in shift schedules.
The Shift Schedules Section
Check out this article and learn more details about the WEBfactory 2010 MessengerPro Shift Schedules section.
The Shift Schedule section displays the available shift schedules and allows the user to edit them. The user can also create new shift schedules, or see weekly or monthly overviews of the shift schedules.

Shift Schedules
The shift schedules can be either cyclic or calendar based.
Shift Schedules Main View
In the main view, all the available shift schedules are listed in the table, as follows:
UI Option | Description |
|---|---|
Shift schedule | The sift schedule name. |
Description | The description associated with the shift schedule. |
Type | The type of the shift schedule. It can be either Cyclic or Calendar based. |
Creating a new Shift Schedule
To create a new shift schedule, press the New button from the toolbar. Any shift schedule can be either cyclic or calendar based.
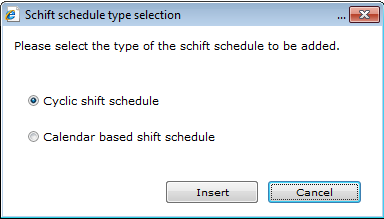
Shift Schedule type selection
A Cyclic shift schedule is a one week schedule with the particularity that the planned week can be repeated up to 8 times. Ex: planning a 4 week cyclic shift schedule means that after 4 weeks the shift schedule will start from beginning.
The Calendar based shift schedule is a non-repetitive schedule that follows a calendar pattern.
Editing a Shift Schedule
To edit a shift schedule, click the Edit button from the toolbar.
The Edit shift schedule window allows the user to edit the name, description, calendar week (if calendar based shift schedule) or Week cycle ad Start week (if cyclic shift schedule). More important, the Edit window allows the planning of the escalation tables during a shift.
UI Option | Description |
|---|---|
Shift schedule | The name of the Shift schedule. |
Description | The description of the shift schedule. |
Cyclic shift schedule | |
Week cycle | The number of cycles the shift will run. A cycle is a week. |
Start week | The starting week for the cyclic shift schedule. |
Calendar based shift schedule | |
Calendar week | The starting week for the calendar based shift schedule. |
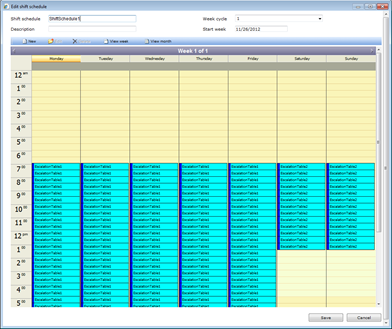
Editing a cyclic shift schedule
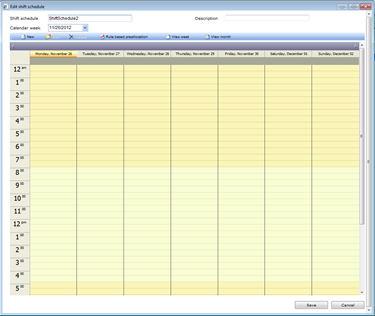
Editing a calendar based shift schedule
To plan a new Escalation table in a shift, double-click the desired day in the Edit shift schedule window. The Shift Schedule window will pop up.
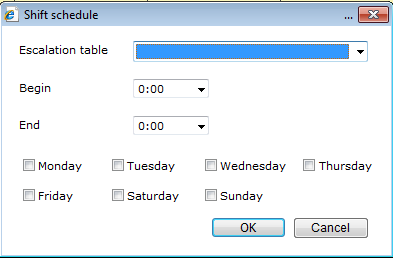
Shift Schedule window
UI Option | Description |
|---|---|
Escalation table | Select the desired escalation table to be planned in the shift. |
Begin | The beginning hour of the period for which the selected escalation table is planned. |
End | The ending hour of the period for which the selected escalation table is planned. |
Monday, Tuesday, Wednesday, Thursday, Friday, Saturday, Sunday | The days of the week in which the planned escalation table will be active. |
The scheduled escalation tables will be displayed in the daily calendar inside the Edit shift schedule window.
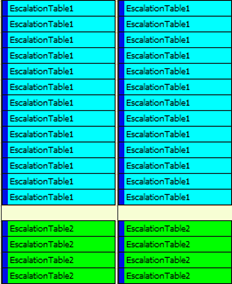
Scheduled escalation tables
Click the Save button to save the new schedule.
Week View
The View week button allows the user to have an overall of the selected week. To open the Shift schedule – week view window, press the View week button from the toolbar.

Week view
The main view of the Week view window displays the week agenda. The different planed escalation tables are visible for each day.
To select a different week, use the Calendar week drop-down date menu.
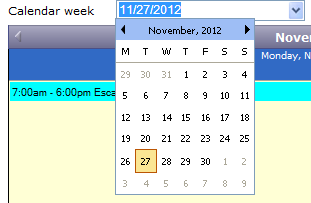
Calendar week
Month View
The View month button allows the user to have an overall of the selected month. To open the Shift schedule – month view window, press the View month button from the toolbar.
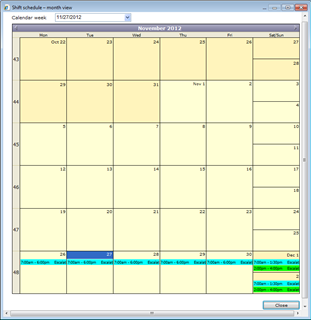
Month view
The main view of the Month view window displays the monthly agenda. The different planed escalation tables are visible for each day.
To select a different month, use the Calendar week drop-down date menu.
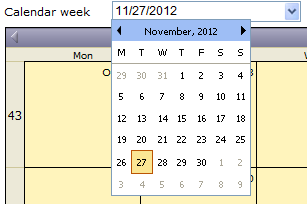
Month view calendar
The Alarming Groups Section
Check out this article and learn more details about the WEBfactory 2010 MessengerPro Alarming Group section.
For The Alarming groups section allows the user to group different Shift schedules under a single Alarming group. The Alarming groups can be used for notifying different service units, each one containing its own shifts and escalation tables.
For example, electricians and mechanics, each with their own shift schedules, can be easily combined in one Alarming group.
Alarming Groups Main View
The main view of the Alarming groups section contains the list of defined Alarming groups.

Alarming Groups list
Using the contextual menu, the existing Alarming groups can be copied or deleted, or new Alarming groups can be created.
Alarming Groups Toolbar
The toolbar hosts the usual buttons (New, Copy, Delete and the View). The same options are available using the contextual menu in the main view.

Alarming Groups toolbar
Alarming Groups Details Panel
The details panel contains two tabs: General tab and Shift Schedules tab.
General tab
UI Option | Description |
|---|---|
Alarming Group | The name of the Alarming group |
Description | The description of the Alarming group |
Shift Schedules tab
UI Option | Description |
|---|---|
Shift schedule | The name of the selected shift schedule |
Confirmations |
To add a new Shift schedule to the Alarming group, click the New button from the Shift Schedules tab toolbar. The Shift Schedules Selection window will open, allowing the user to select the desired shift schedules.
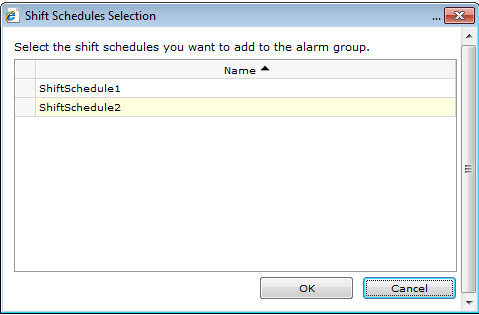
Shift Schedule Selection for Alarming Groups
To delete a Shift schedule, select the schedule and press Delete in the tab’s toolbar.
Press Save to save the Alarming groups changes.
The Alarming List Section
Check out this article and learn more details about the WEBfactory 2010 MessengerPro Alarming List section.
The existing alarms and alarm groups can be found in the Alarming list section of the MessengerPro. The toolbar provides the options of creating new alarms and new alarm groups, besides the expected Copy and Delete options.
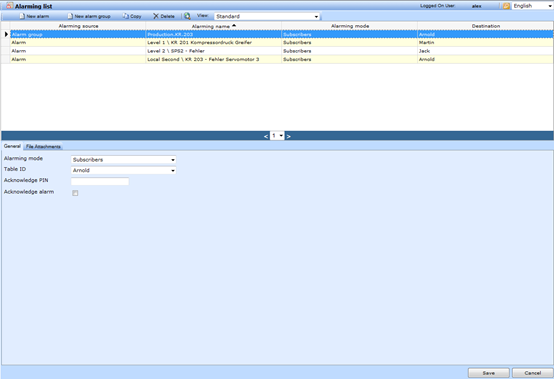
Alarming List entry
In the Alarming list section, the alarms or alarm groups can be set up in different ways: the alarms can be set up to directly notify subscribers or use escalation tables, shift schedules or alarming groups.
Alarming List Main View
The main view contains the alarms table. The table contains all the alarms and the alarm groups defined in MessengerPro.

List of existing Alarmings
UI Option | Description |
|---|---|
Alarming source | The source of the alarming: alarm or alarm group. |
Alarming name | The name of the Ewon by HMS Networks alarm. |
Alarming mode | The procedure followed by MessengerPro for the current alarm. |
Destination | The destination of the alarm: Escalation table, Shift schedule, Alarming group or direct notification to member. |
The alarm mode might either be a single alarm or a selection of an existing alarm group.
When selecting an “alarm group”, the message is sent when any alarm of that specific group becomes active. There is no need for setting up 10 alarms for a specific group to send a message; the Alarming Group can be used as alarm mode.
Alarming List Details Panel
The Alarming list details panel contains two tabs: the General tab and the File Attachments tab.
General tab
UI Option | Description |
|---|---|
Alarming mode | The procedure followed by MessengerPro for the current alarm. It can be Escalation table, Shift schedule, Alarming group or Subscriber.
|
Table ID | The Shift schedule, Escalation table, Alarming group or member that will receive the notification. |
Acknowledge PIN | The PIN required for remote alarm acknowledgment. |
Acknowledge alarm | If on, the alarm can be acknowledged by the users who have acknowledgment rights. |
File Attachment tab
UI Option | Description |
|---|---|
Language | The language of the file |
Text | The textual description of the file |
File URL | The URL of the file |
The Call Archive Section
Check out this article and learn more details about the WEBfactory 2010 MessengerPro Call Archive section.
The Call archive section of MessengerPro contains the list of calls logged in the system.
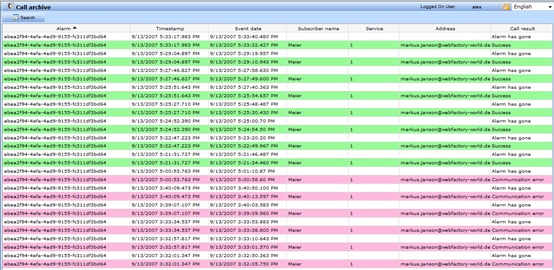
The calls are listed in a table that contains all important information for the calls:
UI Option | Description |
|---|---|
Alarm | The alarm event that triggered the call. |
Timestamp | The date and time when the alarm has been raised. |
Event date | The date and time when the notification was sent. |
Subscriber name | The name of the subscriber that received the notification call. |
Service | The communication service used for the notification call. |
Address | The address where the call was made. |
Call result | The result of the notification. |
The user has the ability to search the Call archive using the Search button from the toolbar. The Call archive search allows extensive search using wildcards and complex filtering.
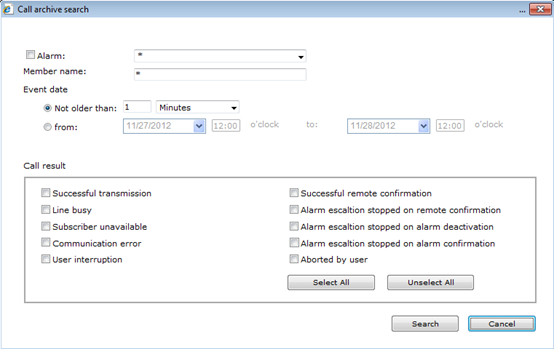
The search can be made using the alarm name, the member name, event date or call result.
UI Option | Description |
|---|---|
Alarm | Allows filtering by alarms. Wildcards are supported. |
Member name | Allows filtering by member names. Wildcards are supported. |
Event date | Filters the alarms by event date. The filtering can be exclusive (Not older than…) or inclusive (from… to). |
Call result | Allows filtering by call result. Selecting all call results is possible using the Select All button. |
MessengerPro Functions and definitions
Check out this article and learn more details about the WEBfactory 2010 MessengerPro functions and definitions.
Supported communication services
The following communications services are supported when alerting the service employees:
Email, Pager
Short Message Service (SMS)
Fax
Voice Message
Usually the message is composed of:
Alarm qualifier
Alarm text
Extension text
Time of alarm occurrence
This information is separated by a period.
When notifications are sent via email, additional service documents can be attached to the email notification.
An email or fax notification includes:
Header – this optional text is the same in all notifications.
Message
Footer – this optional text is the same in all notifications.
SMS notifications are sent via analogue modems, GMS modems or ISDN devices. Since the SMS text is limited to 160 characters (based on the providers settings), the notification might be truncated.
For Voice messages, the computer reads the notification text. Ewon by HMS Networks MessengerPro uses the Microsoft SAPI5 interface (voice engine). This open interface can be used in different available languages.
The voice interface SAPI5 and the English language are included in Windows XP or later.
The SAPI interface version 5.1 is available for free here.
The above package includes two English language engines.
Please note that due to licensing reasons, no voice engine can be shipped with Ewon by HMS Networks MessengerPro. Any voice engine based on SAPI5 can be used.
The 4-bit ADPCM method is used for speech generation. The modem or ISDN card must support this procedure.
Ewon by HMS Networks tested devices:
Modem: Devolo MicroLink 56k i (“i” stands for Industry Standard)
GSM Modem: Siemens MC35i, Westermo GDW-11
ISDN card: Fritz!Card USB V2.1
USB device server: Silex Technologies SX3000GB for indirect coupling of Fritz!Card USB V2.1
A voice message is composed of three parts:
Welcome sequence: starts when the call is answered. The Welcome sequence is the same for all notifications.
Message sequence: consists of the unique alarm ID, the alarm text and additional texts. The alarm text is set up in WEBfactory 2010 Studio.
Final sequence: similar to the Welcome sequence, it is the same for all notifications.
The voice message must be played to the final sequence. Otherwise, the call will be marked as failed and will be repeated. Quitting the call during the message delivery is possible.
Remote Acknowledgement
Each service employee can acknowledge certain alarms if he is entitled to. Using a wired phone or a mobile phone or email, the alarm can be acknowledged by entering the alarm identifier and the employee number. If the acknowledgment is complete, no further notifications will be sent.
The remote acknowledgment is passed to the Ewon by HMS Networks alarming system. This makes possible both the remote acknowledgment and the acknowledgment of the alarm from the visualization. The remote alarm acknowledgment via DTMF (Dual Tone Multi Frequency) is possible as the alarm occurs or at a later date.
Alarm Mode
The alarm mode is regulated by the temporal and organizational procedures for alerting service personnel. The rules are assigned to the alarm occurrence during configuration. In the following subsections, the three different alarm modes supported by Ewon by HMS Networks MessengerPro will be described.
In all alarm modes, the escalation table is followed. The escalation table sets out clear which service employee is notified, the time of notification and what notification service is used. Each service employee can specify multiple notification services, called “call destinations”. The alarm notification will be sent to each specified call destination.
If a Fax or Voice call cannot reach the destination due to busy line, the Voice call/Fax will be repeated at a later date. The time interval after an unsuccessful notification attempt is defined during configuration for each communication service.
The alarm chain determined by the escalation table is interrupted only when the alarm has been acknowledged through the visualization or when enough positive alarm acknowledgments have been received.
Direct Notification
When WEBfactory 2010 is operated without the MessengerPro module, sending alarm notifications is still possible. These notifications are directly assigned to a person and don’t follow the escalation tables, schedules or alarm groups.
The parametrization of the notification levels is independent of the used version and always possible.
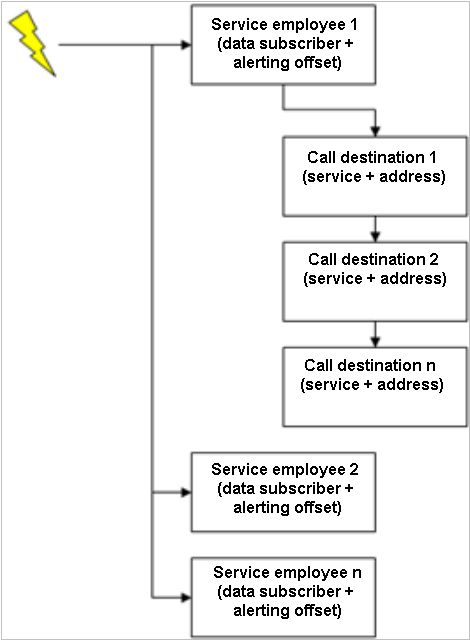
Direct Notification example
Alarm Escalation Tables
Immediately after the notification request has been received, the Ewon by HMS Networks MessengerPro determines, based on the assigned escalation table, the service employee to receive the notification and the call destinations.
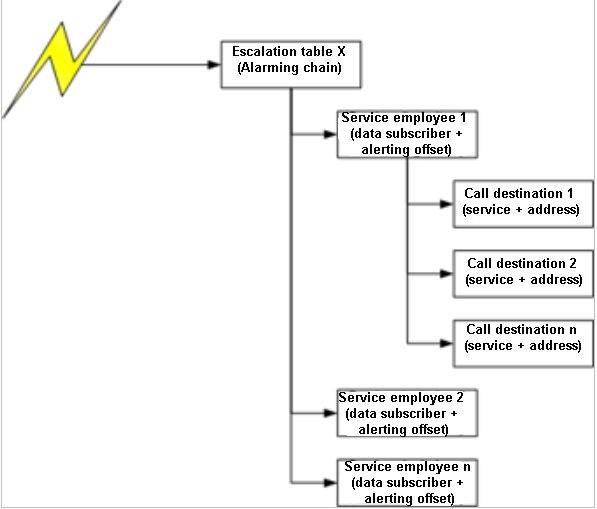
Alarm Escalation Table example
Alerting according to Shift Schedules
When an alarm notification is to be sent to a service employee according to a shift schedule, Ewon by HMS Networks MessengerPro first finds the shift schedule at the time of occurrence, using the occurrence time and the shift schedule. Based on this data, it uses the appropriate escalation table inside the shift schedule and afterward the service employees.
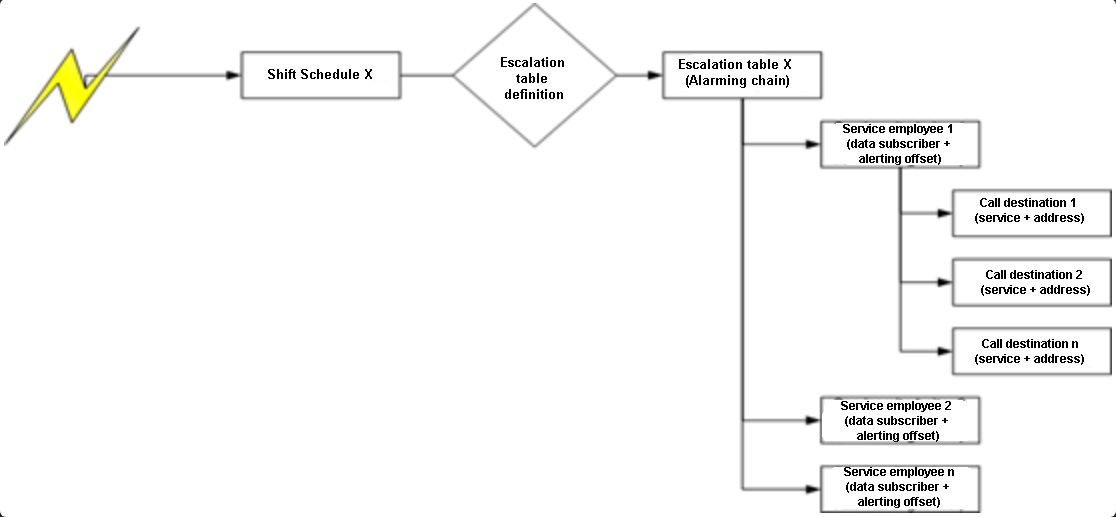
Alerting according to Shift Schedules
Alerting according to Alarm Groups
Ewon by HMS Networks MessengerPro determines to which service unit to send the alarm notifications based on the alarm group that contains the triggered alarm. Each service unit has an associated shift schedule. The employees will be notified based on the associated shift plan and the escalation table.
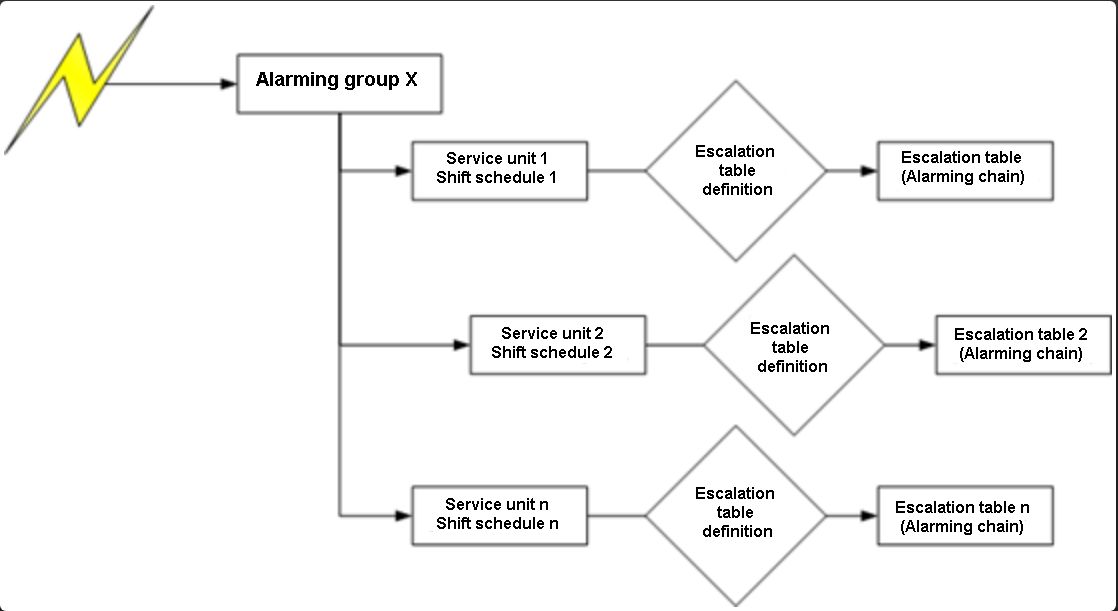
Alerting according to Alarm Groups
The alarm notifications using alarm groups allow the usage of multiple shift schedules simultaneously. If two shift schedules are associated with one alarm group, both associated service units will be notified according to the shift schedule and the escalation table. Ex: The electricians and the mechanics.
Notification Log
Every action is logged in Ewon by HMS Networks MessengerPro, including event notifications. Here are the following messages:
Successful transmission
Line busy
Member not reachable
Communication error
User abort
Remote acknowledgment
Remote acknowledgment , escalation interrupted
Alarm goes, escalation interrupted
Alarm is acknowledged, escalation interrupted
The exact time each employee was notified is logged. Additionally, any change of the alarm status will be logged in MessengerPro call log.
MessengerPro Web Application Configuration
Check out this article and learn more details about the WEBfactory 2010 MessengerPro Web Aplication Configuration.
Ewon by HMS Networks MessengerPro can be configured directly through Ewon by HMS Networks Studio or using the web application. This makes possible the configuration of MessengerPro from any visualization.
The changes made by the user from the visualization at run time are immediately implemented by Ewon by HMS Networks MessengerPro.
The WEB Application may be used with multiple browsers: Internet Explorer 11 (or higher), Chrome, Microsoft Edge.
Starting the Web Application
Use the http://servername/_WEBfactory /messengerpro address in the web browser. Replace the “servername” with the name of the computer where Ewon by HMS Networks MessengerPro is installed. After the initialization, the login window appears.
The hardware related configuration can be done from Ewon by HMS Networks Studio, from Settings > Messages > Services.
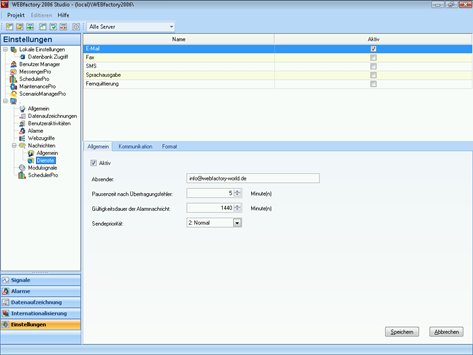
Messaging Services area
Application
If no valid user is logged in, the application page will initialize the login dialog.
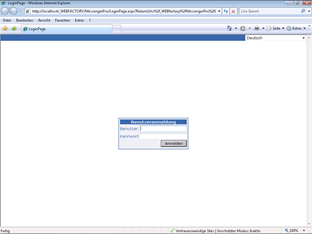
MessPro Web Access Login page
The authorized users should be found in Ewon by HMS NetworksStudio > Settings > User Manager > Access Groups > System access tab.
For every user with configuration read permission, the system authorization “MessengerPro: Guest” should be active. If the user is allowed to edit the configuration, the system authorization “MessengerPro: Administration” should be active.
For additional information about the User Manager, please refer to the Ewon by HMS Networks Studio documentation.
MessengerPro Call Archive Result Codes inside the Database
Check out this article in order to learn more details about MessengerPro Call Archive result codes inside the database.
The MessengerPro call archive can be viewed directly in the SQL database, using Microsoft SQL Server Management Studio.
The call archive of the MessengerPro module is stored inside the dbo.MessengerCallArchive table from the working database, and the Result Codes are displayed in the CallResult column of the table.
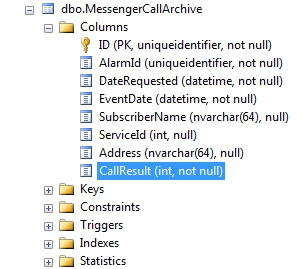
MessengerPro Call Archive - Database
The CallResults column will display the call archive result codes as shown in the table below:
Value of CallResult field | Meaning (English) | Meaning (German) |
|---|---|---|
1 | Success | Erfolg |
2 | Line busy | Leitung besetzt |
3 | No answer | Teinehmer nicht erreichbar |
4 | Communication error | Kommunikationsfehler |
5 | User interruption | Benutzerabbruch |
6 | Remote confirmation | Fernquittierung |
7 | Remote confirmation | Fernquittierung |
8 | Alarm has gone | Alarm geht |
9 | Alarm confirmed | Alarm quittiert |
10 | Abbruch durch Benutzer |
MessengerPro Server Application
Check out this article and learn more detials about the WEBfactory 2010 MessenerPro Server application.
Starting the MessengerPro Service
The Ewon by HMS Networks MessengerPro service can be started and stopped using the Ewon by HMS Networks Service Manager.
Alternatively, the service can be started and stopped using the Services window in Microsoft Windows (Start > Control Panel > Administrative Tools > Services). The MessengerPro service can be set to start up automatically when Windows loads.
Runtime
At runtime, the application has no user interface. However, it is possible to check the operations of the application using either the Call archive tool or the TraceInfo program.
Using the Call archive, the user can focus on communication errors using the filtering system.
The exact error message can be obtained using the TraceInfo application. This application displays the debug messages for all Ewon by HMS Networks software.
Ewon by HMS Networks Remote Confirmer
Check out this article and learn more details about the WEBfactory 2010 Remote Controler.
The Ewon by HMS Networks Remote Confirmer provides the service of remote acknowledgment.
The Remote Confirmer starts automatically when Ewon by HMS Networks MessengerPro Service is started.
Acknowledgment at Runtime
Each service employee can interact with the application during a voice call using the phone keys. It’s possible to acknowledge by email, SMS or direct call. The acknowledgment of an alarm message is possible during a voice call. The called employee can interrupt the message and acknowledge the alarm.
Acknowledging alarms via Voice calls
Direct acknowledgment for incoming voice messages:
Enter * (star sign) to start the acknowledgment sequence.
Enter the user's Acknowledge PIN followed by ** (two star signs): [user Acknowledge PIN]**
The alarm Acknowledge PIN is automatically taken form the message. Alternatively, the user can enter the alarm Acknowledge PIN and * followed by the user ID and **:
Proceed for remote acknowledgment.
The alarm Acknowledge PIN is available in the Alarming List area.
The user Acknowledge PIN is available in the Members area.
Not every phone can send DTMF tones. Read the phone manual and make sure that the device is capable of sending DTMF tones.
After the greeting, the application awaits for keystrokes. The acknowledgment sequence is made of the alarm Acknowledge PIN and user Acknowledge PIN.
The alarm Acknowledge PIN is part of the notification and is tied to the message. After the alarm Acknowledge PIN is entered, the * (star) key is expected. The User Acknowledge PIN can be taken from the web application. After the User Acknowledge PIN, the system expects ** (two star signs).
The confirmation sequence can be restarted by pressing the # (pound) key. The sequence must be entered again. The remote acknowledgment is not possible when the Alarm Mode is set to Subscriber. The Alarm Mode must be set to at least Escalation Tables so that remote acknowledgment is possible.
Acknowledging alarms via SMS
If an Alarm message is received via SMS, the receiver can reply to the SMS and acknowledge the alarm.
To acknowledge an alarm via SMS:
Reply to the SMS;
Enter the alarm Acknowledge PIN, * (star), user Acknowledge PIN, ** (double star): [alarm Acknowledge PIN]*[user Acknowledge PIN]**.
In Ewon by HMS Networks Studio, the Acknowledgment option must be set up for each service to accept incoming acknowledgments.
SMS acknowledgment is possible only when using SMS via GSM modem.
Acknowledging alarms via Email
The subscriber can reply an alarming email sent by the MessengerPro service or write a new email to the MessengerPro email address (defined within Ewon by HMS NetworksStudio > Settings > Services > Email).
The content of the email body must contain the confirmation syntax: [alarm Acknowledge PIN]*[user Acknowledge PIN]**.
In case of wrong confirmation:
If there is no valid confirmation syntax, the MessengerPro service will send an answer email with the subject and body defined within Ewon by HMS Networks Studio (Studio > Settings > Services > Email > Confirmation > Invalid request).
If there was a valid confirmation syntax, but the user Acknowledge PIN or alarm Acknowledge PIN do not match to an active alarm or user, the MessengerPro service will send an answer email with the subject and body defined within Ewon by HMS Networks Studio (Studio > Settings > Services > Email > Confirmation > Error occurred).
In case of success:
If MessengerPro successfully confirmed the requested alarm with the user Acknowledge PIN, it will send an answer email with the subject and body defined within Ewon by HMS Networks Studio (Studio > Settings > Services > Email > Confirmation > Successful confirmation).
MessengerPro Voice Message
Check out this article and learn more details about the WEBfactory 2010 MessengerPro Voice Message.
A voice message can be repeated by dialing 1 or *1 (depending on the phone).
MessengerPro Text Replacements
Check out this article and learn more details about the WEBfactory 2010 MessengerPro Text Replacements.
MessengerPro configuration has some parameters that do not allow only static text. It is possible to feed information into some output texts using text replacement syntax.
There are three different types of text replacements:
Text replacement with alarm properties.
Text replacement in feedback mails or SMS messages (answer of MessengerProService to a confirmation request mail or SMS).
Text replacement for exchange parameters.
Text replacement with alarm properties
Inside an alarming message (email, fax, voice call or SMS message) the user can configure additional information inside the following texts:
Header of email, fax or SMS message (Configured inside Ewon by HMS Networks Studio at the concerning service)
Footer of email, fax or SMS message (Configured inside Ewon by HMS Networks Studio at the concerning service)
Additional Alarm Text for all services (Configured inside Ewon by HMS Networks MessengerPro web application at the alarming definition)
Attachment of emails (Configured inside Ewon by HMS Networks MessengerPro web application at the alarming definition)
The following commands are recognized as text replacements:
Command | Description |
|---|---|
##AlarmType## | The alarm type of the alarm (defined as alarm property inside Studio) |
##AlarmGroup## | The alarm group of the alarm (defined as alarm property inside Studio) |
##AlarmText## | The alarm text of the alarm (defined as alarm property inside Studio) |
##AlarmConstant## | Alarm constant (defined within alarm condition inside Studio) |
##AlarmConstantTo## | Alarm constant To (defined within alarm condition inside Studio) |
##SignalName## | Signal name of the alarm (defined as alarm property inside Studio) |
##DateOn## | Timestamp of the alarm activation (as it is inside Alarm Online) |
##DateOff## | Obsolete: Timestamp of the alarm deactivation (in former versions an alarm needed to be off and acknowledged to stop its alarming. Now a deactivated alarm will cause an alarming) |
##DateAck## | Obsolete: Timestamp of the alarm acknowledgement (in former versions an alarm needed to be off and acknowledged to stop its alarming. Now an acknowledged alarm will cause an alarming) |
##x## | [x as number 1 to 5] Alarm Replacement Signal Values (defined as alarm property inside Studio) |
Text replacement with MSSQL User Defined Functions (for advanced users only):
Command | Description |
|---|---|
##UDFx# | [x as number] The replacement text is generated by a user defined function that is located inside Ewon by HMS Networksdatabase. MessengerPro Service will call this function with the following SQL Statement: SELECT dbo.udfGetMessengerText('{AlarmID}', '{SubscriberID}',{UdfNumber}) AlarmID is the primary key of the Alarms table SubscriberID is the primary key of the Subscribers table UdfNumber is the number taken from the command (for example 11 for ##UDF11##). UdfNumber can be used to differ between different replacement tasks like:
and so on … |
There is one command without a text replacement:
Command | Description |
|---|---|
##NDT## | No Default Text. This command deactivates the default text containing: {Alarming PIN}.{Alarm Text}.{Date On} The user then has to define the alarming text by using the additional text configuration property (alarming configuration of MessengerPro web application). |
Text replacement in feedback mails or SMS messages
MessengerPro sends feedback messages (answer of MessengerPro Service to a confirmation request mail or SMS).
There are three types of feedback message:
Invalid request
Error occurred
Successful confirmation
For “Invalid request” messages there are no text replacement options.
For “Error occurred” message the user can have the following replacements:
Command | Description |
|---|---|
##AlarmingPIN## | Alarming PIN from the confirmation request. |
##UserPIN## | User PIN from the confirmation request. |
For “Successful confirmation” messages all replacements for “Error occurred” messages are possible plus the text replacements with alarm properties (see sub chapter above).
Text replacements for exchange parameters
It is possible to forward SMS and fax to an MS Exchange Server. This is done with CDO Objects from Microsoft. The Exchange Server is able to send a fax or SMS to a subscriber through an additional plugin (third party software).
Therefore exchange server needs to detect which message is a mail and which message is a fax message. This filter and the interface depends on the specific Exchange extension and could be for example a defined subject like “$$FAX$$” or similar.
For that purpose the fields (address, subject and text) of the exchange allow replacements:
Command | Description |
|---|---|
##MemberAddressee## | Alarming PIN from the confirmation request. |
##AlarmText## | Default alarm text. |
##MessageText## | Complete message text containing header, footer and additional text. |
MessengerPro GSM Observation
Check out this article and learn more details about the WEBfactory 2010 MessengerPro GSM Observation.
MessengerPro supports observation of the GSM modem if the SMS confirmation for that GSM modem is active. The observation is done before MessengerPro checks for incoming SMS confirmation request messages. The polling time can be configured inside Studio (Service SMS, Register tab confirmation)
The observation result is written to some internal i4scada signals:
GSM_Modem_SignalStrength
0..31: Current Signal Strength of mobile phone connection
-1: Unknown
GSM_Modem_Online
0: Not Online
1: Online
2: Online with roaming
GSM_Modem_Error
0: No Error
Other values are device specific errors
Note
To use GMS Observation a registry key “ObserverGsm” must be set to 1.
Create a new string type Registry under this path: Computer\HKEY_LOCAL_MACHINE\SOFTWARE\WOW6432Node\WEBFACTORY\WFMessenger\2.00\Settings. In case the Keys/Folders registry does not exist it should be also manually added.
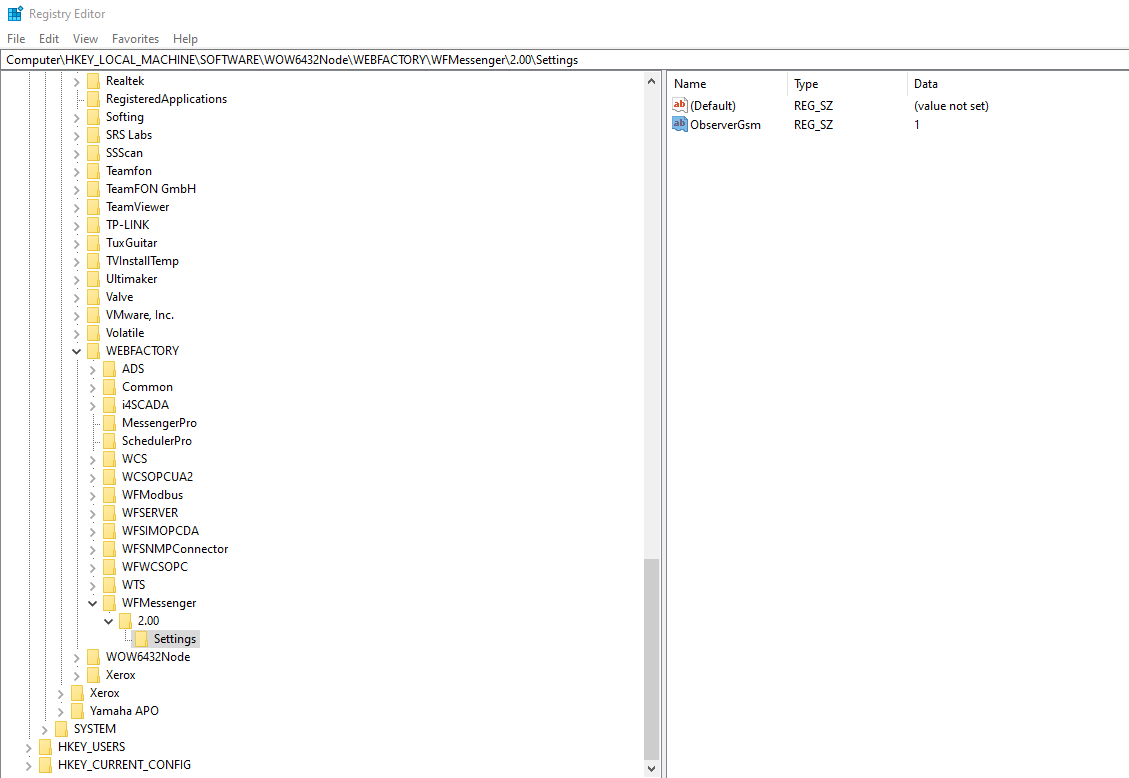
The Settings Registry
MessengerPro Heartbeat Signals
Check out this article and learn more details about the WEBfactory 2010 MessengerPro Heartbeat Signals.
The MessengerPro Service outputs two internal Ewon by HMS Networks signals for its current health status:
WFMInternal_AliveTimeStamp
WFMInternal_AliveStatus
WFMInternal_AliveTimeStamp outputs the current UTC time and is actualized every operation cycle of MessengerPro service. If this timestamp is not actualized for a longer time, it would mean that the MessengerPro service stopped or is frozen.
WFMInternal_AliveStatus describes the current status of the service. It can have the following values:
10: Stopped
12: Starting
13: Running
MessengerPro Service for write access of Ewon by HMS Networks Signals
Check out this article and learn mre details about the MessengerPro Service for write access of WEBfactory Signals.
MessengerPro supports the following services:
Email
Fax
SMS
Voice
OPC Items (Ewon by HMS Networks Signals)
A Subscriber can have one or more of those services to get in contact with him. An OPC item could be a lamb or a horn that informs the subscriber about the alarming. For that the signal must be permitted for MessengerPro inside the “Module Signals” configuration in Ewon by HMS NetworksStudio.
Since MessengerPro service does not have direct contact to PLC, Ewon by HMS Networks server must run to use this feature. But the write request from MessengerPro to Ewon by HMS Networks Server is buffered, if the Server is currently not available (for example a restart after a maintenance job).
Registry Keys to use ActiveXperts (Advanced Users)
Read here a few details on how the WEBfactory 2010 advanced users can use ActiveXperts Registry Keys.
There is the possibility to change the GSM SMS Toolkit, if there are problems in sending SMS messages. If the “sendSmsWithLuca” key is set to 0, the MessengerPro service will use ActiveXperts Toolkit to send via GSM modem.
