Running WEBfactory 2010 without administrative privileges
In order to run WEBfactory 2010 without administrative privileges read this article and follow up the described steps.
Starting with Service Pack 4, the WEBfactory 2010 version 3.6.x can be run by a Windows user with no administrative privileges. Getting WEBfactory 2010 to run with no administrative rights requires a series of manual setup steps to be performed in advance. This setup must be done only one time, and once complete, the WEBfactory 2010 software can be used by a normal, non-admin user.
In order to be able to use WEBfactory 2010 with a non-admin user, the user's password must never expire. This is required by the Windows services logging on with this user, which would fail and require reconfiguration each time the password expires.
The steps required to set up WEBfactory 2010 to run without administrative rights must be executed by the system administrator, in the indicated order.
Related Topics |
|---|
Setup the Studio project
The WEBfactory 2010 project database must be set up and configured using Ewon by HMS NetworksStudio. All the required signals, alarms, logs or settings must be configured using the administrator account. If using an existing WEBfactory 2010 project database, open it in Ewon by HMS NetworksStudio.
In the Settings area of Ewon by HMS NetworksStudio, using the left-side tree menu, expand the Server settings and select the General section. Disable the Allow database structure changes at runtime option.

IMPORTANT
In case of Remote Service Controller address errors, for example "A call to SSPI failed" (which might occur when the RemoteController runs on a different machine than Studio), use the IP address inside the Remote service controller address property, instead of the machine name. For example:
http://localhost:4800/Scada/RemoteControllerServicebecomes
http://192.168.1.31:4800/Scada/RemoteControllerService
Configure the project's database
Initialize the internal databases needed for the project to work ($AlarmLog, $Events and $Logs) by running the manual initialization scripts against the project's database. Download the following scripts:
Right-click and select Save As... if the download doesn't start when left-clinking the download links above.
Edit each of the SQL scripts above and replace the database name and server ID with your own database name and server ID. These editable variables are located in the Input section, at the top of the SQL scripts:
@MainDatabaseName - the name of the project database which will run on the WEBfactory 2010 Server.
@ServerId - the unique ID of the server running the project. This ID can be found in the Servers table inside the project database, and will correspond to the server name "." or the name of the machine where it is running.
Open the project database using Microsoft SQL Server 2014 Management Studio (SQL Server 2012 Management Studio if using the older SQL Server 2012).
Connect to the database using the database administrator user.
Execute the three modified scripts against the project database. Make sure that the project database is selected when running the scripts!

Configure the non-admin user
Create a new SQL login for the non-administrator user that will run WEBfactory 2010. In this example, out TestUser is a local user, but the non-admin user can also be an domain user. If the SQL login already exists for the non-admin user, open it's properties dialog.
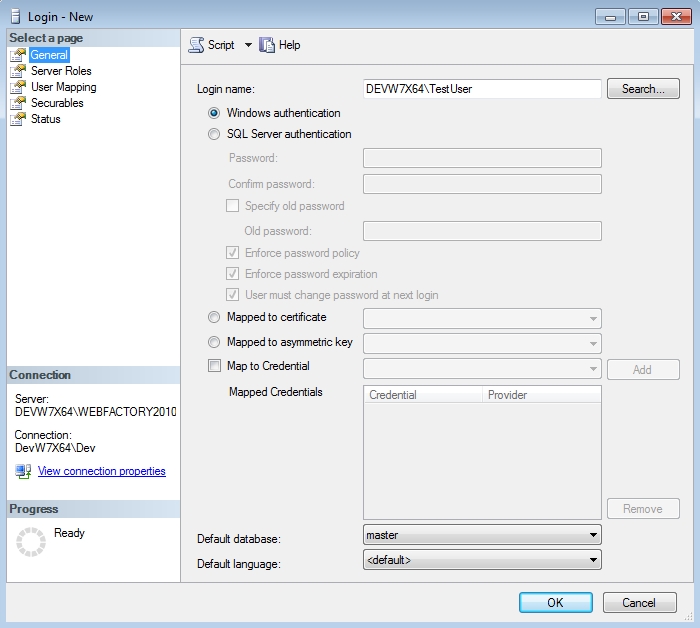
In the User Mapping section of the New Login dialog, map the non-admin user to the WEBfactory 2010 project databases, including the internal databases created earlier. Select the following role membership for each database mapping:
db_datareader
db_datawriter

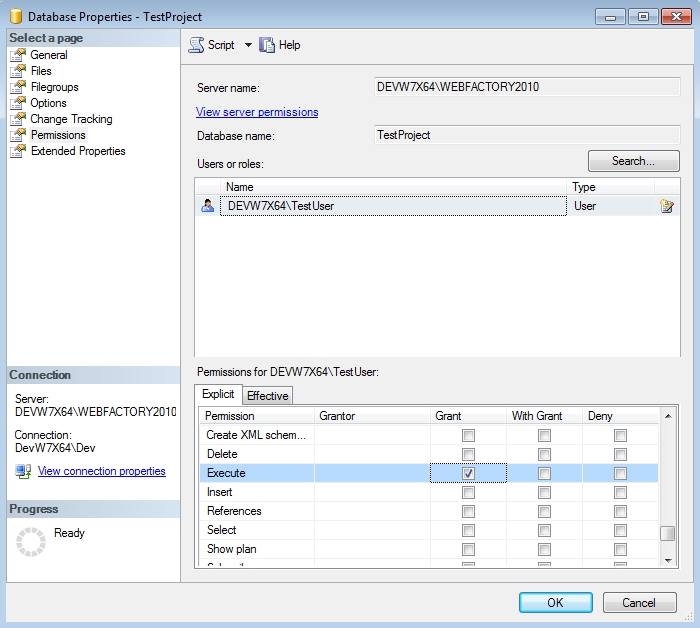
Next, set the Execute permission for the new user login for the main project database. To do so, open the Database Properties window and select the Permissions section.
Select the login corresponding to the non-admin user and mark the Grant check-box for the Execute permission, in the permissions table.
Configure the services
Next the Component Services (VBQueue, WCS and WTS) must be configured to work with the non-admin user. The non-admin user must be added to the permissions lists on these services, using the Component Services management window (search for Component Services in the Start menu or execute dcomcnfg.exe in the Run dialog).
In the left-side panel, under the Console Root, expand the tree following this path: Component Services > Computers > My Computer. Select the DCOM Config element and, using the main panel, select the VBQueue service.

Open the service's Properties panel using the contextual menu and select the Security tab.

For Launch and Activation Permissions, select Customize and click the Edit button. Add the non-admin user to the permissions list and allow all the available permissions.
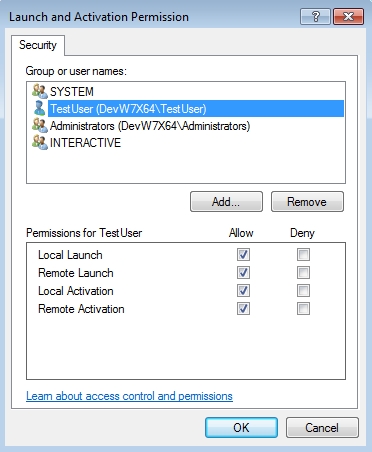
Repeat the above procedure (step 4) for the Access Permissions and Configuration Permissions.
Set the same permissions for the non-admin users for the remaining WCS service and WTS service from DCOM Config (repeat steps 3, 4 and 5 for both WCS and WTS services).
Next, the Ewon by HMS Networks Windows services must be configured to run using the non-admin user. This setting must be done for the following services:
WEBfactory 2010 Alarm Manager (WFAlarmManager)
WEBfactory 2010 Communication Manager (WFCommunicationManager)
WEBfactory 2010 Log Manager (WFLogManager)
WEBfactory 2010 Remote Controller (WFRemoteController)
WEBfactory 2010 Server (LTServer)
Follow these steps to set up the new user for the required services:
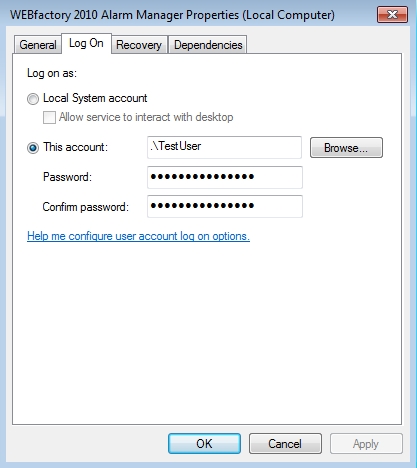
Open the Services window (search for services.msc in the Start menu or execute services.msc in the Run dialog). Locate the WEBfactory 2010 Alarm Manager service and open its Properties window.
Select the Log On tab and set the Log on as property to This account. Input the non-admin user account credentials. Make sure that the password in typed in correctly.
Repeat the steps above for the remaining four Windows services.
Finally, the non-admin user must be allowed to control the services. This is required by the Server and Remote Controller in order to properly initialize all services. This configuration can be done using the SubInACL tool provided by Microsoft, so use the link below to download and install the tool before proceeding:
Once the tool is installed, follow these steps to accomplish the configuration:
Open an Command Prompt console with administrative privileges and navigate to the installation directory of the SubInACL tool (by default C:\Program Files (x86)\Windows Resource Kits\Tools). Input the command that will grant to the non-admin user the ability to start, stop and query the status of the service.
subinacl /service [ServiceName] /grant=[MachineNameOrDomainName]\[NonAdminUser]=STO
where:
[ServiceName] is the name of the service (not the display name)
[MachineNameOrDomainName]\[NonAdminUser] represents the account name which uses either a domain name or a machine name, as [MachineNameOrDomainName] can be:
the name of the computer, if the user is a local user.
the name of the domain, if the user is a domain user.
[NonAdminUser] is the user name of the normal user that will run WEBfactory 2010
Execute the above command for the following services:
WEBfactory 2010 Alarm Manager (service name: WFAlarmManager)
WEBfactory 2010 Communication Manager (service name: WFCommunicationManager)
WEBfactory 2010 Log Manager (service name: WFLogManager)
WEBfactory 2010 Remote Controller (service name: WFRemoteController)
WEBfactory 2010 Server (service name: LTServer)
Example command: subinacl /service LTServer /grant=DevW7X64\TestUser=STO
IMPORTANT: This command must be executed for every service that will be controlled by WEBfactory 2010Service Manager, as it relies on the WEBfactory 2010 Remote Controller service to start/stop other services, which in turn runs under the non-admin user.
Once all the setup is complete, WEBfactory 2010 should be able to run using the non-admin user.