Server List Section
The Server List section displays the list of available servers.

The Server List section
The main panel displays the available servers in a grid form, having the following columns:
UI Option | Description |
|---|---|
Active | Check-box that allows the user to activate or deactivate a server. |
Name | The name of the server (.) represents the default local server. |
Description | The description of the server. |
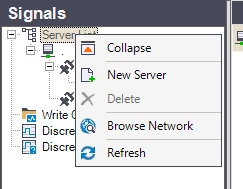
Right-clicking on the Server List item in the Signals tree menu will open the contextual menu. The Server List contextual menu provides options such adding servers, browsing the network for servers or refreshing the server list.

The Server List section actions
UI Option | Description |
|---|---|
Expand/Collapse | Expands/Collapses the Server List view menu item, hiding or displaying the available servers. |
New Server | Adds a new server with the default name and no description. |
Browse Network | Opens the dialog that allows the user to browse the network for available servers. |
Refresh | Reloads the list of servers. |
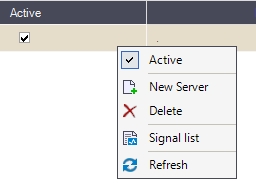
Right-clicking on a server listed in the main panel will open the contextual menu, providing the user with the options to edit the column in which the contextual menu is opened, add or delete servers, open the Signal Browser to view the signals from the selected server and refresh the server list.

The Server List section contextual menu
UI Option | Description |
|---|---|
Edit | Edits the cell in which the contextual menu has been opened (where the user right-clicked). |
Server | Adds a new server with the default name and no description. |
Delete | Deletes the selected server. |
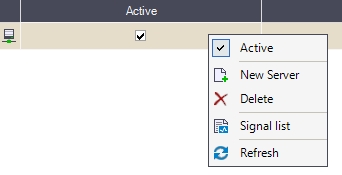
Signal list | Opens the Signal Browser window, allowing the user to view the available signals for the selected server. |
Refresh | Reloads the list of servers. |
Signal Browser window
This article describes the Signal browser window and all the actions provided to the user in this view.
To open the Signal Browser window, select the Signal List option from the Server List contextual menu.

The Signal List option
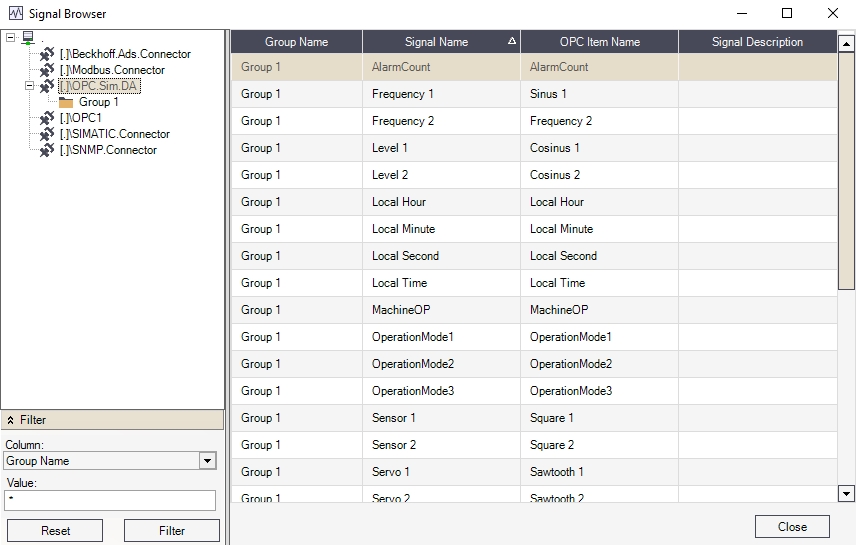
The Signal Browser window allows the user to view the available signals for each connector of the server.

The Signal Browser window
Depending on the selected view from the tree menu, the Signal Browser main panel can display the signals available in the whole server, in the selected connector or in the selected signal group.
In the Server view (when the server is selected), the Signal Browser will list the signals available in all the connectors and groups of the server.

The Server view
The main panel grid will display the following columns:
Connector Name - the name of the connector containing the signal.
Group Name - the name of the signal group containing the signal.
Signal Name - the name of the signal in the Studio project.
OPC Item Name - the name of the signal in the OPC server.
Signal Description - the description of the signal.
The Filter panel will also reflect the columns available in the Server view by allowing the user to use the columns and their values as filtering criteria.
In the Connector view (when the connector is selected), the Signal Browser will list the signals available in all the groups of the connector.

The Connector view
The main panel grid will display the following columns:
Group Name - the name of the signal group containing the signal.
Signal Name - the name of the signal in the Studio project.
OPC Item Name - the name of the signal in the OPC server.
Signal Description - the description of the signal.
In the Group view (when the signal group is selected), the Signal Browser will list the signals available in the selected group.

The Group view
The Filter panel will also reflect the columns available in the Connector view by allowing the user to use the columns and their values as filtering criteria.
The main panel grid will display the following columns:
Signal Name - the name of the signal in the Studio project.
OPC Item Name - the name of the signal in the OPC server.
Signal Description - the description of the signal.
The Filter panel will also reflect the columns available in the Group view by allowing the user to use the columns and their values as filtering criteria.