WFAlarmViewer
WFAlarmViewer is an all-around alarm handling tool that provides complex capabilities like alarm acknowledgment, processing, commenting, filtering and offline alarm viewing. It provides a detailed alarm status representation using color codes, textual hints and audio signals. The active alarms can be filtered for both display and processing using the complex filtering criteria available in the contextual menu.
Features
The WFAlarmViewer control shares the following common features of the Ewon by HMS Networks controls library:
It also provides the following particular features (click on the features below to expand their details):
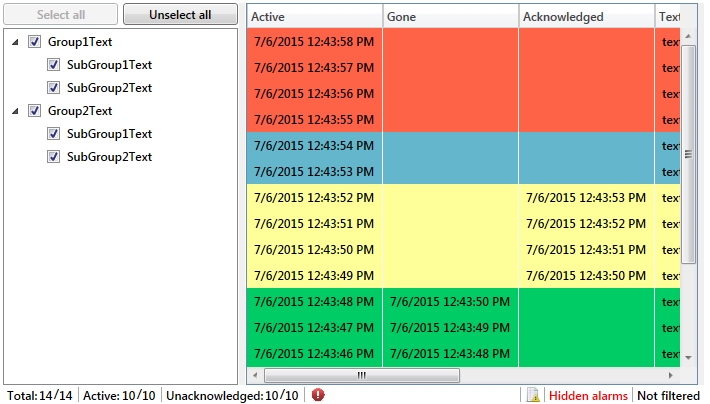
Group and Type filtering
The WFAlarmViewer provides a complex filtering system at runtime. The user is able to filter the displayed alarms either by using the Alarm Groups/Types Filter panels or the Filter... option from the contextual menu.
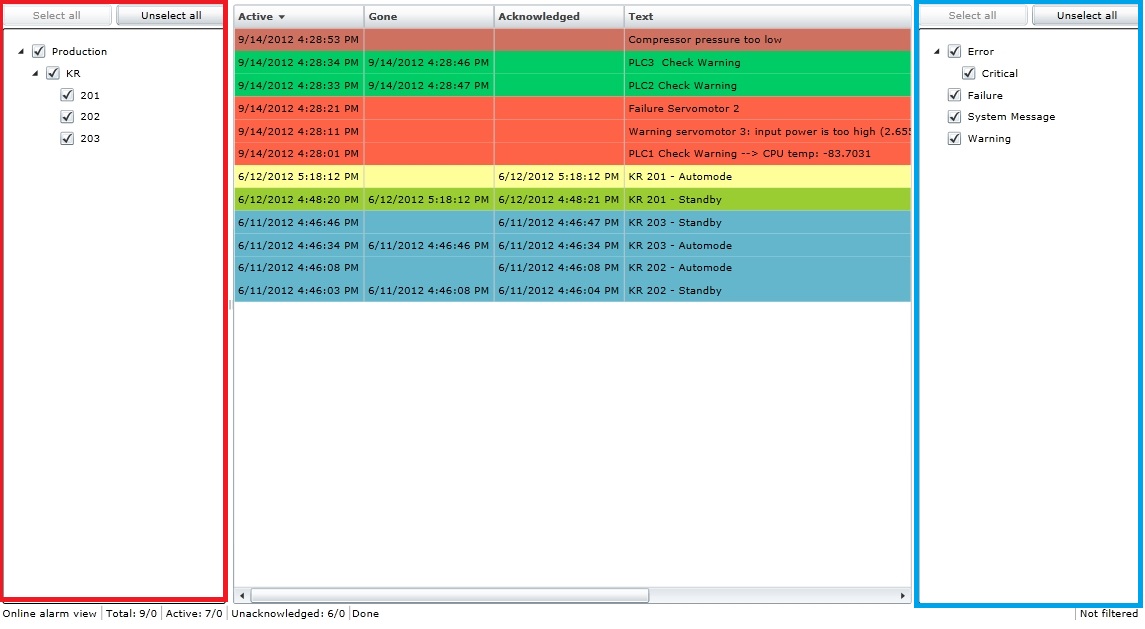
Alarm Groups Filter panel (red) and Alarm Types Filter panel (blue)
When using the Alarm Groups/Types Filter panels, the user is able to quickly select or deselect what alarm groups or types are visible in the WFAlarmViewer control. All the alarm groups and types that exist in the database will be available in the control, if the logged in user has the authorization to use them.
Advanced alarm filtering
The Filtering option from the contextual menu provides more filtering options at run time. These advanced filtering options are also available at design-time via the control's properties.
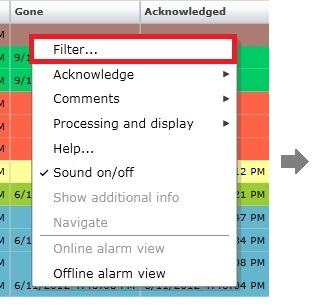

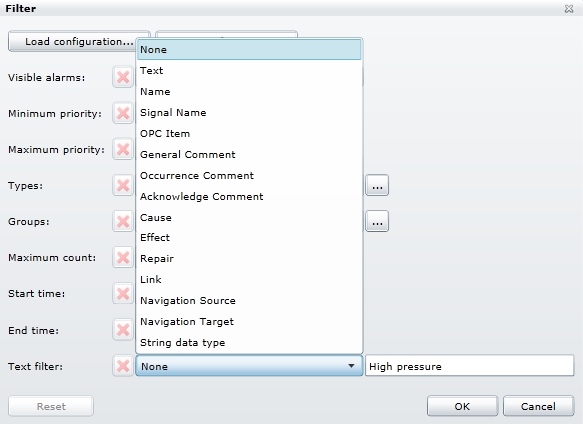
Contextual menu filtering option and Filter window
To have all the filtering options available at run time, make sure that all the options are enabled in the Filter Settings properties at design time!
When selected, the Filter window will allow the user to select more advanced filtering options:
Visible alarms - the user can choose between Active or not acknowledged, Not acknowledged, Gone, Active and All.
Sort order - the order that the alarms are pulled from the server. The alarms can be sorted: by time (DateDescending ) or by priority (PriorityDescending).
Minimum priority - the user can select the minimum priority for the displayed alarms.
Maximum priority - the user can select the maximum priority for the displayed alarms.
Types - allows the user to select one or more alarm types to be displayed. If the * wildcard is used, all the available alarm types will be selected.

Selecting the alarm types
Groups - allows the user to select one or more alarm groups to be displayed. If the * wildcard is used, all the available alarm groups will be selected.
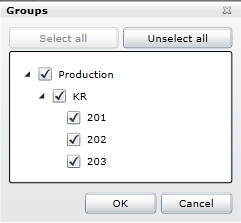
Selecting the alarm groups
Maximum count - allows the user to specify the maximum number of alarms to be displayed.
Start time, End time - displays the alarms from the selected period.
Text filter - allows the user to filter the alarms based on a specified text from a selected alarm column. For example, the user can filter the alarms and display only those that have the text "High pressure" in the Cause column of the alarms.
Using the Text filter
In the Filter window, the user also has the possibility to save and load a filtering configuration, using the Load configuration... and Save configuration... buttons.
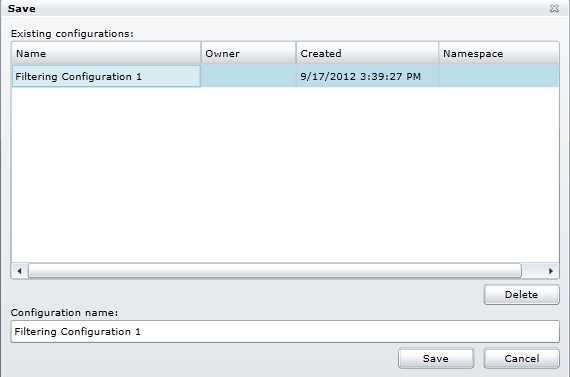
When saving a filter configuration, the user must specify a configuration name. The new configuration is saved in the database. The user has the option to select and delete previously saved configurations.
Save configuration window
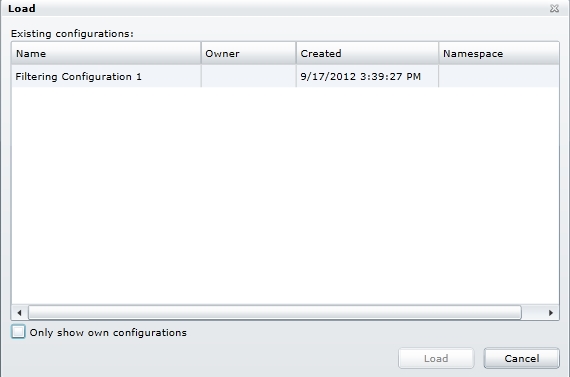
The configurations are loaded from the database, where the saved configurations are stored. In the Load configuration window, the user has the possibility to see only own configurations.
Load configurations window
The filtering options can also be accessed from the Status bar (right side), by clicking on the Not Filtered text (if no filters are already applied) or on the Filtered text (if filters are applied). This section of the Status bar indicates if any filters are applied.

The right side of the Status bar
Alarm acknowledgment
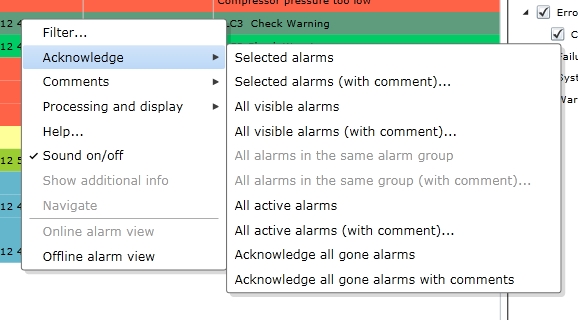
Also available from the contextual menu, the Acknowledgment options allow the user to acknowledge alarms in various ways.
Acknowledging alarms from the contextual menu
The alarms can be acknowledged as follows:
Selected alarms - only the selected alarms will be acknowledged.
Selected alarms (with comment) - the selected alarms will be acknowledged with comment text.
All visible alarms - all the visible alarms will be acknowledged.
All visible alarms (with comment) - all visible alarms will be acknowledged with comment text.
All alarms in the same alarm group - acknowledges all the alarms that belong to the same alarm group.
All alarms in the same alarm group (with comment) - acknowledges all the alarms that belong to the same alarm group with comment text.
All active alarms - acknowledges all the active alarms.
All active alarms (with comment) - acknowledges all the active alarms with comment text.
Acknowledge all gone alarms - acknowledges all gone alarms.
Acknowledge all gone alarms - acknowledges all gone alarms with comment text.
Online and offline alarm view
The Online alarm view option activates the online mode of the control. This means that the control will display the alarms in real time, as they occur.
The Offline alarm view option turns the WFAlarmViewer control in offline mode. When in Offline mode, the control will display all the alarms that were triggered, based on the applied filtering.
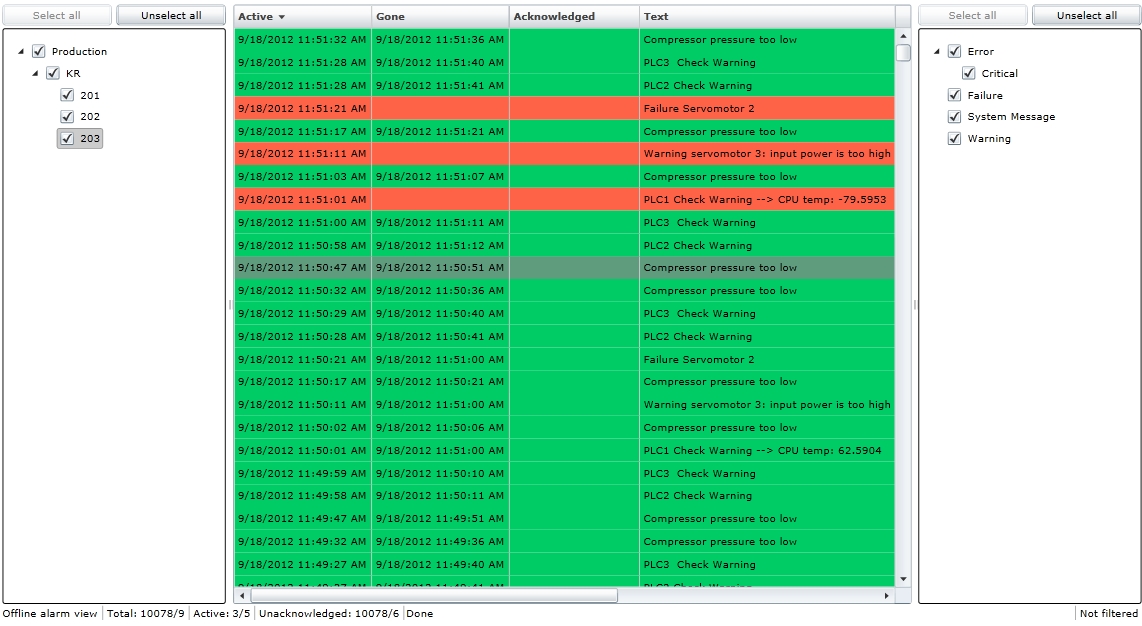
The control in Offline mode
Alarm comments
The contextual menu provides the Comments option. Using this option, the user has the possibility to add a general comment or an occurrence comment to the selected alarm(s).
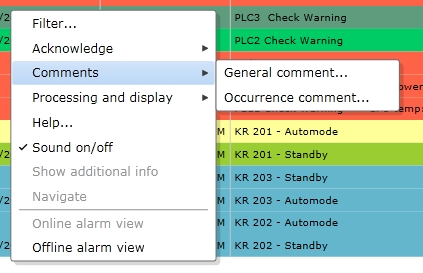
Adding a comment to an alarm
General comments and Occurrence comments are stored in different database tables.
Alarm processing and display
The Processing and display menu allows the user to set four different statuses to an alarm:
Process and display - the alarm is visible and can be processed.
Process but not display - the alarm can be processed but it is not displayed.
Display but do not process - the alarm can be displayed but not processed.
Do not process and do not display - the alarm is not processed and not displayed.
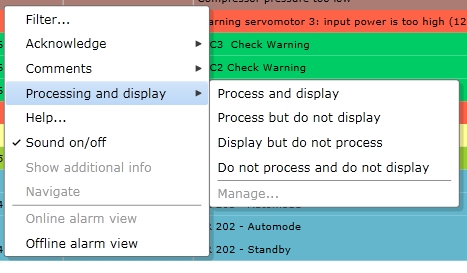
Processing and display
Help menu
When accessing the Help... option from the contextual menu, the Help window will open. The Help window contains information regarding the Cause, Effect and Repair of the alarm. This content must be inserted when the alarm is defined.
Alarm horn
The WFAlarmViewer control allows the user to configure a certain MP3 or WAV file for using it as alarm horn. The horn can be triggered once or can be set to loop until the alarm that triggered the horn is acknowledged. The sound can be turned off at run-time using the contextual menu.
Additional alarm information
WFAlarmViewer offers the possibility to open a new web browser window/tab and read more info regarding the selected alarm, if the Additional Info option was configured for that alarm.
This feature can be found under the contextual menu.
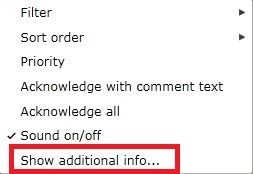
Contextual menu additional information
Navigate option
The Navigate option allow the user to go to a predefined page which will be loaded in a navigation target. For this, the alarm should have Navigation Source and Navigation Target set up.
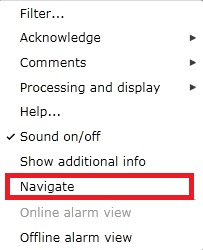
Contextual menu Navigate option
Advanced Status bar
The WFAlarmViewer status bar displays information about the current status of the control.

WFAlarmViewer status bar
Online/offline alarm view - shows if the control runs in online or offline mode.
Total - the total number of active or unacknowledged alarms.
Active - the number of active alarms.
Unacknowledged - the number of unacknowledged alarms.
Hidden alarms - opens the Processing and display window and allows the user to choose the processing and display options for the hidden (not displayed) alarms. If no alarm is hidden (not displayed), the Hidden alarms option will not be visible in the Status bar.
Filtered/Not filtered - allows the user to see if any filtering is applied and access the filtering window.
The values of the Total, Active and Unacknowledged filters are displayed from both the AlarmViewer control and the Server, as follows: x/y, where
x, called Filter, represents the number of alarms displayed by the AlarmViewer control,
y, called Project, represents the number of alarms in the system.
For example, Total: 10/25 would mean that there are 10 active or unacknowledged alarms displayed by the AlarmViewer control and 25 active or unacknowledged alarms in the system.
Design-time color customization
Each type of alarm event can be colorized accordingly to the project specifications. The alarm events color scheme can be customized based on the alarms priority, group, type, horn and loop. All this can be used as filters for defining color schemes for specific kinds of alarms.
Design-time columns customization
The controls columns can be positioned and named accordingly to the project specifications. Each column can be assigned on a certain, well defined position and have custom widths. The auto size feature is available, case in which the column size will adjust to fit the content. The user is able to rearrange the columns at runtime by simply dragging the column header in the desired position.
Design-time security setup
WFAlarmViewer features advanced security options, allowing the user to set security parameters on each of the WFAlarmViewer's runtime actions. Using the advanced security options, the administrator can enable a user to have access to the filtering and commenting capabilities of the control, but not at alarm acknowledgment or processing, for example. The restricted areas can be visible but disabled or can be not visible at all.
The security options can be set independently, the administrator being able to select different authorization groups for each of the controls capabilities.
The WFAlarmViewer control also features the WriteSecure security option that forces the user to confirm the password when acknowledging an alarm. The option's purpose is to confirm that the same user that logged in the application is making the sensitive modifications in the control.
Design-time properties
The WFAlarmViewer control shares some of the following common design-time properties of the Ewon by HMS Networks controls library:
It also exposes the following particular properties in 's Property Inspector:
Alarm Configuration properties
In Microsoft Blend and Visual Studio, the following properties can be found under the WEBfactory 2010 - General category.
HornPath - allows the user to select a sound file (mp3 or wav) to be used as an alarm event sound.
Loop - if checked, the horn sound will be looped until the alarm's state is changed (becomes inactive or acknowledged).
Appearance properties
In Microsoft Blend and Visual Studio, the following properties can be found under the Brush and WEBfactory 2010 - General categories.
Opacity - adjusts the opacity of the control. Opacity values range from 0 (lowest value) to 1 (highest value).
ToolTip - allows the user to set a tool tip text that will be displayed at run time, when the mouse rests over the control.
AcknowledgedAlarmBackground - sets the acknowledged alarms background color.
AcknowledgedAlarmForeground - sets the acknowledged alarms foreground color.
AcknowledgedAndGoneAlarmBackground - sets the acknowledged and gone alarms background color.
AcknowledgedAndGoneAlarmForeground - sets the acknowledged and gone alarms foreground color.
ActiveAlarmBacground - sets the background color for the active alarms.
ActiveAlarmForeground - sets the foreground color for the active alarms.
AlarmCountDisplayMode - allows the user to choose how to display the alarm count. The options are:
Filter: shows only the number of alarms displayed by the AlarmViewer control;
Project: shows only the alarms available in the system;
FilterAndProject: shows both the alarms displayed by the control and the alarms available in the system, separated by a slash.
When AlarmViewer is in Offline mode, it will show only the Filter option regardless of the selection at design time.
BadQualityAlarmBackground - sets the bad quality alarms background color.
BadQualityAlarmForeground - sets the bad quality alarms foreground color.
InactiveAlarmBacground - sets the background color for the inactive alarms.
InactiveAlarmForeground - sets the foreground color for the inactive alarms.
PriorityColorDefinitions - allows the user to set a custom color scheme for alarms that have a certain priority.
RowColorDefinitions - allows the user to define a custom color scheme for a row, based on specific alarm properties:
AlarmGroup;
AlarmType
HornPath
Loop
Priority
ShowActiveAlarmCount - displays the active alarms count in the status bar at run time.
ShowAlarmGroupsFilterTree - displays the alarm groups filter tree in the left side of the WFAlarmViewer control, at run time.
ShowAlarmTypesFilterTree - displays the alarm types filter tree in the left side of the WFAlarmViewer control, at run time.
ShowDateTimeMilliseconds - allows the user to select millisecond as unit for the date and time.
ShowHeader - toggles the display of headers at run time.
ShowMultilineTextValues - allows the text to flow on more than one line.
ShowScrollbars - enables scrollbars at run time.
ShowStatusBar - enables the status bar at run time.
ShowTotalAlarmCount - displays the total alarm count in the status bar at run time.
ShowUnacknowledgedAlarmCount - displays the unacknowledged alarms count in the status bar at run time.
Configuration properties
In Microsoft Blend and Visual Studio, the following properties can be found under the WEBfactory 2010 - General category.
Columns - allows the user to customize the WFAlarmViewer columns.
The user has the ability to add columns and configure their size, visibility, type and name. The available column options are:
IsAutoSize - if checked, the column will auto-size itself, depending on it's contents.
IsVisible - if checked, the column will be visible at run time.
Type - allows the user to select a type of column:
PriorityColor
Active
SystemTime
Gone
Acknowledged
AcknowledgedWithComment
Text
Name
Group
Type
SignalName
OpcItem
Priority
HttpLink
OccurrenceCount
Duration
StatusText
HelpCause
HelpEffect
HelpRepair
GeneralComment
OccurrenceComment
AcknowledgeComment
NavigationSource
NavigationTarget
ExtendedProperty1 to ExtendedProperty32
TypeName - allows the user to enter a custom name for the column header.
Width - allows the user to specify a fixed width for the column.
EnableNavigation - if checked, the navigation option for the alarms will be available. The alarms must have the navigation source and navigation target defined in Ewon by HMS NetworksStudio.
EnablePopup - enables the pop-up behaviors in WFAlarmViewer at run time. If disabled, the contextual menu will not be available anymore.
Offline - starts the WFAlarmViewer in offline mode.
OfflineInterval - sets the time interval from which the offline alarms will be displayed. Can be:
Day, Week, Month, Year
Range: a selected time range defined by two days
Yesterday, Current day
Last <N> days/hours/minutes
RefreshInterval - allows the user to set a custom refresh interval for the alarms. The value is in seconds.
EnableAcknowledgeByDoubleClick - allows the user to double-click an alarm to acknowledge it. This setting is enabled by default.
Filter Settings properties
In Microsoft Blend and Visual Studio, the following properties can be found under the WEBfactory 2010 - Filter category.
AlarmVisibility - allows the user to filter the displayed alarm events. User can choose to display: ActiveOrNotAcknowledged alarms, NotAcknowledged alarms, Active alarms or All alarms.
FilterGroupsByUser - enables the user to filter the available alarm groups at runtime, depending on the logged in user. If the logged in user has no rights to access a certain alarm group, it will not be available in the control.
GroupFilters - allows the user to filter the displayed alarm events by selecting the desired alarm groups. The alarms that belong to other groups will not be displayed at run time. The option supports wildcards.
MaximumCount- the maximum number of alarms that can be displayed in the control.
MaximumPriority - the maximum priority that the listed alarms can have.
MinimumPriority - the minimum priority that the listed alarms can have.
ServerSordOrder - the order that the alarms are pulled from the server: DateDescending or PriorityDescending.
ShowAlarmVisibilityInRuntimeFilter - displays the Visible alarms option in the Filter window at run time.
ShowGroupsInRuntimeFilter - displays the Groups filtering option in the Filtering window at run time.
ShowMaximumCountInRuntimeFilter - displays the Maximum count option in the Filter window at run time.
ShowPriorityInRuntimeFilter - displays the Maximum priority and Minimum priority options in the Filter window at run time.
ShowServerSortOrderInRuntimeFilter - displays the Server sort option in the Filter window at run time.
ShowTextFilterInRuntimeFilter - displays the Text filter option in the Filter window at run time.
ShowTypesInRuntimeFilter - displays the Types option in the Filter window at run time.
TextFilter - allows the user to use a text for filtering.
TextFilterColumn - specifies in what column the TextFilter (above) will be applied.
TypesFilter - allows the user to filter the displayed alarm events by selecting the desired alarm type. The alarms that belong to other alarm types will not be displayed at run time. The option supports wildcards.
Security properties
In Microsoft Blend and Visual Studio, the following properties can be found under the WEBfactory 2010 - Security category.
SecurityPolicies - allows the user to customize the security options for different parts of the control at run time.
The SecurityPolicies window allows the user to select an run time action and customize the security policy for it. The available run time actions are:
Help
Refresh
Filter
Acknowledge
Comments
ProcessingAndDisplay
SoundToggle
Navigate
OnlineMode
OfflineMode
CustomQueryMode
HttpLink
The security options available for the above actions are:
IsVisible - toggles the visibility of the action.
SecurityAuthorizationName - allows the user to select an authorization group. The members of the selected authorization group will have access to the selected action.
SecurityDenyAccessBehaviour - allows the user to select a behavior that will be active when a user that doesn't belong to the above selected authorization group logs in. The action can either be disabled or hidden.
WriteSecure - allows the user to enable an extra security layer. If active, the user will be asked to confirm the login password in order to modify any alarm state.