Applying Symbolic Text Translations using WEBfactory 2010 Silverlight SDK
Check out this article and learn how to apply symbolic text translations using WEBfactory 2010 Silverlight SDK.
The following article will help the user understand how to work with the WEBfactory 2010 Silverlight SDK in order to apply symbolic text translations in a user control. In the next steps, the user will be guided through the process of creating a new user control with Microsoft Visual Studio and applying the symbolic text translation provided by the WEBfactory 2010 Silverlight SDK to the controls inside the project.
In order to complete the steps described below, the user must define the required symbolic texts and their translations in WEBfactory 2010Studio.
Creating the project
Using Microsoft Visual Studio (or Microsoft Expression Blend), we will create a new Silverlight Application with four text blocks and the WFLanguageSelector1 control (for switching the language of the application between English and German at run time).
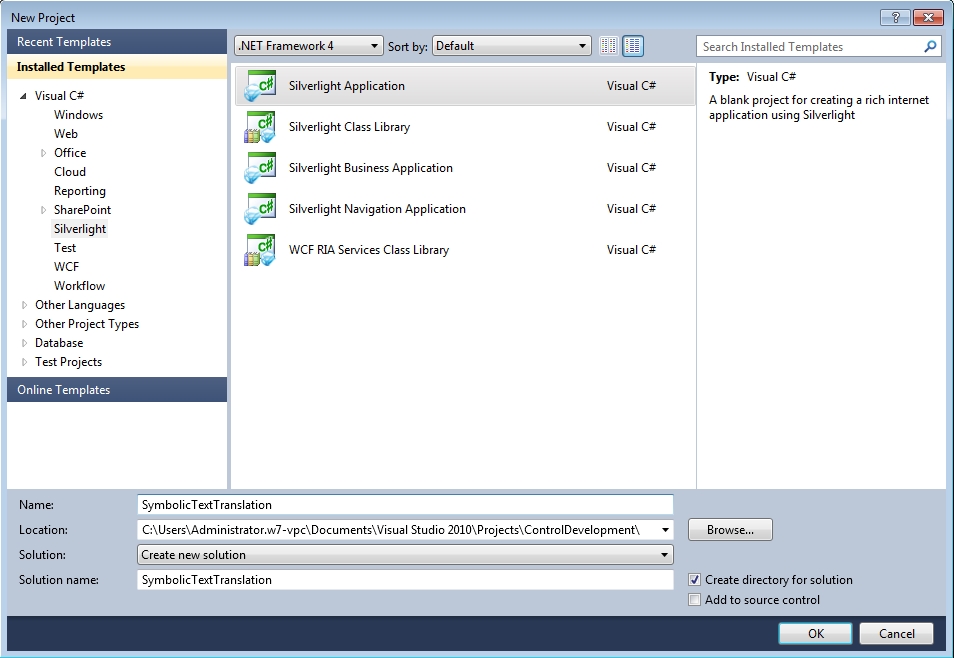
Open Microsoft Visual Studio. Create a new project from File > New > Project.
In the New Project dialog, select to create a new Silverlight Application and name it SymbolicTextTranslation.
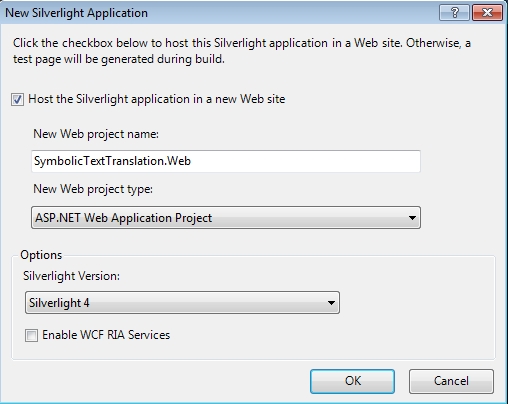
In the New Silverlight Application dialog, make sure that the Host the Silverlight application in a new Web site option is enabled. Also make sure to have the ASP.NET Web Application Project selected as the project type and Silverlight for the Silverlight Version. Click OK to proceed.
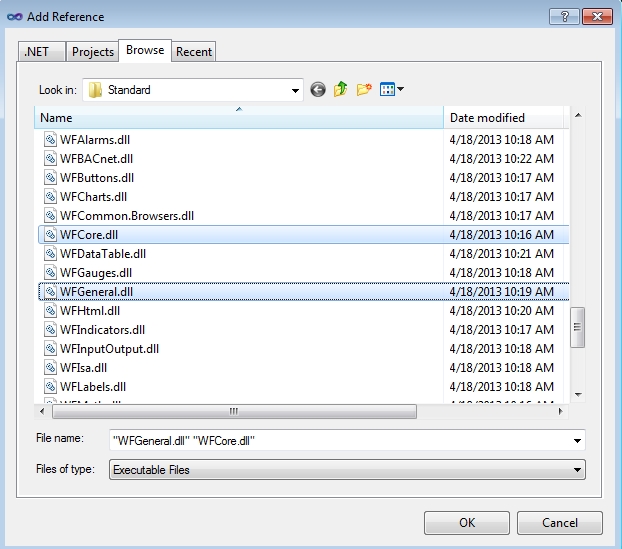
Once the project is created, right-click on the References folder under the SymbolicTextTranslation project from the Solution Explorer and select Add Reference. We will need to reference two assemblies, the WFCore (for using the WEBfactory 2010 Silverlight SDK) and the WFGeneral (for using the WFLanguageSelector1 control).
In the Add Reference dialog, click on the Browse tab and navigate to the WEBfactory 2010\Silverlight\Standard folder (from the WEBfactory 2010 installation folder). Select the WFGeneral.dll and WFCore.dll. Click OK to add the two references.
Creating the XAML of the project
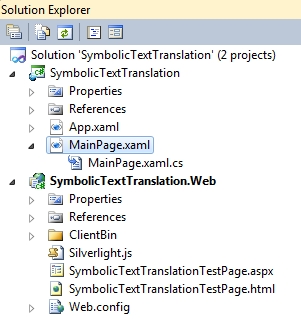
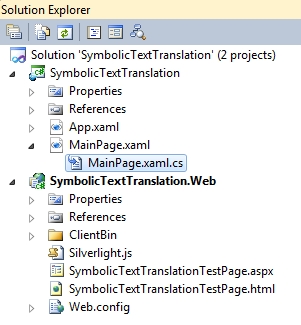
Head in the Solution Explorer and open the MainPage.xaml.
In the XAML side of the MainPage, we will add four TextBlock controls and the WFLanguageSelector1 control (for switching the languages). The TextBlock controls will be used in groups of two, one for displaying the Symbolic Texts and one for displaying values. The TextBlock controls will be named propperly:
<TextBlock x:Name="value1"/>
<TextBlock x:Name="label1"/>

<TextBlock x:Name="value2"/>
<TextBlock x:Name="label2"/>


<WFGeneral:WFLanguageSelector1/>
In order for the controls to be visible on the page, we will place them in a StackPanel structure:
<StackPanel Orientation="Horizontal" HorizontalAlignment="Center" VerticalAlignment="Center">
    <StackPanel.Resources>
        <Style TargetType="TextBlock">
            <Setter Property="Margin" Value="0,0,10,0"/>
        </Style>
    </StackPanel.Resources>
    <StackPanel>
        <TextBlock x:Name="value1"/>
        <TextBlock x:Name="label1"/>
    </StackPanel>
    <StackPanel>
        <TextBlock x:Name="value2"/>
        <TextBlock x:Name="label2"/>
    </StackPanel>
    <WFGeneral:WFLanguageSelector1/>
</StackPanel>
The StackPanel.Resources will contain the Style which will set the value 10 for the left Margin property of each TextBlock control from the page. This way, the controls are spaced properly.
The five controls can be placed on the page in any desired mode, the above structure serves as an example only.
The complete XAML code of the MainPage.xaml will look like this:
<UserControl
    xmlns="http://schemas.microsoft.com/winfx/2006/xaml/presentation"
    xmlns:x="http://schemas.microsoft.com/winfx/2006/xaml"
    xmlns:d="http://schemas.microsoft.com/expression/blend/2008"
    xmlns:mc="http://schemas.openxmlformats.org/markup-compatibility/2006"
    xmlns:sdk="http://schemas.microsoft.com/winfx/2006/xaml/presentation/sdk"
    xmlns:WFGeneral="clr-namespace:WFSilverlight.General;assembly=WFGeneral"
    x:Class="SymbolicTextTranslation.MainPage"
    mc:Ignorable="d"
    d:DesignHeight="300" d:DesignWidth="400">

    <Grid x:Name="LayoutRoot" Background="White" Loaded="LayoutRoot_Loaded">
        <StackPanel Orientation="Horizontal" HorizontalAlignment="Center" VerticalAlignment="Center">
            <StackPanel.Resources>
                <Style TargetType="TextBlock">
                    <Setter Property="Margin" Value="0,0,10,0"/>
                </Style>
            </StackPanel.Resources>
            <StackPanel>
                <TextBlock x:Name="value1"/>
                <TextBlock x:Name="label1"/>
            </StackPanel>
            <StackPanel>
                <TextBlock x:Name="value2"/>
                <TextBlock x:Name="label2"/>
            </StackPanel>
            <WFGeneral:WFLanguageSelector1/>
        </StackPanel>
    </Grid>
</UserControl>
Programming the controls
Open the MainPage.xaml.cs from the Solution Explorer.
To use the WEBfactory 2010 Silverlight SDK from the WFCore.dll, add the following using at the end of the using list:
using WFSilverlight.Core;
In our code, we will use the WFConnector from the WEBfactory 2010 Silverlight SDK that will process the signals, two signal constants (Local Minute and Local Second) that will have their values displayed by the value1 and value2 controls and an array of symbolic names that will hold the symbolic texts displayed by the label1 and label2 controls.
Define the four elements in the MainPage class:
private WFConnector wfc;
private const string SignalName1 = "Local Minute";
private const string SignalName2 = "Local Second";
private string[] MyOwnSymbolicNames;
Next, we will load the symbolic texts in the previously defined string array when the application loads. First, we will define the Loaded event:
private void LayoutRoot_Loaded(object sender, System.Windows.RoutedEventArgs e)
{
}
and load the symbolic texts when the event is triggered:
private void LayoutRoot_Loaded(object sender, System.Windows.RoutedEventArgs e)
{
	MyOwnSymbolicNames = new string[] { "FirstSymbolicName", "SecondSymbolicName" };
}
Also on the LayoutRoot_Loaded event, we will need to create a new connector and register the change of signal values for our two signals and the change of language at run time.
We must make sure that the connector is created only on run time:
if (!System.ComponentModel.DesignerProperties.IsInDesignTool)
{
	wfc = new WFConnector(false);
}
then register the handlers that will execute the SignalChanged methods (defined later in this guide) when the values of the two signals change:
if (!System.ComponentModel.DesignerProperties.IsInDesignTool)
{
	wfc = new WFConnector(false);
	wfc.RegisterSignalChangedHandler("", SignalName1, SignalChanged1);
	wfc.RegisterSignalChangedHandler("", SignalName2, SignalChanged2);
}
Also on run time, we will nee to register another handler that will execute the OnLanguageChanged method when the language of the application is changed at run time:
if (!System.ComponentModel.DesignerProperties.IsInDesignTool)
{
	wfc = new WFConnector(false);
	wfc.RegisterSignalChangedHandler("", SignalName1, SignalChanged1);
	wfc.RegisterSignalChangedHandler("", SignalName2, SignalChanged2);
	wfc.RegisterLanguageChangedHandler(MyOwnSymbolicNames, OnLanguageChanged);

}
The LayoutRoot_Loaded event should look like this:
private void LayoutRoot_Loaded(object sender, System.Windows.RoutedEventArgs e)
{
    // TODO: Add event handler implementation here.

    MyOwnSymbolicNames = new string[] { "FirstSymbolicName", "SecondSymbolicName" };

    if (!System.ComponentModel.DesignerProperties.IsInDesignTool)
    {
        wfc = new WFConnector(false);
        wfc.RegisterSignalChangedHandler("", SignalName1, SignalChanged1);
        wfc.RegisterSignalChangedHandler("", SignalName2, SignalChanged2);
        wfc.RegisterLanguageChangedHandler(MyOwnSymbolicNames, OnLanguageChanged);
    }
}
Now that we have defined what happens when the application is loaded, we need to create the methods that will update the TextBlock controls. First, create the SignalChanged1 and SignalChanged1 methods. These two methods will write the signal values in the appropriate TextBlock controls if the value is not null:
private void SignalChanged1(string name, object value)
{
    if (value != null)
    {
        value1.Text = value.ToString();

    }
}

private void SignalChanged2(string name, object value)
{
    if (value != null)
    {
        value2.Text = value.ToString();

    }
}
Next, we need to create the last method of our code, the OnLanguageChanged method that will write the translated symbolic texts to the appropriate controls. If the translations of the symbolic texts are not available (don't exist in Studio's translations table), the WEBfactory 2010 Silverlight SDK automatically falls back to the symbolic names, displaying them instead of the missing translations.
private void OnLanguageChanged(string[] symbolicNames, string[] translationTexts)
{
    label1.Text = translationTexts[0];
    label2.Text = translationTexts[1];
}
Press F5 to build and run the solution. Make sure that the correct database (containing the used signals) is loaded and the WEBfactory 2010 Server is started.
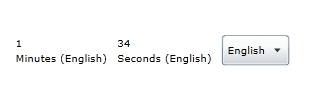
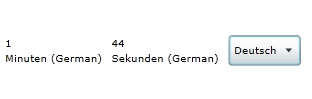
The test application displaying the symbolic texts translated in both German and English