Using animated XAML graphics in WFIndicatorDynamic
The WFIndicatorDynamic control can use XAML graphic files to represent different control states. In a previous tutorial we learned how to display bitmap images using XAML in the WFIndicatorDynamic control. But in may situations, animated XAML is required to emphasize certain states. In this tutorial we will learn how to use the WFIndicatorDynamic control with animated XAML.
Tutorial Requirements
In order to be able to follow this tutorial, please download and install the Kaxaml software by using the following link:
Creating the animated XAML
In order to be able to use an animated XAML inside the WFIndicatorDynamic control, the XAML code must be clean and must stick to the Silverlight 3 animation standards. Because of this, we cannot create the animated XAML in Expression Blend and use it as it is inside the WGIndicatorDynamic control. We will still use Expression Blend to create the animation, but we will modify the code and check it against Kaxaml, a free lightweight XAML editor that will allow us to see if the animated XAML will work with WFIndicatorDynamic.
Animating in Expression Blend
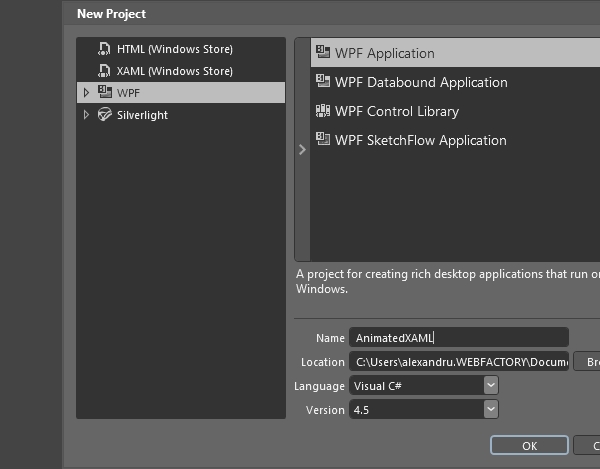
Create a new WPF Application project in Expression Blend.
We need to use a WPF Application project template in order to ensure the Silverlight 3 animation standard which is supported by the WFIndicatorDynamic control.
Create the graphic symbols that you need to animate. For this demonstrative purpose, we will create a rather simplistic XAML, containing two crossed rectangles. We will animate their rotation and color later on.
Remember that we only need parts of the code obtained in Expression Blend. The final XAML file will be obtained in Kaxaml.
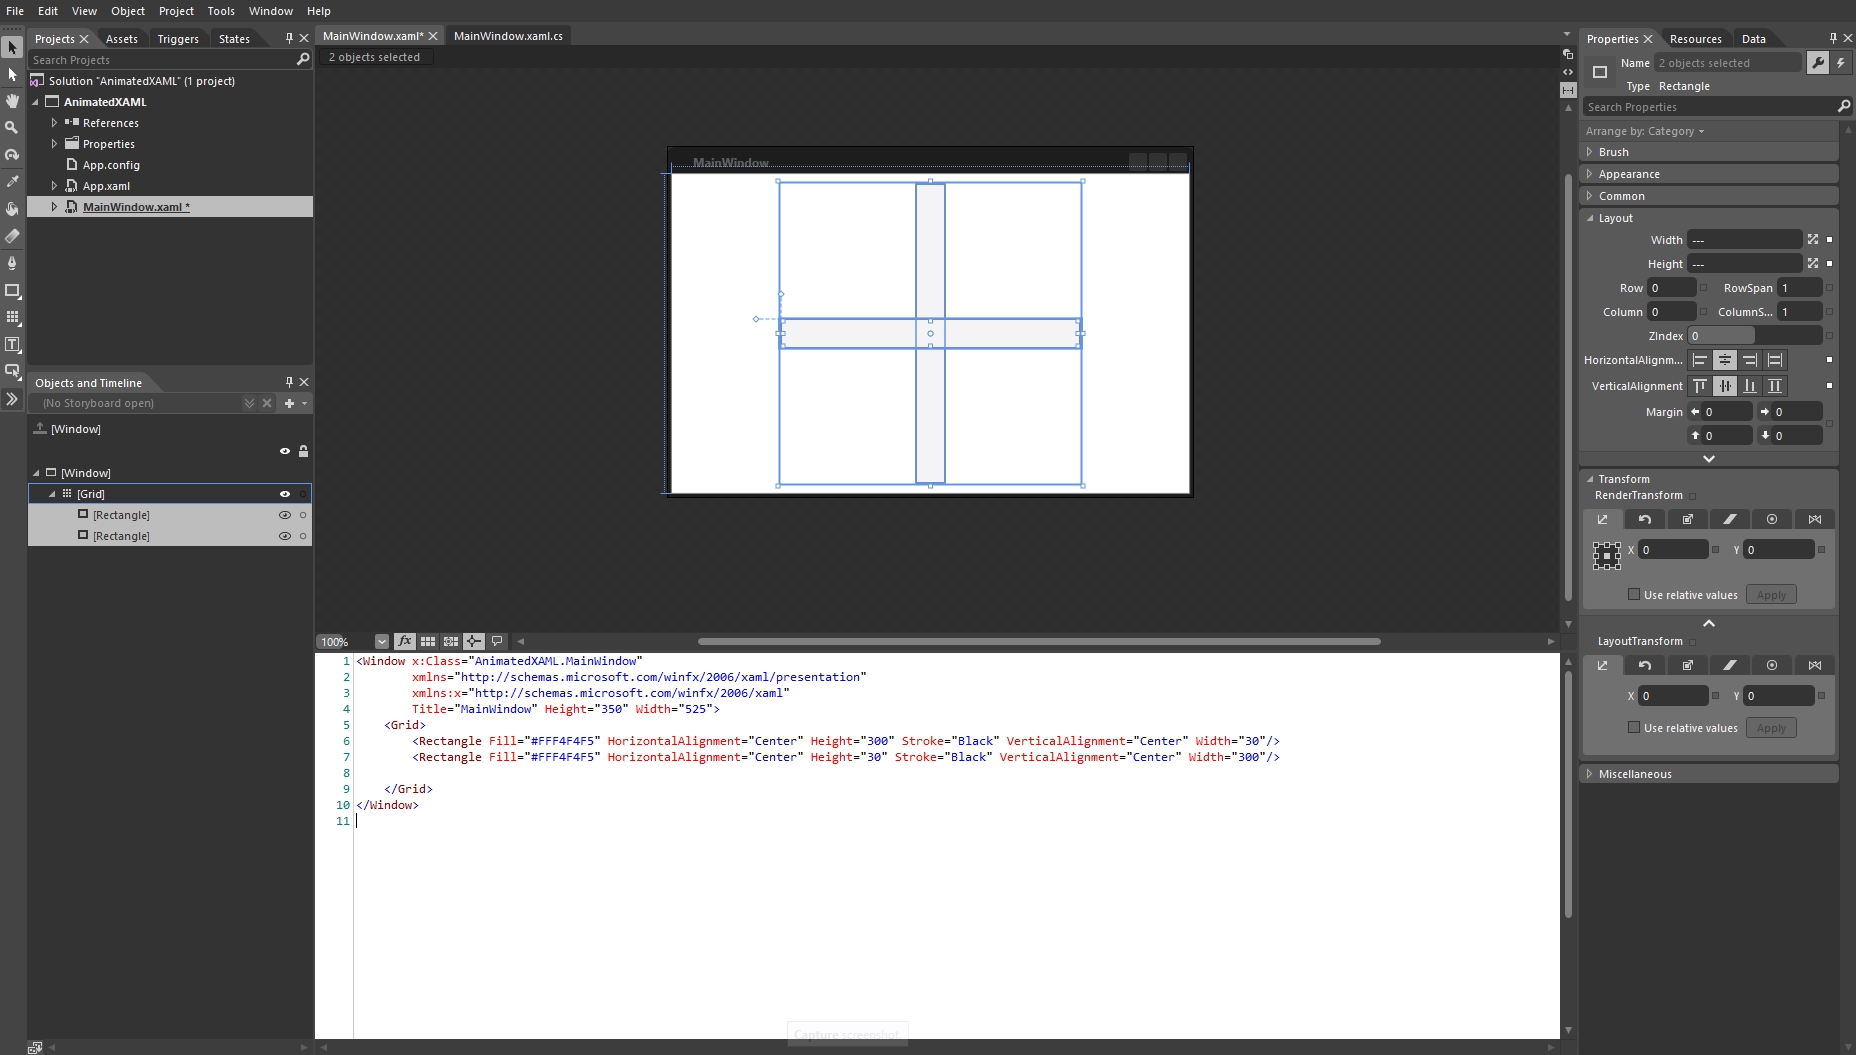
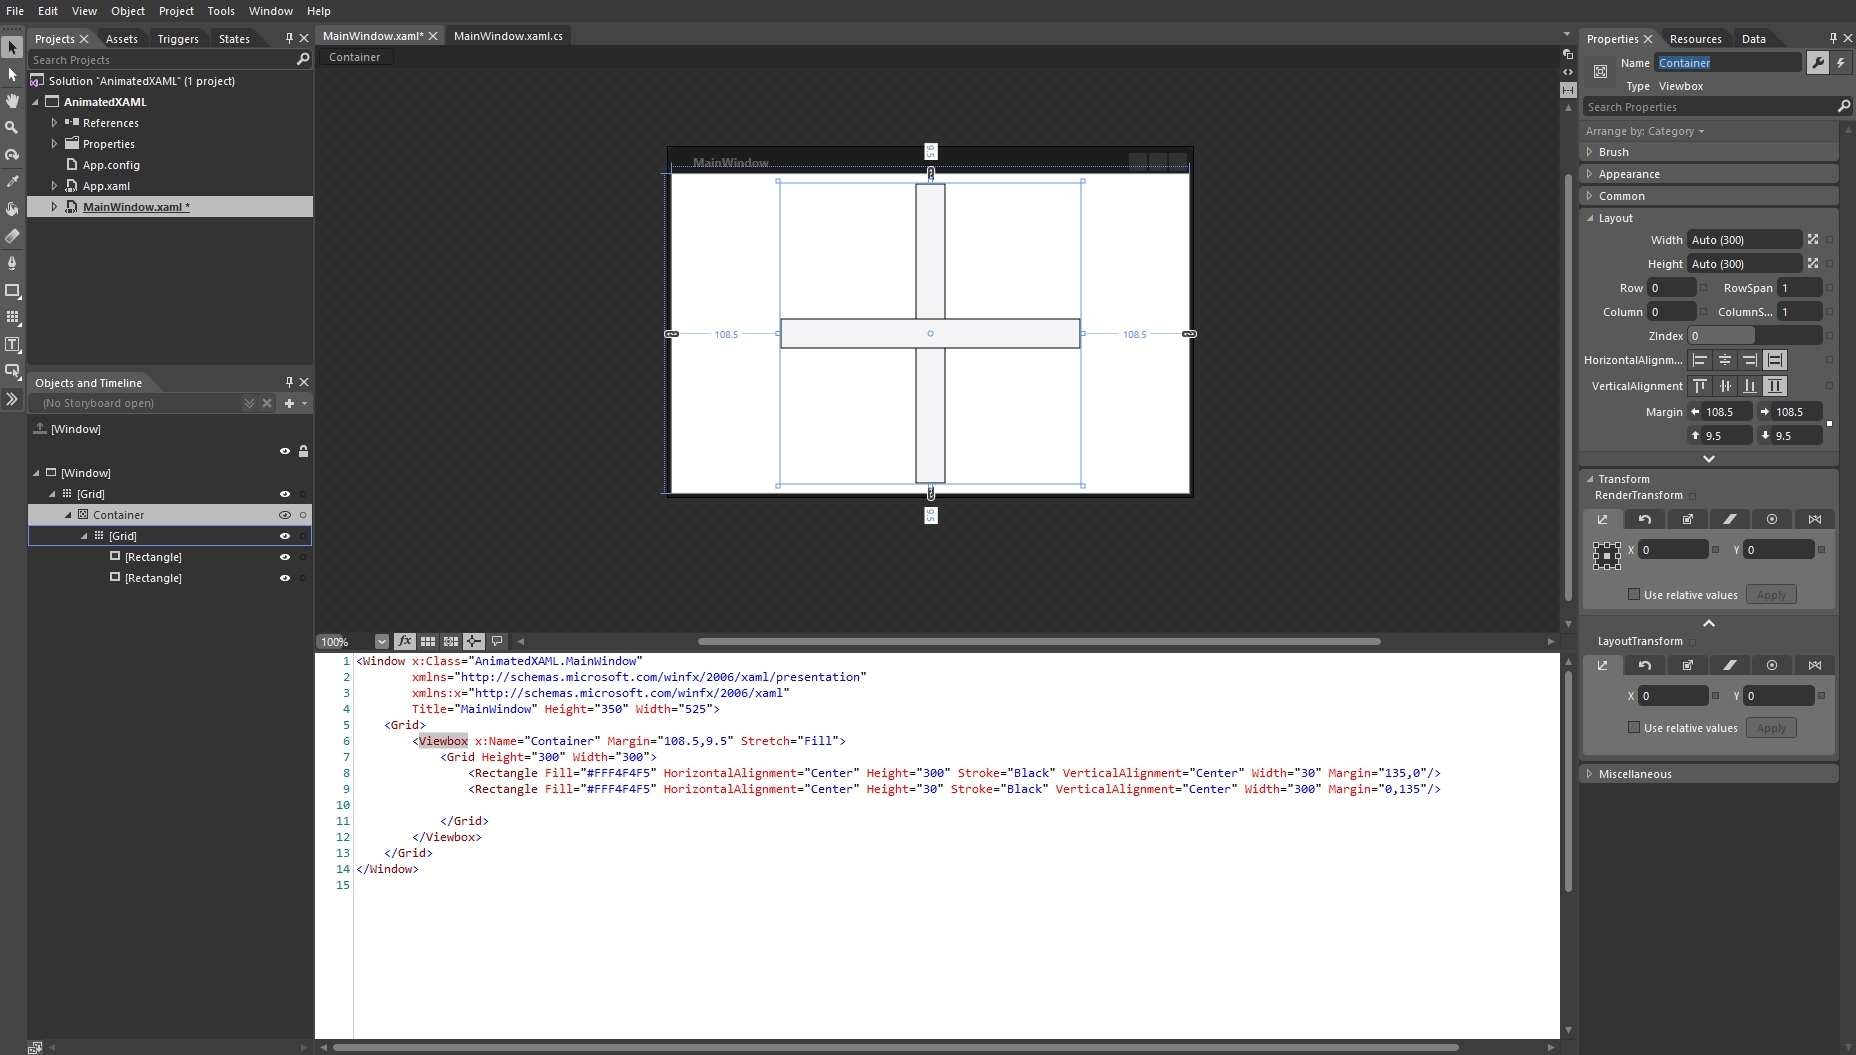
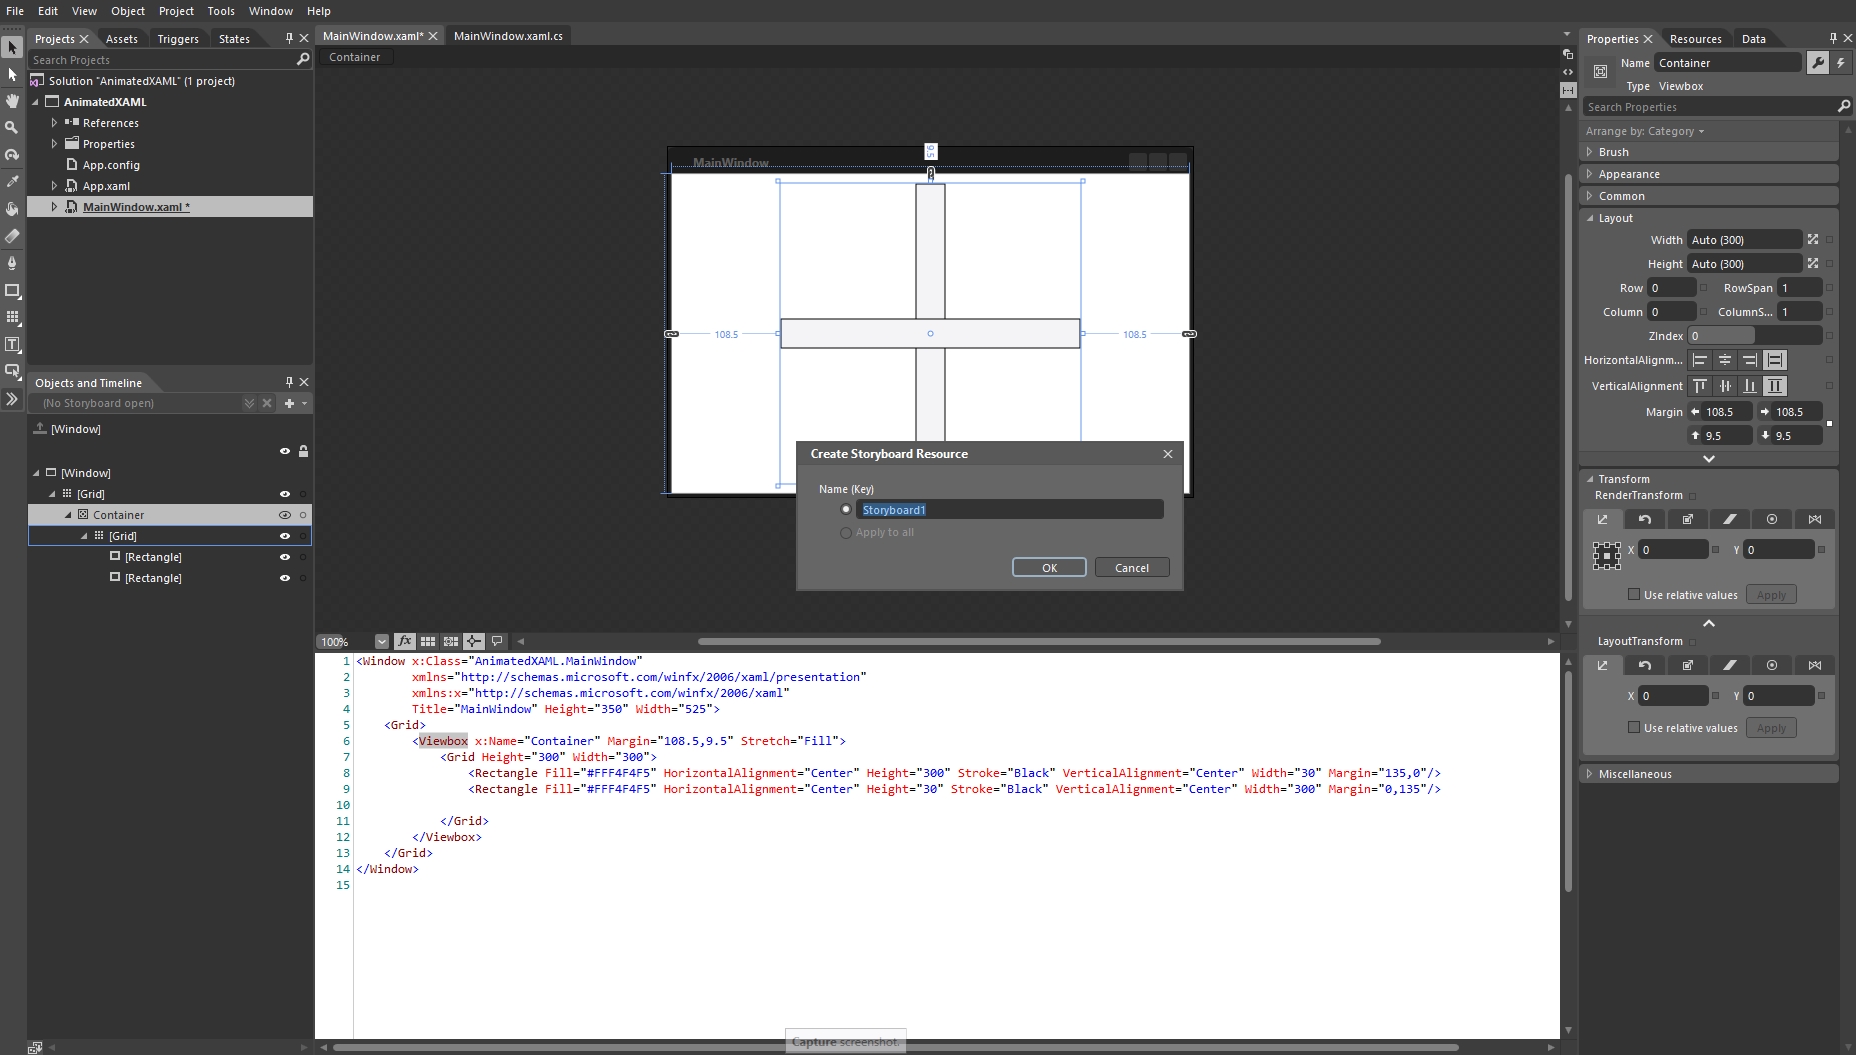
As we want to animate both rectangles at once, we will group them under a Viewbox (select both rectangles > right-click > Group Into > Viewbox).
Make sure to name the Viewbox in so we can reference it later when animating it! In our example, the Viewbox will be named Container.
By grouping graphical elements together, we can create more complex animation by animating the group itself and each element contained by the group.
Now we will animate the rotation of the Container viewbox. We will use Expression Blend's storyboards to obtain our animation which we will then copy and paste it into the animation triggers.
Click on the + sign in the Objects and Timeline panel to create a new storyboard.
In the new storyboard, drag the cursor on the 2 seconds mark and use the Rotate property under Transform in the Properties panel to rotate the Container viewbox 180 degrees. A keyframe will be automatically added in the storyboard at the cursor position, marking the end of the rotation.
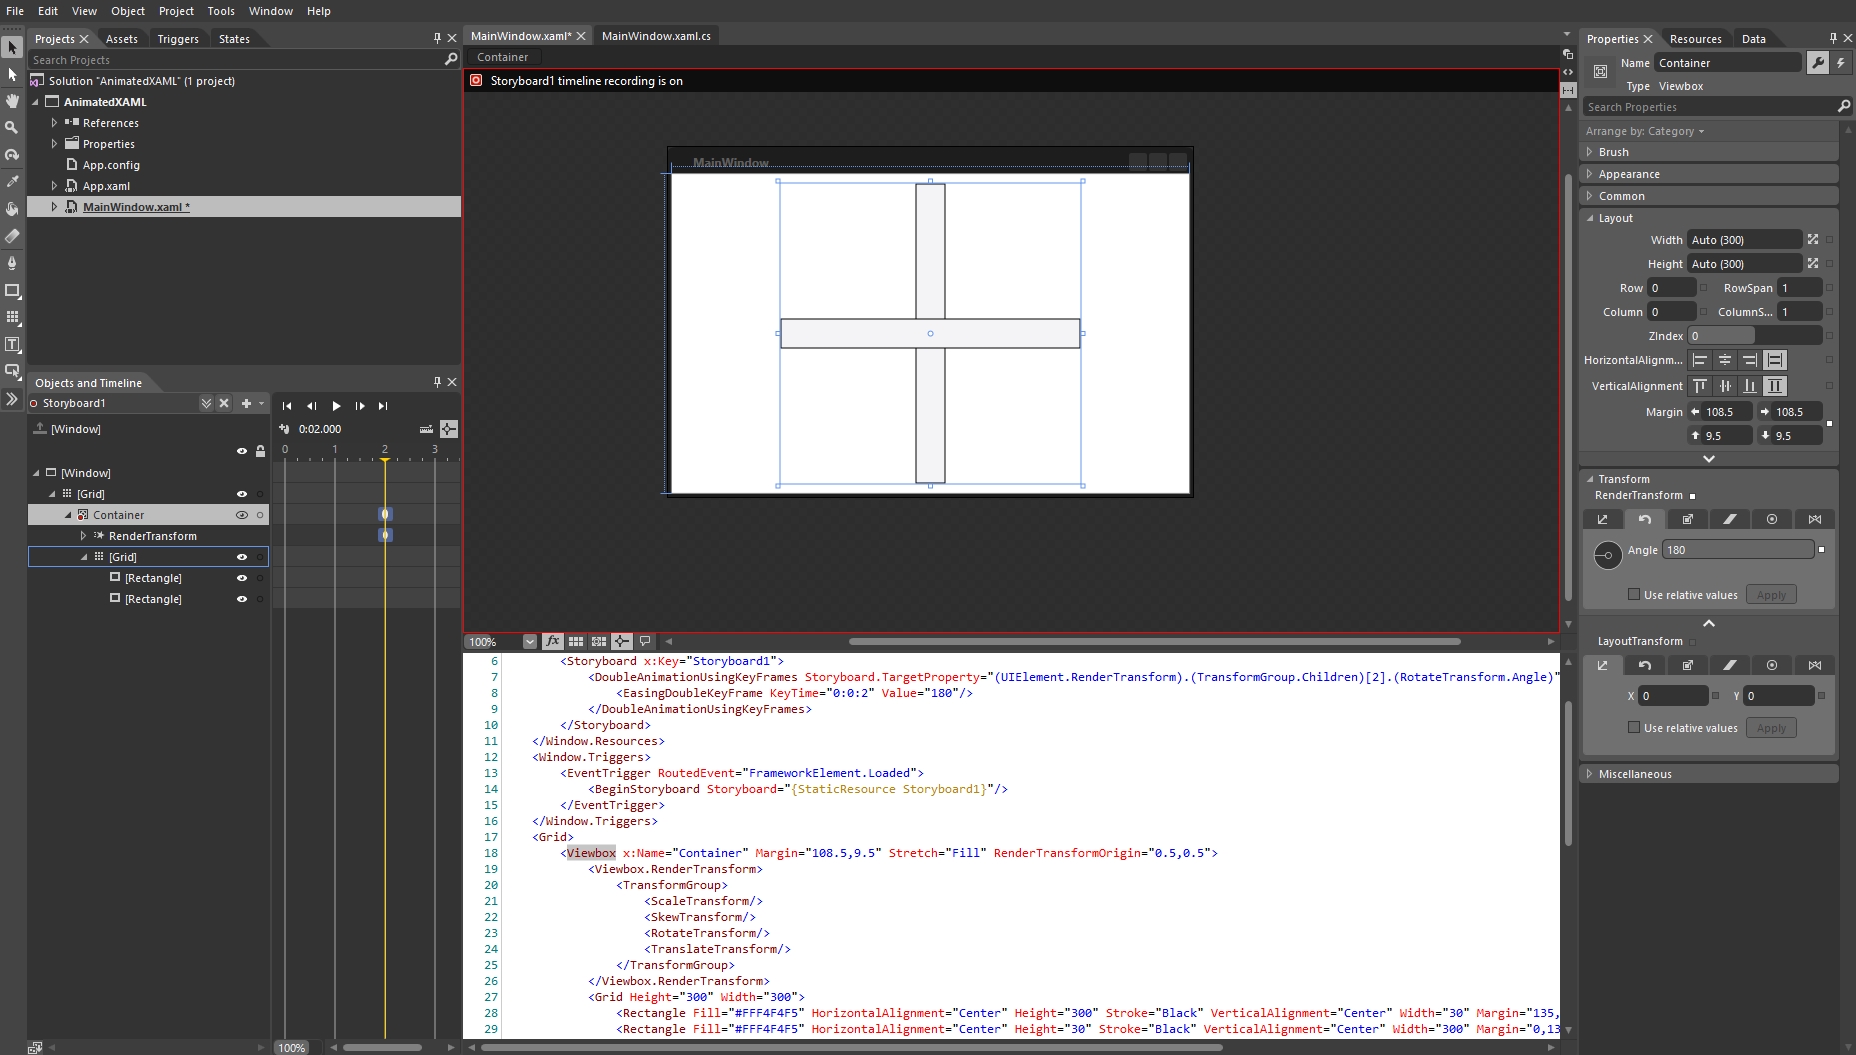
Playing the storyboard will show the animation created above.
Next we will also animate the color of the two rectangles. Select both rectangles from the Container viewbox while having the storyboard cursor at the same 2 seconds mark. Using the Brush editor from the Properties panel, select the color which the two rectangles should have at the end of the animation. Notice how new keyframes are added in the storyboard marking the change of color.
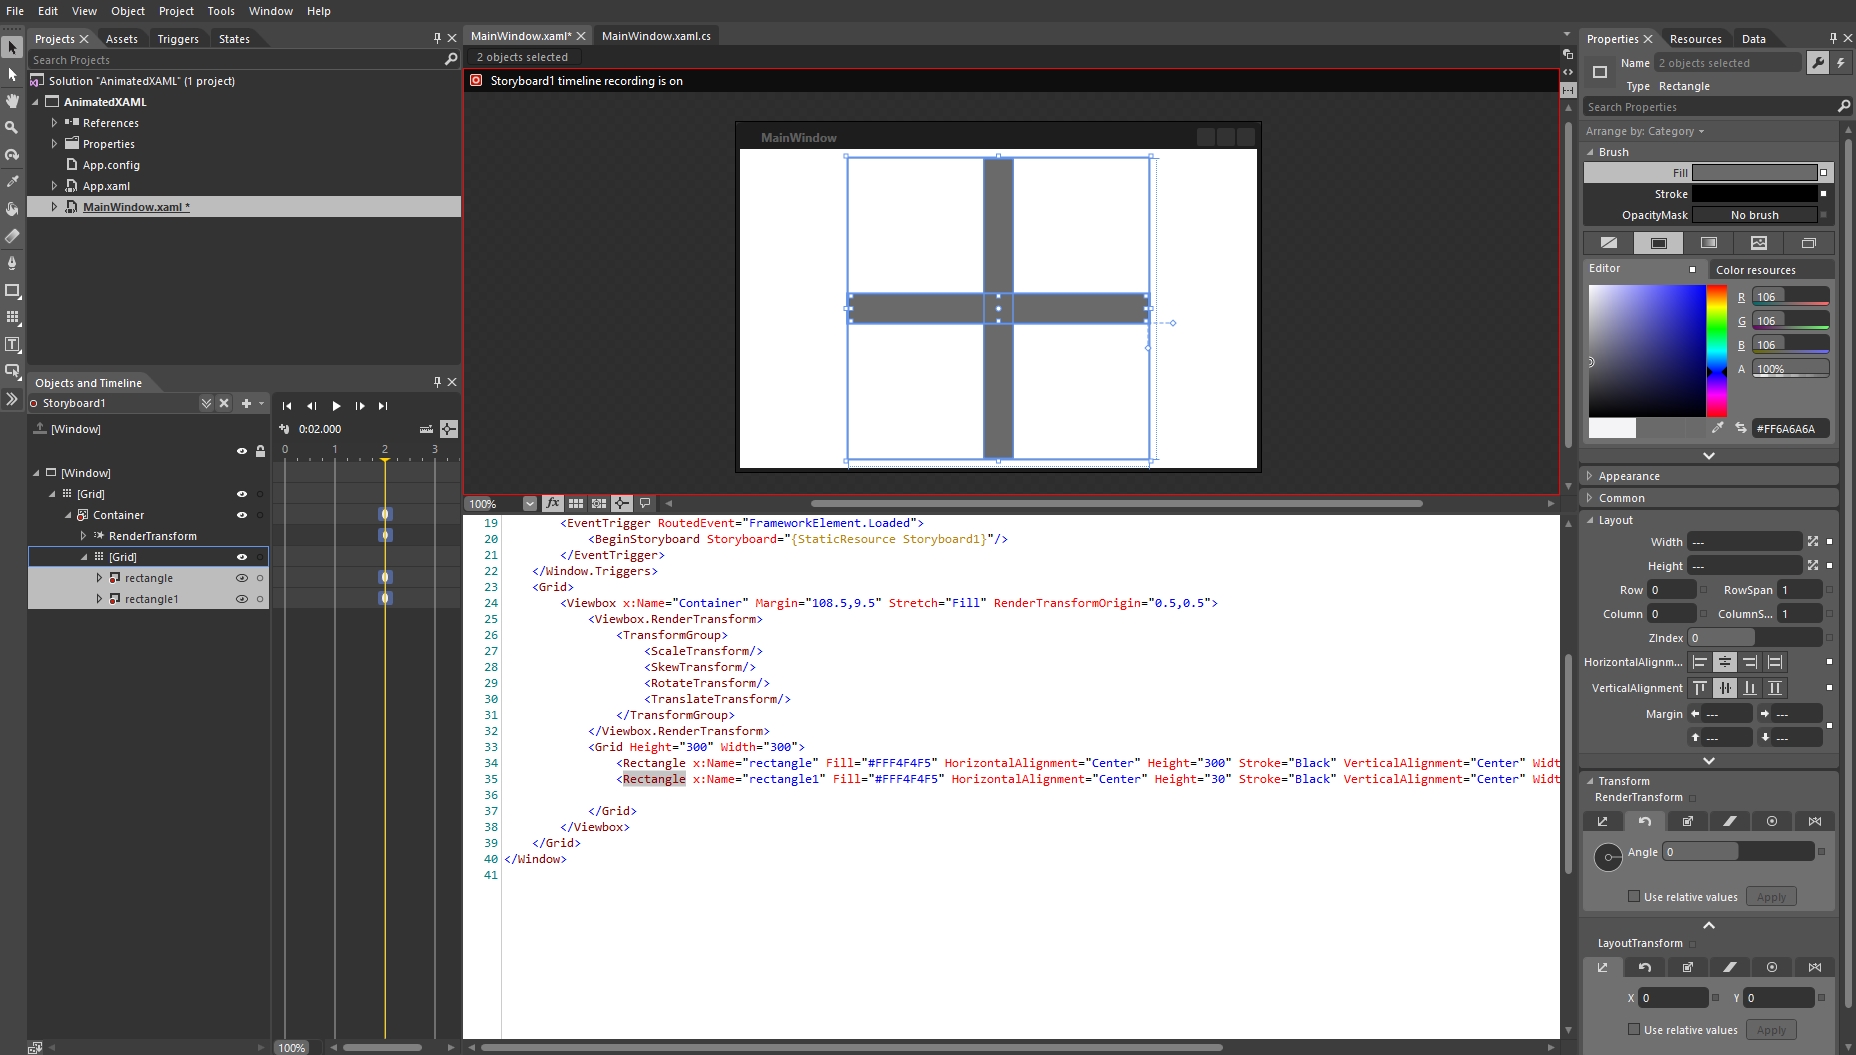
Notice that when playing the storyboard, all animations (the rotation of the Container viewbox and the color change of the rectangles) are played.
At this point, our XAML code should look like this:
<Window x:Class="AnimatedXAML.MainWindow"
        xmlns="http://schemas.microsoft.com/winfx/2006/xaml/presentation"
        xmlns:x="http://schemas.microsoft.com/winfx/2006/xaml"
        Title="MainWindow" Height="350" Width="525">
	<Window.Resources>
		<Storyboard x:Key="Storyboard1">
			<DoubleAnimationUsingKeyFrames Storyboard.TargetProperty="(UIElement.RenderTransform).(TransformGroup.Children)[2].(RotateTransform.Angle)"
			Storyboard.TargetName="Container">
				<EasingDoubleKeyFrame KeyTime="0:0:2" Value="180"/>
			</DoubleAnimationUsingKeyFrames>
			<ColorAnimationUsingKeyFrames Storyboard.TargetProperty="(Shape.Fill).(SolidColorBrush.Color)" Storyboard.TargetName="rectangle">
				<EasingColorKeyFrame KeyTime="0:0:2" Value="#FF6A6A6A"/>
			</ColorAnimationUsingKeyFrames>
			<ColorAnimationUsingKeyFrames Storyboard.TargetProperty="(Shape.Fill).(SolidColorBrush.Color)" Storyboard.TargetName="rectangle1">
				<EasingColorKeyFrame KeyTime="0:0:2" Value="#FF6A6A6A"/>
			</ColorAnimationUsingKeyFrames>
		</Storyboard>
	</Window.Resources>
	<Window.Triggers>
		<EventTrigger RoutedEvent="FrameworkElement.Loaded">
			<BeginStoryboard Storyboard="{StaticResource Storyboard1}"/>
		</EventTrigger>
	</Window.Triggers>
    <Grid>
    	<Viewbox x:Name="Container" Margin="108.5,9.5" Stretch="Fill" RenderTransformOrigin="0.5,0.5">
    		<Viewbox.RenderTransform>
    			<TransformGroup>
    				<ScaleTransform/>
    				<SkewTransform/>
    				<RotateTransform/>
    				<TranslateTransform/>
    			</TransformGroup>
    		</Viewbox.RenderTransform>
    		<Grid Height="300" Width="300">
    			<Rectangle x:Name="rectangle" Fill="#FFF4F4F5" HorizontalAlignment="Center" Height="300" Stroke="Black" VerticalAlignment="Center" Width="30" Margin="135,0"/>
    			<Rectangle x:Name="rectangle1" Fill="#FFF4F4F5" HorizontalAlignment="Center" Height="30" Stroke="Black" VerticalAlignment="Center" Width="300" Margin="0,135"/>

    		</Grid>
    	</Viewbox>
    </Grid>
</Window>
Now that we have our animations set up, we need to modify the XAML code in order to make it compatible with the WFIndicatorDynamic control from SmartEditor. As Expression Blend places the storyboard as resources in the project, we need to take the storyboard and place it inside the EventTrigger.
Note that by doing so, Expression Blend will not be able to display the storyboard or play the animations. This is why we need Kaxaml for testing the animation.
Select the storyboard from the Window.Resources and cut it. The bold highlight represents the XAML code that needs to be selected and moved.
<Window.Resources>
	<Storyboard x:Key="Storyboard1">
		<DoubleAnimationUsingKeyFrames Storyboard.TargetProperty="(UIElement.RenderTransform).(TransformGroup.Children)[2].(RotateTransform.Angle)"
		Storyboard.TargetName="Container">
			<EasingDoubleKeyFrame KeyTime="0:0:2" Value="180"/>
		</DoubleAnimationUsingKeyFrames>
		<ColorAnimationUsingKeyFrames Storyboard.TargetProperty="(Shape.Fill).(SolidColorBrush.Color)" Storyboard.TargetName="rectangle">
			<EasingColorKeyFrame KeyTime="0:0:2" Value="#FF6A6A6A"/>
		</ColorAnimationUsingKeyFrames>
		<ColorAnimationUsingKeyFrames Storyboard.TargetProperty="(Shape.Fill).(SolidColorBrush.Color)" Storyboard.TargetName="rectangle1">
			<EasingColorKeyFrame KeyTime="0:0:2" Value="#FF6A6A6A"/>
		</ColorAnimationUsingKeyFrames>
	</Storyboard>
</Window.Resources>
Inside the Window.Triggers/EventTrigger node, replace the <BeginStoryboard> self-closing tag with a normal <BeginStoryboard></BeginStoryboard> tags like follows:
<Window.Triggers>
	<EventTrigger RoutedEvent="FrameworkElement.Loaded">
		<BeginStoryboard Storyboard="{StaticResource Storyboard1}">

		</BeginStoryboard>
	</EventTrigger>
</Window.Triggers>
Now paste the copied storyboard between the <BeginStoryboard> tags.
<Window.Triggers>
	<EventTrigger RoutedEvent="FrameworkElement.Loaded">
		<BeginStoryboard Storyboard="{StaticResource Storyboard1}">
			<Storyboard x:Key="Storyboard1">
				<DoubleAnimationUsingKeyFrames Storyboard.TargetProperty="(UIElement.RenderTransform).(TransformGroup.Children)[2].(RotateTransform.Angle)"
				Storyboard.TargetName="Container">
					<EasingDoubleKeyFrame KeyTime="0:0:2" Value="180"/>
				</DoubleAnimationUsingKeyFrames>
				<ColorAnimationUsingKeyFrames Storyboard.TargetProperty="(Shape.Fill).(SolidColorBrush.Color)" Storyboard.TargetName="rectangle">
					<EasingColorKeyFrame KeyTime="0:0:2" Value="#FF6A6A6A"/>
				</ColorAnimationUsingKeyFrames>
				<ColorAnimationUsingKeyFrames Storyboard.TargetProperty="(Shape.Fill).(SolidColorBrush.Color)" Storyboard.TargetName="rectangle1">
					<EasingColorKeyFrame KeyTime="0:0:2" Value="#FF6A6A6A"/>
				</ColorAnimationUsingKeyFrames>
			</Storyboard>
		</BeginStoryboard>
	</EventTrigger>
</Window.Triggers>
At this point, Expression Blend will underline the Storyboard tag, showing that an error occurred. To fix this, delete the Storyboard attribute of the <BeginStoryboard> tag and the x:Key attribute of the <Storyboard> tag.
<Window.Triggers>
	<EventTrigger RoutedEvent="FrameworkElement.Loaded">
		<BeginStoryboard>
			<Storyboard>
				<DoubleAnimationUsingKeyFrames Storyboard.TargetProperty="(UIElement.RenderTransform).(TransformGroup.Children)[2].(RotateTransform.Angle)"
				Storyboard.TargetName="Container">
					<EasingDoubleKeyFrame KeyTime="0:0:2" Value="180"/>
				</DoubleAnimationUsingKeyFrames>
				<ColorAnimationUsingKeyFrames Storyboard.TargetProperty="(Shape.Fill).(SolidColorBrush.Color)" Storyboard.TargetName="rectangle">
					<EasingColorKeyFrame KeyTime="0:0:2" Value="#FF6A6A6A"/>
				</ColorAnimationUsingKeyFrames>
				<ColorAnimationUsingKeyFrames Storyboard.TargetProperty="(Shape.Fill).(SolidColorBrush.Color)" Storyboard.TargetName="rectangle1">
					<EasingColorKeyFrame KeyTime="0:0:2" Value="#FF6A6A6A"/>
				</ColorAnimationUsingKeyFrames>
			</Storyboard>
		</BeginStoryboard>
	</EventTrigger>
</Window.Triggers>
Note that after fixing the error, the storyboard will no longer be available in the Objects and Timeline panel.
Making the XAML animation work in Kaxaml
As Expression Blend cannot help us at this point, we will move the required XAML code to a new Kaxaml project.
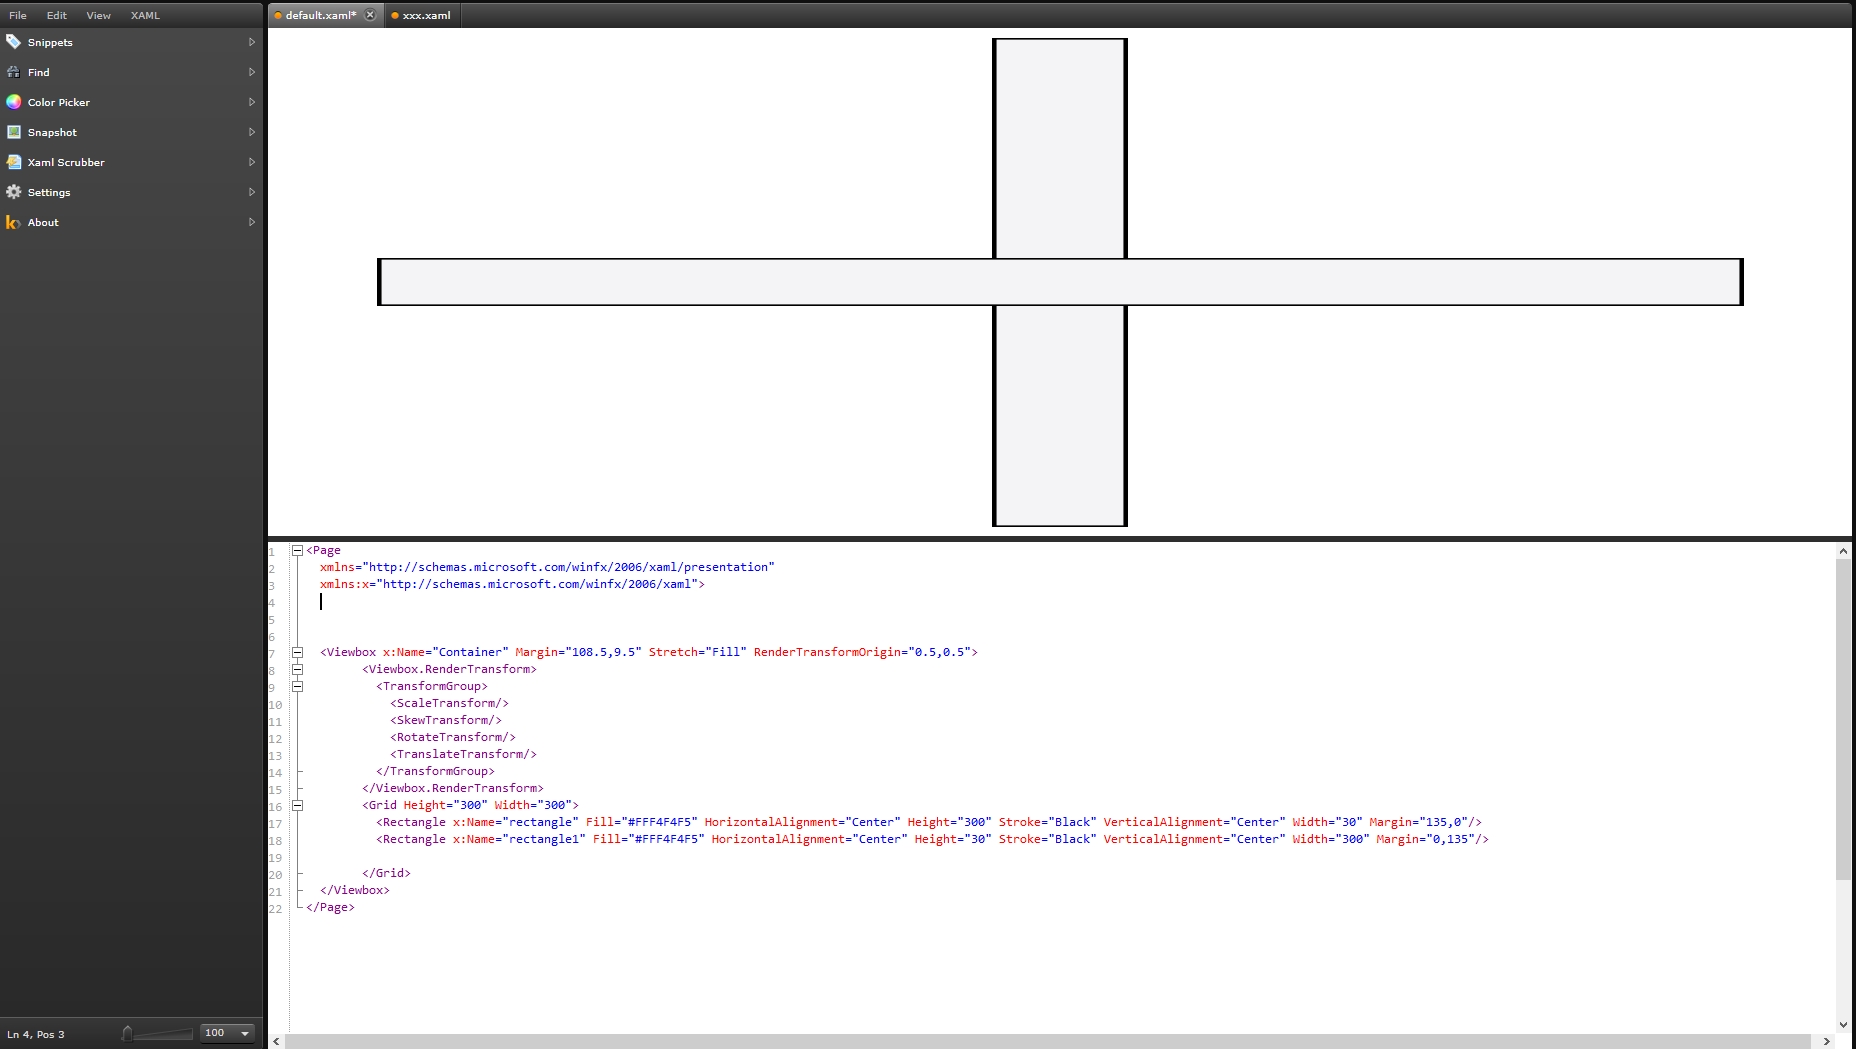
Open Kaxaml. A new default.xaml document will be automatically opened.
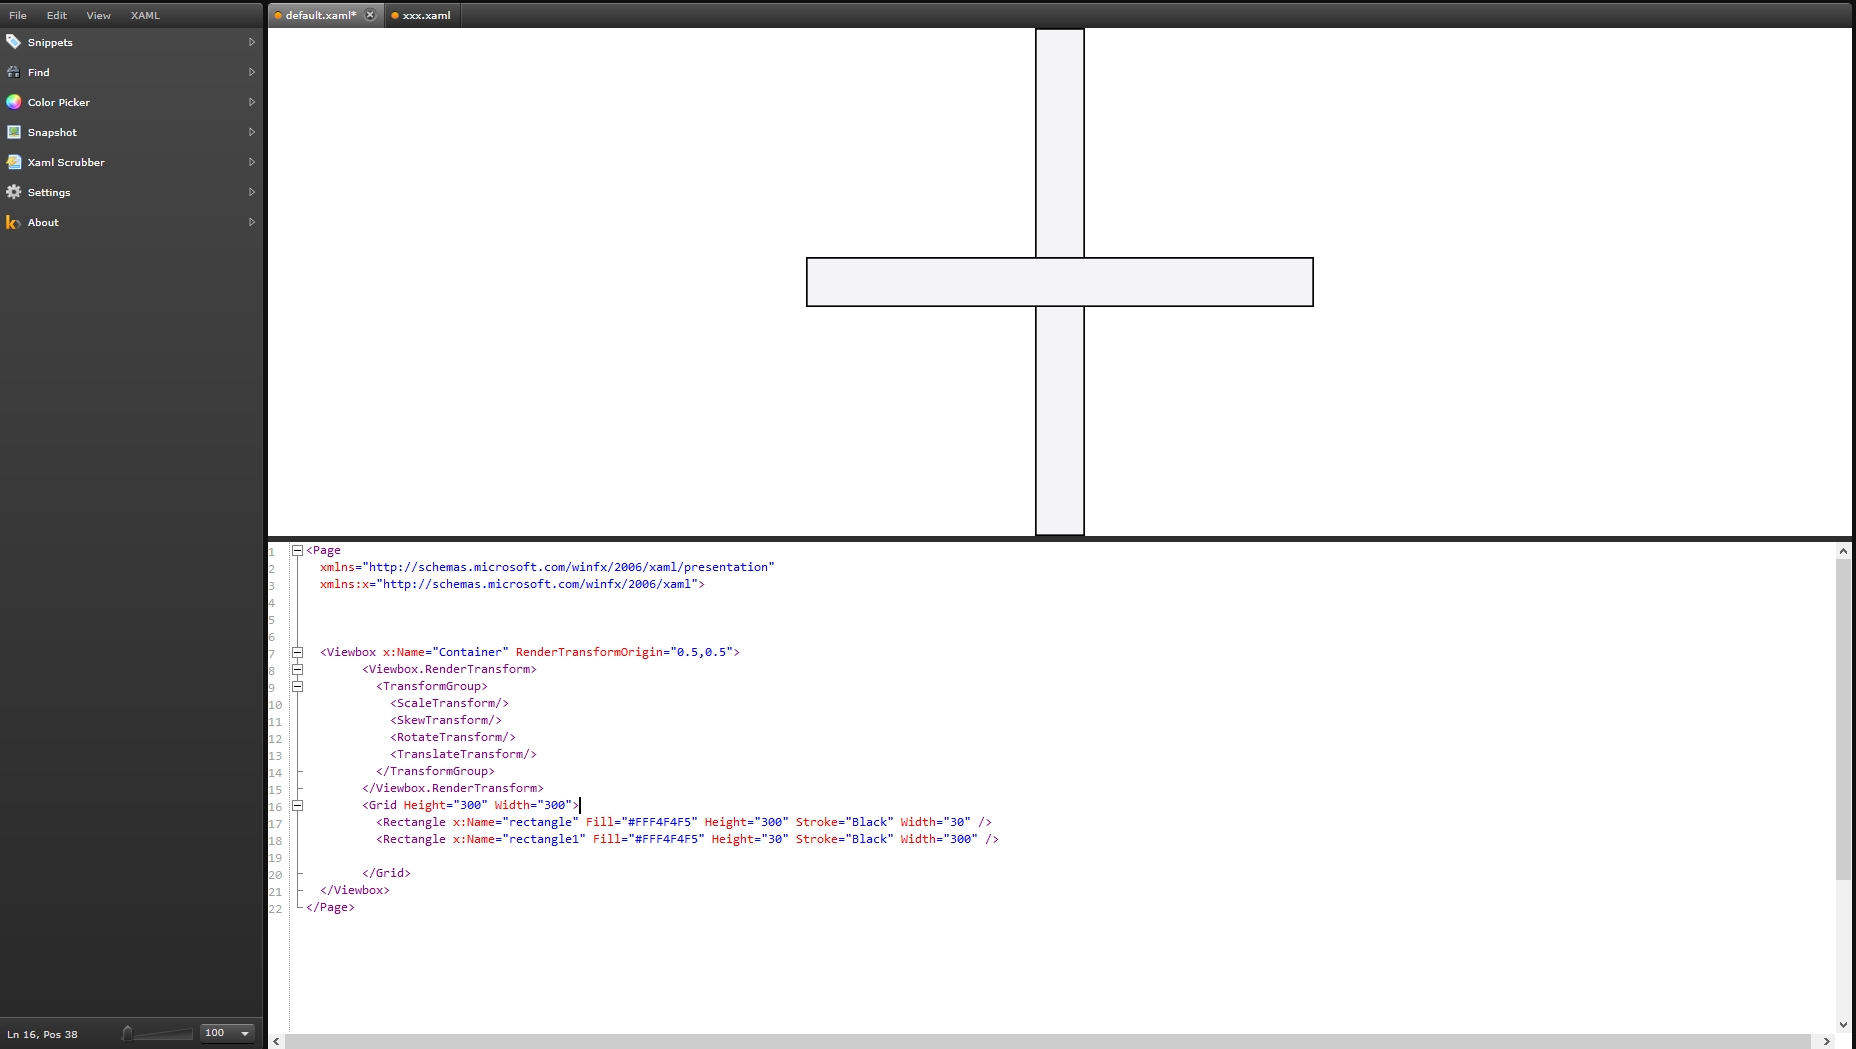
From Expression Blend, copy the Container viewbox and its contents and replace the empty grid in the Kaxaml document.
As mentioned earlier, we need to clean the code in order to make it work as it should. Delete the following unnecessary attributes in the Kaxaml document:
the Margin and Stretch attributes of the Container viewbox.
the Height and Width attributes of the grid containing the two rectangles.
the HorizontalAlignment, VerticalAlignment and Margin attributes or the two rectangles.
Next we need to copy the complete Window.Triggers tag and its contents from Expression Blend to the Kaxaml project.
At this point, Kaxaml will display an error. We will fix it in the next step.
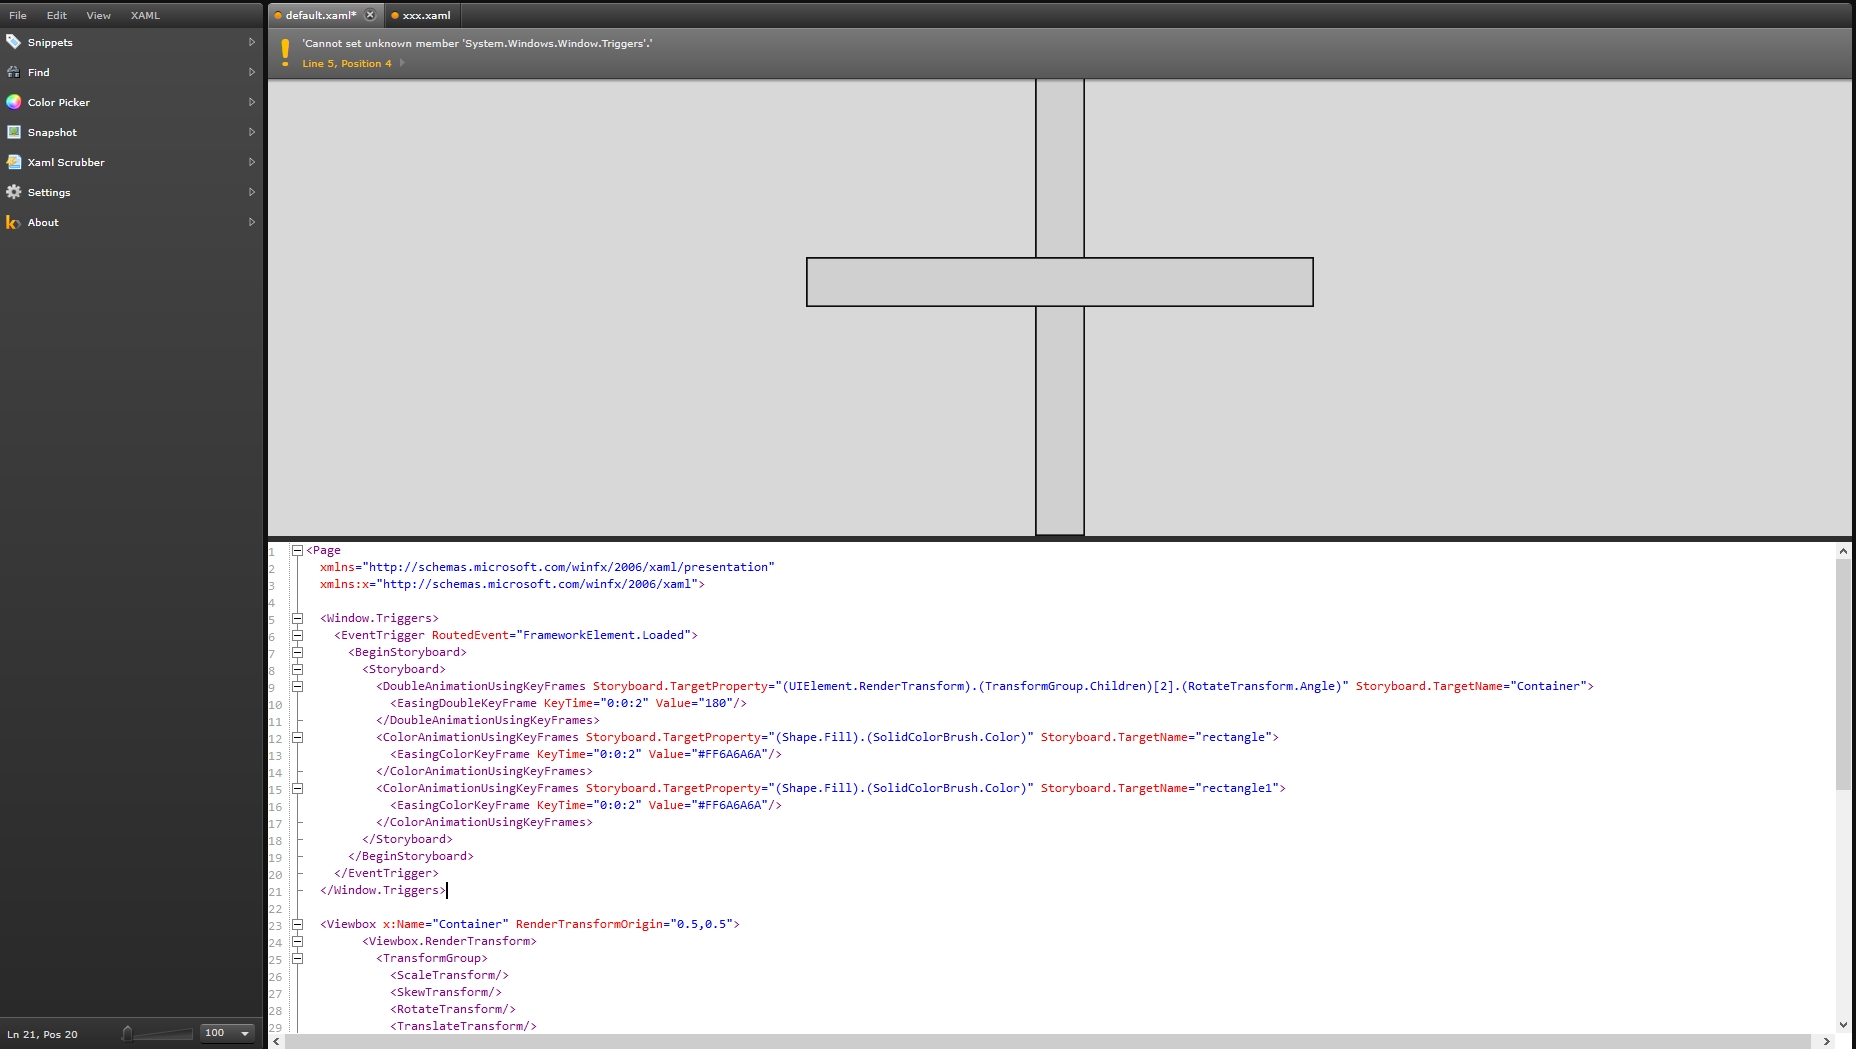
As the Triggers are set for the Window root element in Expression Blend (Window.Triggers) and in Kaxaml the root element is Page, we will need to replace the old Window root element from the Triggers with the current one. By doing so, the animation will work perfectly in Kaxaml. But given the fact that SmartEditor uses the Page root in different contexts, it is best to avoid using it in our XAML files. Thus, we need to replace both the old Expression Blend root element (Window from Window.Triggers) and Kxaml's new root element (Page) with a safer XAML container - the Grid.
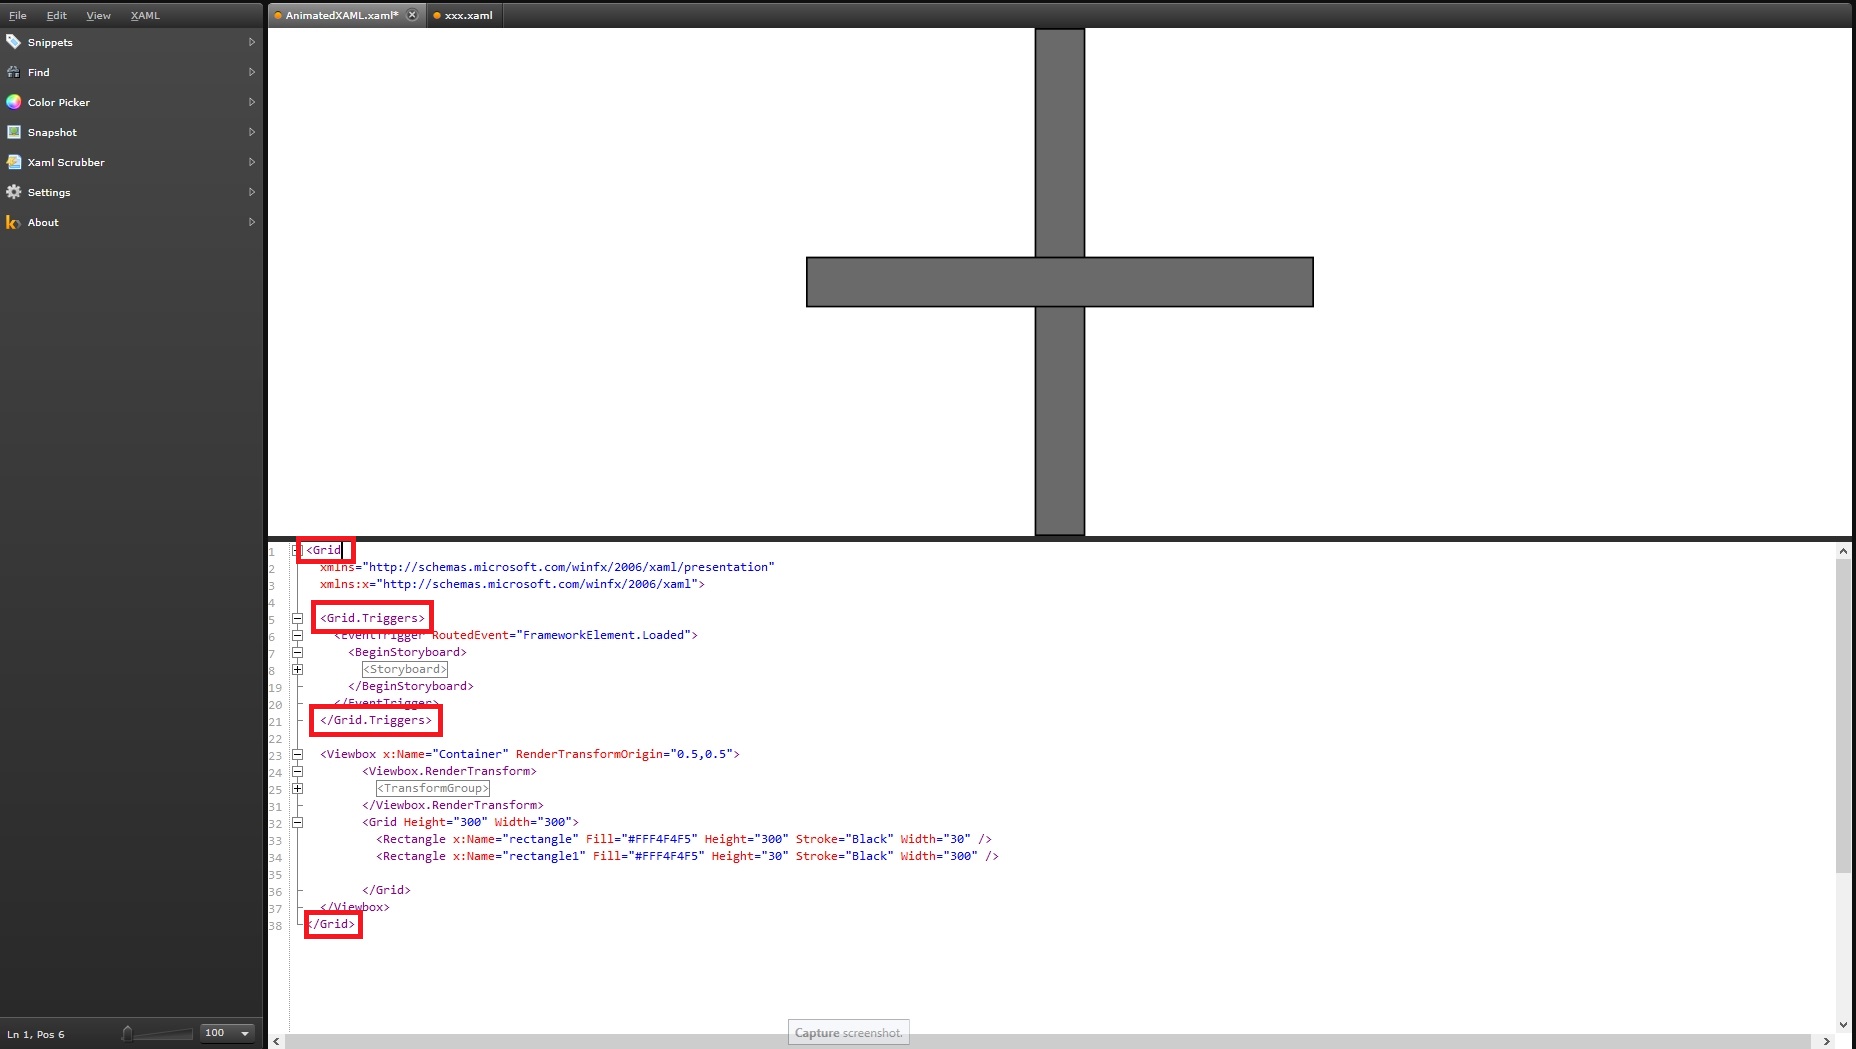
Notice that after doing the replacements, the Kaxaml project will be displayed as expected and the animation will once play be default.
Editing the XAML animation in Kaxaml
The code can look pretty messed up at this point, so in order to organize the XAML code, the Xaml Scrubber option from Kaxaml can prove very useful.
Now the XAML animation works as expected. But in order to demonstrate the editing capabilities of Kaxaml, we will further improve our animation my making it play forever and reversing it's rotation after one cycle.
To make the animation repeat forever, the RepeatBehavior attribute of the storyboard must be set to Forever:
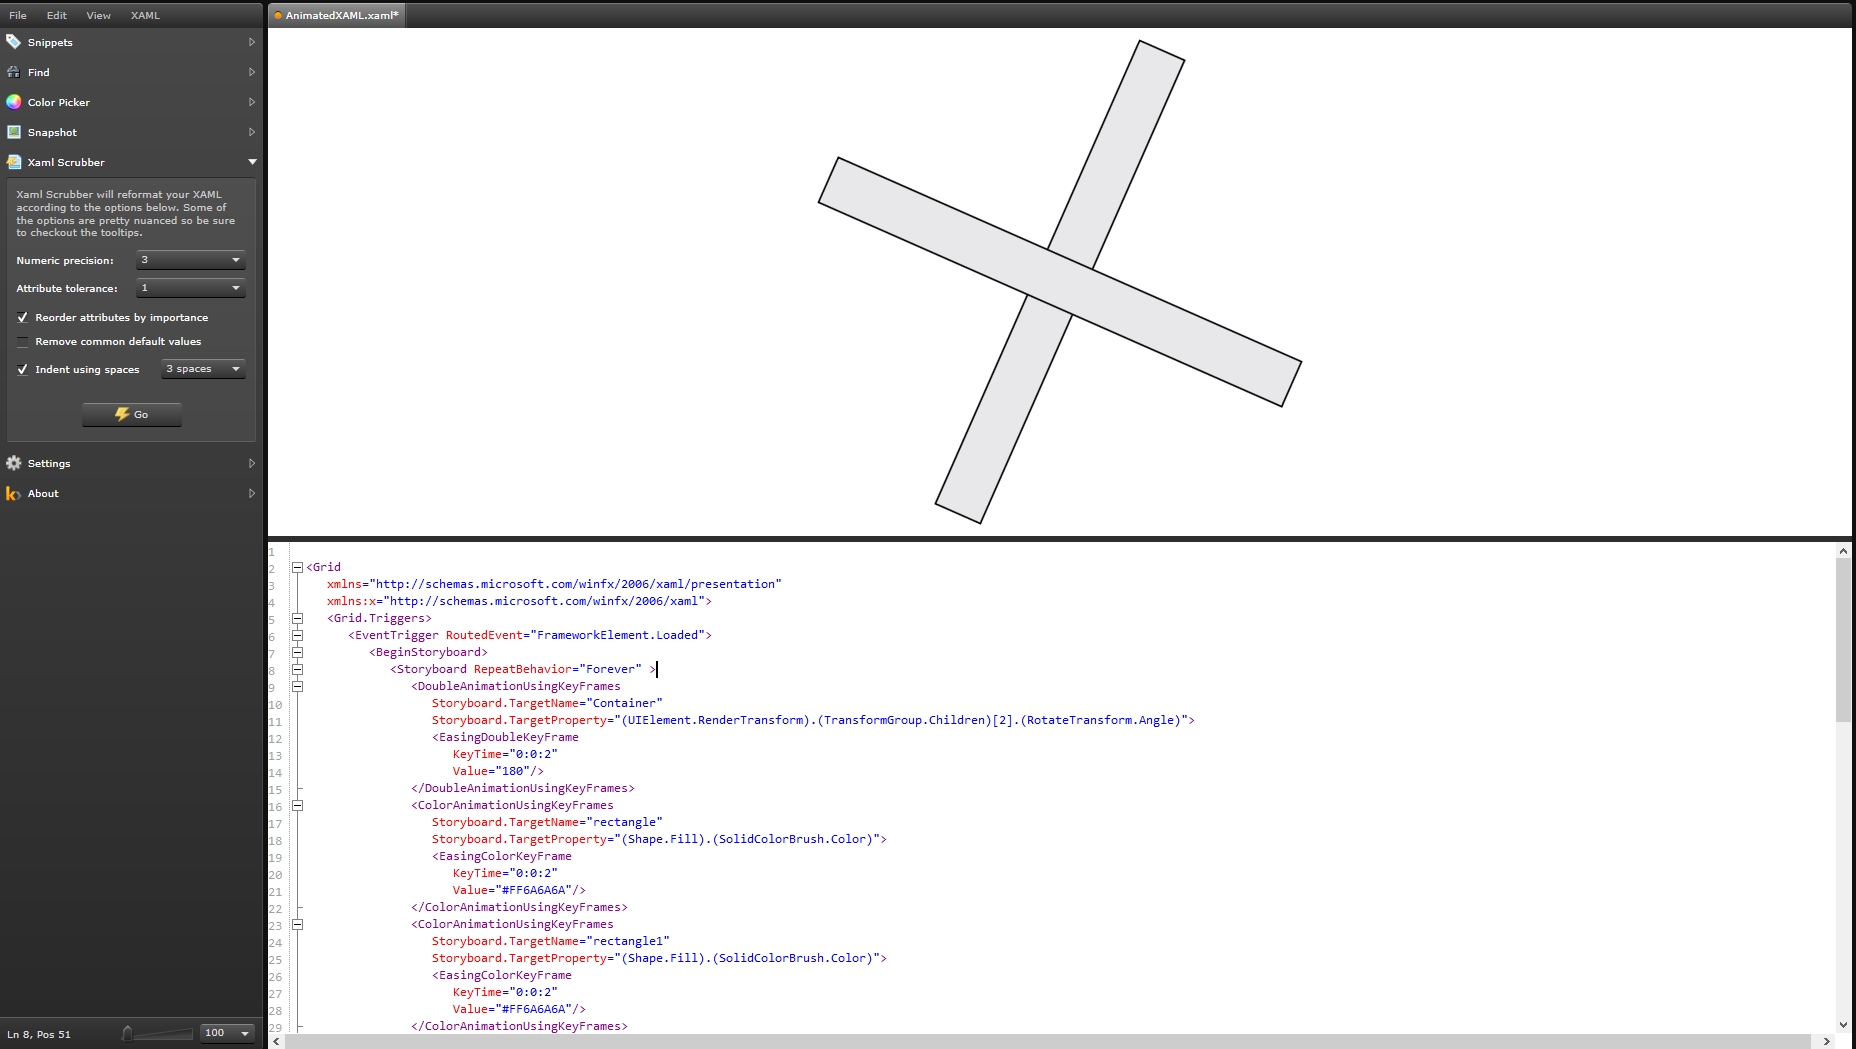
To make the rotation reverse it's direction after one cycle, the AutoReverse attribute of the storyboard must be set to True:
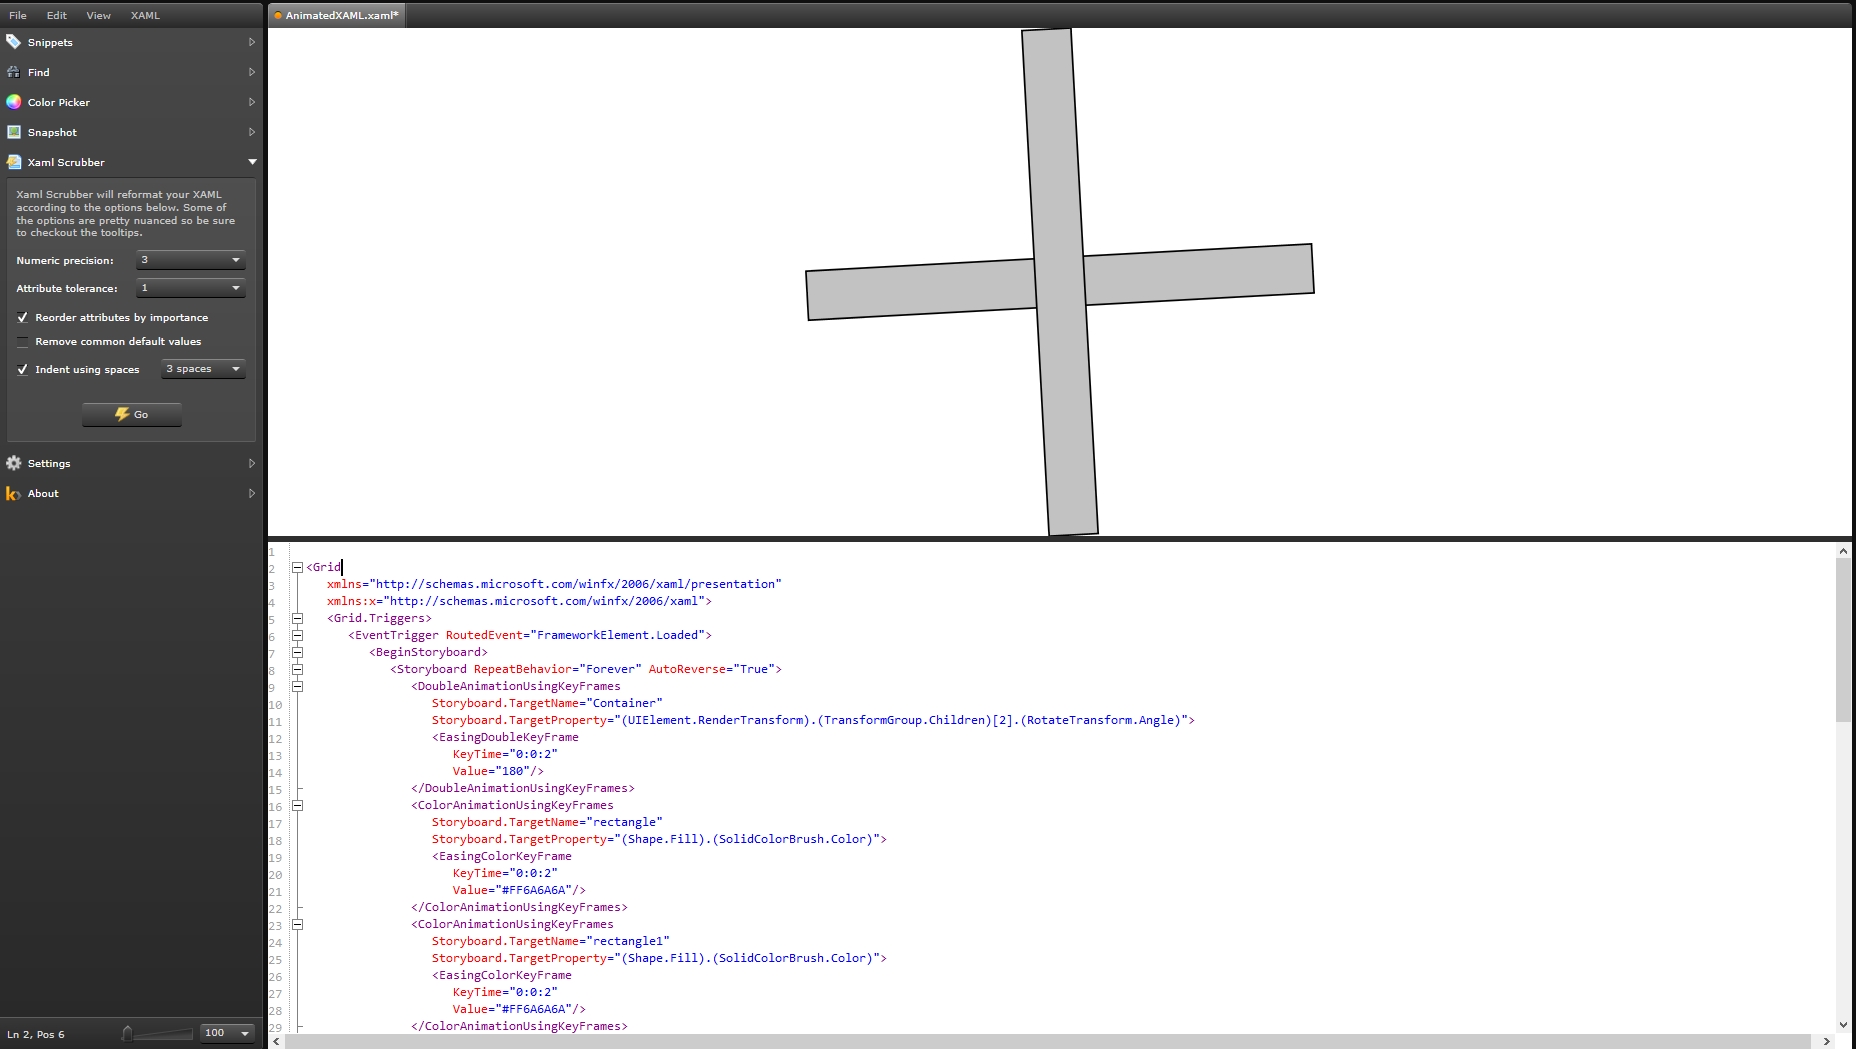
The final XAML animation code should look like this:
<Grid
   xmlns="http://schemas.microsoft.com/winfx/2006/xaml/presentation"
   xmlns:x="http://schemas.microsoft.com/winfx/2006/xaml">
   <Grid.Triggers>
      <EventTrigger RoutedEvent="FrameworkElement.Loaded">
         <BeginStoryboard>
            <Storyboard RepeatBehavior="Forever" AutoReverse="True">
               <DoubleAnimationUsingKeyFrames
                  Storyboard.TargetName="Container"
                  Storyboard.TargetProperty="(UIElement.RenderTransform).(TransformGroup.Children)[2].(RotateTransform.Angle)">
                  <EasingDoubleKeyFrame
                     KeyTime="0:0:2"
                     Value="180"/>
               </DoubleAnimationUsingKeyFrames>
               <ColorAnimationUsingKeyFrames
                  Storyboard.TargetName="rectangle"
                  Storyboard.TargetProperty="(Shape.Fill).(SolidColorBrush.Color)">
                  <EasingColorKeyFrame
                     KeyTime="0:0:2"
                     Value="#FF6A6A6A"/>
               </ColorAnimationUsingKeyFrames>
               <ColorAnimationUsingKeyFrames
                  Storyboard.TargetName="rectangle1"
                  Storyboard.TargetProperty="(Shape.Fill).(SolidColorBrush.Color)">
                  <EasingColorKeyFrame
                     KeyTime="0:0:2"
                     Value="#FF6A6A6A"/>
               </ColorAnimationUsingKeyFrames>
            </Storyboard>
         </BeginStoryboard>
      </EventTrigger>
   </Grid.Triggers>
   <Viewbox
      x:Name="Container"
      RenderTransformOrigin="0.5,0.5">
      <Viewbox.RenderTransform>
         <TransformGroup>
            <ScaleTransform/>
            <SkewTransform/>
            <RotateTransform/>
            <TranslateTransform/>
         </TransformGroup>
      </Viewbox.RenderTransform>
      <Grid
         Width="300"
         Height="300">
         <Rectangle
            x:Name="rectangle"
            Width="30"
            Height="300"
            Fill="#FFF4F4F5"
            Stroke="Black"/>
         <Rectangle
            x:Name="rectangle1"
            Width="300"
            Height="30"
            Fill="#FFF4F4F5"
            Stroke="Black"/>
      </Grid>
   </Viewbox>
</Grid>
Save the Kaxaml document on the hard drive. This XAML file will be used as default state further in the WFIndicatorDynamic control.
Using the XAML animation in the WFIndicatorDynamic control
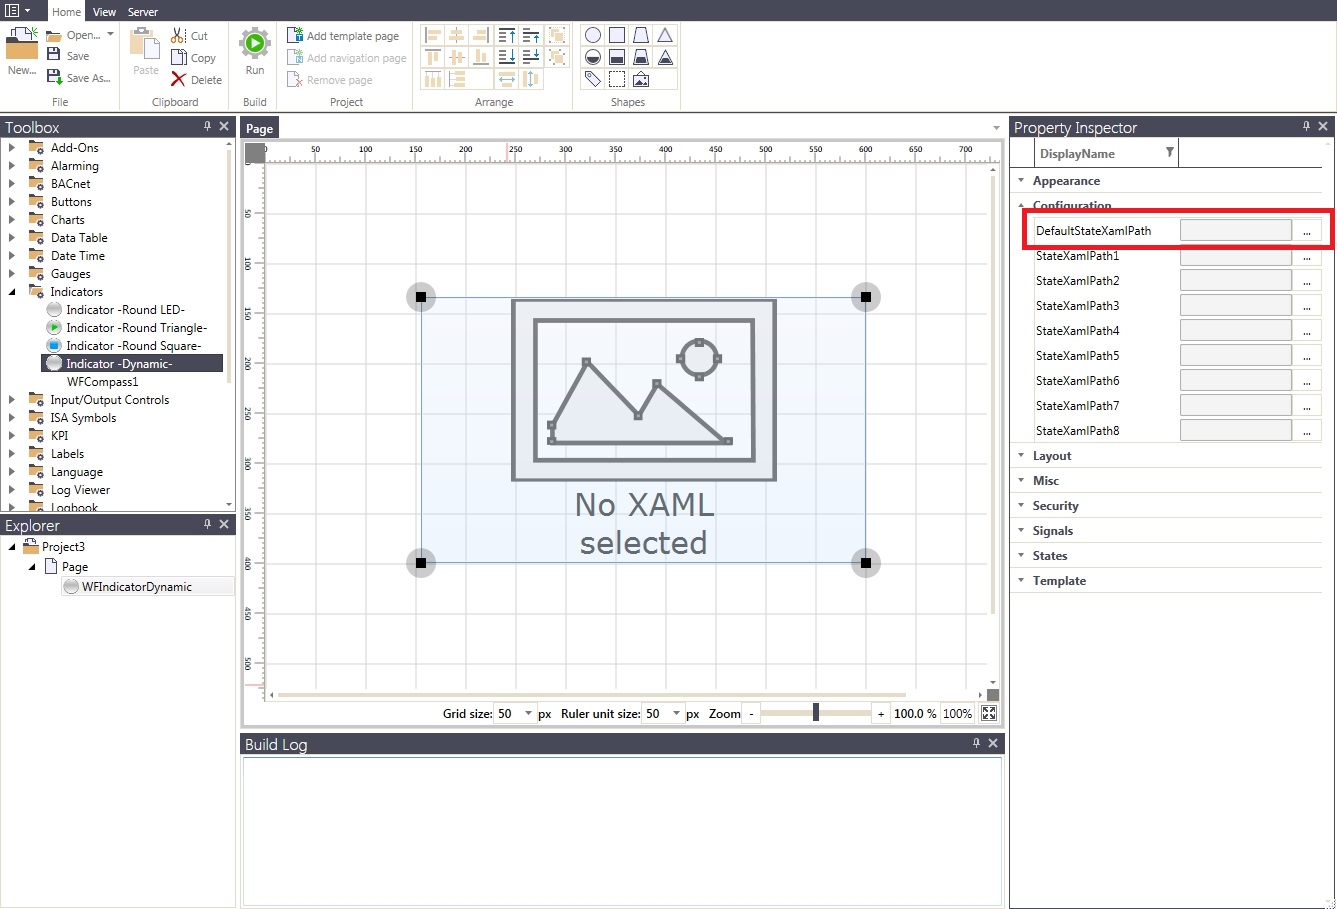
In the Ewon by HMS NetworksSmartEditor project, while having the WFIndicatorDynamic control selected, expand the Configuration property category from the Properties Inspector panel.
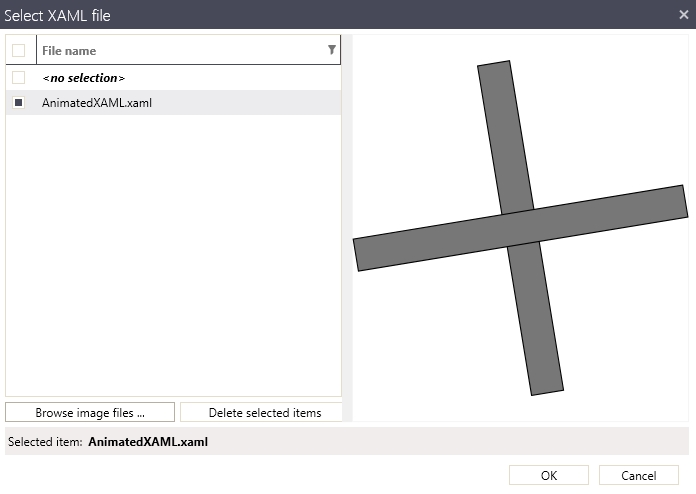
Click on the DefaultStateXamlPath button to set the newly created XAML file as the default state XAML.
In the Select XAML file dialog, browse for the XAML file created above.
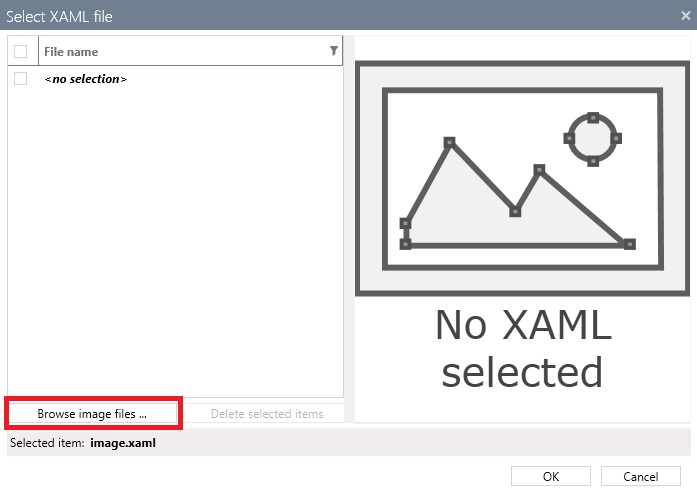
Browse for the new XAML file
Select the XAML file saved from Kaxaml and click Open. The animation will be visible in the Select XAML file dialog.