User Manager
Creating a User Manager Visualization and deploy it to IIS
Creating a User Manager Visualization using SmartEditor/Blend
The objective of this tutorial is to create a User Manager visualization using SmartEditor (See Ewon by HMS NetworksSmartEditor User Interface) and build it. Expression Blend or Visual Studio can be used too for achieving the same result.
The visualization will contain three Ewon by HMS Networks controls:
a Login control (for authentication)
a Language selector control (for selecting the display language)
a User manager control (See Ewon by HMS Networks User Manager for more details about User Manager)
The first step in developing a visualization is creating the project (SmartEditor/Expression Blend):
in WEBfactory Smart Editor create a new project and name it DemoVisualization
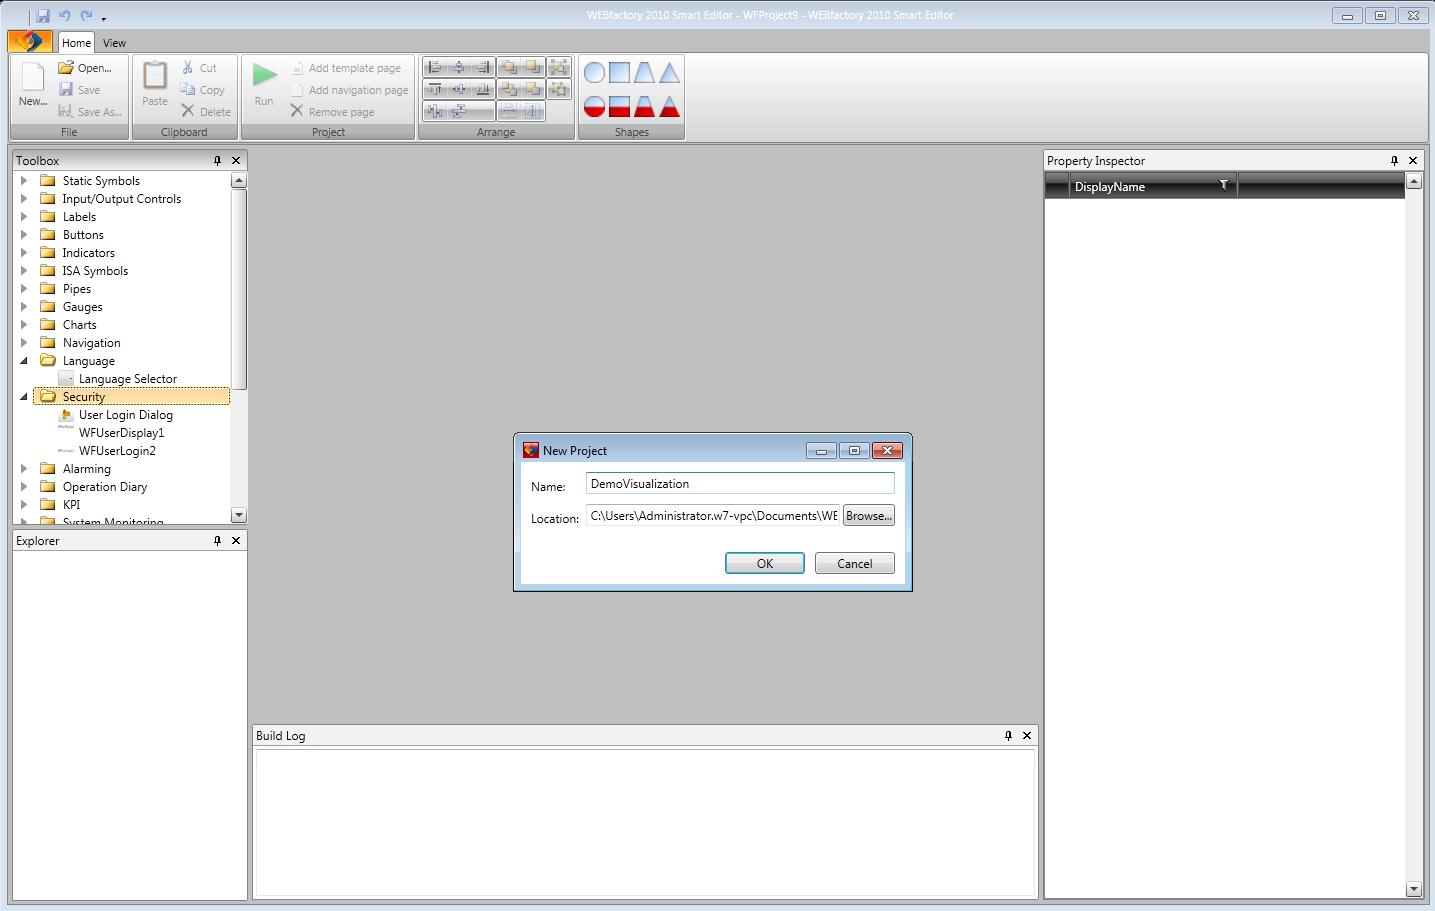
Creating a new project in SmartEditor
In Expression Blend, it is necessary to create a new Ewon by HMS Networks Silverlight Application + Website. Reference all the Ewon by HMS Networks libraries after creating the project (right-click on References, select Add Reference and navigate to the /Standard folder in the Ewon by HMS Networks installation directory; select all the dll files and add them as references).
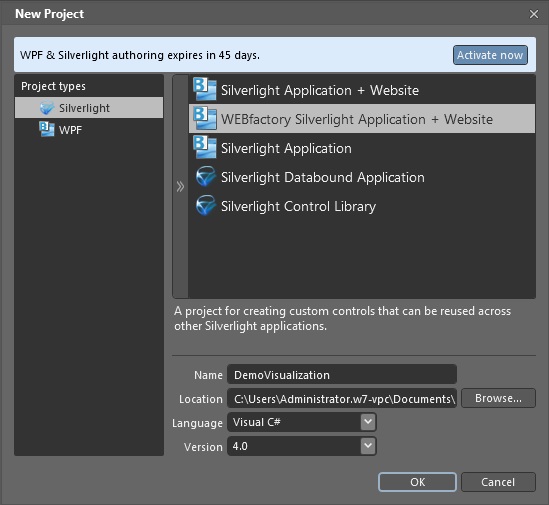
Creating a visualization in Expression Blend
Once the project is created, select the Page and resize it to 1024x576. This way the controls will have enough space to display properly, without being too clustered.
To resize the Page in SmartEditor, go in the Property Inspector, in the Appearance category and select the desired size from the drop-down menu.
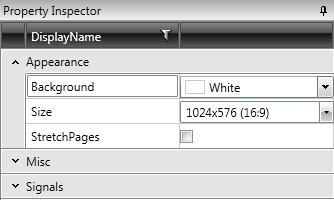
Resize a page in SmartEditor
to resize the page in Expression Blend, select the User Control from the Objects and Timeline panel, and set the desired size from the Layout category in the Properties panel.
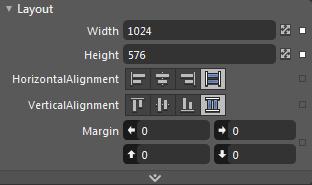
Resize a page in Expression Blend
Next, drag the following controls on the page and arrange them to fit properly
in SmartEditor, drag the controls from the Toolbox
User Login Dialog (from Security category);
Language Selector (from Language category);
WFUserManager (from User Management category).
In Expression Blend, use the Assets button to search for the controls
WFUserLogin1
WFLanguage
WFUserManager
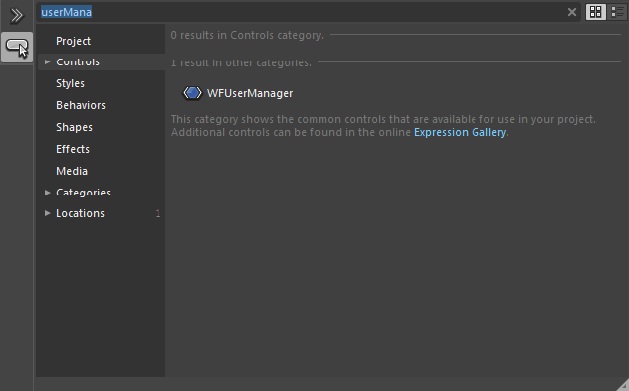
Adding controls in Expression Blend
The resulting layout should look like this:
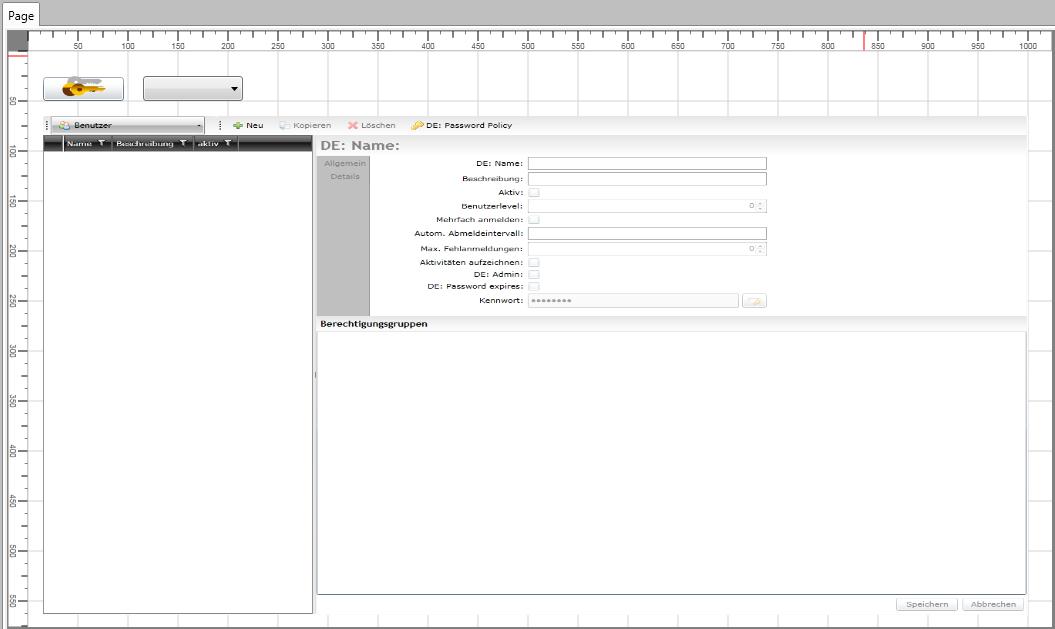
The layout of the visualization
Build the project by clicking the Run button in the Ribbon (or F5) in SmartEditor, or Project > Build Project (F6) in Expression Blend.
In the web browser, select the desired language and log in to gain access to the User Manager.
If the visualization is not deployed to IIS and set up, the "Error while loading the records!" error will pop up while loading the User Manager.
To use the User Manager visualization properly, it is necessary to deploy it in IIS.
Creating a User Manager Visualization using Visual Studio
This tutorial will describe the steps needed to use the User Manager control in a Visual Studio project. The process of developing a Visual Studio visualization project containing the User Manager control are:
Creating and setting up the Visual Studio project
Create a new Silverlight Application project in Visual Studio and name it UserManagerVS.
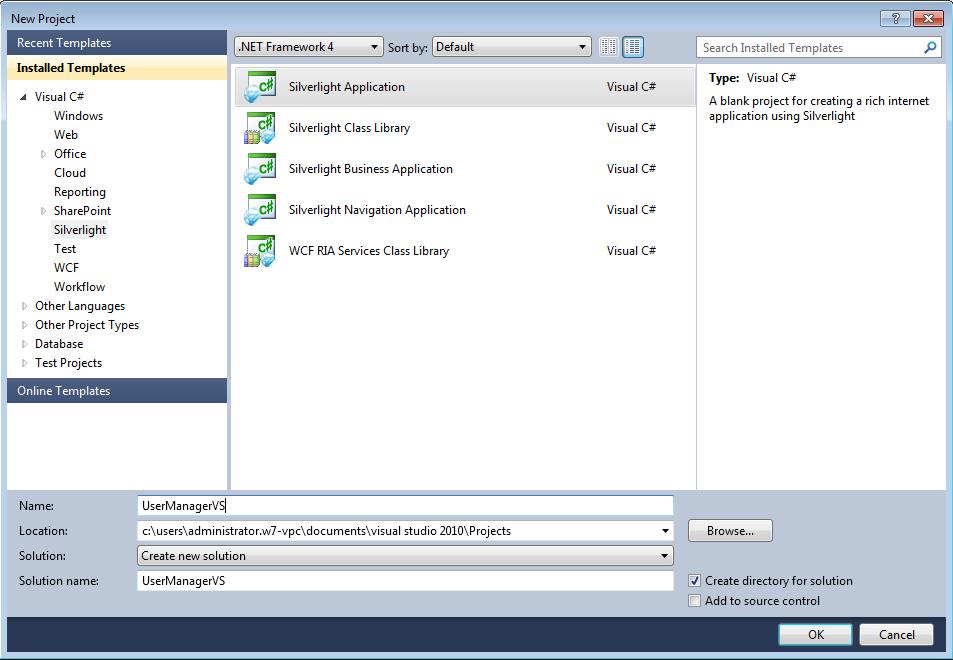
Creating a the new project in Visual Studio
The Ewon by HMS Networks Silverlight libraries need to be referenced in the project.
Right click on References under the UserManagerVS project in the Solution Explorer and select add reference.
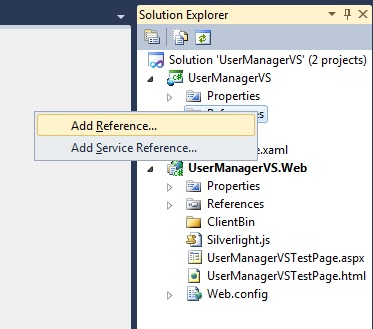
Referencing the Ewon by HMS Networks Silverlight libraries
In the Add Reference window select the Browse tab and navigate to C:/Program Files/WEBfactory 2010 /Silverlight/Standard (or C:/Program Files (x86)/WEBfactory 2010 /Silverlight/Standard if using a 64 bit system).
Select all the dll files in the Standard folder and click Ok to confirm. The process might take up to few minutes.
We also need to reference some dll files to the web application part of the project. This dll files are necessary only for User Manager, because the User Manager needs to use the RIA services in order to work.
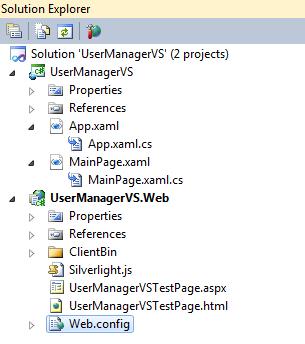
Right-click on the References under the UserManagerVS.Web and select Add Reference.... The dll files we need to reference are located in the installation folder of WEBfactory 2010 \Studio\UserManager\bin\. Navigate to this location and reference the dll files from that folder.

References needed for the UserManagerVS.Web application
After the referencing is done, head into the MainPage.xaml (it should be opened by default). The page size is too small to be used with the User Manager control. The next step is expanding the MainPage surface.
In MainPage XAML code, change the d:DesignHeight and d:DesignWidth values to 600 and 1000 (the default values are 400 and 600). The results can be instantly seen in the Design view of the MainPage.
Now the project is prepared, so we will head on to the next step.
Placing the User Manager and User Login controls in XAML
In the XAML view of the MainPage, we need to insert the control. The code source will be taken from the libraries we referenced earlier.
First, we need to declare the necessary namespaces in the XAML code. Add the following lines in the XAML code of the MainPage, inside the UserControl tag:
	xmlns:UserManagement="clr-namespace:UserManagement;assembly=WFUserManagement"
        xmlns:WFGeneral="clr-namespace:WFSilverlight.General;assembly=WFGeneral"
This namespaces will add the WFUserManagement and WFGeneral assemblies to the project.
The actual User Manager control needs to be added in the XAML Grid. In order to do so, we need to expand the Grid to the dimensions of the layout.
Add the following properties to the Grid:
Width="1000"
Height="600"
Inside the Grid tags, place the User Manager control:
<UserManagement:WFUserManager Margin="41,68,38,24"/>
The result can be instantly seen in the design view.
Notice the Margin properties we defined from the start inside the User Manager control. This margins are needed to define the placement and make room for another necessary control: the User Login control.
The User Manager cannot work without logging in.
Next, add the User Login control:
<WFGeneral:WFUserLogin1 Content="WFUserLogin1" HorizontalAlignment="Left" Height="30" Margin="41,17,0,0" VerticalAlignment="Top" Width="99"/>
By default, the User Manager language is German. In order to change the language to English, we will need a third control, the Language Selector control. This is an optional step.
In order to add the Language Selector control, insert the following code after the User Login control:
<WFGeneral:WFLanguageSelector1 HorizontalAlignment="Left" Height="30" Margin="144,17,0,0" VerticalAlignment="Top" Width="102"/>
The XAML code should look like this:
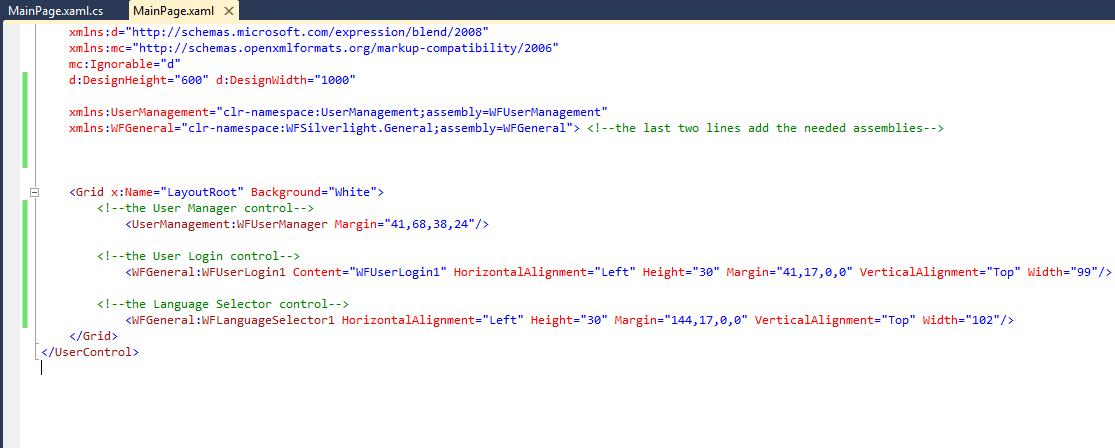
The complete XAML code
NOTE
All the positioning options (margins, alignments) or size options can be modified based on the developers needs. The values in this tutorial are example values.
Before building the application, we will need to edit the Web.config file of our UserManagerVS.Web application.
Earlier we had referenced dll files required by the UserManagerVS.Web application. Now we need to enable the services referenced.
The web configuration for the web application
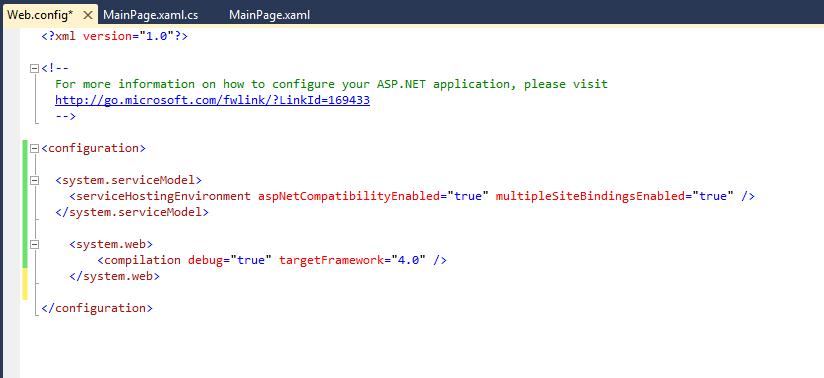
The Web.config contents
We need to add the code necessary to enable the RIA services:
inside the <configuration> tag, before <system.web> tag:
 	<system.serviceModel>
   		 <serviceHostingEnvironment aspNetCompatibilityEnabled="true" multipleSiteBindingsEnabled="true" />
 	 </system.serviceModel>
inside the <system.web> tags:
	<httpModules>
       	 <add name="DomainServiceModule" type="System.ServiceModel.DomainServices.Hosting.DomainServiceHttpModule, System.ServiceModel.DomainServices.Hosting, Version=4.0.0.0, Culture=neutral, PublicKeyToken=31bf3856ad364e35" />
      	</httpModules>
after the <system.web> tags:
  	<system.webServer>
    		<validation validateIntegratedModeConfiguration="false" />
    		<modules runAllManagedModulesForAllRequests="true">
      			<add name="DomainServiceModule" type="System.ServiceModel.DomainServices.Hosting.DomainServiceHttpModule, System.ServiceModel.DomainServices.Hosting, Version=4.0.0.0, Culture=neutral, PublicKeyToken=31bf3856ad364e35" />
    		</modules>
  	</system.webServer>
The Web.config file will have the following contents:
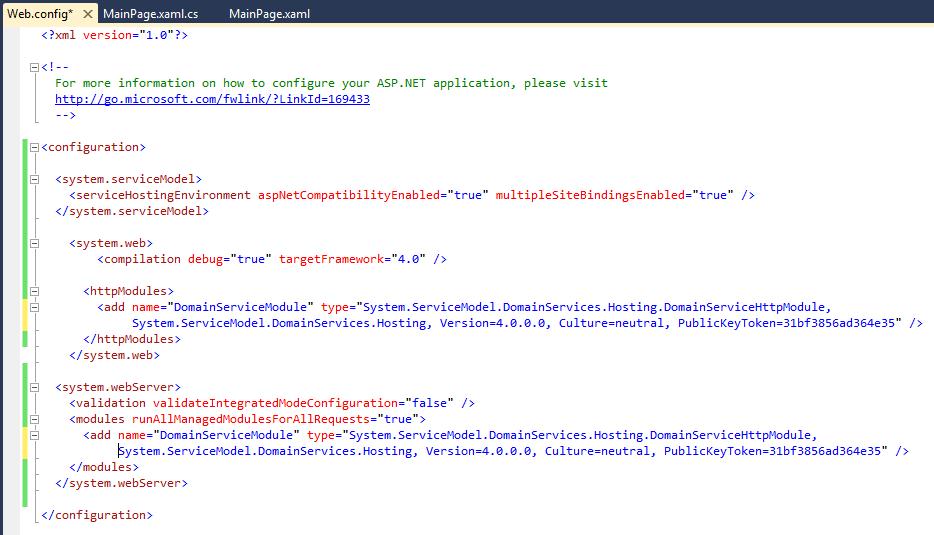
New Web.config contents
Press F6 to build the application or F5 to start the debugging and see the result in the browser (a username and password must be provided to log in to User Manager).
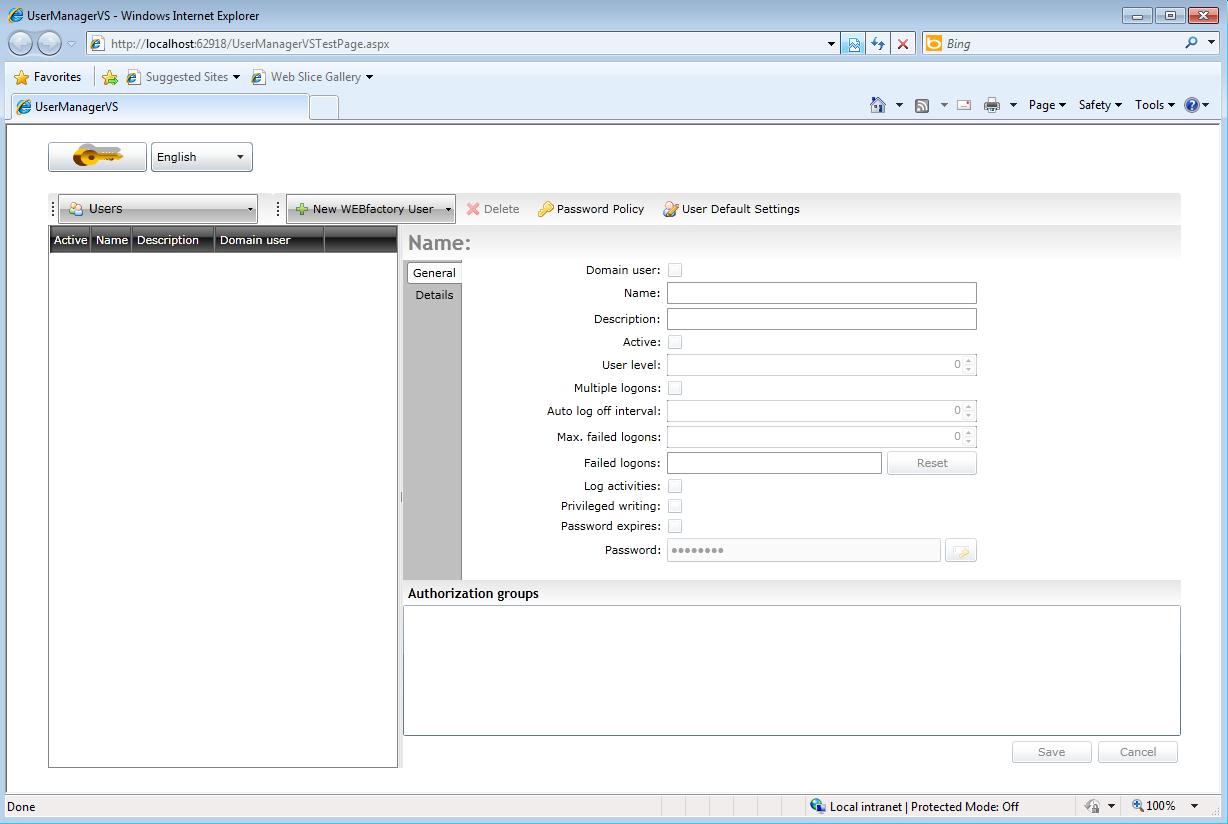
The resulting visualization containing the User Manager control, User Login control and the Language Selector control
If the Language Selector was inserted, it will appear nest to the User Login button.
If the visualization is not deployed to IIS and set up, the "Error while loading the records!" error will pop up while loading the User Manager.
To use the User Manager visualization properly, it is necessary to deploy it in IIS.
Deploying the User Manager Visualization in ISS
In order to have access to the visualization using a web browser (Internet Explorer, Mozilla Firefox, Google Chrome, Safari, Opera), the visualization must be deployed in IIS.
Once the User Manager visualization is build, we need to make the IIS deployment. In order to do that, we need to copy the built project in the wwwroot folder of IIS.
Navigate to C:\Users\UserName\Documents\WEBfactory 2010 <MadCap:variable name="MyVariables.WFSmartEditor" /> Projects and copy the folder DemoVisualization.Web to C:\inetpub\wwwroot.
The Expression Blend project is located in C:\Users\UserName\Documents\Expression\Blend 4\Projects\ProjectName and it is called ProjectNameSite.
The Visual Studio project is located in C:\Users\UserName\Documents\Visual Studio 2010\Projects\ProjectName .
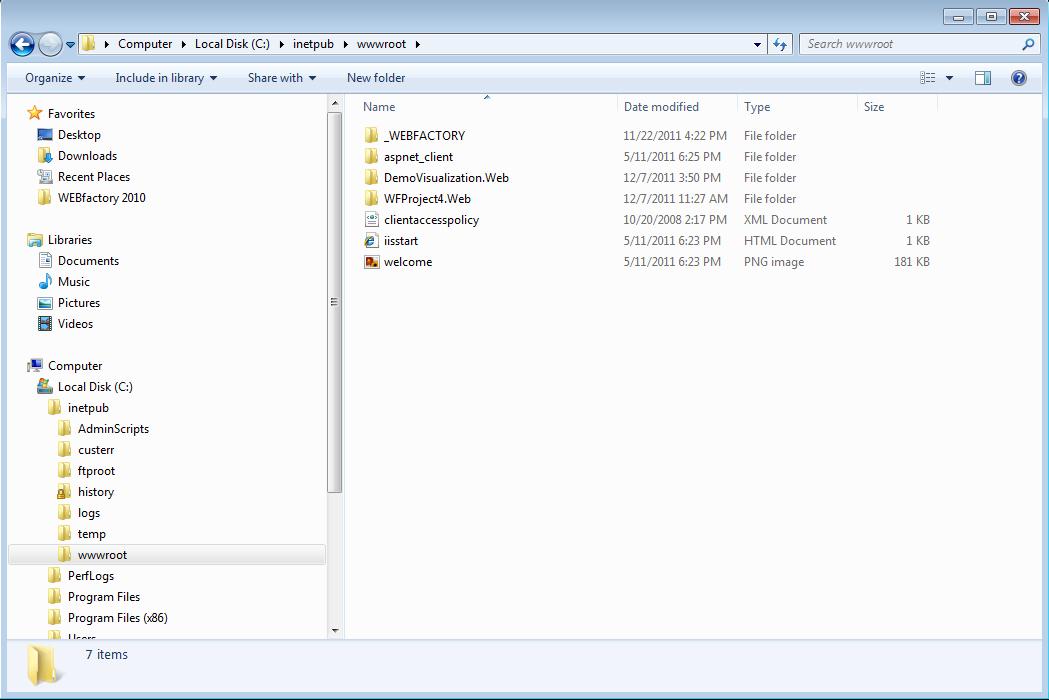
The wwwroot folder
After the project is copied to the wwwroot folder, delete the following files/folders:
For <MadCap:variable name="MyVariables.WFSmartEditor" /> projects - delete the Build folder inside the ProjectName.Web project folder.
For Visual Studio projects - delete the following files/folders from ProjectName.Web folder:
obj folder
Properties folder
|YourProjectName.Web.csproj
YourProjectName.Web.csproj.user
Now it is necessary to convert the build project to a web application. To do so, open Internet Information Services (IIS) Manager from Control Panel > System and Security > Administrative Tools.
In the left panel, under Sites > Default Web Site, the DemoVisualization.Web (or DemoVisualizationSite if build with Expression Blend) will be available.
Right click on the project and select Convert to Application.
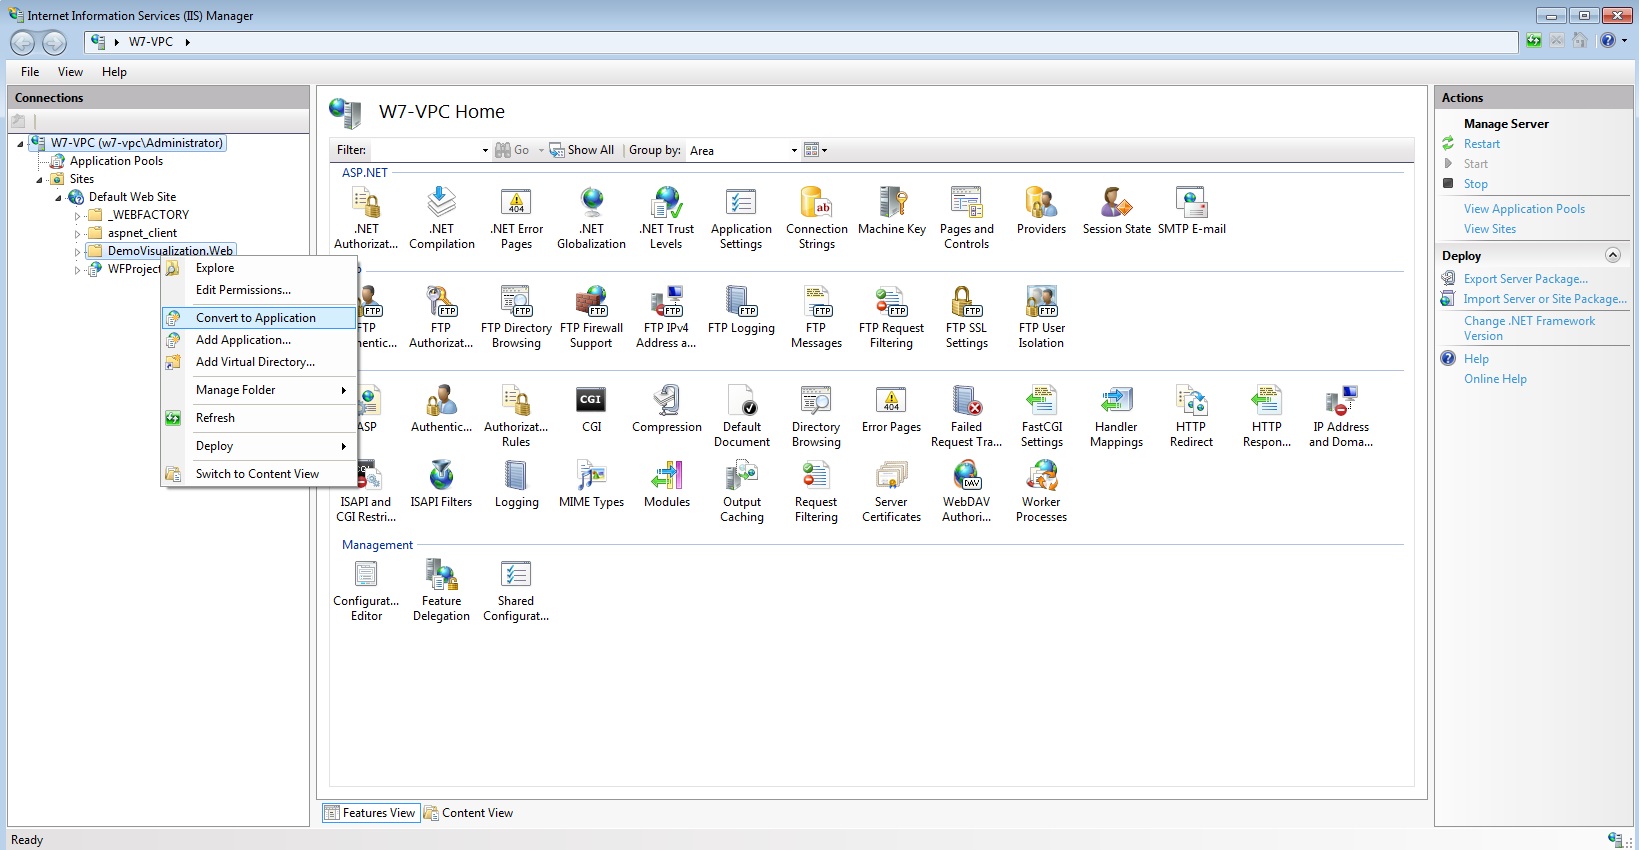
Convert the visualization project to application
In the Add Application window, click on Select... .
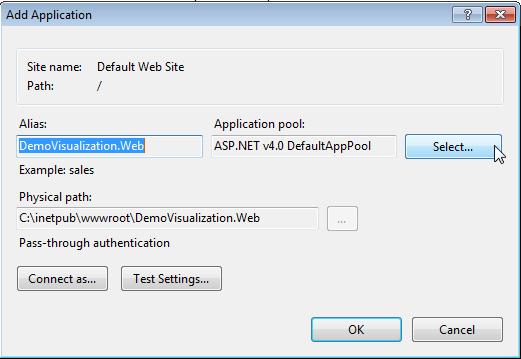
Add Application window in IIS
Select Ewon by HMS Networks_AppPool from the Application Pool drop-down menu and press Ok.
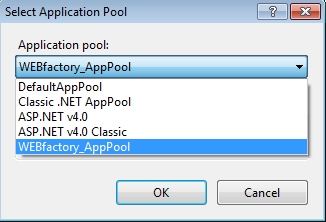
Select Application pool
Press Ok to confirm the adding of the application.
Running the visualization
To run the visualization application, go to Content View in IIS, right-click Default.html and select Browse.
If "Error while loading the records!" error message is encountered when running the visualization, please review the settings described above and make sure all the steps above are properly executed. Click here for more information about Avoiding/Fixing User Manager "Error while loading the records!" [PROBLEM LINK].
To access the User Manager visualization from a remote machine via local network or Internet, open a web browser and access the IIS root folder using the HTTP protocol:
http://computer/DemoVisualization.Web/Default.html
computer is the ip/computer name of the machine running the IIS.
If the visualization will be accessed via Internet or from a location that is in a different network than the machine running the IIS, the router must be configured in order to allow access to the IIS from outside the local network.
To access the User Manager visualization without specifying html document at the end of the URL, the next settings must be made:
In IIS Features View, go to Default Document options under IIS category.
In Default Document, you can see that there already is a Default.htm defined at the top of the list. As our document has the html extension and not the htm, we will need to add Default.html on top of the list, as default document.
The order if the documents in Default Document in the list matters; IIS will first look for the first document, and if that document doesn't exist, will look for the second, and so on.
Right click in the Default Document window and select Add. In the dialog, enter "Default.html" and select Ok.
Now the visualization can be accessed from the web browser by typing the URL without the "Default.html" part:
http://computer/DemoVisualization.Web
Running UserManager on a different protocol, host and port number
As a Silverlight application, the WEBfactory 2010 UserManager uses the default Silverlight protocol, host name and port number to access the web services. Starting with WEBfactory 2010 Service Pack 10, these settings can be configured inside Studio, so the UserManager can access the web services using a non-default protocol, host name or port number.
Customizing the protocol, host and port number
To use your custom web services URL for UserManager, the following settings must be done:
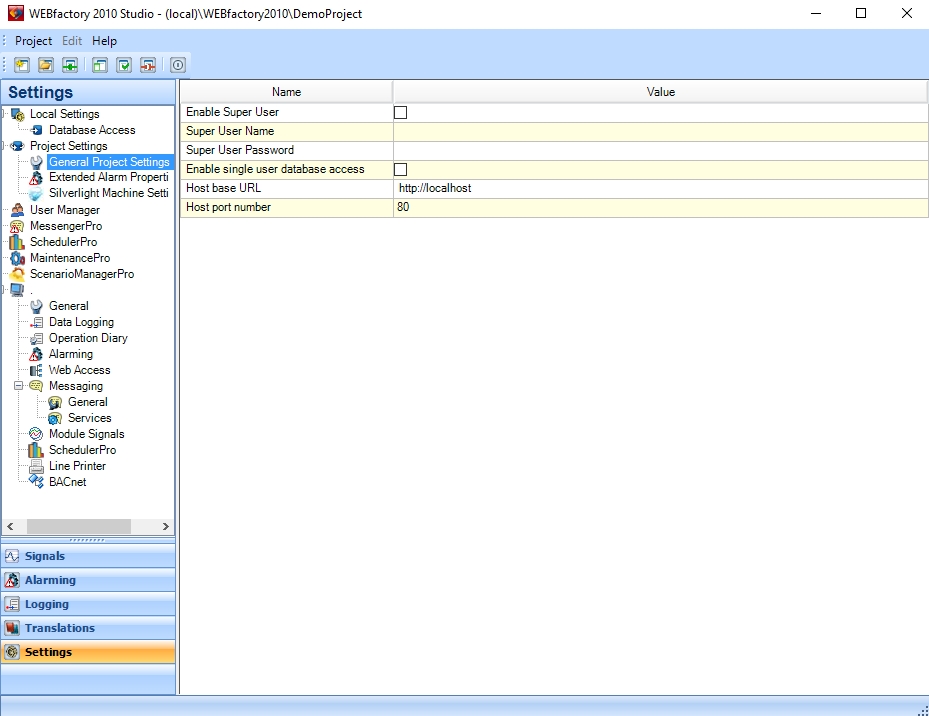
In WEBfactory 2010 Studio, navigate to the Settings section > Project Settings > General Project Settings.
The two settings that define the way UserManager accessed the web services are:
Host Base URL - the base URL of the host, starting with the protocol and the host name. The protocol can be http or https, while the host name can be either the actual name or the IP address.
Host Port Number - the port number on which the web services can be accessed on the host
Configure the above options to match the web services access protocol, host and port number. These settings will be applied to UserManager when opened. The default values are http://localhost and port 80.
Using the Ewon by HMS Networks User Manager
This tutorial will guide you through:
Creating and setting a Write Group for a specific signal in Studio
In WEBfactory 2010Studio, go to Write Groups in the Signals Tab.
Right-click in the right panel and select New Write Group; name the new Write Group.
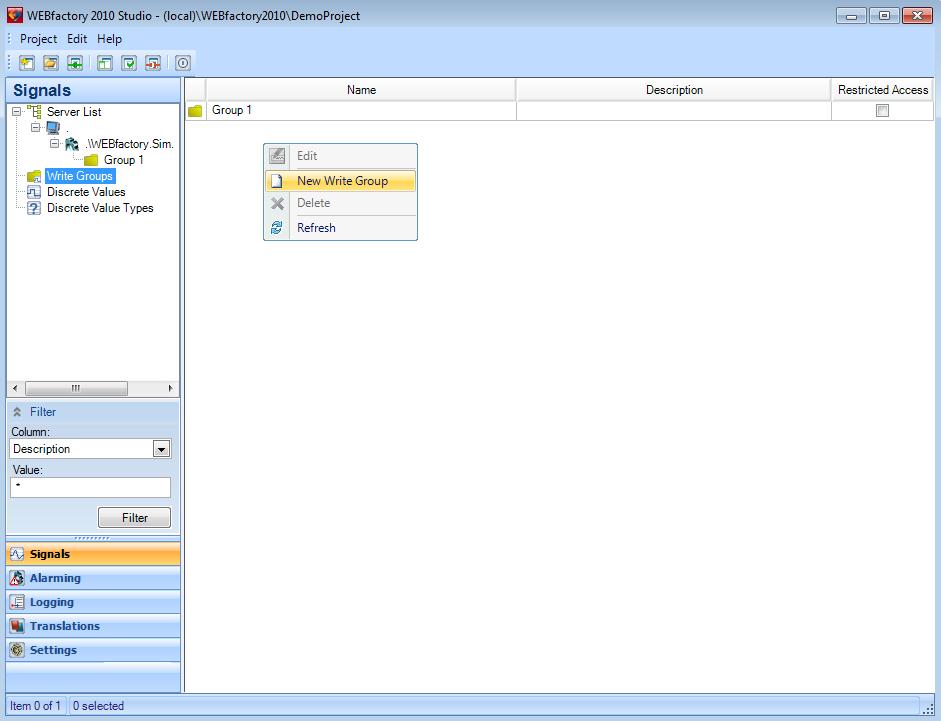
Creating a new Write Group
The new Write Group is created. To add a signal to the new Write Group, go to Signals > Server List and navigate to the Group that has the desired signals. In Ewon by HMS Networks Demo Project, the signals are in Group 1.
Select the desired signal. For this tutorial we will use the Setpoint 1 signal from the Demo Project.
Right-click on the signal and select Signal Details. The Signal Details panel will expand from the bottom of the window.
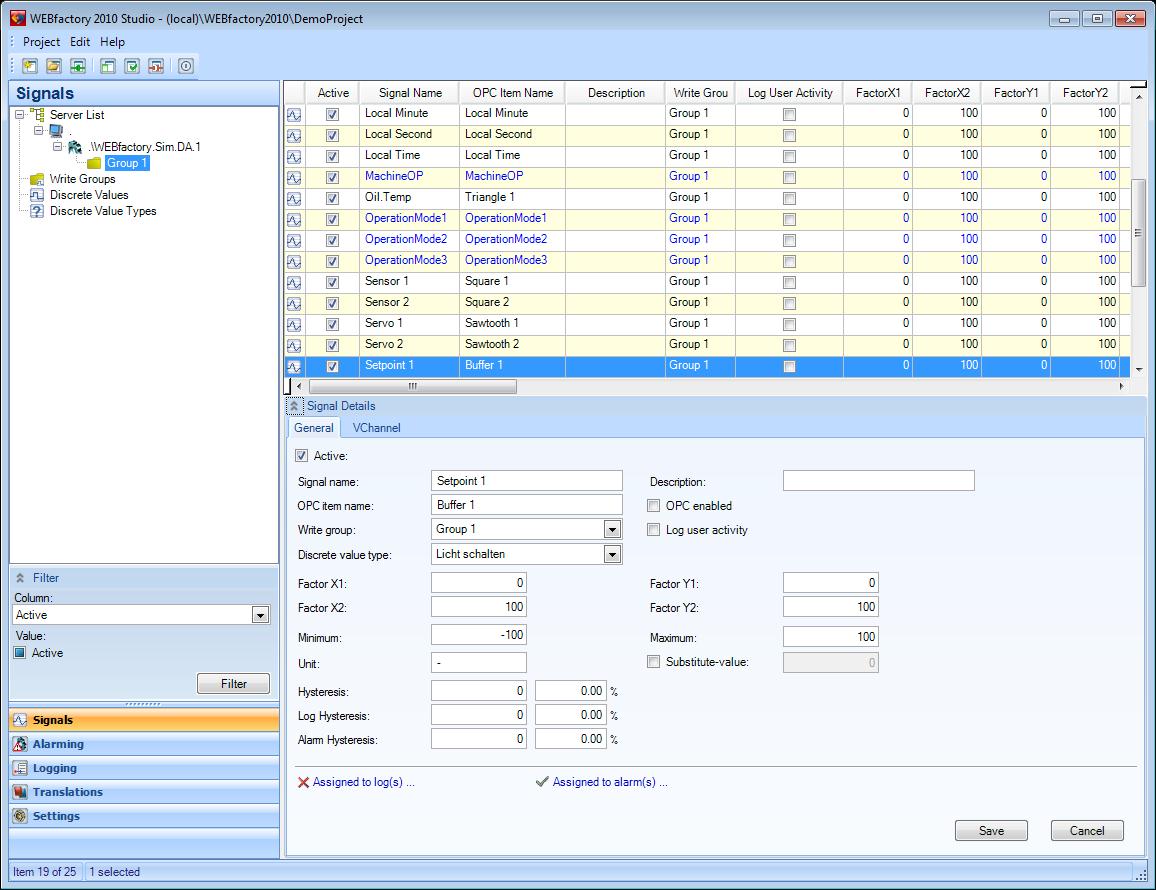
Signal Details panel
Expand the Write Group drop-down menu and select the new Write Group. In this particular case, ExampleWriteGroup.
Click the Save button from the bottom right side of the Signal Details panel to save the changes.
Now the Setpoint 1 signal is assigned to the ExampleWriteGroup Write Group.
Creating an Authorization Group in User Manager and activate the write group
More about Authorization Groups
In order to create and Authorization Group, navigate to the User Manager, under the Settings tab in WEBfactory 2010Studio.
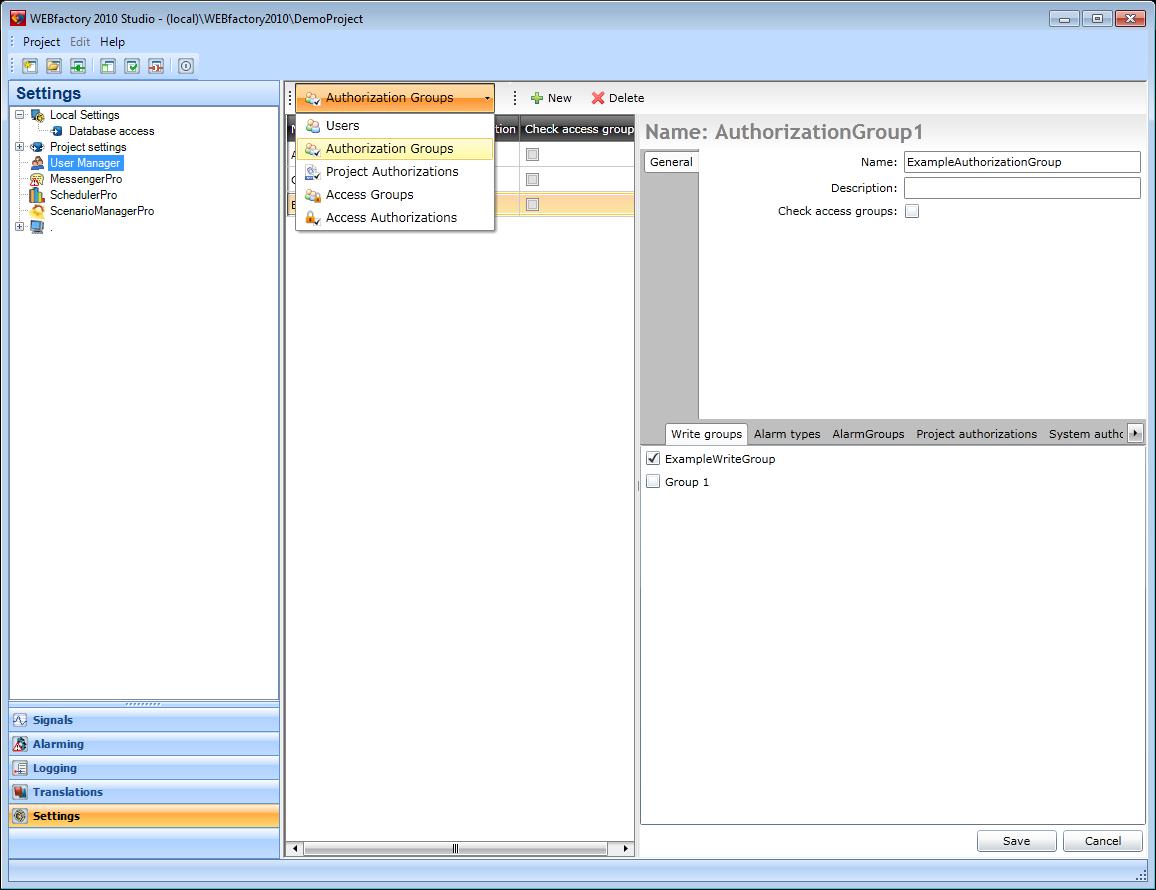
WEBfactory 2010User Manager
Select Authorization Groups from the drop-down menu in the top bar.
Select New (from the right side of the dropdown menu). Enter the name of the new Authorization Group in the General tab from the right panel. In this particular case, the new Authorization Group will be named ExampleAuthorizationGroup.
In the Write Groups tab, select the new ExampleWriteGroup and click Save to save the changes.
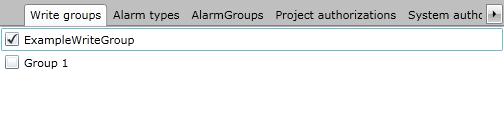
Select the Write Group for the ExampleAuthorizationGroup
Now the ExampleAuthorizationGroup created above has the ExampleWriteGroup marked as active.
Creating a user in User Manager and assigning the user to the Authorization Group
In User Manager, select the Users option from the drop-down menu.
Create a new user by clicking on the New Ewon by HMS Networks User button, on the right side of the drop-down menu.
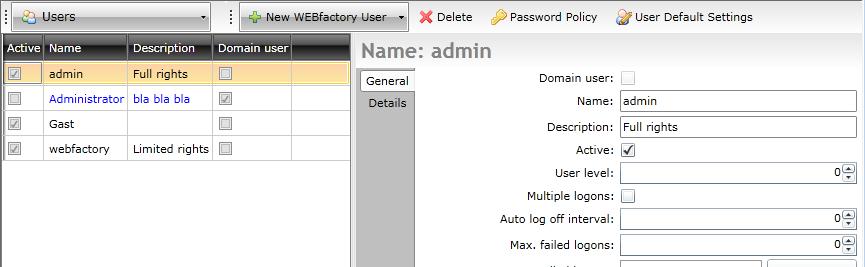
The Users section of the User Manager
The User Manager offers the possibility to use Active Directory Users in Ewon by HMS Networks . In order to use this option, a new ActiveDirectory User must be created by clicking on the arrow next to the New Ewon by HMS Networks User button.
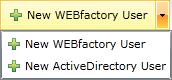
Ewon by HMS NetworksUser and ActiveDirectory User
You have the option to choose between the two types of users.
And ActiveDirectory User in Ewon by HMS Networks is an user that uses the ActiveDirectory credentials for logging in the Ewon by HMS Networks applications.
After creating a new user, the right side panel will display the list of options for the new users. Complete the necessary fields with the required information. For the demonstrative purpose, we will name the new user ExampleUser.
To assign the user to an authorization group, go to Authorization groups section below the user details, in the right side panel.
Select the desired authorization group. In our example, the ExampleAuthorizationGroup.

Assign the user to an Authorization Group
Click on the Save button to save the changes.