WFUserManager Users
Users
This section is dedicated to managing users. The grid displays the list of the existing users.
WEBfactory 2010 can accept logins from two types of users: local users (normal user) and domain users (ActiveDirectory User). The ActiveDirectory Users can log in Ewon by HMS Networks using their Windows Domain credentials, and their properties will be partially shared between Active Directory and Ewon by HMS Networks .

User Manager grid
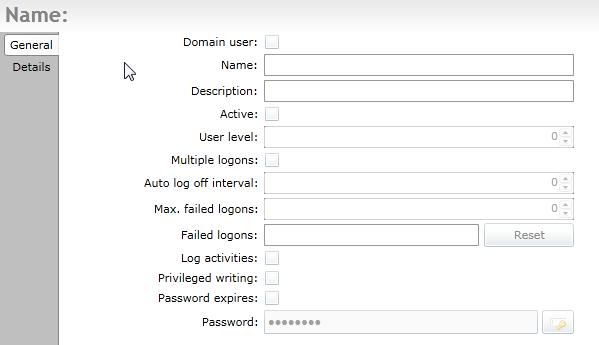
By selecting any of them, the settings panel will display the settings for that users (eg. Name, Description, User Level, etc.).

User settings
Option | Description |
|---|---|
Domain user | Displays the status of the user: local user or Active Directory user. If the user is an Active Directory user, WEBfactory 2010 will allow the Active Directory credentials to be used for logging in Ewon by HMS Networks visualizations. Learn more about the Active Directory Integration here. |
Name | The user name. This user name will be used to log in into any WEBfactory 2010 visualization. |
Description | The custom description of the user. This field can be used to specify particular details about the user. |
Active | Enables the user to take actions in the system. If this option is not checked, the user cannot log in or perform any actions in WEBfactory 2010 visualizations. |
User level | Displays the level of the user. Users can be split in multiple user levels for easier management. |
Multiple logons | If active, the user is able to log on simultaneously in the same WEBfactory 2010 visualization from different locations. |
Auto log off interval | The log off timer for idle users. If the amount of time specified here passes while the user is idle (performs no action while logged in a WEBfactory 2010 visualization), the user will be logged off. When returning from the idle state, the user must log in again. |
Max. failed logons | Specifies the number of failed login attempts that can be made before blocking the user. If the user tries and fails to log in more than the number of times specified here, the system will automatically block him for one minute. After the first minute, the user can try to log in again. If the next attempt fails, the user will be blocked for the next 2 minutes, and so on. For each consecutive failed login attempt, the block time will be increased to a maximum of 30 minutes. If the user performs a successful login, the failed login attempts and the block time will be reset. If the WEBfactory 2010 Server is stopped while a user is blocked, the user will be allowed to attempt to login directly when the Server starts. If the attempt fails, the user will be blocked again and the block time increases from the previous increment. |
Failed logons | Displays the number of failed login attempts that the selected users has. This value can be reset by an Administrator. |
Log activities | If enabled, all the user's login and logout actions are stored as events in the database or sent to the message queue, as follows:
|
Privileged writing | If enabled, it allows the user to take ownership of the write groups configured with restricted access, even if they are currently owned by another user. |
Password expires | If enabled, the user's password will expire after the time period specified in the Max. Password Age option of the Password Policy dialog. |
Password | Sets the password for the selected user. |
Option | Description |
|---|---|
First name | The first name of the user. |
Last name | The last name of the user. |
Company | The company name. |
Plant | The name of the plant or factory. |
Personnel number | The serial number of the employee. |
RFID serial number | The RFID serial number of the employee. |
Maintenance forecast | The number of days to display the maintenance reminder before the maintenance is scheduled. |
If the selected user is assigned to any Authorization Group, the settings panel will display them.

Authorization Groups listed in the details panel for the admin user
You can press the Save button to save the users settings, Cancel to discard any changes or add and delete users:
To add a new user, select the user option (local or Active Directory) from the top bar.
To delete an existing user, mark the check-box corresponding to the desired user and press delete.
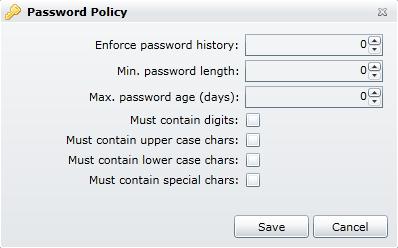
To set the password policy, click on the Password Policy button from the top bar and adjust the settings. The new password policy will be active only for the passwords created from that point on. The existing passwords will not be affected.

Password Policy settings
Option | Description |
|---|---|
Enforce password history | The number of password renewal cycles, during which a password cannot be repeated. |
Min. password length | The minimum number of characters of the password. |
Max. password age (days) | The number of days until the user is forced to change the password. If the Enforce password history is set to an amount of renewal cycles other than 0, the user will not be able to repeat the password until that number of cycles pass. |
Must contain digits | If enabled, the password must contain at least one digit. |
Must contain upper case chars | If enabled, the password must contain at least one upper case character. |
Must contain lower case chars | If enabled, the password must contain at least one lower case character. |
Must contain special chars | If enabled, the password must contain at least one special character. |
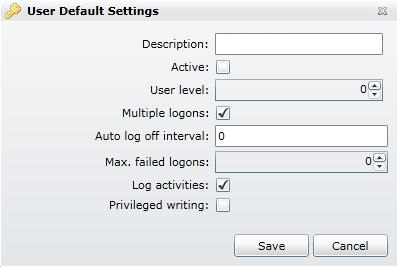
The Users Default Settings options allows the administrator to specify some of the user properties as default for all the new users.

User Default Settings