WEBfactory 2010 Studio Alarming area
The Alarm Manager is an essential part of WEBfactory 2010 Runtime. It links online process values in real time with the stored alarm rules to online alarms.
The Alarming area of Ewon by HMS NetworksStudio provides the user with the tools for managing the Alarm Groups, Alarm Types, Alarm Conditions and Alarms.
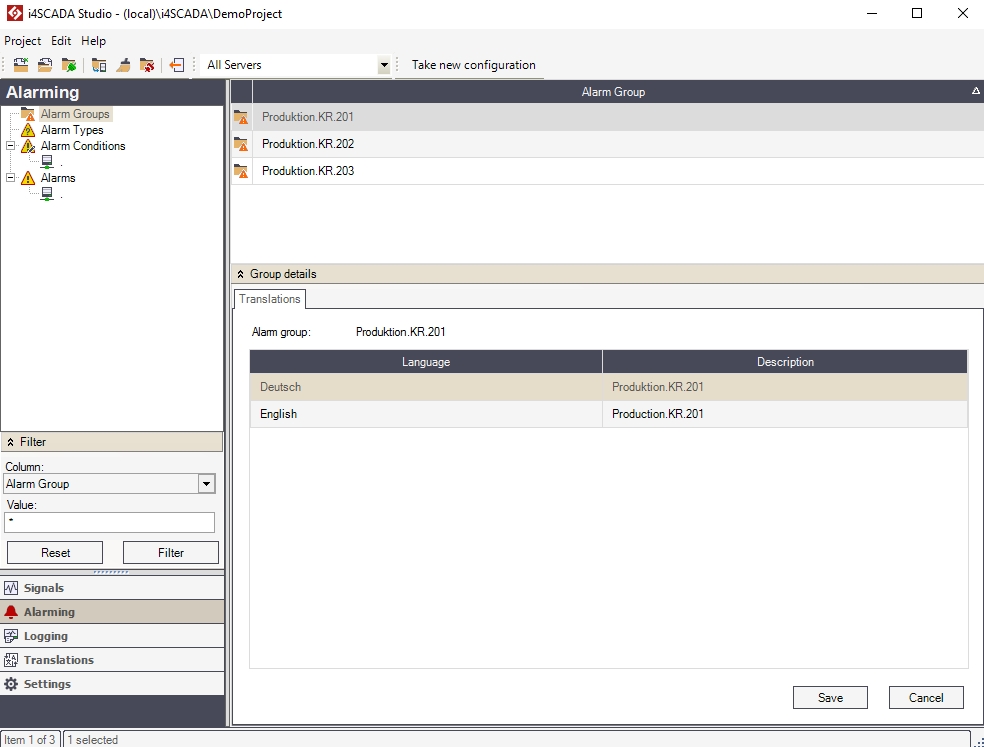
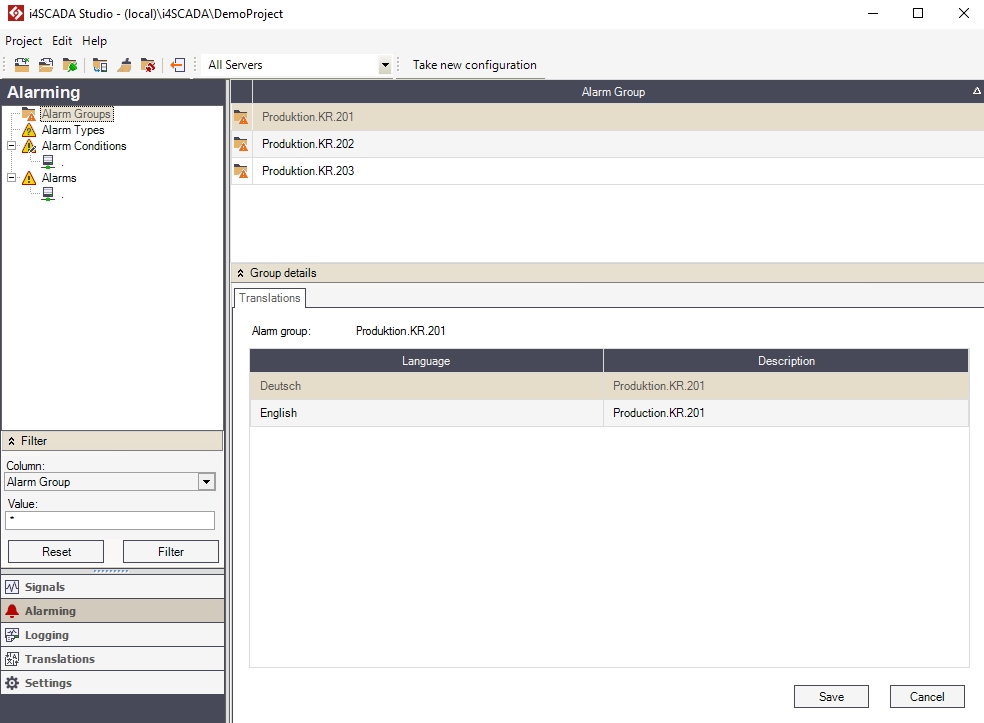
The Alarming area of the WEBfactory 2010 Studio
The Alarming area's functionality is divided in four sections, available for selection using the Alarms tree menu:
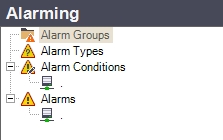
The Alarming tree menu
The Alarm Groups section
The Alarm Groups section displays the list of alarm groups and allows the user to create and set up new alarm groups or edit the existing ones.
The alarm groups help the user to create a logical structure of alarms by grouping them together based on the project's requirements. For example, all the alarms from the devices on the production floor can be grouped in the ProductionFloor alarm group.
The alarm groups can be edited in the main panel or in the Group Details panel.
The Alarm Groups section
The main panel displays the available alarm groups in a grid form, having a single column:
UI Option | Description |
|---|---|
Alarm Group | The name of the existing alarm groups. |
Important
Alarm Group Naming Convention and Translations
Using the period sign (.) in the Alarm Group name makes the name to be interpreted as a hierarchical structure. The period (.) is interpreted by Studio as separator in the hierarchical structure of the name. Taking the example names from the Demo Project, the naming convention would be represented like this:
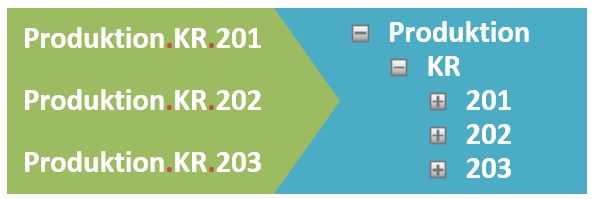
StudioHierarchical interpretation of period-separated names in
It is extremely important to keep the same naming structure in the Alarm Groups translation texts! If the Alarm Group translation text does not contain the same amount of periods (.) as the Alarm Group symbolic text name to which it corresponds, the translated name will not be visible at run-time! The translation of Alarm Group names would be represented like this:

Keeping the same hierarchical structure in translation texts
The Group Details panel is expanded by default when selecting the Alarm Groups section in the Alarming tree menu. It provides quick access to the selected alarm group translations in all the languages available in Ewon by HMS NetworksStudio. The user has the ability to edit the translation of the alarm group name for each language.
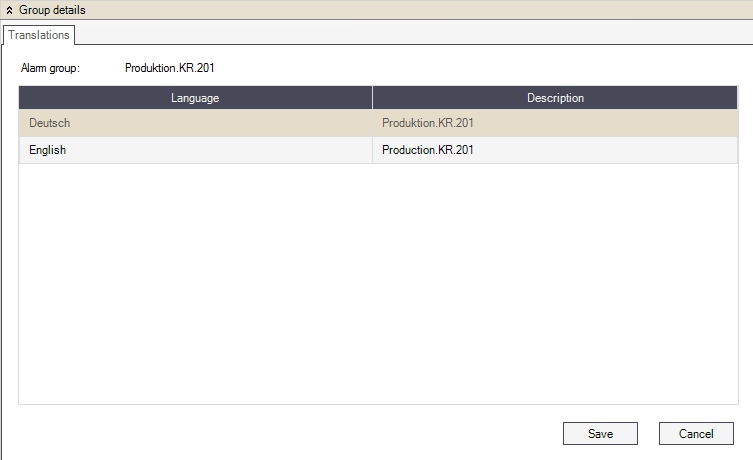
The Group details panel
The changes will be saved upon pressing the Save button.
Right-clicking on the Alarm Groups item in the Alarms tree menu will open the contextual menu. The Alarm Groups contextual menu provides a single option for creating new alarm groups.
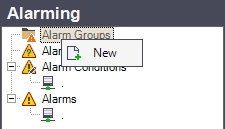
Alarm Groups contextual menu in the tree menu
UI Option | Description |
|---|---|
New | Creates new alarm group. |
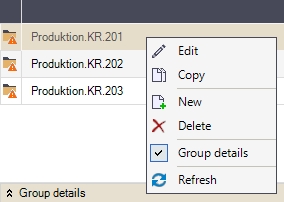
Right-clicking on an alarm group listed in the main panel will open the contextual menu, providing the user with the options to edit the column in which the contextual menu is opened, copy, add or delete alarm groups, expand or collapse the Group Details panel and refresh the alarm groups list.
Listed Alarm group contextual menu
UI Option | Description |
|---|---|
Edit | Edits the cell in which the contextual menu has been opened (where the user right-clicked). |
Copy | Copies the selected alarm group for the desired amount of times. 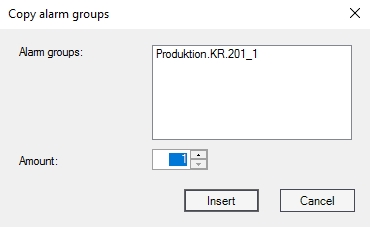 |
New | Creates new alarm group. |
Delete | Deletes the selected group. |
Group Details | Expands / collapses the Group Details panel. |
Refresh | Reloads the list of alarm groups. |
The Alarm Types section
The Alarm Types section displays the list of alarm types and allows the user to create and set up new alarm types or edit the existing ones.
The alarm types help the user to group together same types of alarms and separate them from other types of alarms. For example, all the Warning alarms can be grouped under the Warning alarm type, and Error alarms can be grouped under the Error alarm type.
The user also has the option to enable or disable Automatic Alarm Acknowledgment for an alarm type.
The alarm types can be edited in the main panel or in the Type Details panel.
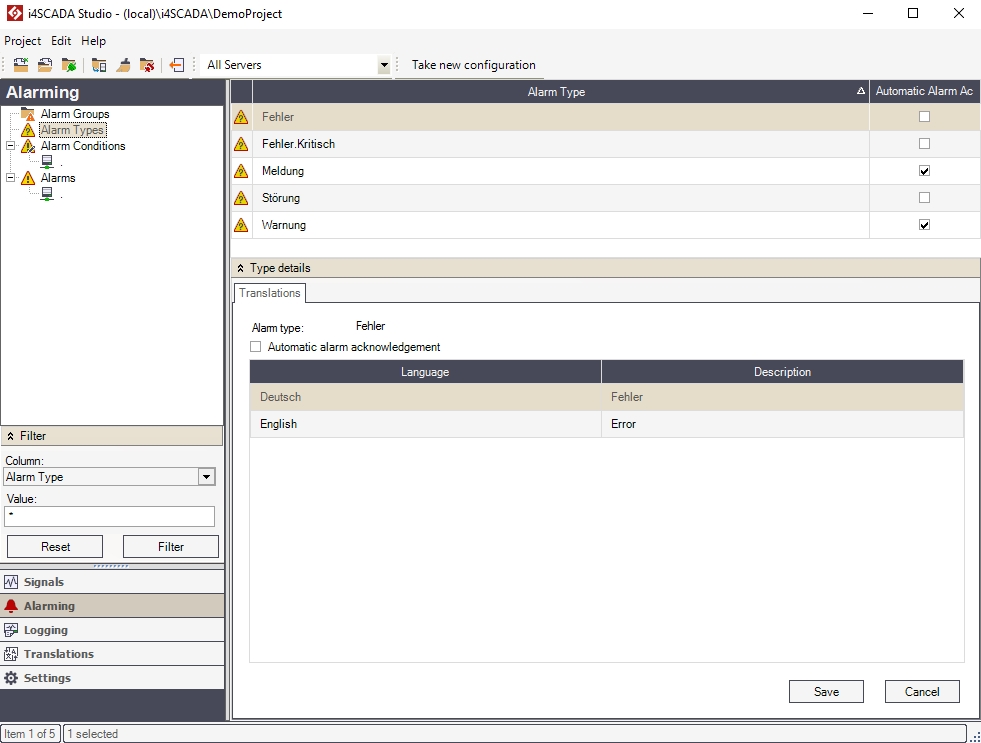
The Alarm Types section
The main panel displays the available alarm types in a grid form, having the following columns:
UI Option | Description |
|---|---|
Alarm Type | The name of the existing alarm types. |
Automatic Alarm Acknowledgment | If enabled, when an alarm occurs, it is automatically acknowledged and displayed as acknowledged in the visualization. |
Important
Alarm Types Naming Convention and Translations
Using the period sign (.) in the Alarm Types name makes the name to be interpreted as a hierarchical structure. The period (.) is interpreted by Studio as separator in the hierarchical structure of the name. Taking the example names from the Demo Project, the naming convention would be represented like this:

StudioHierarchical interpretation of period-separated names in
It is extremely important to keep the same naming structure in the Alarm Types translation texts! If the Alarm Type translation text does not contain the same amount of periods (.) as the Alarm Type symbolic text name to which it corresponds, the translated name will not be visible at run-time! The translation of Alarm Types names would be represented like this:

Keeping the same hierarchical structure in translation texts
The Type Details panel is expanded by default when selecting the Alarm Types section in the Alarming tree menu. It provides quick access to the selected alarm types translations in all the languages available in Ewon by HMS NetworksStudio. The user has the ability to edit the translation of the alarm group name for each language.
The user also has the option to enable or disable Automatic Alarm Acknowledgment for an alarm type.
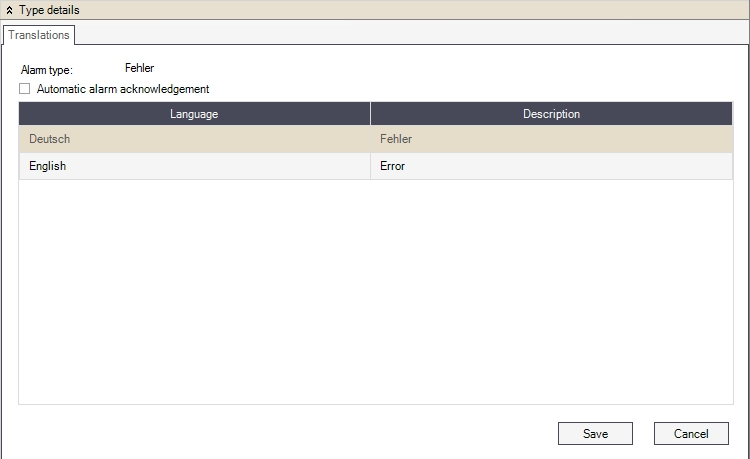
Type Details panel
The changes will be saved upon pressing the Save button.
Right-clicking on the Alarm Types item in the Alarms tree menu will open the contextual menu. The Alarm Types contextual menu provides a single option for creating new alarm types.
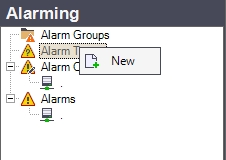
Alarm Types contextual menu in the tree menu
UI Option | Description |
|---|---|
New | Creates new alarm type |
Right-clicking on an alarm type listed in the main panel will open the contextual menu, providing the user with the options to edit the column in which the contextual menu is opened, copy, add or delete alarm types, expand or collapse the Type Details panel and refresh the alarm types list.

Alarm Type contextual menui in the list view
UI Option | Description |
|---|---|
Edit | Edits the cell in which the contextual menu has been opened (where the user right-clicked). |
Copy | Copies the selected alarm type for the desired amount of times. 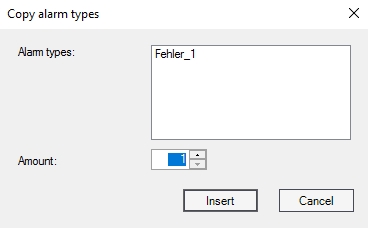 |
New | Creates new alarm type. |
Delete | Deletes the selected alarm type. |
Type Details | Expands/collapses the Type Details panel. |
Refresh | Reloads the list of alarm types. |
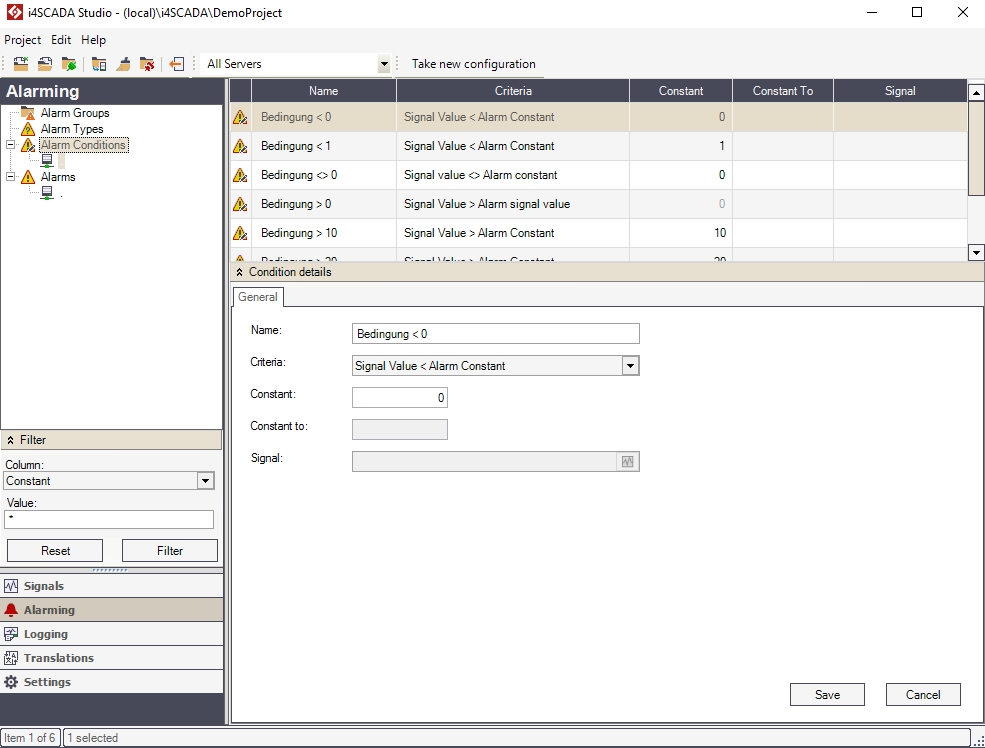
The Alarm Conditions section
The Alarm Conditions section displays the list of alarm conditions and allows the user to create and set up new alarm conditions or edit the existing ones. An alarm conditions allow the user to define a the logic for triggering an alarm. The conditions can be based on constants, ranges or other signal values. The alarm conditions can be edited in the main panel or in the Condition Details panel.
The Alarm Conditions sections
The main view displays the available alarm conditions in a grid form, having the following columns:
UI Option | Description |
|---|---|
Name | The name of the condition. |
Criteria | The condition for triggering the alarm:
|
Constant | The Alarm Constant used in the different criteria. |
Constant to | The second constant used to define a range, along with Constant. |
Signal | The Alarm Signal Value used in the different criteria. |
Right-clicking on the Alarm Conditions item in the Alarming tree menu will open the contextual menu. The Alarm Conditions contextual menu provides a single option for creating new alarm conditions.
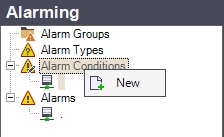
Alarm Conditions contextual menu in the tree menu
UI Option | Description |
|---|---|
New | Creates a new alarm condition. |
Right-clicking on an alarm condition listed in the main panel will open the contextual menu, providing the user with the options to edit the column in which the contextual menu is opened, copy, add or delete alarm conditions, expand or collapse the Condition Details panel and refresh the alarm conditions list.
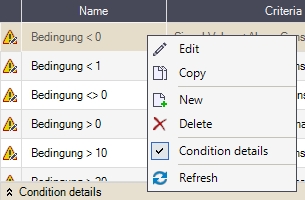
Condition contextual menu in the list view
UI Option | Description |
|---|---|
Edit | Edits the cell in which the contextual menu has been opened (where the user right-clicked). |
Copy | Copies the selected alarm condition for the desired amount of times. 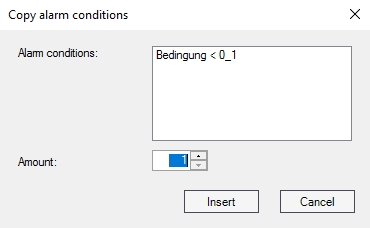 |
New | Creates new alarm condition. |
Delete | Deletes the selected alarm condition. |
Condition Details | Expands / collapses the Condition Details panel. |
Refresh | Reloads the list of alarm conditions. |
The Condition Details panel is expanded by default when selecting the Alarm Conditions section in the Alarming tree menu. It provides quick access to the selected alarm condition settings. This panel provides the same functionality as the main panel.
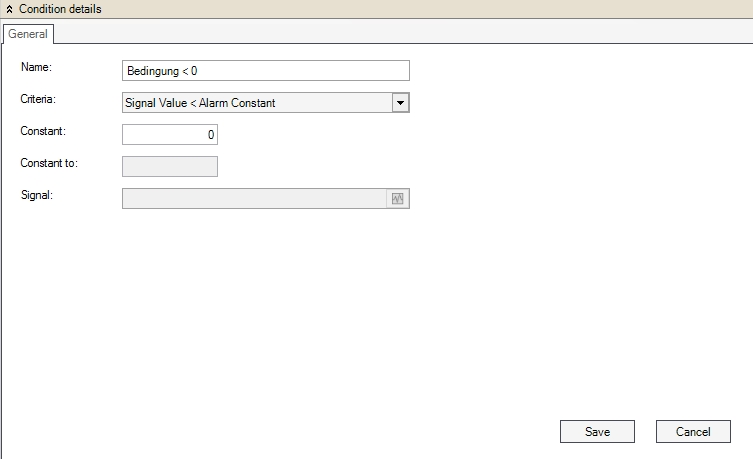
Condition details panel
UI Option | Description |
|---|---|
Name | The name of the condition. |
Criteria | The condition for triggering the alarm:
|
Constant | The Alarm Constant used in the different criteria. |
Constant to | The second constant used to define a range, along with Constant. |
Signal | The Alarm Signal Value used in the different criteria. |
The Alarms section
The Alarms section displays the list of alarms and allows the user to create and set up new alarms or edit the existing ones. The alarms are defined by a signal that is monitored and a condition that triggers the alarm. In the main panel, all the alarms details are available and can be edited. The alarms can be edited in the main panel or in the Alarm Details panel.
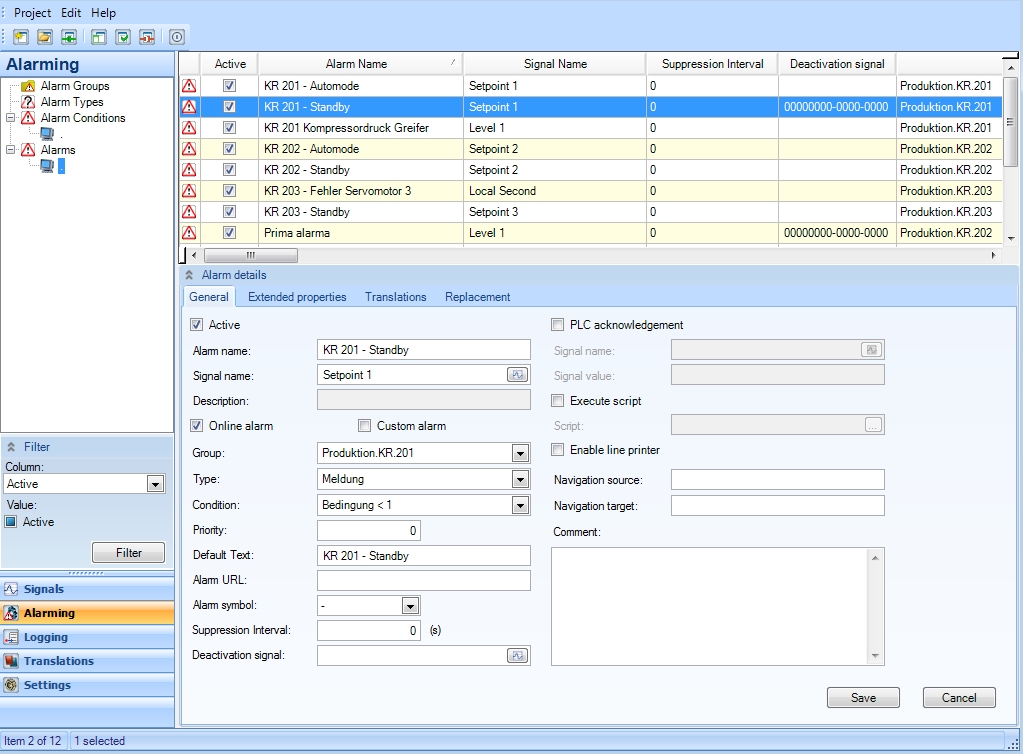
The Alarms section
The main panel displays the available alarm groups in a grid form, having the following columns:
UI Option | Description |
|---|---|
Active | When enabled, the alarm is taken into account by the WEBfactory server when the server is started. |
Alarm Name | The name of the alarm. |
Signal Name | The signal that triggers the alarm based on the established conditions. |
Suppression Interval | The amount of time, expressed in seconds, between the moment when the alarm is triggered and the moment the alarm message is displayed. |
Deactivation Signal | The signal which will act like a deactivation switch for all the alarms generated by this alarm definition. |
Group | The alarm group to which the alarm belongs, defined in Alarm Groups. |
Type | The type of alarm, defined in Alarm Types. |
Condition | The condition that triggers the alarm, defined in Alarm Conditions. |
Priority | The alarm priority. The priority is expressed by an integer value and can be used as a filter in the alarm visualization. |
PLC On | Shows if the PLC Acknowledgment is active. This means that when the alarm is acknowledged, the PLC is notified that the alarm has been acknowledged by writing a certain value on a predefined PLC signal. This PLC signal is mandatory for using PLC Acknowledgment. The PLC Acknowledgment setting can be edited in the Alarm Details panel by checking/unchecking the PLC Acknowledgment checkbox. |
PLC Signal | Shows the signal name of the PLC signal used for PLC Acknowledgment. This signal will be written with the predefined value when the alarm is acknowledged. This PLC signal can be set in the Alarm Details panel by selecting the required signal in the Signal name option, under PLC Acknowledgment. The PLC signal is mandatory for using PLC Acknowledgment. |
Description | The alarm description. |
PLC New Value | The value written to the PLC Signal when the alarm is acknowledged. This value notifies the PLC that the alarm has been acknowledged. This value can be modified in the Alarm details panel, in the Signal value property under PLC Acknowledgment. |
URL | The alarm URL. This URL can be used to pass extended information (like documentation, troubleshooting guides, etc) when the alarm message is displayed. |
Online Alarm | If enabled, the alarm is displayed and monitored in the visualization's online alarm control. When triggered, the alarm message will be displayed. If disabled, the alarm will not generate an alarm message in the visualization's online alarm control when triggered. |
Custom Alarm | If enabled, marks the alarm as a custom alarm. Custom alarms are useful when logging messages from third part/custom modules as WEBfactory alarms. |
Execute Script | If enabled, a provided script is executed when the alarm is triggered. This option allows the user to greatly extend the alarms functionality. |
Script Path | The path to the script that gets executed when the alarm is triggered, if the Execute Script option is enabled. |
Enable Line Printer | If enabled, the line printer will output the alarm message. |
Replace On | If enabled, the values of the replacement signals (set in the in the Replacement tab of the Alarm Details panel) can be used in the alarm message. This is done by passing a placeholder for the desired signal inside the alarm's default text. For example: ##X##, where X is the number of the replacement signal (1 to 20). At run time, the placeholder is replaced with the value that the specified signal had at the time of the event occurrence. |
Default Text | The default alarm text which is displayed in the alarm monitoring controls when no translation is available for the alarm text. The replacement signals placeholders can be used here. |
Alarm Symbol | The alarm symbol used in Operation Diary. The options are None, 1, 2, 3 or 4. Each of the four numbers corresponds to an Operation Diary symbol. |
Navigation Source | The name of the page to be displayed in the navigation target when the alarm is clicked in the visualization. |
Navigation Target | The control where the visualization page will be displayed in the visualization. |
Cause | The reason why the alarm has been triggered. |
Effect | The possible effect of the alarm. |
Repair | The possible strategies for rectification. |
Comment | Custom comment, used for providing additional information about the alarm. |
Replace Signal 1 to 20 | The replacement signals used when the Replace On option is enabled. Each signal can be referenced using the ##X## placeholder, where X represents the number of the replacement signal. Note that at run time, the placeholder will be replaced with the signal value (at the time of the event occurrence), not the signal name. |
Right-clicking on the Alarms item in the Alarms tree menu will open the contextual menu. The Alarms contextual menu provides a single option for creating new alarms.
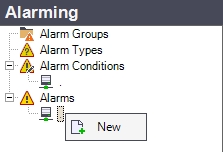
Alarms contextual menu in the tree menu
UI Option | Description |
|---|---|
New | Creates a new alarm |
Right-clicking on an alarm listed in the main panel will open the contextual menu, providing the user with the options to edit the column in which the contextual menu is opened, copy, add or delete alarm groups, export and import alarms, expand or collapse the Alarm Details panel and refresh the alarms list.
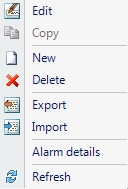
The Alarms contextual menu
UI Option | Description |
|---|---|
Edit | Edits the cell in which the contextual menu has been opened (where the user right-clicked). |
Copy | Copies the selected alarms for the desired amount of times. |
New | Creates new alarm. |
Delete | Deletes the selected alarm. |
Alarm Details | Expands / collapses the Alarm Details panel. |
Refresh | Reloads the list of alarms. |
The Alarm Details panel is expanded by default when selecting the Alarms section in the Alarming tree menu. It provides quick access to the selected alarm general properties, extended properties, translations and replacement signals.
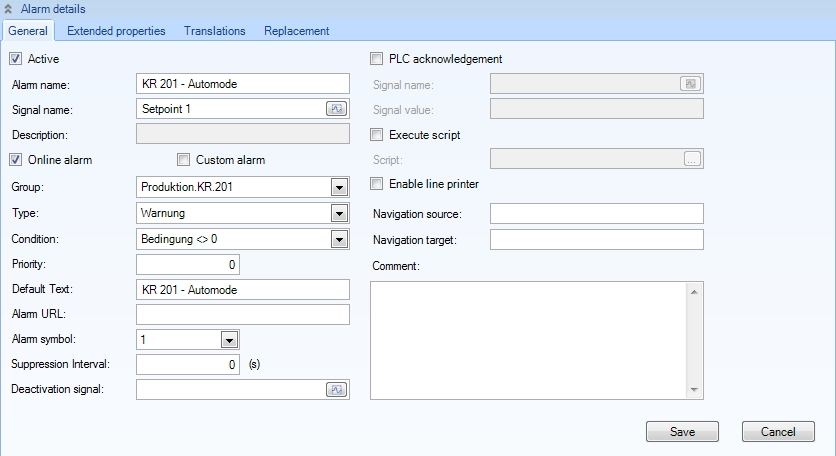
Alarm Details panel
The Alarm details panel
The Alarm Details panel, located at the bottom of the main view of the Alarms section, displays the complete set of alarm properties. The same properties are available in the alarms grid.
The Alarms Details panel is split in four tabs:
General, containing the general alarm properties;
Extended properties, containing extended properties attributes;
Translations, containing the multilingual versions of the Description, Cause, Effect and Repair fields;
Replacement, containing the list of replacement signals.
Alarm Details panel
Note
Any change applied in the Alarm Details panel is applied only when the Save button is pressed.
General tab
The General tab contains the general alarm properties. These properties can be found also in the signals grid.
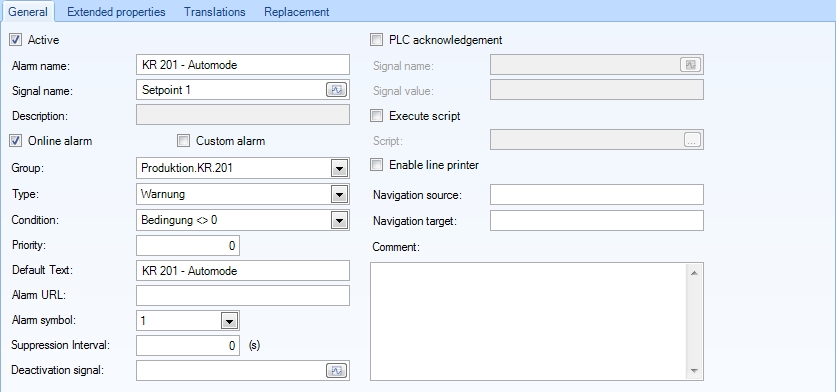
The General tab of the Alarm Details panel
UI Option | Description |
|---|---|
Active | When enabled, the alarm is taken into account by the WEBfactory server when the server is started. |
Alarm Name | The name of the alarm. |
Signal Name | The signal that triggers the alarm based on the established conditions. |
Description | The alarm description. |
Online Alarm | If enabled, the alarm is displayed and monitored in the visualization's online alarm control. When triggered, the alarm message will be displayed. If disabled, the alarm will not generate an alarm message in the visualization's online alarm control when triggered. |
Custom Alarm | If enabled, marks the alarm as a custom alarm. Custom alarms are useful when logging messages from third part/custom modules as WEBfactory alarms. |
Group | The alarm group to which the alarm belongs, defined in Alarm Groups. |
Type | The type of alarm, defined in Alarm Types. |
Condition | The condition that triggers the alarm, defined in Alarm Conditions. |
Priority | The alarm priority. The priority is expressed by an integer value and can be used as a filter in the alarm visualization. |
Default Text | The default alarm text which is displayed in the alarm monitoring controls when no translation is available for the alarm text (description). |
Alarm URL | This URL can be used to pass extended information (like documentation, troubleshooting guides, etc) when the alarm message is displayed. |
Alarm Symbol | The alarm symbol used in Operation Diary. The options are None, 1, 2, 3 or 4. Each of the four numbers corresponds to an Operation Diary symbol. |
Suppression Interval | The amount of time, expressed in seconds, between the moment when the alarm is triggered and the moment the alarm message is displayed. |
Deactivation Signal | Allows the user to select a signal which will act like a deactivation switch for all the alarms generated by this alarm definition. This is useful when the configuration is in progress and you don't want to trigger the alarms. The alarms based on the current alarm definition are deactivated when value 1 is written to this signal and activated back when value 0 is written to this signal. |
PLC Acknowledgement | When enabled, the PLC acknowledgment is active. This means that when the alarm is acknowledged, the PLC is notified that the alarm has been acknowledged by writing a certain value on a predefined signal. |
Signal Name | The signal name of the PLC signal used for PLC acknowledgment. This signal will be written with the predefined value when the alarm is acknowledged. |
Signal Value | The value written to the PLC Signal when the alarm is acknowledged. This value notifies the PLC that the alarm has been acknowledged. |
Execute Script | If enabled, a provided script is executed when the alarm is triggered. This option allows the user to greatly extend the alarms functionality. |
Script | The script that gets executed when the alarm is triggered, if the Execute Script option is enabled. |
Enable Line Printer | If enabled, the line printer will output the alarm message. |
Navigation Source | The name of the page to be displayed in the navigation target when the alarm is clicked in the visualization. |
Navigation Target | The control where the visualization page will be displayed in the visualization. |
Comment | Custom comment, used for providing additional information about the alarm. |
Extended Properties tab
The Extended Properties tab list the available extended alarm properties and allows the user to store data in the available extended properties. The data stored in one extended property must match the data type of the property.
Note that the Extended Properties tab does not provide a way of adding/deleting extended properties; this can be achieved using the Project Settings > Extended Alarm Properties section of the Settings area of Ewon by HMS NetworksStudio.
Click here to learn more about Extended Properties
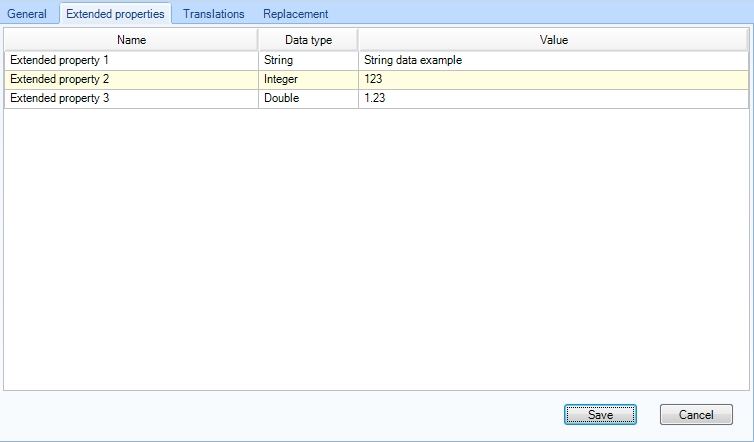
The Extended Properties tab of the Alarm Details panel
UI Option | Description |
|---|---|
Name | The name of the extended alarm property. |
Data type | The data type of the data to be stored in the property. |
Value | The data to be stored in the property. |
Translations tab
The Translations tab provides the option to add multilingual texts for the Description, Cause, Effect and Repair properties of the alarm. The user has the ability to chose an existing translation text (symbolic text) or input a custom one for each available language.
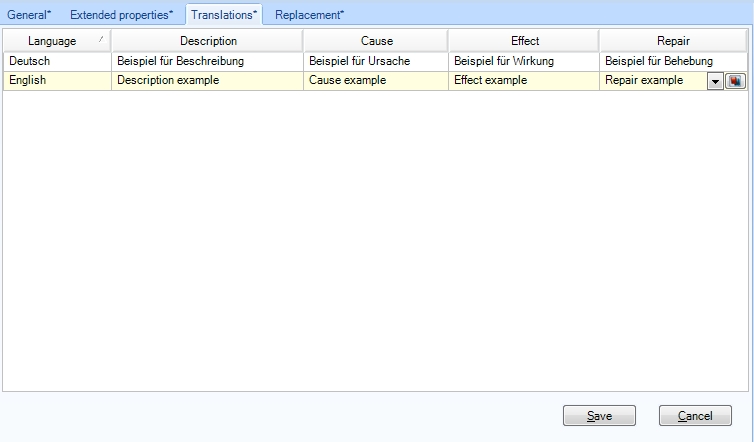
The Translations tab of the Alarm Details panel
UI Option | Description |
|---|---|
Language | The language available in Ewon by HMS NetworksStudio |
Description | The alarm description text. |
Cause | The alarm cause text. |
Effect | The alarm effect text. |
Repair | The alarm repair suggestions text. |
Replacement tab
The Replacement tab allows the user to enable Replacement and select signals to be replaced when using the specific placeholders in the alarm's message. For example, the ##1## placeholder would be replaced by the signal assigned to the Signal 1 property.
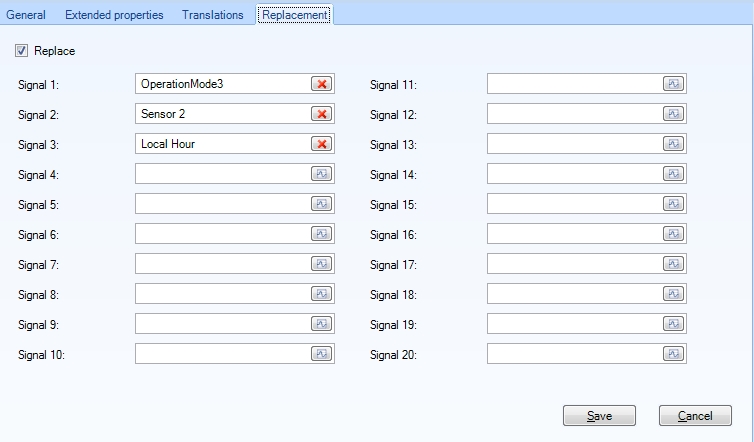
The Replacement tab of the Alarm Details panel
UI Option | Description |
|---|---|
Replace | If enabled, the set of signals set up as replacement signals (in the Replacement tab of the Alarm Details panel) can be used in the alarm message by passing a placeholder for the desired signal. For example: ##X##, where X is the number of the replacement signal (1 to 20). |
Signal 1 to 20 | The replacement signals used when the Replace On option is enabled. Each signal can be referenced using the ##X## syntax, where X represents the number of the replacement signal. |