Custom Connector Development
Check out these articles and learn how to build, test and implement the Custom Connector using the WEBfactory 2010 Server SDK.
Building a Custom Connector using the Ewon by HMS Networks SDK
Check out this article and learn how to build a WEBfactory 2010 Custom Connector using the Server SDK.
Within this section we will create a custom Ewon by HMS Networks Custom Connector. The code samples are meant to help you understand the steps required to create a complete Custom Connector.
Creating a new project
Open Visual Studio and create a new empty project by choosing File > New Project... from the main menu or by pressing SHIFT+CTRL+N.
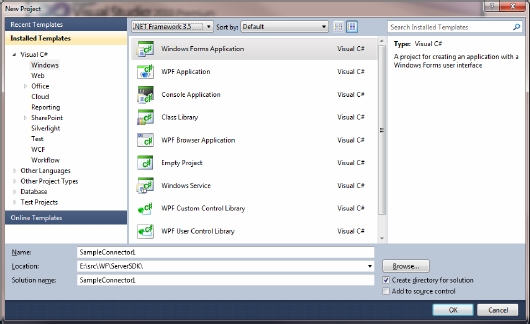
New Project dialog
Select Windows Forms Application as the project type and name it SampleConnector1.
In this first sample we will build a custom connector inside a Windows Form Application, because it is easy to create this project for the first steps. For production we recommend to create a Windows Service to implement a custom connector. There are many advantages in creating Windows Services:
A Windows Service cannot be started twice [no multiple instances]
A Windows Service can be started without any user logged in into Windows console
Adding a Reference to WEBfactory 2010 Server SDK
Since we are going to use the WEBfactory 2010 Server SDK, we need define a reference to the library. Inside Solution Explorer, select References and open the contextual menu with a right mouse click.
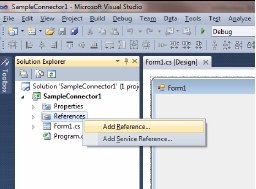
Add Reference
Choose Add Reference... and a Windows File Open Dialog appears. Please choose ServerSDK.dll file from the lib folder of the Ewon by HMS Networks Server SDK installation folder or from the WEBfactory 2010 installation disk (SDKs\WEBfactory 2010 Server SDK).
After it successfully added the reference, the Solution Explorer should look like this:
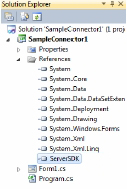
View References
Adding External Dependencies
After we added the reference to Ewon by HMS Networks Server SDK, we need to include two files that are external dependencies of the Ewon by HMS Networks Server SDK: hasp_com_windows.dll and hasp_windows_demo.dll. Select the project inside the Solution Explorer and open contextual menu with a right mouse click.
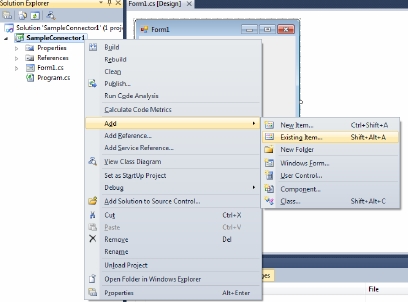
Add existing item
A Windows File Open Dialog appears. Please choose the hasp_com_windows.dll and hasp_windows_demo.dll files from the lib folder of the Ewon by HMS Networks Server SDK installation folder or from the WEBfactory 2010 installation disk (SDKs\WEBfactory 2010 Server SDK).

Choose files
These files will be added to the Solution Explorer afterward. Please select both files and select Copy if newer at the Copy to Output Directory from the Properties window.
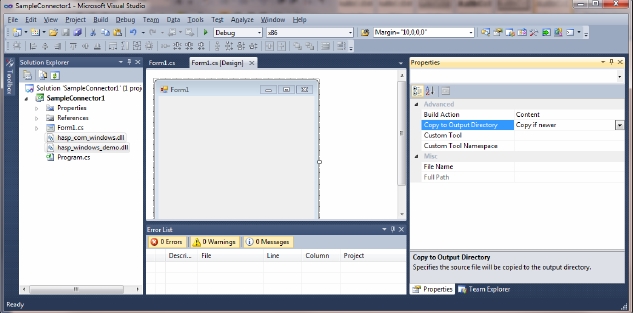
Select "Copy if newer"
This makes sure that both files are copied to the output directory after a build operation.
Adding an App.Config file
In Solution Explorer, right click SampleConnector1 project and choose Add > New Item. Select the Application Configuration File from the Visual C# Items and name it App.config. Click Add to complete the action.
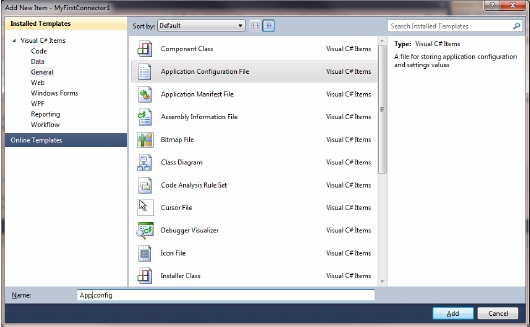
Add an "Application Configuration File"
Open the File App.config from Solution Explorer with a double click. Change its contents to:
<?xml version="1.0" encoding="utf-8" ?>
<configuration>
	<startup useLegacyV2RuntimeActivationPolicy="true">
		<supportedRuntime version="v4.0"/>
	</startup>
</configuration>
Adding and Creating WFServerConnector Instance
Now the project is prepared so we can start coding. All Ewon by HMS Networks Server SDK operations are done by accessing a WFServerConnector instance. Therefore we will add one to our main form called Form1.
NOTE
In the following code samples, the highlighted code represents the new additions.
Open the code view of Form1.cs. This can be done by pressing F7 or selecting View > Code from the main menu.
First add a using statement to the file in order to access the SDK within the file:
using System;
using System.Collections.Generic;
using System.ComponentModel;
using System.Data;
using System.Drawing;
using System.Linq;
using System.Text;
using System.Windows.Forms;
using ServerSDK.Connectors.ServerConnector;
using ServerSDK.Helper;
Add an instance to Form1 class:
namespace SampleConnector1
{
	public partial class Form1 : Form
	{
		WFServerConnector wfsc;
		public Form1()
		{
			InitializeComponent();
		}
	}
}
Now we can create this instance inside the constructor of Form1:
public partial class Form1 : Form
{
	WFServerConnector wfsc;
	public Form1()
	{
		InitializeComponent();
		wfsc = new WFServerConnector("SampleConnector1");
	}
}
In our sample, the name of the Custom Connector is the same like the name of our Windows Application.
If there is a message box that displays the text “Unable to read registry", restart Visual Studio as administrator. Make sure that the user context of our application is allowed to read and write keys from [HKEY_LOCAL_MACHINE].
Creating a Signal
After the WFServerConnector instance was created, we can create signals inside our custom connector. For this, will use the CreateSignal() method of the WFServerConnector:
public Form1()
{
	InitializeComponent();
	wfsc = new WFServerConnector("SampleConnector1");

	int result;
	int returnValue = wfsc.CreateSignal("IOBuffer1", out result);
	if (returnValue != 0)
	{
		MessageBox.Show("CreateSignal returned: " + WFErrorCodes.ToErrorString(returnValue));
		return;
	}
}
This code creates a signal called IOBuffer1. If the CreateSignal method returns an error (the return value of the CreateSignal is not equal to zero), we show a message box with the error and leave the current method.
Updating a Signal
The initial value of IOBuffer1 should be 7 and should be set every time our application starts. To set the value of a signal, we will use the UpdateSignal() method of the WFServerConnector, and we will display any unwanted errors.
public Form1()
{
	InitializeComponent();
	wfsc = new WFServerConnector("SampleConnector1");

	int result;
	int returnValue = wfsc.CreateSignal("IOBuffer1", out result);
	if (returnValue != 0)
	{
		MessageBox.Show("CreateSignal returned: " + WFErrorCodes.ToErrorString(returnValue));
		return;
	}

	returnValue = wfsc.UpdateSignal("IOBuffer1", 7, out result);
	if (returnValue != 0)
	{
		MessageBox.Show("UpdateSignal returned: " + WFErrorCodes.ToErrorString(returnValue));
		return;
	}
}
Working with Write Requests
For some signals, the user should be able to change their value. If the user tries to change a value of the signal, the request is forwarded to the Ewon by HMS Networks Server which checks for security and ranges that were defined inside Ewon by HMS NetworksStudio. After Ewon by HMS Networks Server allows the write access, it forwards the write operation to the concerning connector.
The connector gets the write request by an event called WriteAsyncRequest. It can allow or deny the request by calling the method WriteAsyncRequestResult. To handle write requests correctly we need to do two steps:
Handle the
WriteAsyncRequestevent;Call the
WriteAsyncRequestResultmethod to set the result of the write access.
Handle the WriteAsyncRequest event
After creating the WFServerConnector instance, we need to register the
WriteAsyncRequestevent using a method that will be invoked when the event is fired. Please add the following code right after creating the new connector:public Form1() { InitializeComponent(); wfsc = new WFServerConnector("SampleConnector1"); wfsc.WriteAsyncRequest += new WFWriteAsyncRequestEventHandler(wfsc_WriteAsyncRequest); int result; int returnValue = wfsc.CreateSignal("IOBuffer1", out result); if (returnValue != 0) { MessageBox.Show("CreateSignal returned: " + WFErrorCodes.ToErrorString(returnValue)); return; } returnValue = wfsc.UpdateSignal("IOBuffer1", 7, out result); if (returnValue != 0) { MessageBox.Show("UpdateSignal returned: " + WFErrorCodes.ToErrorString(returnValue)); return; } }wfsc_WriteAsyncRequestis the method that is invoked when the event is fired. Now implement the methodwfsc_WriteAsyncRequest:public Form1() { InitializeComponent(); wfsc = new WFServerConnector("SampleConnector1"); wfsc.WriteAsyncRequest += new WFWriteAsyncRequestEventHandler(wfsc_WriteAsyncRequest); int result; int returnValue = wfsc.CreateSignal("IOBuffer1", out result); if (returnValue != 0) { MessageBox.Show("CreateSignal returned: " + WFErrorCodes.ToErrorString(returnValue)); return; } returnValue = wfsc.UpdateSignal("IOBuffer1", 7, out result); if (returnValue != 0) { MessageBox.Show("UpdateSignal returned: " + WFErrorCodes.ToErrorString(returnValue)); return; } } void wfsc_WriteAsyncRequest(string[] signalNames, object[] signalValues, string asyncID) { if (InvokeRequired) { Invoke(new WFWriteAsyncRequestEventHandler(wfsc_WriteAsyncRequest), new object[] {signalNames, signalValues, asyncID}); } }These lines are necessary to synchronize the Threads between Ewon by HMS Networks Server SDK and our custom connector. It just checks whether the actual thread context is the main thread context. If not [that means
InvokeRequired] then it re-invokes the method in the context of the main thread. This is a necessary not to mix up the different threads.
Call the WriteAsyncRequestResult method
After we synchronized the thread context we are able to allow or deny the write operation:
void wfsc_WriteAsyncRequest(string[] signalNames, object[] signalValues, string asyncID)
{
	if (InvokeRequired)
	{
		Invoke(new WFWriteAsyncRequestEventHandler(wfsc_WriteAsyncRequest), new subject[] {signalNames, signalValues, asyncID});
	}
	else
	{
		int[] results = new int[1]{0};
		if (signalValues[0].ToString() == "11")
		{
			results[0] = -10000;
		}
		else
		{
			int updateResult;
			wfsc.UpdateSignal("IOBuffer1", signalValues[0], out updateResult);
		}
		wfsc.WriteAsyncRequestResult(asyncID, results);
	}
}
The code above checks whether the input is 11. In case of eleven it does not allow the write operation. This is done by setting any other value than 0 as result to WriteAsynchRequestResult. If the value is not 11 then the result is 0 [write access allowed] and the new value is updated with UpdateSignal method.
Of course, the check that is done here is only to show an easy example. More complex operations like accessing a database or a device connected by a serial port could be implemented inside this code.
Releasing the signal
When closing the connector, we need to make sure that the signal we have created is released, to avoid any errors when returning to the connector. Do do this, we need to create an event handler for the FormClosing event of Form1.
In the Solution Explorer, right-click on the Form1.cs and select Properties to open the properties panel.
Double click the Form1.cs in the Solution Explorer to open the Form1.cs in design mode (Form1.cs [Design]). Click on the Form1 to select it.
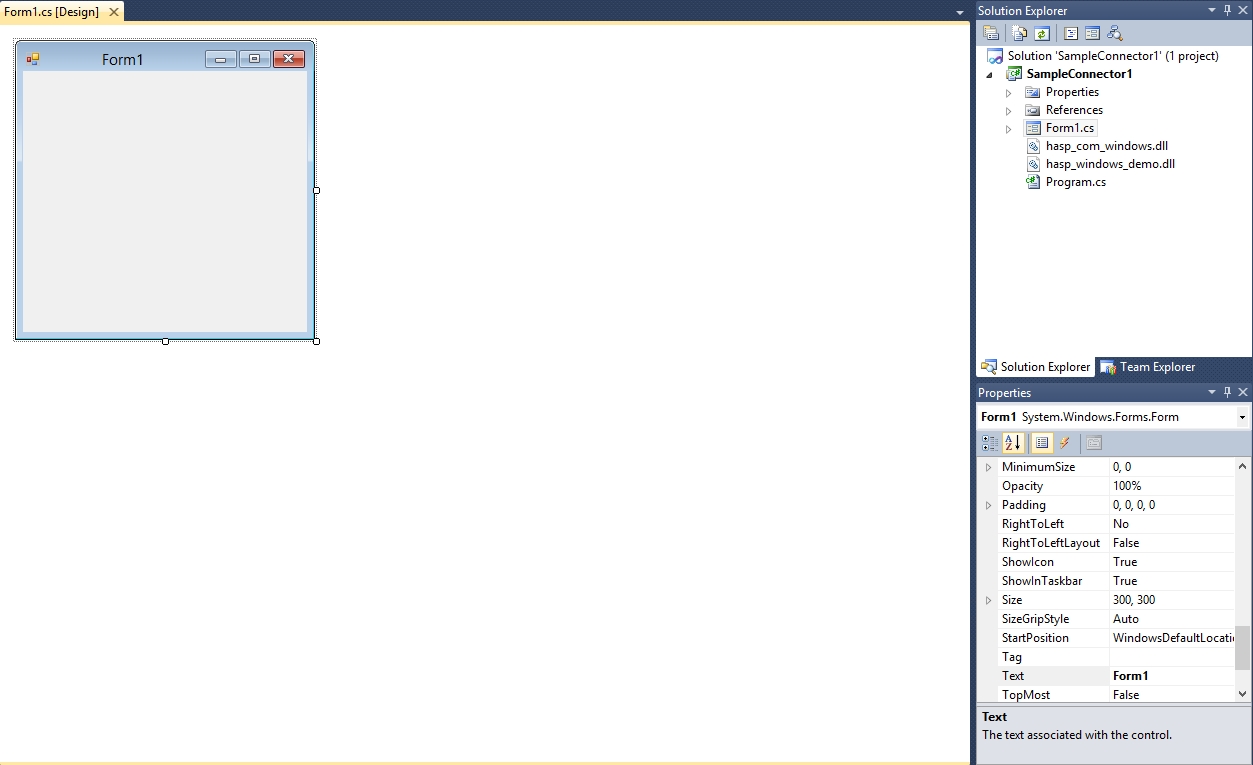
Go to the Properties panel and select the Events (
 ) icon.
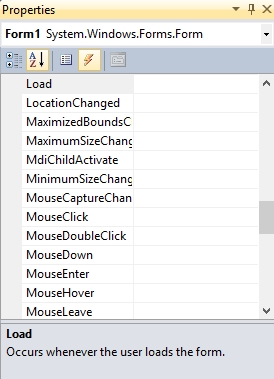
Locate the FormClosing event and double-click it to create the event handler for the FormClosing event.
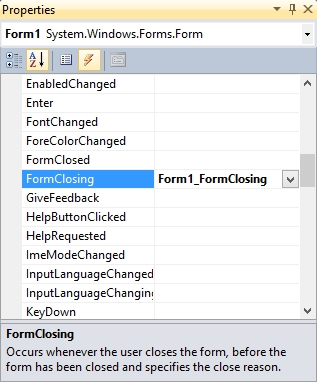
Inside the Form1.cs code view, the event handler for FormClosing is automatically added.
        private void Form1_FormClosing(object sender, FormClosingEventArgs e)
        {

        }
Next, we need to call the ReleaseSignal method of the WFServerConnector to release the signal when the Form1 is closed.
        private void Form1_FormClosing(object sender, FormClosingEventArgs e)
        {
            int result;
            int returnValue = wfsc.ReleaseSignal("IOBuffer1", out result);
        }
We will also check if the method returns an error and display it, like we did for CreateSignal() and UpdateSignal() methods.
        private void Form1_FormClosing(object sender, FormClosingEventArgs e)
        {
            int result;
            int returnValue = wfsc.ReleaseSignal("IOBuffer1", out result);
            if (returnValue != 0)
            {
                MessageBox.Show("ReleaseSignal returned: " + WFErrorCodes.ToErrorString(returnValue));
                return;
            }
        }
Now we can build and use the connector for testing by executing the SampleConnector1.exe application.
When building the solution with Visual Studio in Debug mode, the output can be located in the bin/Debug folder of the SampleConnector1 solution folder.
Testing the Custom Connector
Check out this article and learn how to test your WEBfactory 2010 Custom Connector built with the Server SDK.
This chapter shows how to add a custom connector inside Ewon by HMS NetworksStudio. Afterward it shows how to test the implemented functionality with Ewon by HMS NetworksTest Center.
This tutorial uses the SampleConnector1 solution created in the Building a Custom Connector tutorial.
Creating a new Project database
Open Studio, input the User ID and Password for your Database server and select [new database] from the Database drop-down menu.
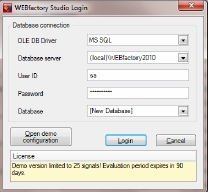
Ewon by HMS NetworksStudio startup
A new dialog will appear.
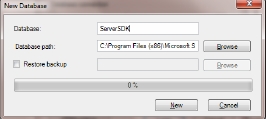
Create new Database
Type in a Database name and click New. Ewon by HMS NetworksStudio will generate an empty database. Please log in to the new database.
Add a new server and set its name to . (dot, representing the local machine).
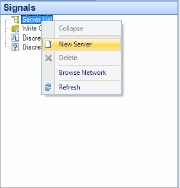
Create new server
Adding a Custom Connector
Now we can add our custom connector with a right mouse button click on the server.
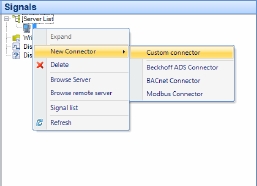
Add a custom connector
Name it Ewon by HMS Networks.Generic.Connector.SampleConnector1.

Define the name of the connector
Add a signal group and define its Read Write Mode property to Write, Read (unsecure).
Add a signal to that group and name its OPC item and its Alias name IOBuffer1.
Start the server
Open Ewon by HMS NetworksService Manager and (re)start the server.
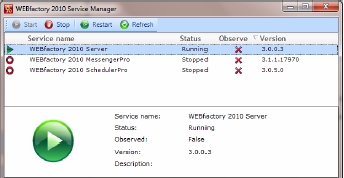
(Re)start the Ewon by HMS Networks Server
After a while, the status becomes "Running".
Start the SampleConnector1 connector
Locate the SampleConnector1 solution folder (by default, in C:\Users\UserName\Documents\visual studio 20XX\Projects\). Navigate to the \SampleConnector1\bin\Debug folder and double-click the SampleConnector1.exe application.
If the SampleConnector1 solution was built on Release, the SampleConnector1.exe application can be found in the \bin\Release folder instead of \bin\Debug.
The SampleConnector1 can also be executed from Visual Studio by going to the Debug menu and selecting Start Without Debugging (Ctrl + F5).
Ewon by HMS NetworksTest Center
Open Ewon by HMS NetworksTest Center and select Communication > Manage servers.
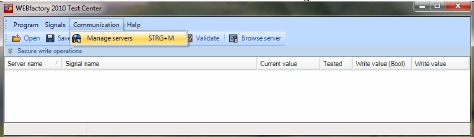
Accessing Manage servers
Open the context menu on the second entry and select New.
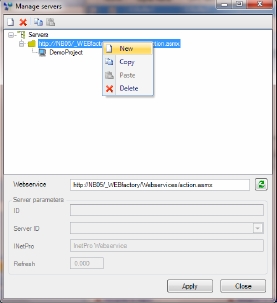
Manage servers
A new entry inside the tree view will appear. This entry's name will be the computer name or localhost. The Server ID should be the name of the server in Ewon by HMS NetworksStudio (the .). Press Apply and then Close. In the main window of the Test Center, click on Browse Server. The Server Chooser dialog will appear.
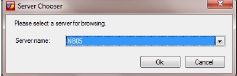
Choose server
Select your server and click OK. The next dialog is a typical Signal Browser dialog. In this sample we only have one signal inside.
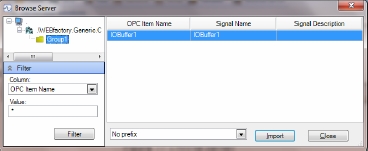
Signal Browser
Select IOBuffer1 and click Import. Close the dialog. The IOBuffer1 signal will be visible in Test Center. The value of the signal will be 7, as programmed in the Building a Custom Connector tutorial.
Try to write values other than 11 and current value will change. If we try to write 11, then an error occurs. This error is displayed inside status bar of Ewon by HMS NetworksTest Center.

Write Access
Implement tracing in the Custom Connector using the Ewon by HMS Networks SDK
Check out this article and learn how to implement the tracing for you WEBfactory 2010 Custom Connector .
Within this section we will implement trace messages in the Custom Connector and display them in Ewon by HMS NetworksActivity Analyzer. To demonstrate this, we will use the SampleConnector1 solution created in the Building a Custom Connector tutorial.
The WFServerConnector class provides the required method for implementing trace messages inside a custom connector: WriteTrace([trace level], "Trace text");, where:
[trace level] represents the required trace level: no trace, Error, Warning or Info. For example:
ServerSDK.Helper.WFTraceLevels.NoTraceServerSDK.Helper.WFTraceLevels.TraceErrorServerSDK.Helper.WFTraceLevels.TraceInfoServerSDK.Helper.WFTraceLevels.TraceWarning
"Trace text" can be any desire text.
Implementing the trace messages in the custom connector
To demonstrate the implementation of trace messages in a custom connector, we will implement a trace message that will notify us that the signal value has been successfully updated or an error has occurred.
In the SampleConnector1 solution, open the Form1.cs in code view (F7).
Locate the implementation of the wfsc_WriteAsyncRequest() method, as in its implementation, this method calls the UpdateSignal() method that we're interested in for our demonstration.
        void wfsc_WriteAsyncRequest(string[] signalNames, object[] signalValues, string asyncID)
        {
            if (InvokeRequired)
            {
                Invoke(new WFWriteAsyncRequestEventHandler(wfsc_WriteAsyncRequest), new object[] { signalNames, signalValues, asyncID });
            }
            else
            {
                int[] results = new int[1]{0};
                if (signalValues[0].ToString() == "11")
	            {
		            results[0] = -10000;
	            }
                else
                {
                    int updateResult;
                    wfsc.UpdateSignal("IOBuffer1", signalValues[0], out updateResult);

                }
                wfsc.WriteAsyncRequestResult(asyncID, results);
            }
        }
Notice that the UpdateSignal() method outputs a parameter named updateResult. This parameter is 0 when the UpdateSignal() method is successful. Knowing this, we can check if the method has successfully updated the signal value or not, and use the WriteTrace() method to notify the user in both cases. First we'll check if the updateResult is different than 0 and call the WriteTrace() method to notify the user that something is wrong. We will set the trace level to Error and an appropriate custom message.
        void wfsc_WriteAsyncRequest(string[] signalNames, object[] signalValues, string asyncID)
        {
            if (InvokeRequired)
            {
                Invoke(new WFWriteAsyncRequestEventHandler(wfsc_WriteAsyncRequest), new object[] { signalNames, signalValues, asyncID });
            }
            else
            {
                /* This code checks whether the input is 11. In case of eleven it does not allow the write operation.
                 * This is done by setting any other value than 0 as result to WriteAsynchRequestResult.
                 * If the value is not 11 then the result is 0 [write access allowed] and the new value is updated with UpdateSignal method. */
                int[] results = new int[1]{0};
                if (signalValues[0].ToString() == "11")
	            {
		            results[0] = -10000;
	            }
                else
                {
                    int updateResult;
                    wfsc.UpdateSignal("IOBuffer1", signalValues[0], out updateResult);
                    if (updateResult != 0)
                    {
                        wfsc.WriteTrace(ServerSDK.Helper.WFTraceLevels.TraceError, "An error has occurred while updating the signal value!");
                    }
                }
                wfsc.WriteAsyncRequestResult(asyncID, results);
            }
        }
Next, we need to handle the situation when updateResult is 0. This time, we will set the trace level to Info and the appropriate custom message:
        void wfsc_WriteAsyncRequest(string[] signalNames, object[] signalValues, string asyncID)
        {
            if (InvokeRequired)
            {
                Invoke(new WFWriteAsyncRequestEventHandler(wfsc_WriteAsyncRequest), new object[] { signalNames, signalValues, asyncID });
            }
            else
            {
                /* This code checks whether the input is 11. In case of eleven it does not allow the write operation.
                 * This is done by setting any other value than 0 as result to WriteAsynchRequestResult.
                 * If the value is not 11 then the result is 0 [write access allowed] and the new value is updated with UpdateSignal method. */
                int[] results = new int[1]{0};
                if (signalValues[0].ToString() == "11")
	            {
		            results[0] = -10000;
	            }
                else
                {
                    int updateResult;
                    wfsc.UpdateSignal("IOBuffer1", signalValues[0], out updateResult);
                    if (updateResult != 0)
                    {
                        wfsc.WriteTrace(ServerSDK.Helper.WFTraceLevels.TraceError, "An error has occurred while updating the signal value!");
                    }
                    else
                    {
                        wfsc.WriteTrace(ServerSDK.Helper.WFTraceLevels.TraceInfo, "The signal value has been successfully updated!");
                    }
                }
                wfsc.WriteAsyncRequestResult(asyncID, results);
            }
        }
In both cases, the user will be notified using the WriteTrace() method and the text message passed to that method will be available in Activity Analyzer, once our SampleConnector1 channel is monitored.
The SampleConnector1 can be now built.
Setting up Activity Analyzer to monitor the SampleConnector1 channel
In order to receive the trace messages that we set in our SampleConnector1, we need to enable Activity Analyzer to monitor that channel.
Open Ewon by HMS NetworksActivity Analyzer and click on the Filter button.
In the Filter settings windows, go to Advanced filter section and add a new custom filter using the filter button
 .
.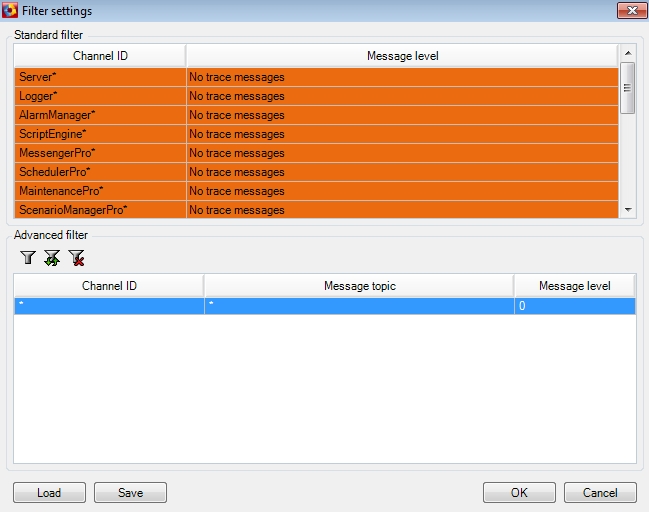
Next we need to set the Channel ID. In our case, the channel ID will be WEBfactory.Generic.Connector.SampleConnector1*.
Note that the asterisk after the channel ID is compulsory!
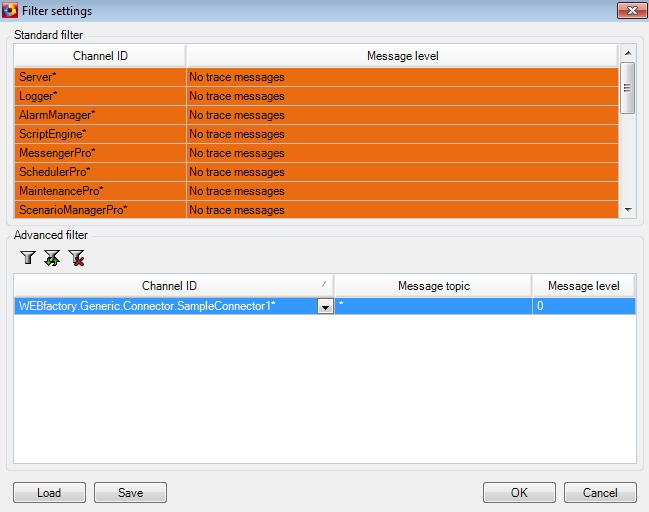
The next step is to configure the Message level for our new channel. Click in the Message channel field and open the Message levels dialog by clicking the more
 button.
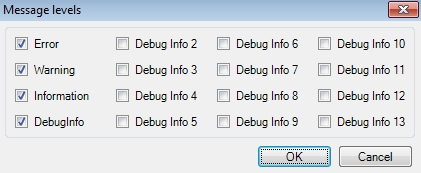
In the Message levels dialog, select the levels want to display in Activity Analyzer. Considering that in our WriteTrace() implementation, we have used both Error and Info levels, we must select at least these two levels in order to see the messages. Click OK to confirm.
The Activity Analyzer Filter settings are now complete, so close the Filter settings window by pressing OK.

Now we can test our implementation of trace messages. Make sure you have the Ewon by HMS Networks Server running and a working database loaded in Studio. Run the SampleConnector1.
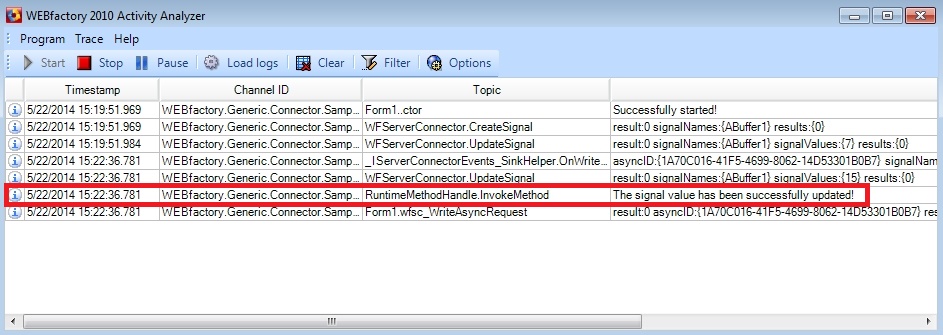
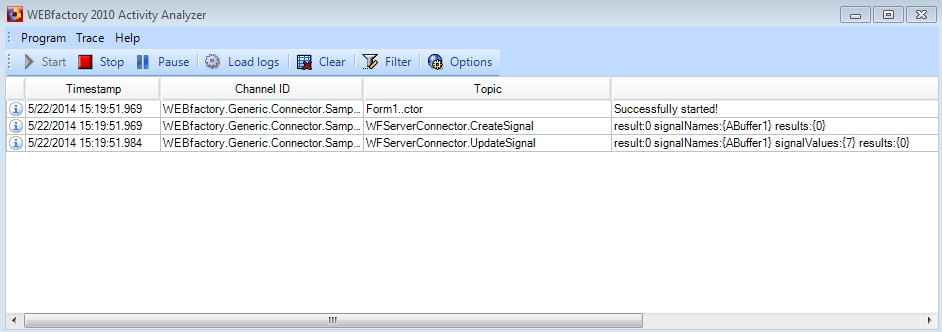
Notice that Activity Analyzer displays Info messages related to our SampleConnector1, regarding the start of Form1, the CreateSignal method and the UpdateSignal method.
In Test Center, add our IOBuffer1 signal and write a value different from 11. The Activity Analyzer will display the Info message for a successful signal update.