Tutorials
Check out these articles and learn more details on how to user the WEBfactory 2010 SchedulerPro functions.
Using WEBfactory 2010 SchedulerPro
Check out this article and learn how to prepare the WEBfactory 2010 SchedulerPro in order to start using it.
The WEBfactory 2010 SchedulerPro module allows the user to schedule events in a calendar-based application. The scheduled events will trigger programs which can control various devices in predefined locations, using specific module signals.
SchedulerPro preparation: before heading in WEBfactory 2010 SchedulerPro, there are few settings that need to be done in WEBfactory 2010Studio:
SchedulerPro module: inside WEBfactory 2010 SchedulerPro, we will follow the next steps that will compose our demo scenario:
The following tutorial uses the Demo Database and Studio project and the signals associated with it.
Set up Discrete Values
The Discrete Values allow us to use a human readable value for the selected signal. When using a Discrete Value in SchedulerPro, the user will assign the Discrete Value ON to a signal instead of assigning value 1, assuming that the Discrete Value ON is set up to write the 1 value.
Using Discrete Values is a recommended but optional step when working with WEBfactory 2010 SchedulerPro. The user is also able to write direct values to the selected signals, not only Discrete Values.
To set up discrete values in WEBfactory 2010Studio, follow the next steps:
Navigate to the Discrete Value section from the Signals area.
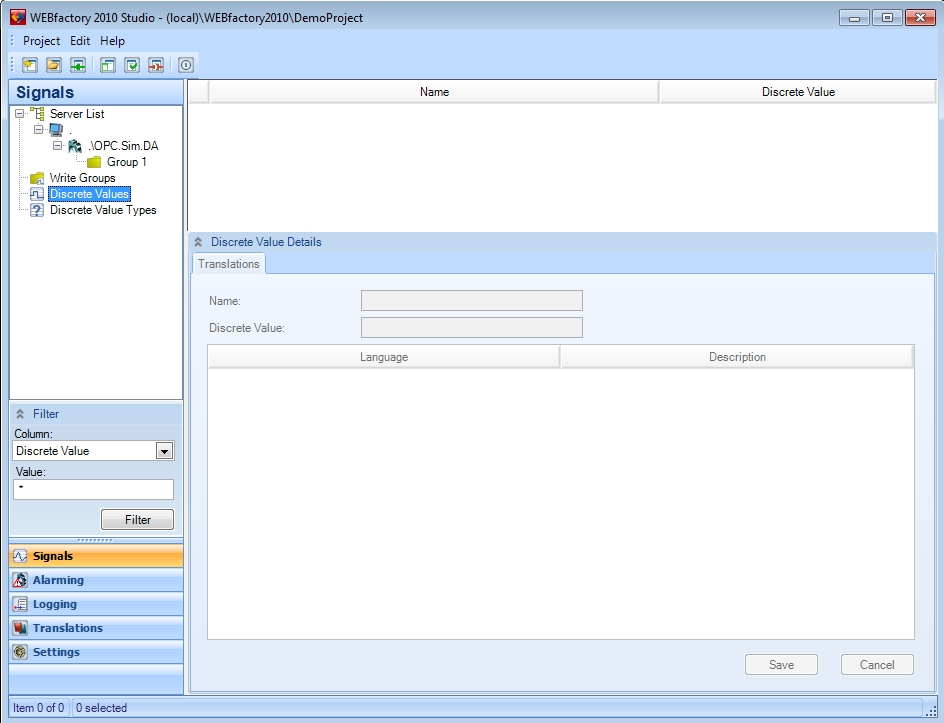
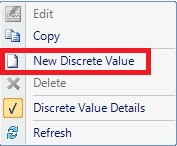
Right-click in the empty space of the main view and select New Discrete Value from the contextual menu.
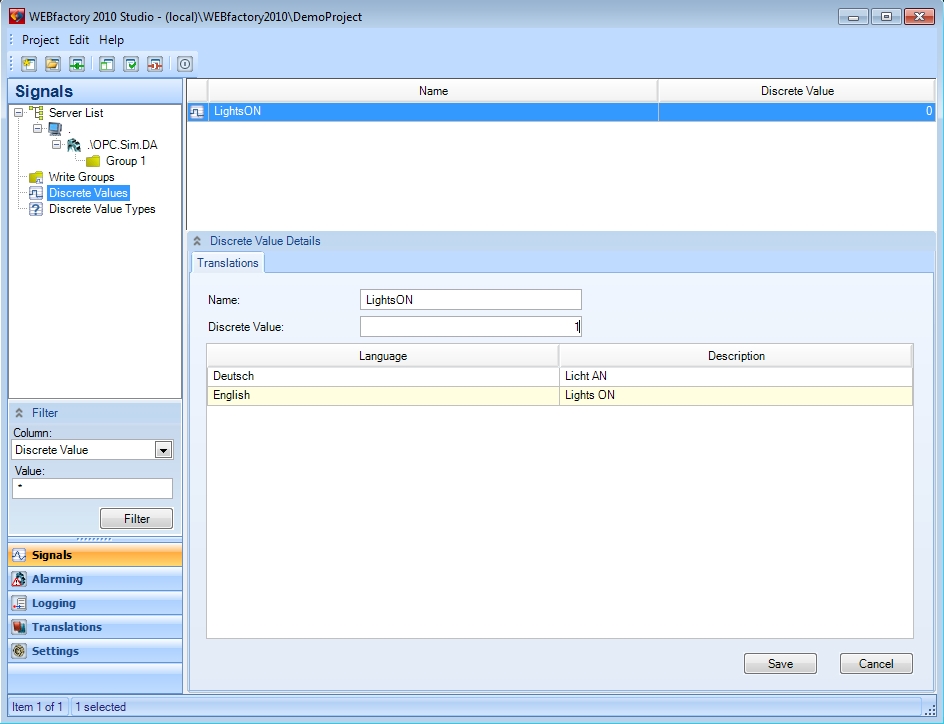
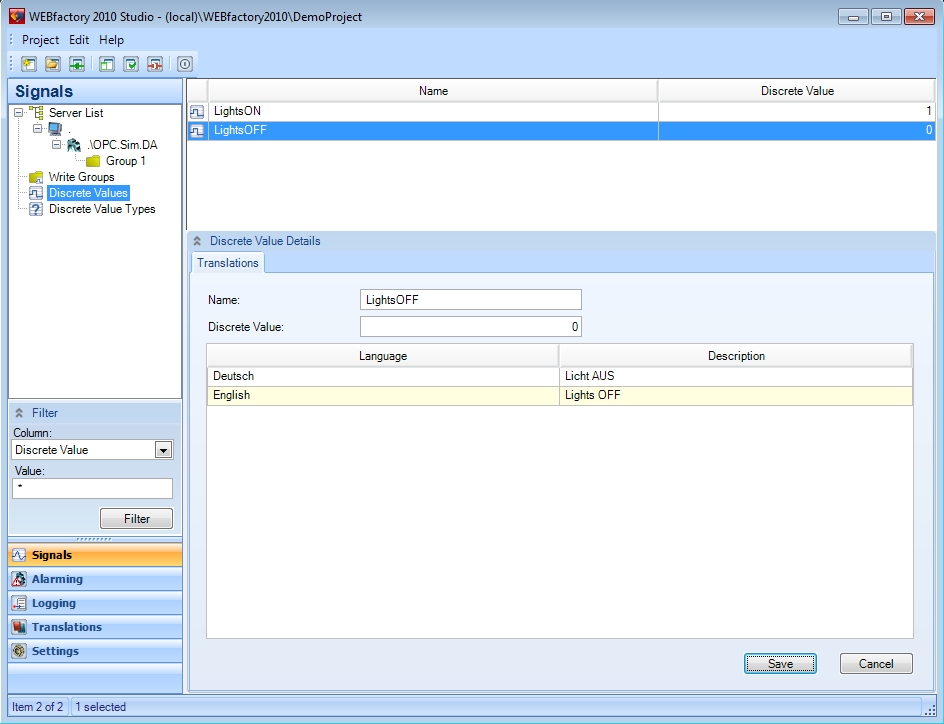
Enter a name, value and descriptions for the new Discrete Value. In our example, the Discrete Value will be named LightsON and will have the value 1. Save the changes using the Save button.
Create a second Discrete Value with the name LightsOFF and the value 0.
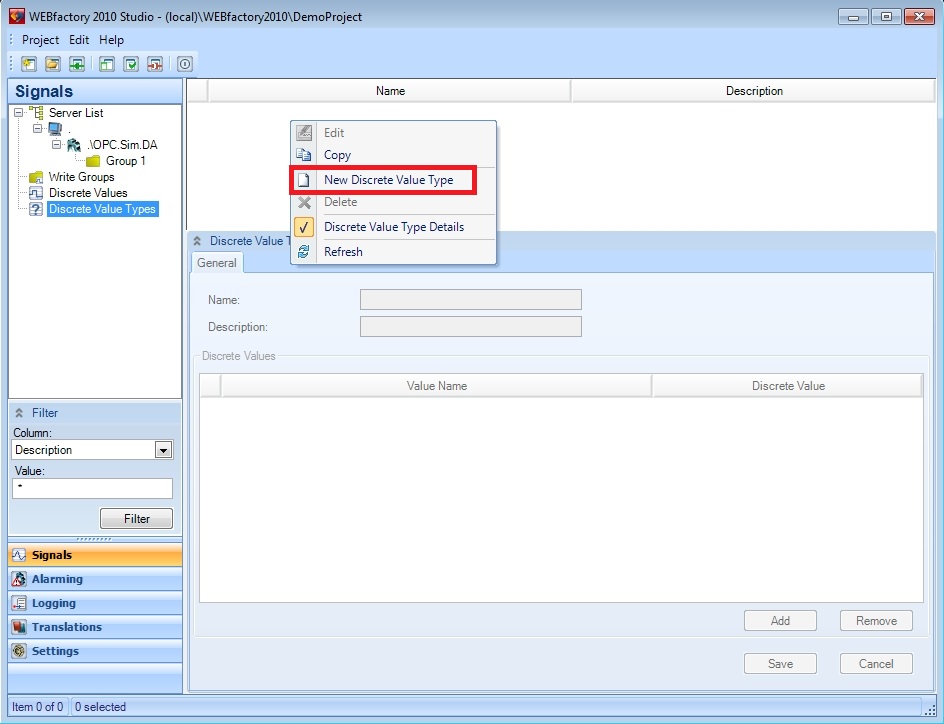
Now head in the Discrete Value Types section and right-click on the empty area of the main view to open the contextual menu and create a new Discrete Value Type.
Name the new Discrete Value Type Lights and add the desired description. By default, the first Discrete Value, LightsON, is added to the Lights Discrete Value Type.
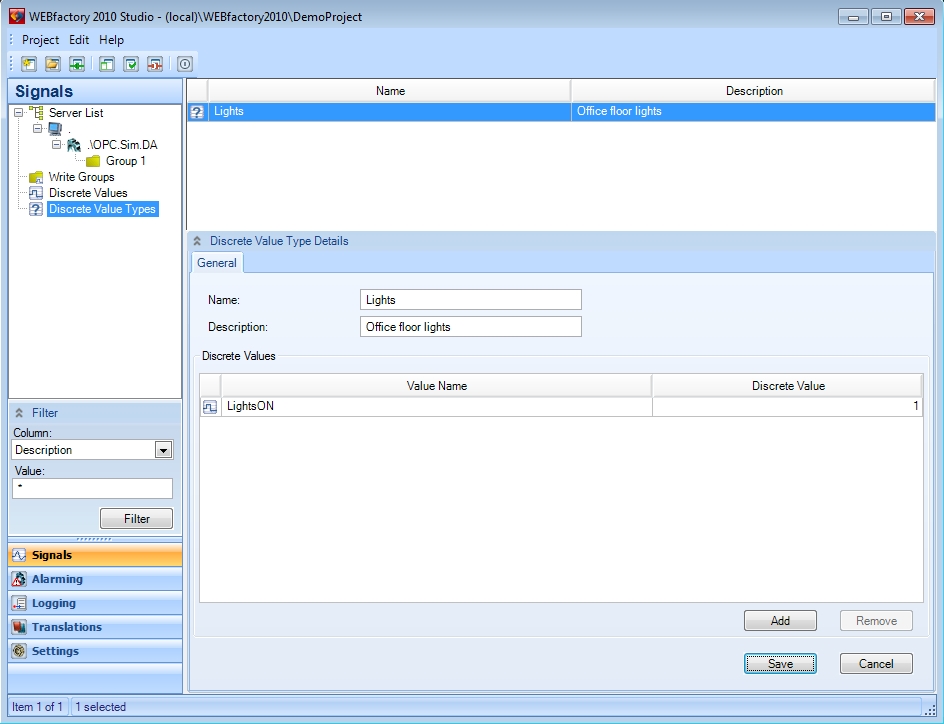
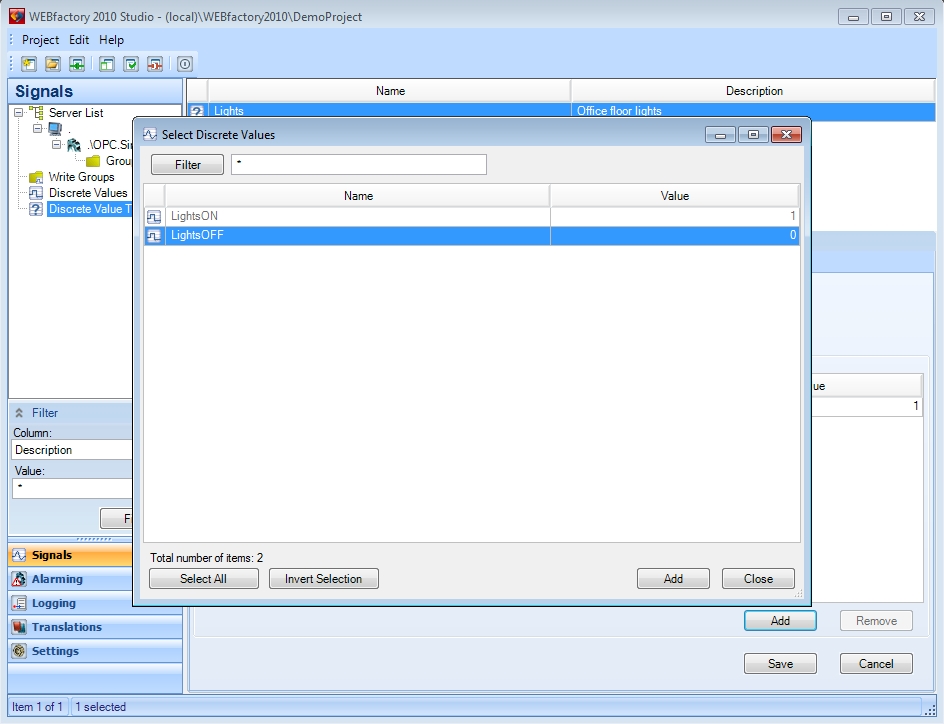
We also need the second Discrete Value, LightsOFF, so click on the Add button to open the Select Discrete Values window and select the LightsOFF discrete value. Click Add to add it to the Lights Discrete Value Types and close the dialog. Save the new Discrete Value Type.
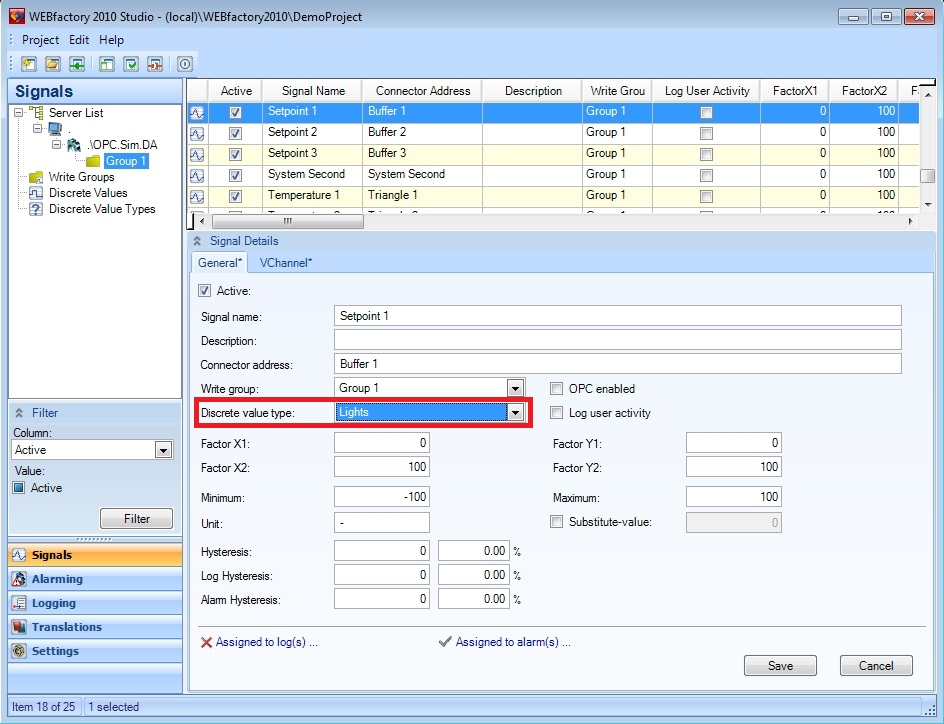
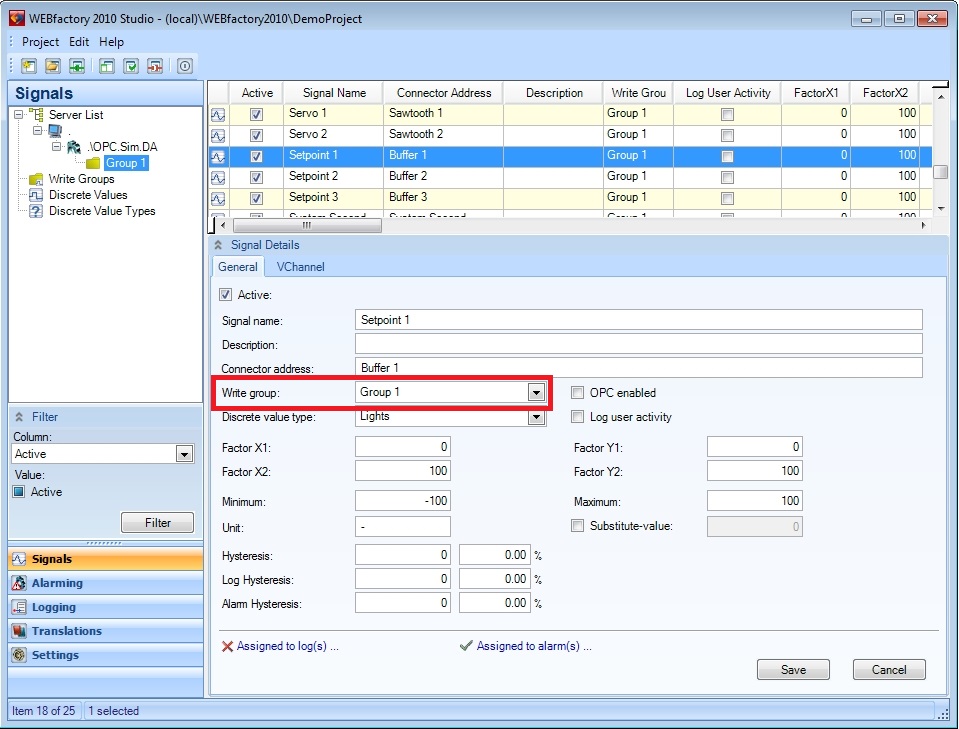
Next, we need to assign the new Discrete Value Type to the signal that we will use in our SchedulerPro demonstration. In the Signals area, select the Group 1 signal group under the simulation OPC server. In the signals list, select Setpoint 1 (or Buffer 1).
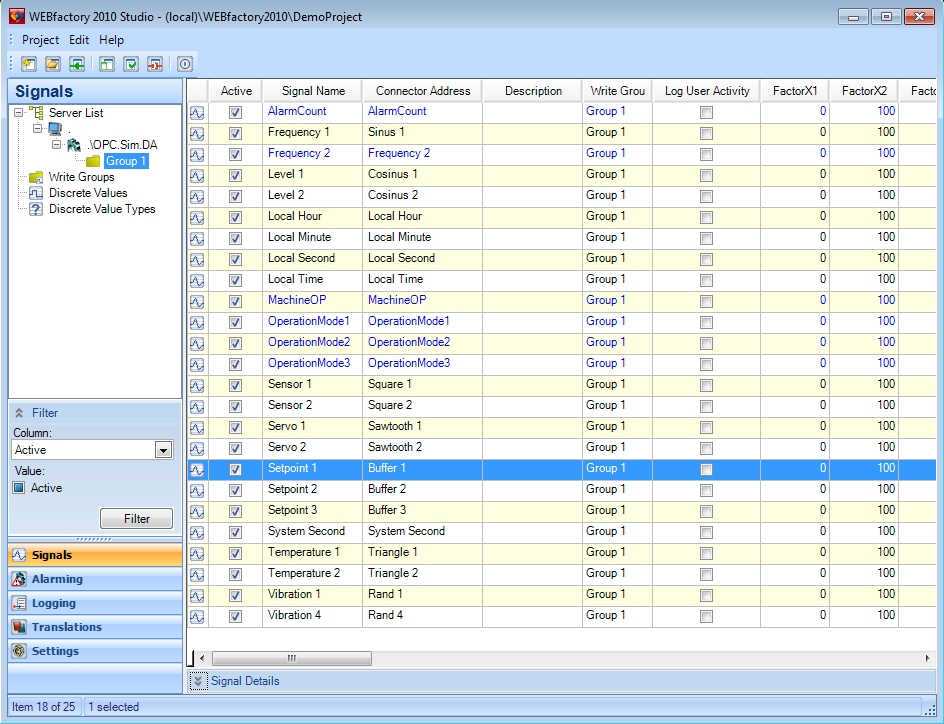
Open the Signal Details panel and, from the Discrete value types combo-box, select the Lights Discrete Value Type that we have previously created. Save the signal configuration.
Set up Module Signals
The Module Signals are the signals that are available to be used in WEBfactory 2010 modules like SchedulerPro. The signals that are not defined as Module Signals for the specific WEBfactory 2010 module (SchedulerPro in our example) will not be available inside the module.
Setting up the Module Signals for SchedulerPro is a compulsory step in using the SchedulerPro module!
Follow the next steps to set up the Module Signals for SchedulerPro:
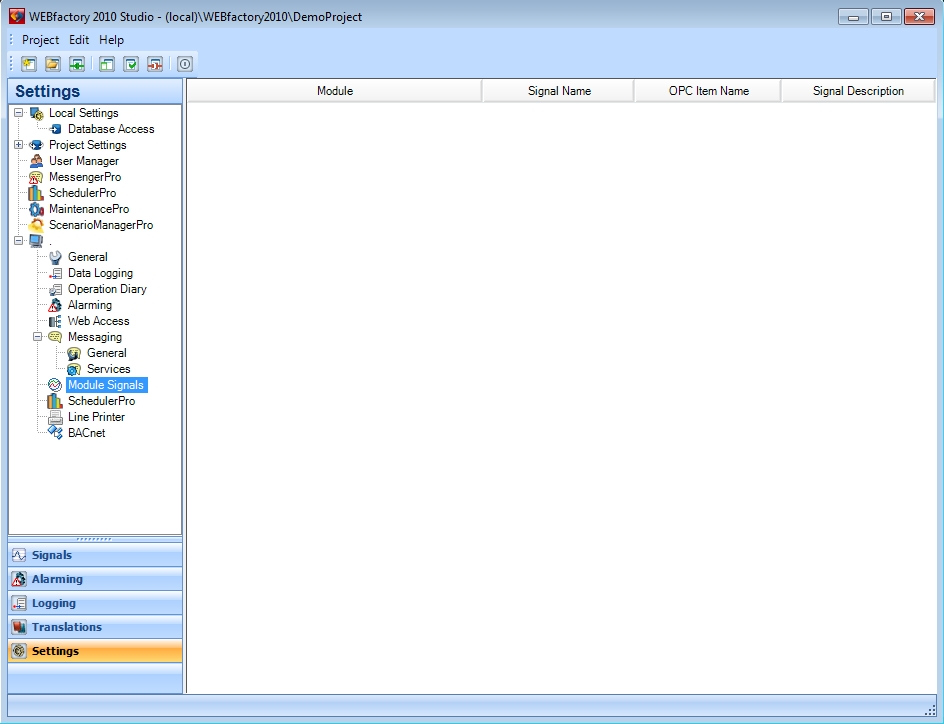
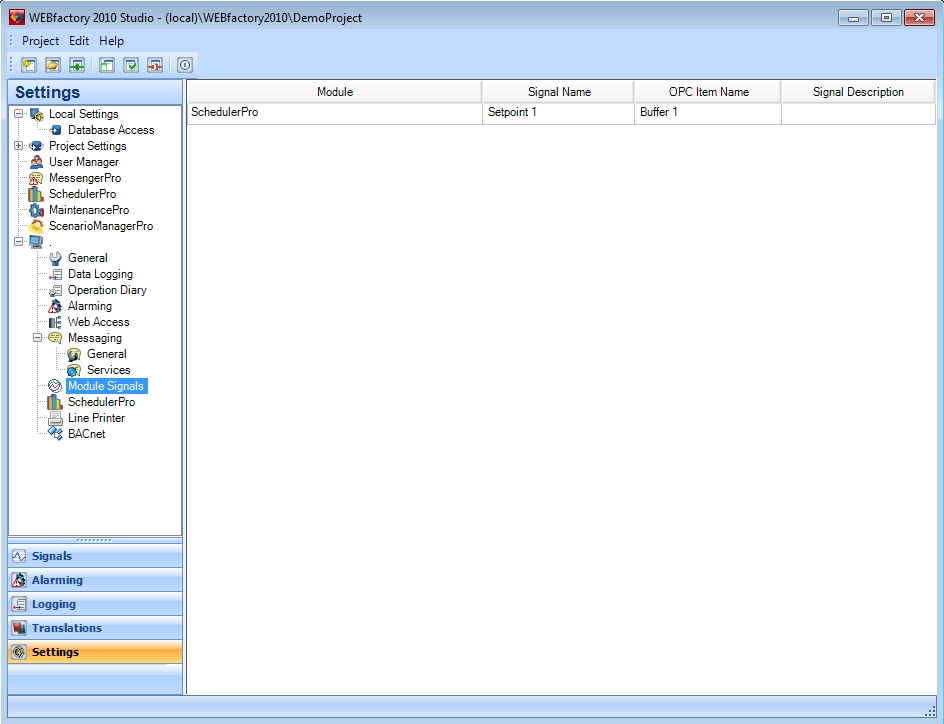
Navigate to the Module Signals section of the Settings area of the Studio.
In the Demo Database, the Module Signals section can be found under the Server settings, represented by the dot (.).
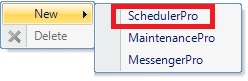
To create a new Module Signal, right-click on the empty space of the main view and select New > SchedulerPro from the contextual menu.
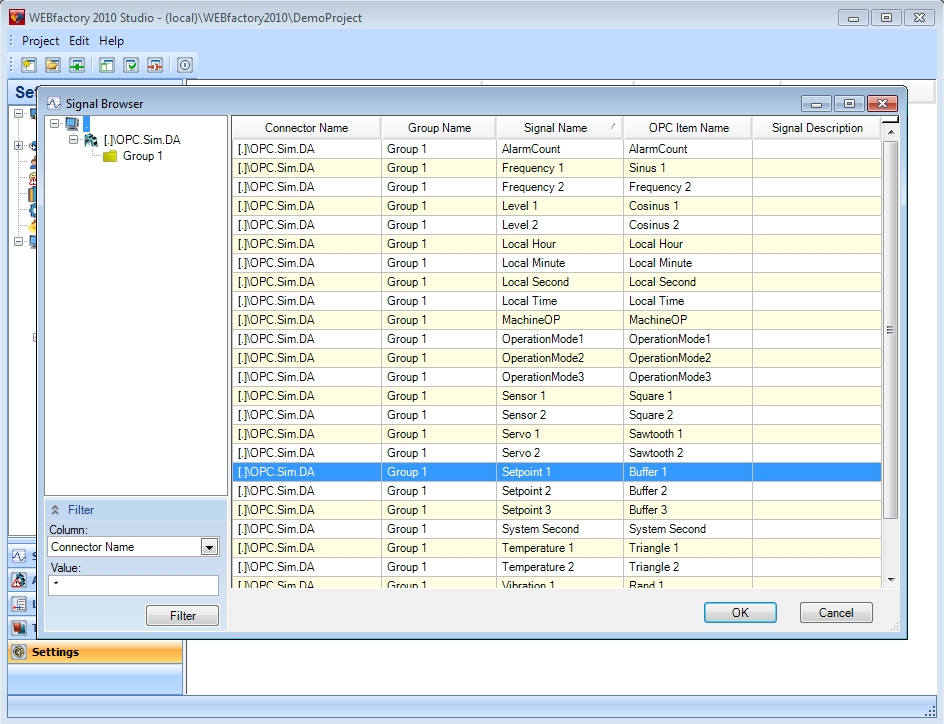
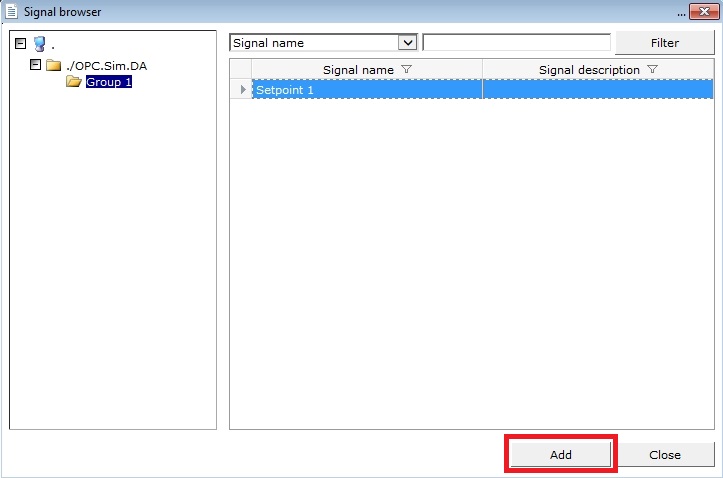
The Signal Browser window will open. Select the desired signal (Setpoint 1 in our tutorial) and click OK.
Now the Setpoint 1 signal is defined as a Module Signal for SchedulerPro and can be used inside this WEBfactory 2010 module.
Set up security and activate SchedulerPro
In order to use the WEBfactory 2010 SchedulerPro module and benefit from the security built in the WEBfactory 2010 solution, we need to make sure that the signal that will be used in the SchedulerPro module can be written by the user using SchedulerPro.
The Security settings are optional but recommended when using WEBfactory 2010 SchedulerPro.
Secure the Signal Group
In the Signals area of the Studio, go to the active server and select the OPC.Sim.DA simulation OPC server.
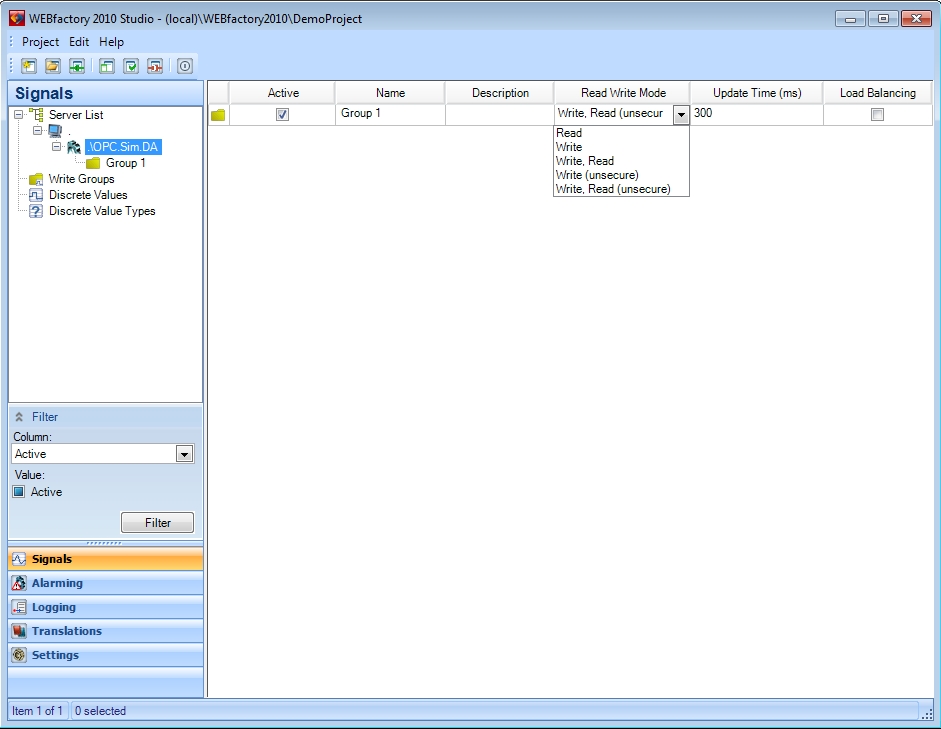
Set the Read Write Mode of the Group 1 signal group to Write, Read. This way, the signal selected as Module Signal for SchedulerPro will not be written without proper credentials.

Write group access
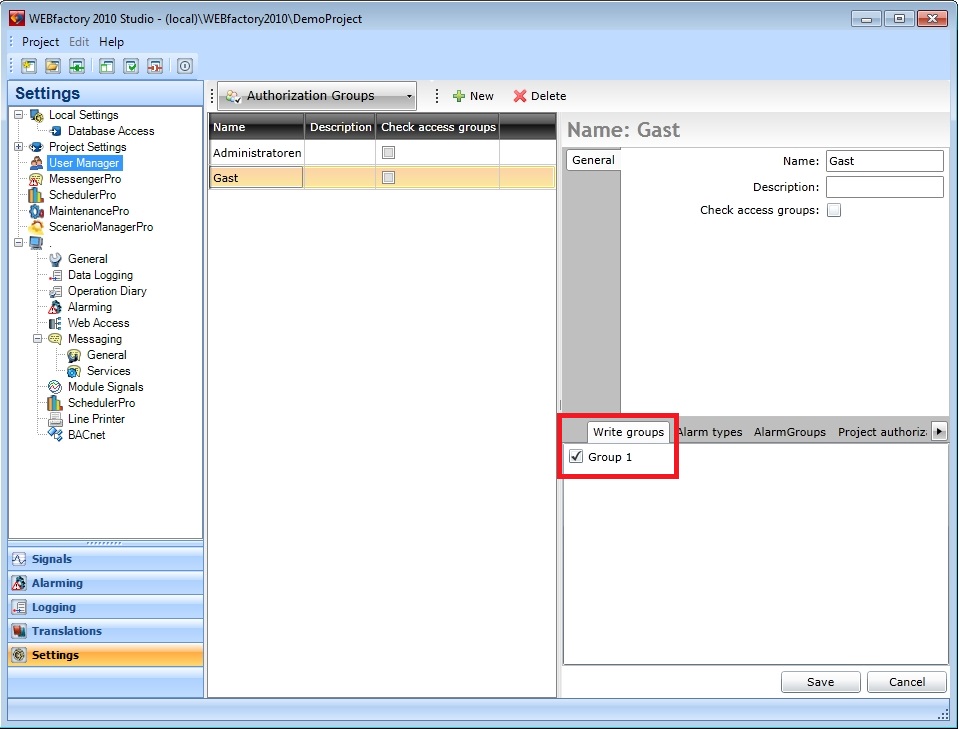
In WEBfactory 2010Studio, go to the User Manager under the Settings area.
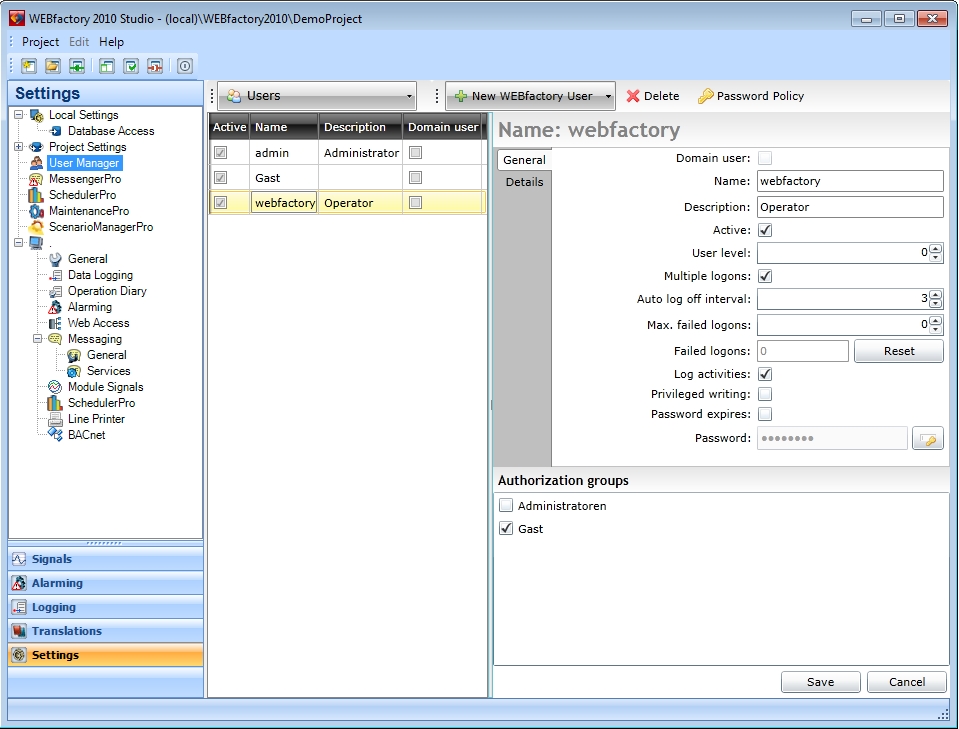
In our tutorial, we will use the webfactory user, predefined in the Demo Database. Make sure that the Authorization group assigned to the user (Gast in our situation) has the same write group assigned as our selected signal (Setpoint 1). This means that our user will be able to write values to the signal belonging to this write group.
SchedulerPro settings
The last step before heading in the SchedulerPro module is to set the user for write operations and activate the SchedulerPro module.
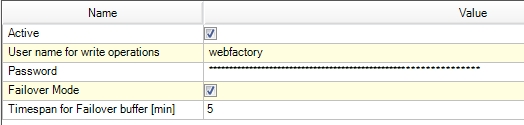
In the Settings area of the Studio, go to the SchedulerPro settings under the Server settings represented by the dot (.).

Activate the SchedulerPro module by checking the box corresponding to the Activate option.
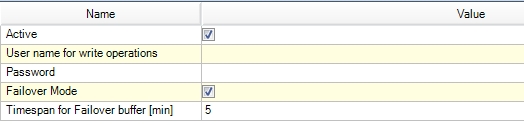
Enter the user name and password for the user that will be used in write operations (the user that has access to the write group assigned to the used signal).
Click here to continue to Using the SchedulerPro module.
Using WEBfactory 2010 SchedulerPro
Check out this article and learn more details about the WEBFactory 2010 SchedulePro addon and how to configure it.
The WEBfactory 2010 SchedulerPro module allows the user to schedule events in a calendar-based application. The scheduled events will trigger programs which can control various devices in predefined locations, using specific module signals.
SchedulerPro preparation: before heading in WEBfactory 2010 SchedulerPro, there are few settings that need to be done in WEBfactory 2010Studio:
SchedulerPro module: inside WEBfactory 2010 SchedulerPro, we will follow the next steps that will compose our demo scenario:
The following tutorial uses the Demo Database and Studio project and the signals associated with it.
Create a location
In WEBfactory 2010 SchedulerPro, we first must define a Location, which represents the location of the controlled device(s). The device's signal is attached to the Location.
For example, the signal controlling the lights in the office is attached to the office location.
To set up a Location in SchedulerPro, follow the next steps:
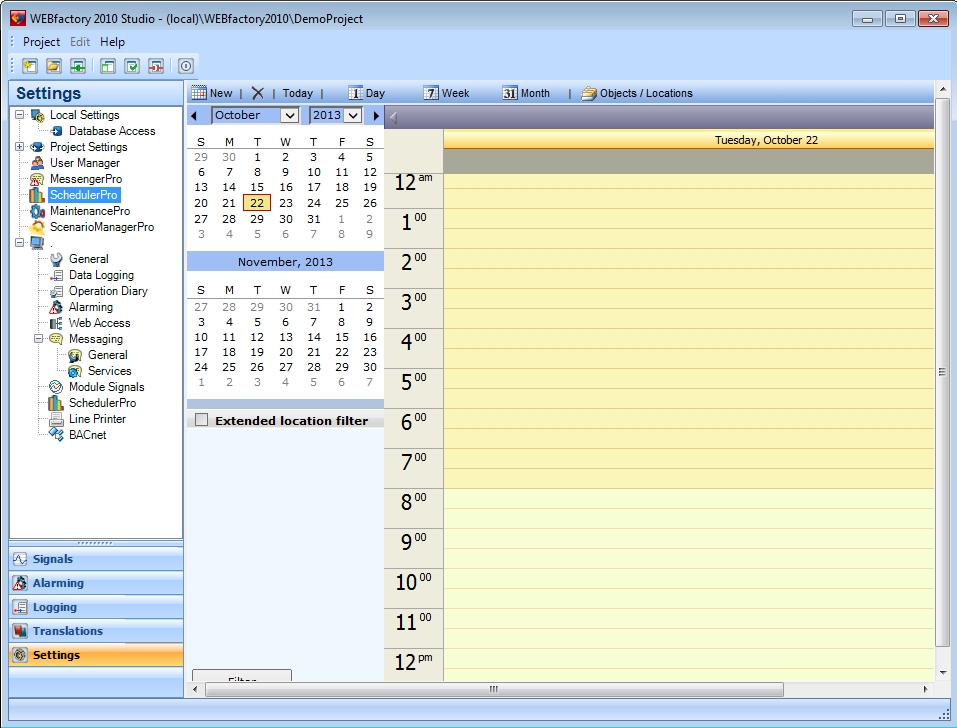
Open WEBfactory 2010 SchedulerPro either from the SchedulerPro option from the Settings area of Studio or access the application using a web browser.
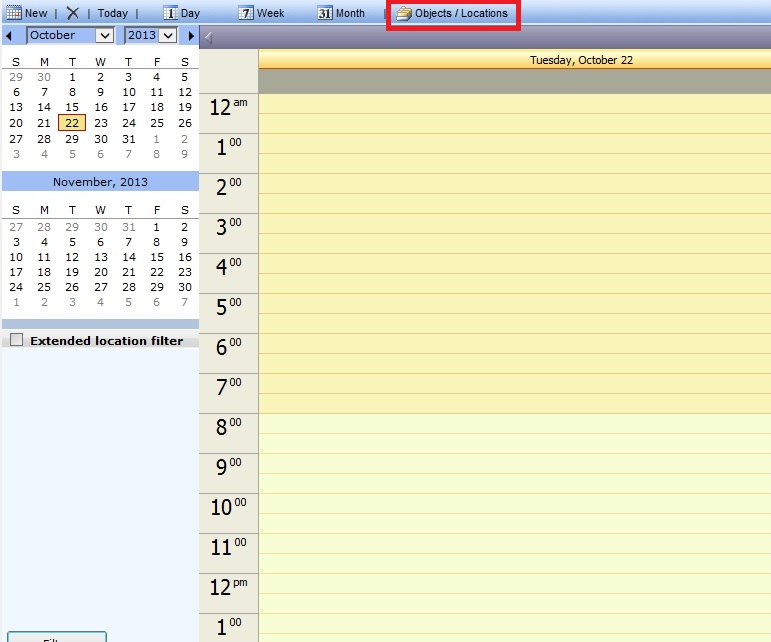
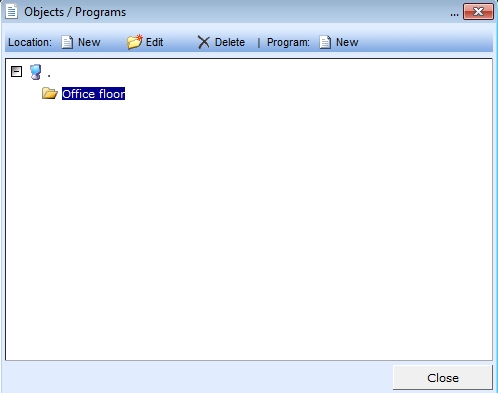
In SchedulerPro, click on the Objects/Locations button available in the main menu (toolbar).
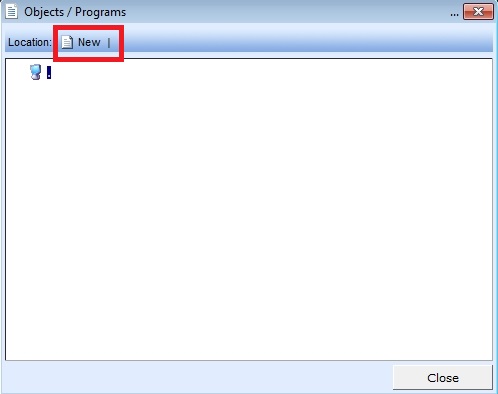
In the Objects / Programs window, click the New button to open the Location Details window and create a new Location.
In the Location Details window, fill in the Name and Description of the location. To add the module signal prepared in the previous part of the tutorial, click on the Add button.
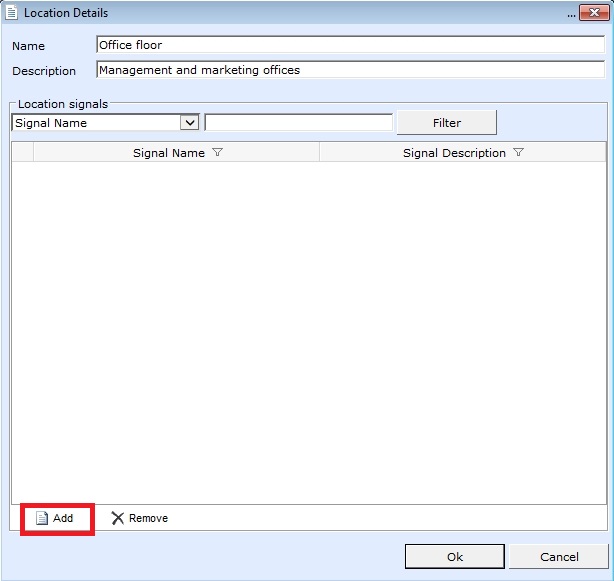
In the Signal browser dialog, expand the tree structure on the left side. The signal defined as module signal for SchedulerPro will be available. Select the signal and click Add.
The module signal is now attached to our Office location. Confirm the Location Details window by pressing the Ok button. The new location is now available in the Objects / Programs window.
Create a program for the location
Now that the Office location is defined, we need to create a program associated with this location. The Program will allow us to manipulate the module signal's value in relation with the start and end of the program.
For example, the signal value can be 0 when the program starts and 1 ten seconds before the program ends.
To set up the Program, follow the next steps:
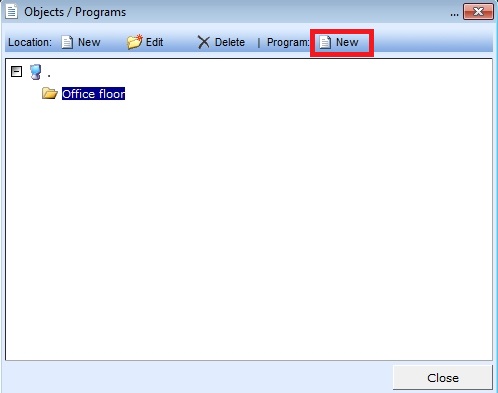
In the Objects / Programs window, select the Location and click on the New button from the program section of the menu. The Program details window will open.
In the Program details window, fill in the Name and Description of the program. The location is already set, so choose a color for this program using the Color drop down menu.
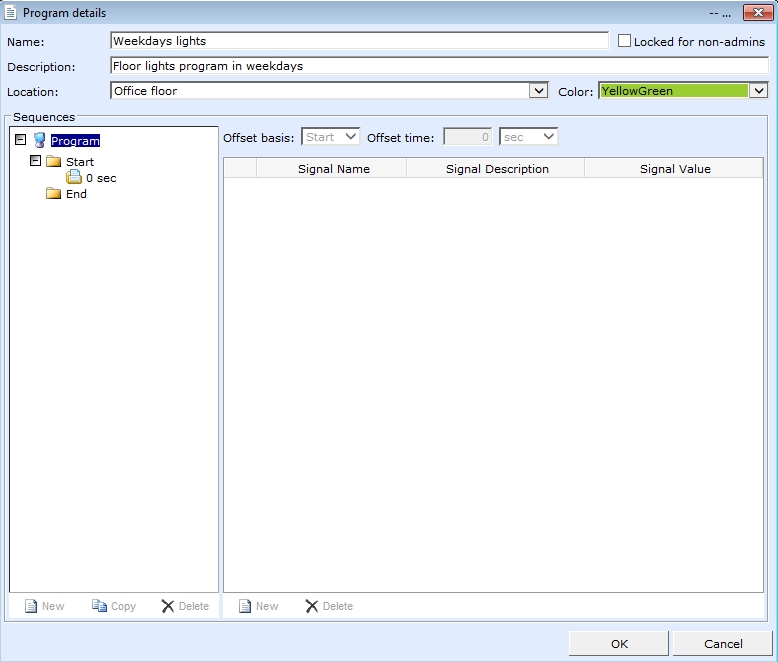
Now we need to define the actual program for our signal. The program is based on sequences (left panel). The Start marker already has a default sequence (0 sec). The sequences are relative to the Start and End markers of the program and the relations with this markers is expressed in seconds or minutes.
For example, the 20 sec sequence under the Start marker will be triggered after 20 seconds after the program started. In a similar way, the 20 sec sequence under the End marker will be triggered at 20 seconds before the program ends.
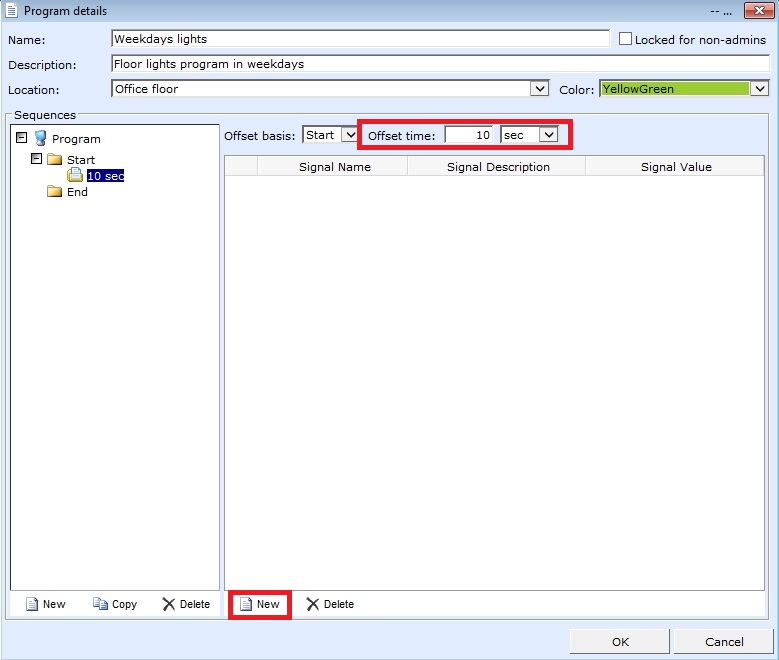
Select the default 0 sec sequence and adjust the Offset time to 10 seconds, so the sequence will start after 10 seconds since the program starts. Click on the New button from the bottom of the right panel to add the signal.
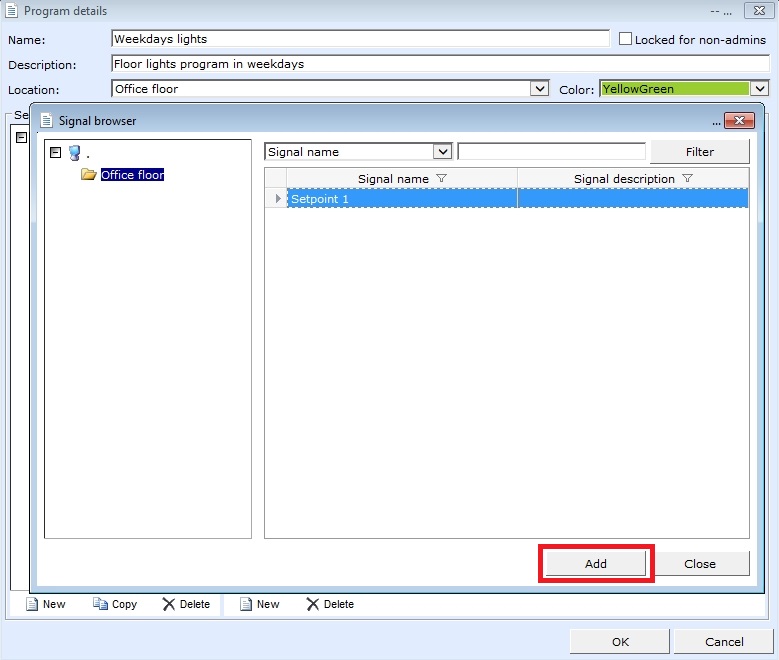
In the Signal browser dialog, select the signal and click Add to add it to the sequence.
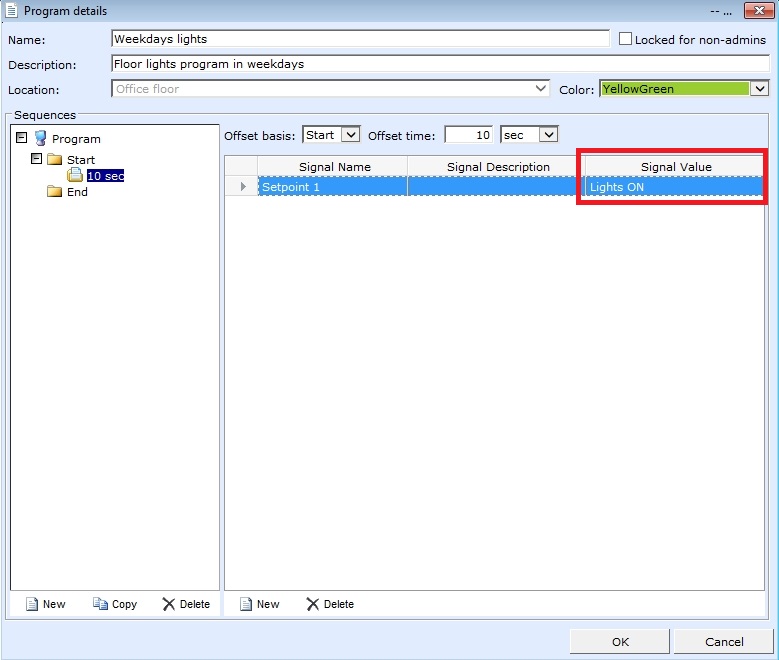
Back in the Program details window, double-click the Signal Value field and type the value 1, corresponding to the Lights ON discrete value. The Signal Value field will display the Lights ON discrete value.
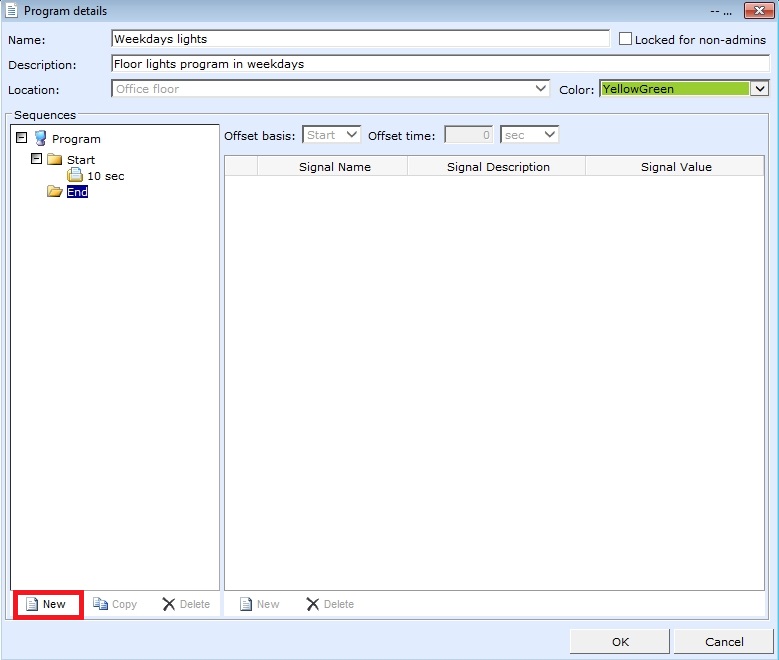
Now, to create switch the lights off when the program ends, we need to create a new sequence under the End marker. Select the End marker from the left side panel and click the New button from the bottom of the panel.
Select the new sequence and adjust its Offset time to 1 minute, thus making the lights go off a minute before the program ends. Click the New button from the bottom of the right side panel to add the signal to this sequence.
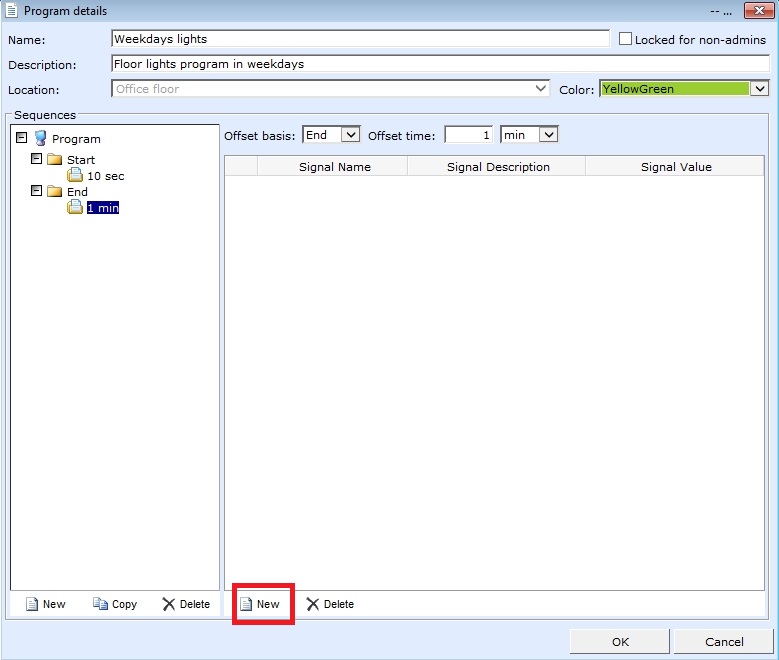
In the Signal browser, select the signal and add it to the sequence. Double-click the Signal Value field and enter the value 0, corresponding to the Lights OFF discrete value.
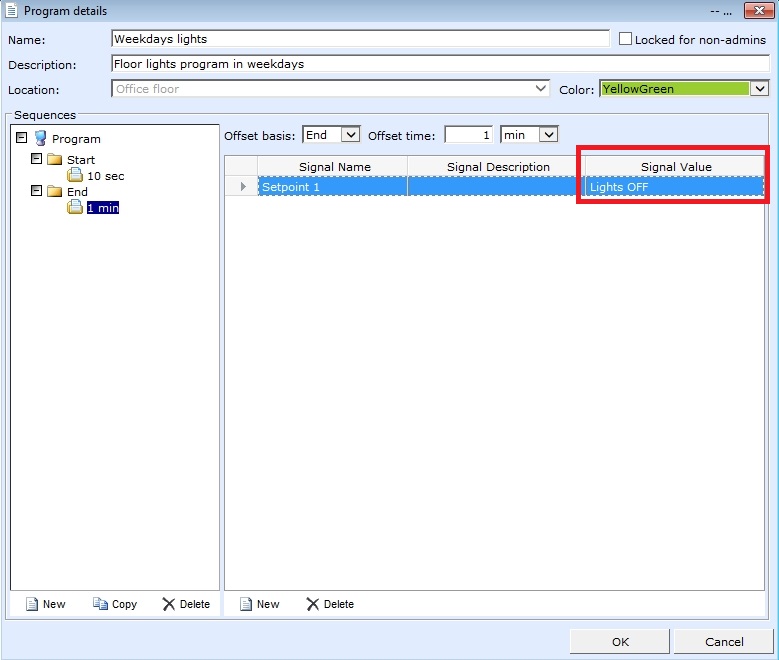
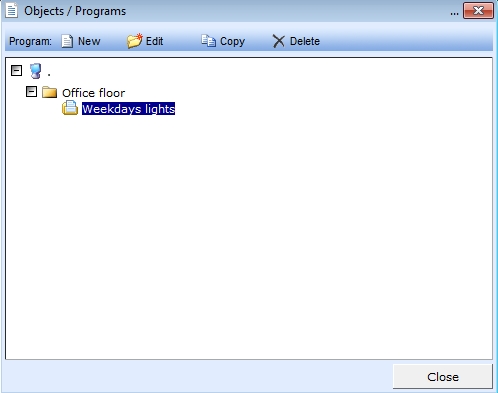
Now the program is defined and it will turn the lights on after 10 seconds since it starts and will turn the lights off a minute before it ends. Click OK to confirm the program. The program will be displayed in the Objects / Programs window, under the Office floor location.
Schedule an event to trigger the program
Now that we have the Location and Program defined, we will use the SchedulerPro calendar interface to schedule the Program to run every day of the week but the weekend.
Follow the next steps to scheduler the Program:
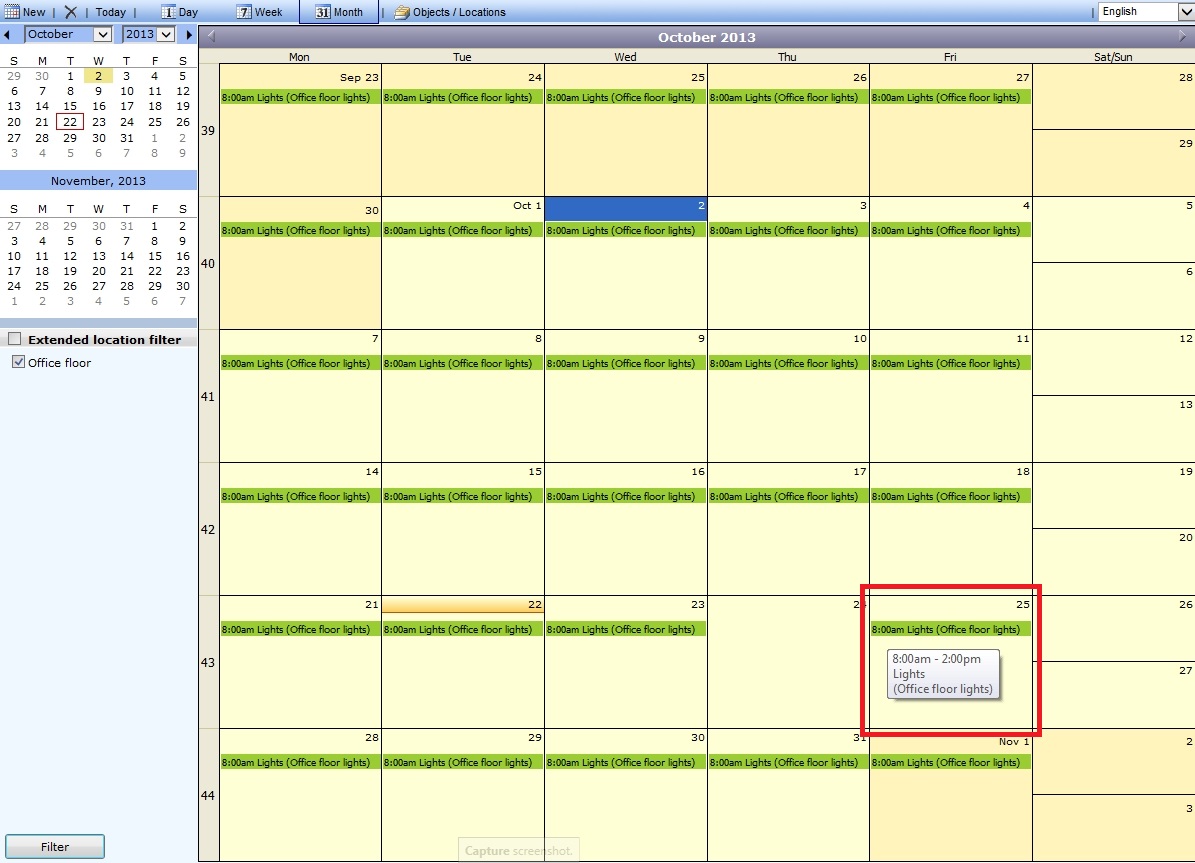
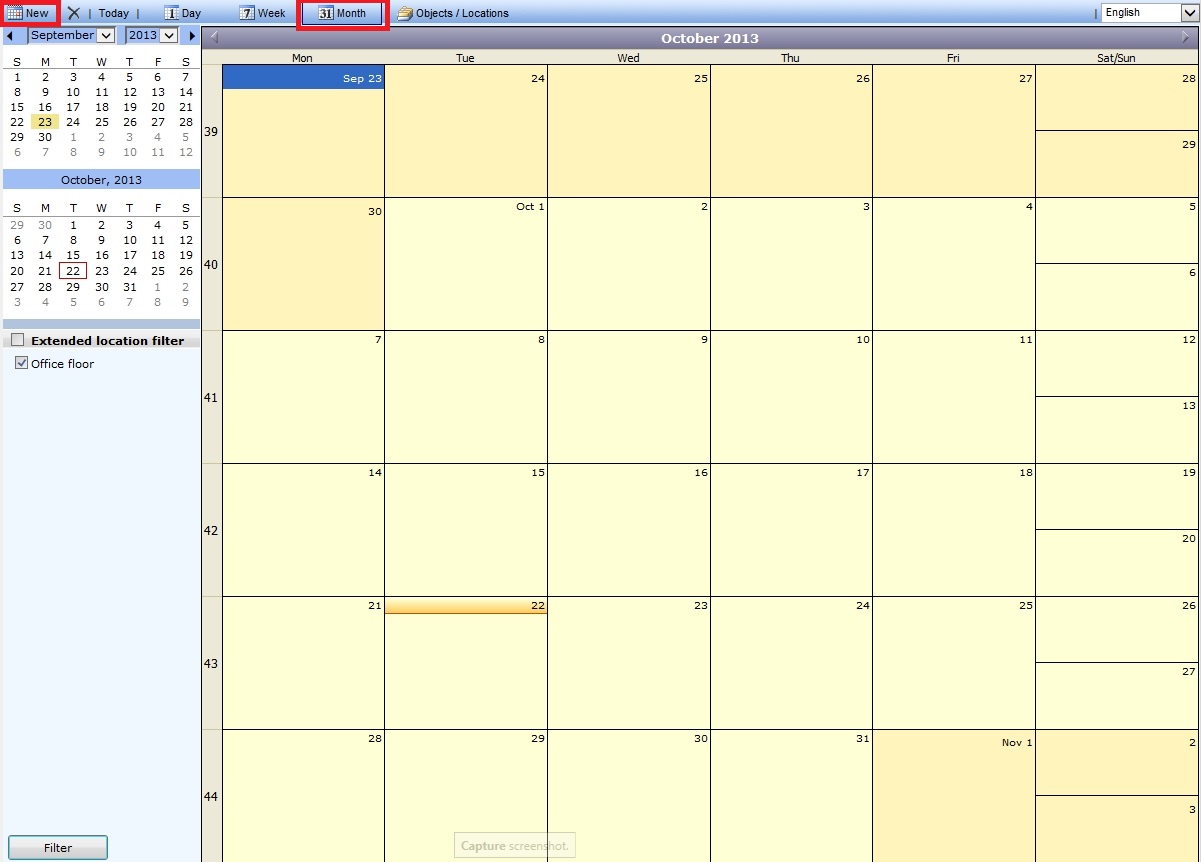
From the SchedulerPro menu, select the Month view, to have a better view of our schedule. Click on the New button from the menu to create a new Event.
In the Event details window, enter the Name and Description of the event. Set the Event time to start at 8 AM and end at 8 PM.

Set the Recurrence pattern to Weekly. Mark the event to take place every week (Every 1 week) and select the weekdays.
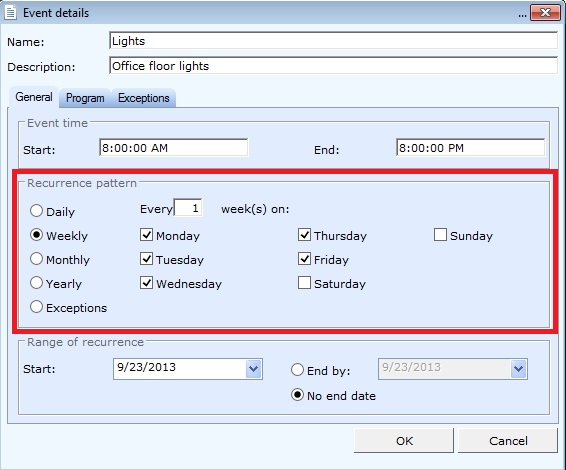
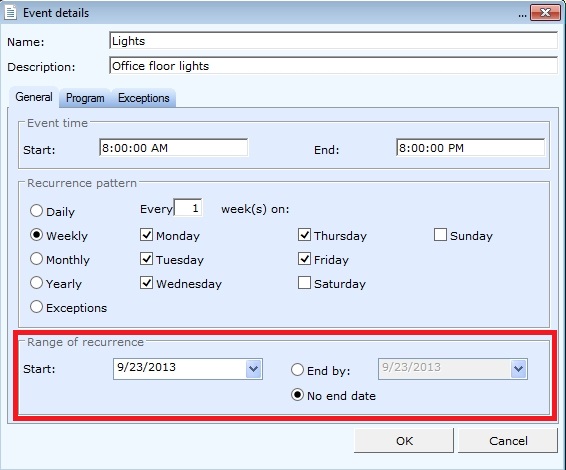
As we want our program to be scheduled indefinitely, select No end date in the Range of recurrence section and select the start date.
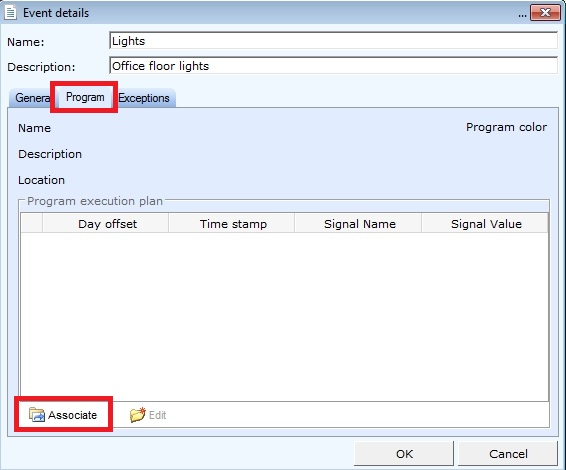
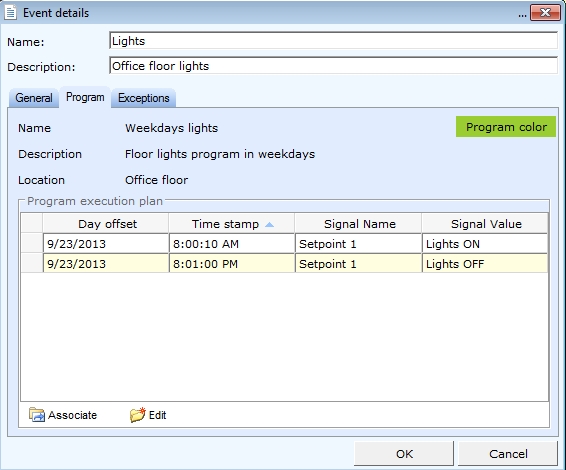
Next, we must associate a Program with this planned event. In the Event details window, click on the Program tab and on the Associate button.
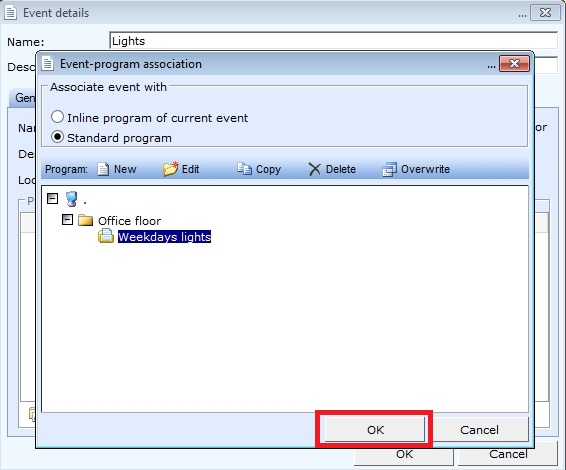
In the Event-program association dialog, select the Weekdays lights program from the Office floor location and click OK to associate it to our event.
The Event details window will display the selected program for this Event. Click OK to confirm the Event.
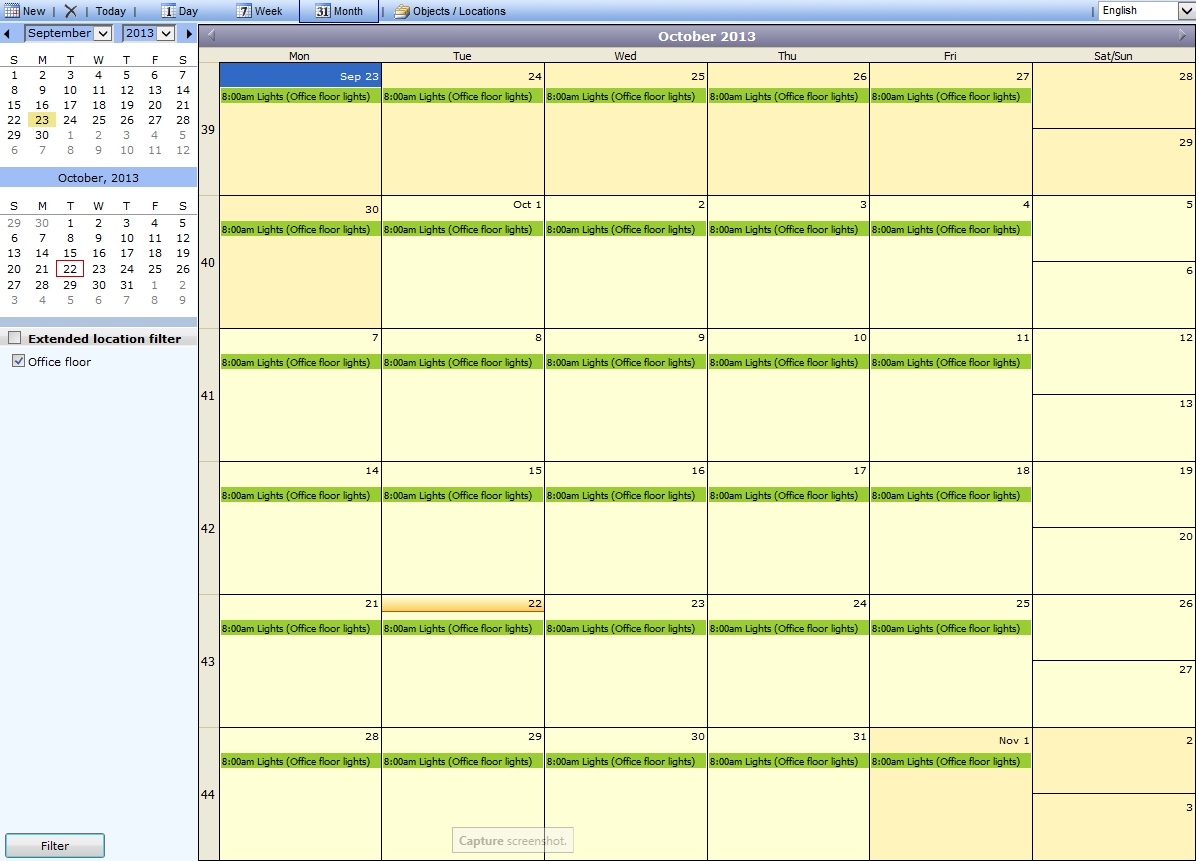
The new Event will be listed for each planned day in the SchedulerPro calendar view.
Create exceptions and adjustments
The scheduled event might be interrupted by holidays, so in order to adapt the event to these interruptions, we are going to schedule an exception and an adjustment for two holiday scenarios.
Create the exception
Right-click on the event displayed in the SchedulerPro calendar view and select Edit event.
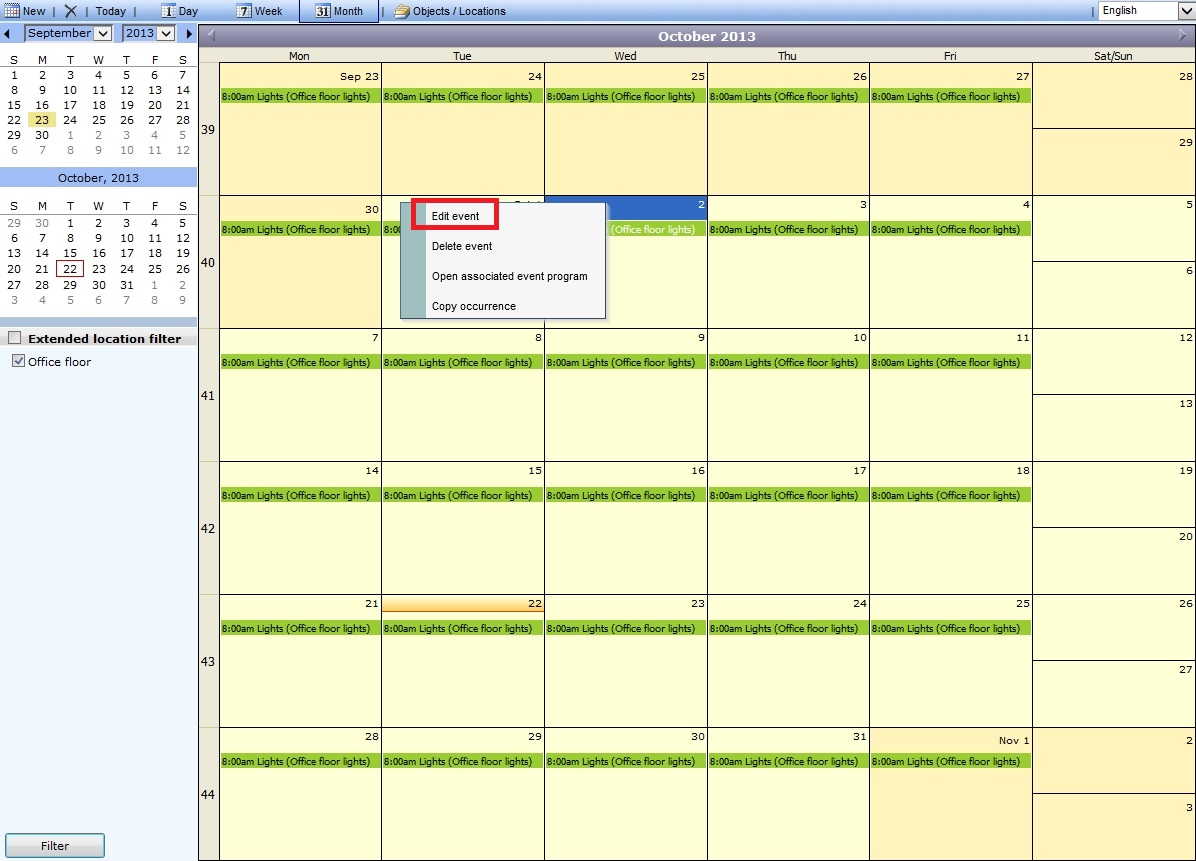
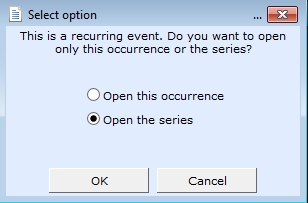
SchedulerPro allows the user to either edit the occurrence or edit the entire series. As we want to edit the event as a whole and not only one occurrence of the event, choose Open the series and click OK to proceed.
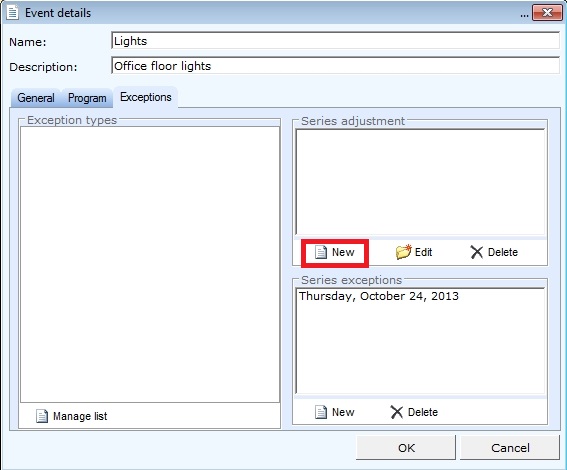
In the Event details window, click on the Exception tab. Click the New button from the Series exceptions section.
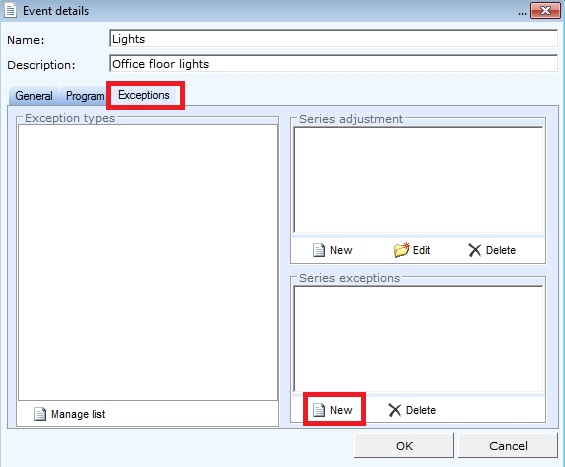
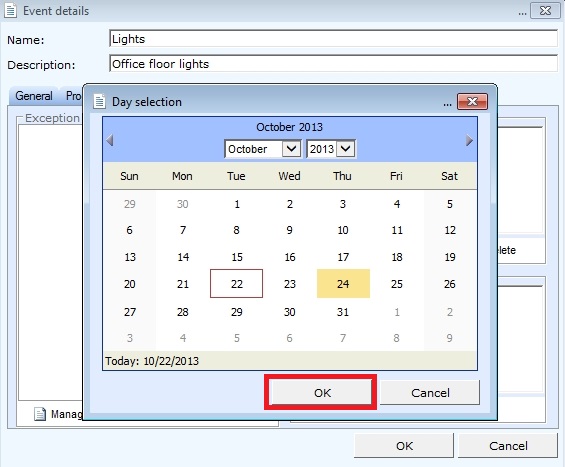
In the Day selection dialog, select the day when the program should not be active (the holiday) and click OK.
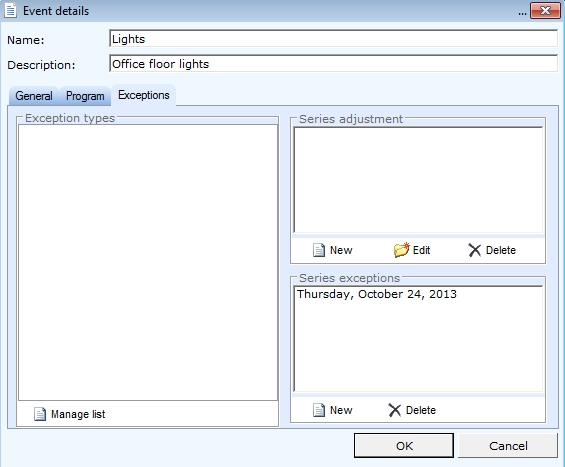
The exception day is now visible in the Series exceptions list. Confirm the Event details window by pressing OK.
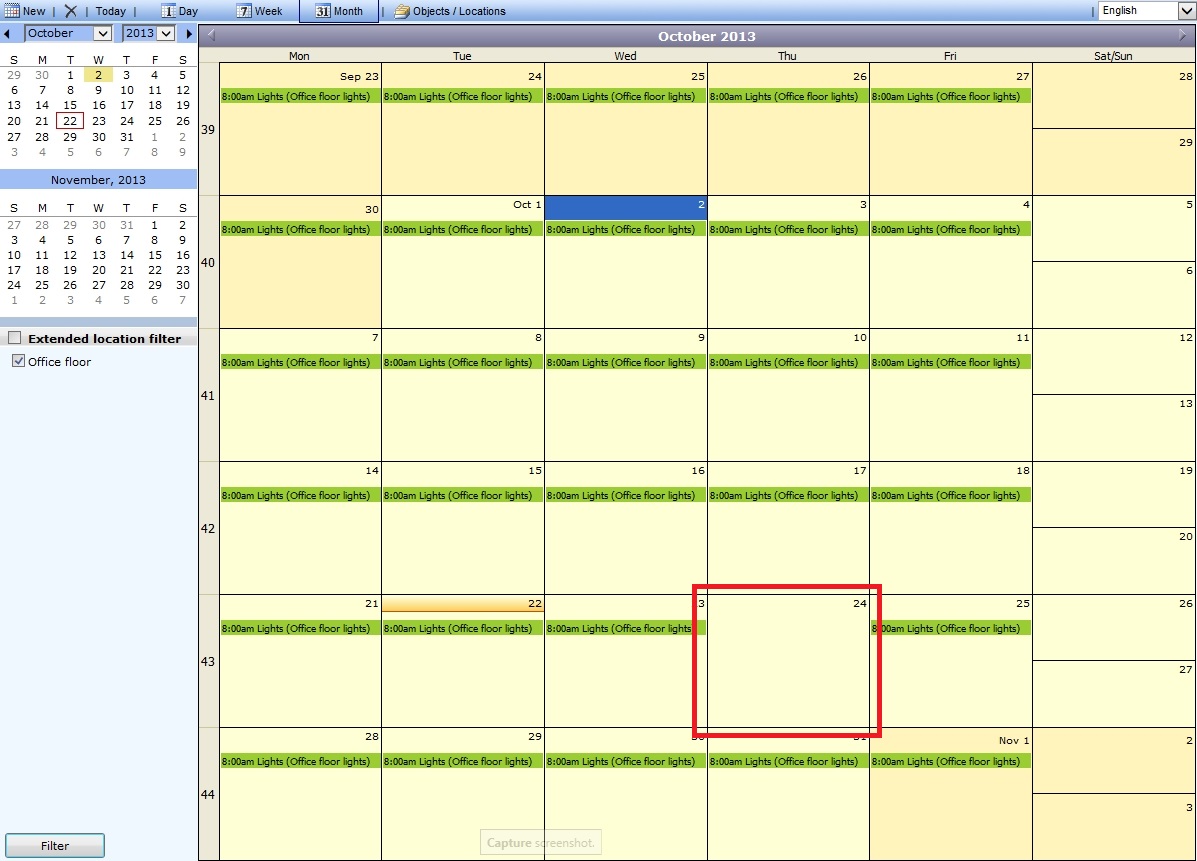
In the SchedulerPro calendar view, the exception day is now free of the planned event.
Create the adjustment
Right-click on the event displayed in the SchedulerPro calendar view and select Edit event.
SchedulerPro allows the user to either edit the occurrence or edit the entire series. As we want to edit the event as a whole and not only one occurrence of the event, choose Open the series and click OK to proceed.
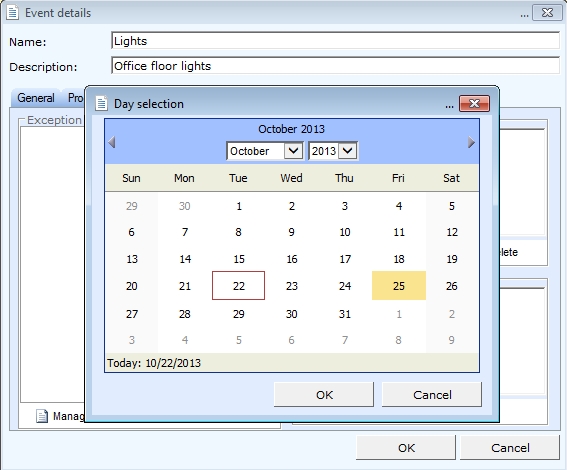
In the Event details window, click on the Exception tab. Click the New button from the Series adjustments section.
In the Day selection dialog, select the day in which the Event should be adjusted. Click OK to proceed.
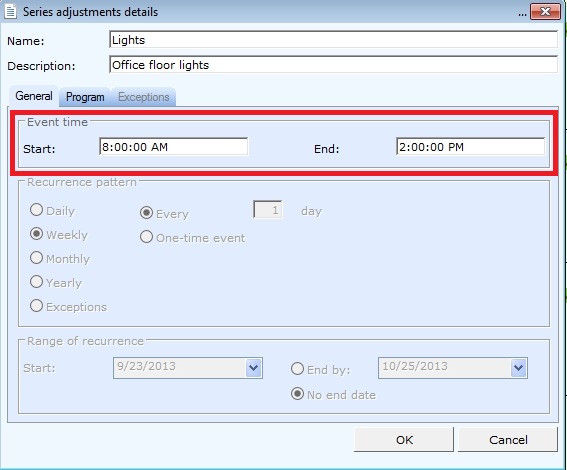
In the Series adjustments details window, we can adjust either the Event time or select another associated Program to run in the selected day. For this example, we will adjust the Event time so that our planned Event will stop earlier. Press OK to confirm the adjustments.
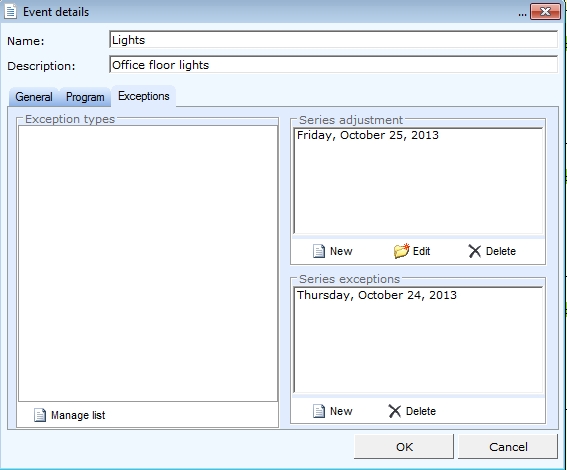
The new adjustment is now listed in the Series adjustments list. Press OK to confirm the changes.
In SchedulerPro calendar view, the adjusted date will display its new program.