Using WCF web services in a Silverlight application
This article provides all the needed information to learn and understand how to use WCF web services in a Silverlight application.
The following tutorial will demonstrate the usage of WCF web services for creating a Silverlight application. The resulting Silverlight application will list the online alarms belonging to a selected type and/or group.
The Silverlight application will be built in a didactic manner, starting with simple calls to the AlarmTypeService and AlarmGroupService and building up further with more complex AlarmService calls.
Click the link below to download the complete Silverlight solution:
Make sure to unblock any downloaded file before using it. Windows automatically blocks the files coming from the internet for security reasons.
If downloading a Visual Studio solution, make sure to update all the references marked with the warning symbol before building it.
The tutorial is split in 6 key sections. Click on the first part of the tutorial to start working:
Setting up the Silverlight application
Check out this article and learn more details on the steps you need to do to set up the Silverlight application.
The tutorial is split in six key sections:
Setting up the Silverlight application (in Visual Studio and Expression Blend)
Creating the XAML structure (in Visual Studio and Expression Blend)
Click the link below to download the complete Silverlight solution:
Make sure to unblock any downloaded file before using it. Windows automatically blocks the files coming from the internet for security reasons.
If downloading a Visual Studio solution, make sure to update all the references marked with the warning symbol before building it.
Using Microsoft Visual Studio
Using Microsoft Visual Studio, we will create a new Silverlight Application:
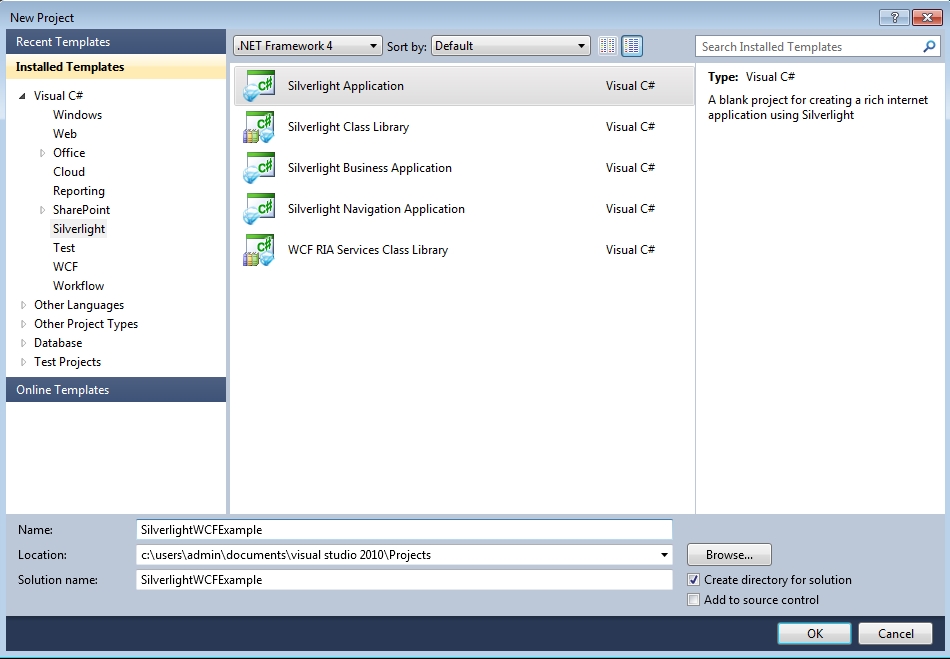
Open Microsoft Visual Studio. Create a new project from File > New > Project.
In the New Project dialog, select to create a new Silverlight Application and name it SilverlightWCFExample.
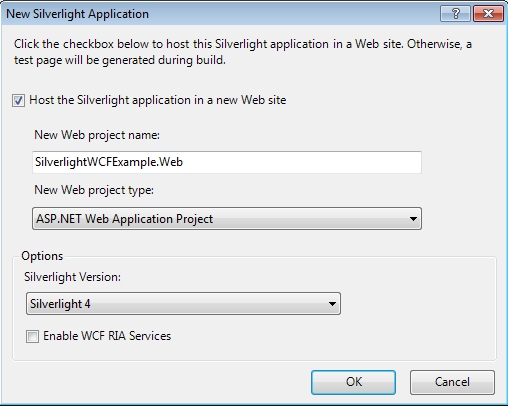
In the New Silverlight Application dialog, make sure that the Host the Silverlight application in a new Web site option is enabled. Also make sure to have the ASP.NET Web Application Project selected as the project type and for the Silverlight Version. Click OK to proceed.
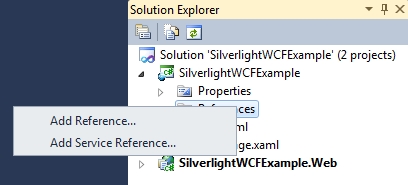
Once the project is created, right-click on the References folder under the SilverlightWCFExample project from the Solution Explorer and select Add Reference. We will need to reference the WFCore.dll, System.Windows.Controls.dll and System.Windows.Controls.Data.dll.
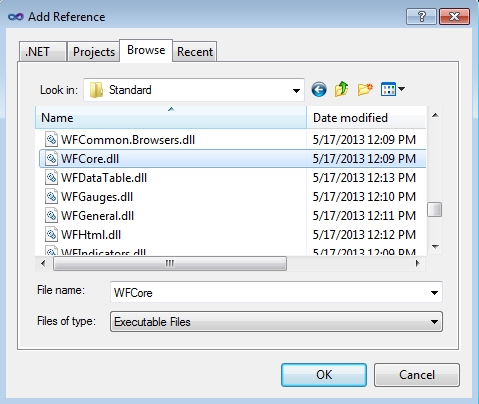
In the Add Reference dialog, click on the Browse tab and navigate to the WEBfactory 2010\\Standard folder (from the WEBfactory 2010 installation folder). Select the WFCore.dll, System.Windows.Controls.dll and System.Windows.Controls.Data.dlland click OK to add the reference.
Using Microsoft Expression Blend
Using Microsoft Expression Blend, we will create a new Silverlight Application:
Open Microsoft Expression Blend. Create a new project using File > New Project... (Ctrl + Shift + N). Name the project SilverlightWCFExample.

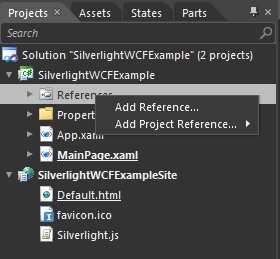
Once the project is created, right-click on the References folder under the SilverlightWCFExample project from the Projects panel and select Add Reference.... We will need to reference the WFCore.dll, System.Windows.Controls.dll and System.Windows.Controls.Data.dll.
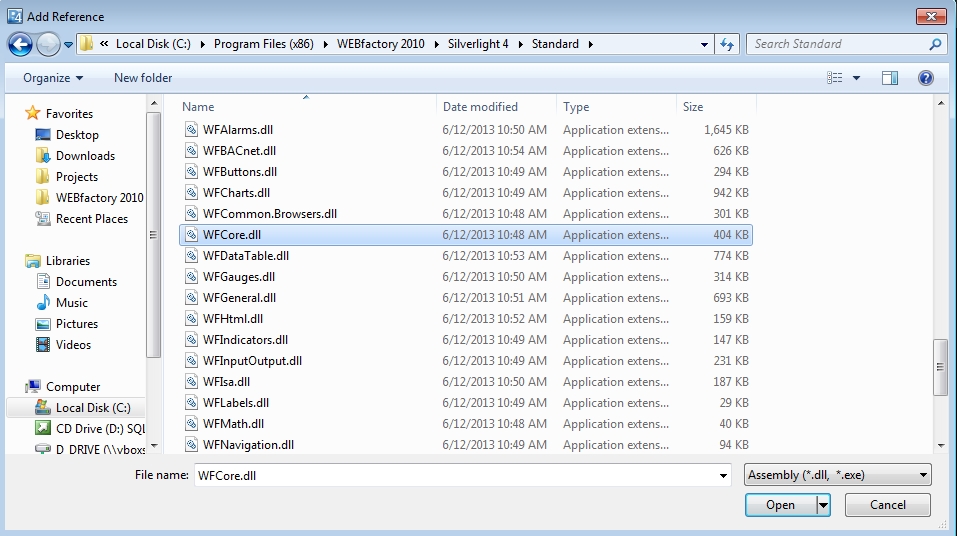
In the Add Reference dialog, navigate to the WEBfactory 2010\\Standard folder (from the WEBfactory 2010 installation folder). Select the WFCore.dll, System.Windows.Controls.dll and System.Windows.Controls.Data.dlland click OPEN to add the reference.
Creating the XAML structure
Check out this article and learn more details on the steps you need to do to create the XAML structure.
The tutorial is split in six key sections.:
Setting up the Silverlight application (in Visual Studio and Expression Blend)
Creating the XAML structure (in Visual Studio and Expression Blend)
Click the link below to download the complete Silverlight solution:
Make sure to unblock any downloaded file before using it. Windows automatically blocks the files coming from the internet for security reasons.
If downloading a Visual Studio solution, make sure to update all the references marked with the warning symbol before building it.
Using Microsoft Visual Studio
Because our application will list the alarms depending on their type and group, we will need to place the following controls in our XAML:
two TextBlock controls that will display what each combo-box does;
two ComboBox controls that will list the alarm types and the alarm groups;
a DataGrid control that will list the alarms belonging to the selected group and type.
In order to use the DataGrid control in our XAML code, we need to add the following namespace in the code:
xmlns:data="clr-namespace:System.Windows.Controls;assembly=System.Windows.Controls.Data"
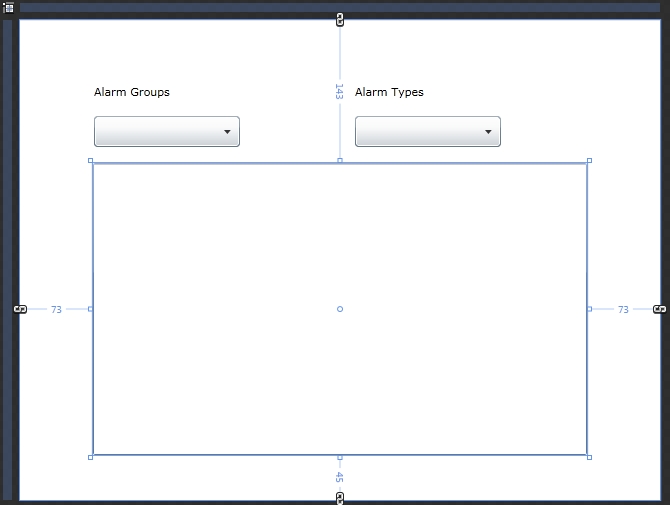
On the LayoutRoot grid element, set the Margin to be 200 left and right and 100 top and bottom:
<Grid x:Name="LayoutRoot"
      Margin="200, 100"
      Background="White">


</Grid>
Define three rows and two columns for the default LayoutRoot grid element. Set the height of the first row to Auto and the height of the second row to 40:
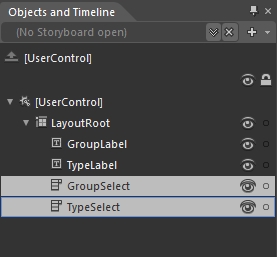
<Grid x:Name="LayoutRoot"
      Margin="200, 100"
      Background="White">

    <Grid.RowDefinitions>
        <RowDefinition Height="Auto" />
        <RowDefinition Height="40" />
        <RowDefinition />
    </Grid.RowDefinitions>
    <Grid.ColumnDefinitions>
        <ColumnDefinition />
        <ColumnDefinition />
    </Grid.ColumnDefinitions>

</Grid>
Inside our grid, place the first TextBlock control named GroupLabel on the first column and first row of our grid. Set the control to display the Alarm Groups text and center the control vertically:
<TextBlock x:Name="GroupLabel"
            Grid.Row="0"
            Grid.Column="0"
            VerticalAlignment="Center"
            Text="Alarm Groups" />
Place the corresponding ComboBox control in the grid cell bellow and name it GroupSelect. Align the control to left and center it vertically. We must also define what the control should display and what value should the displayed item have:
<ComboBox x:Name="GroupSelect"
            Grid.Row="1"
            Grid.Column="0"
            HorizontalAlignment="Left"
            VerticalAlignment="Center"
            DisplayMemberPath="SymbolicTextTranslation"
            SelectedValuePath="SymbolicTextName" />
Now place the second TextBlock control named TypeLabel on the first row of the grid, but this time on the second column. Set the control to display the Alarm Types text and center the control vertically:
<TextBlock x:Name="TypeLabel"
            Grid.Row="0"
            Grid.Column="1"
            VerticalAlignment="Center"
            Text="Alarm Types" />
Now place the corresponding ComboBox control in the grid cell below the TypeLabel TextBlock and name it TypeSelect. Align the control to left and center it vertically. We must also define what the control should display and what value should the displayed item have:
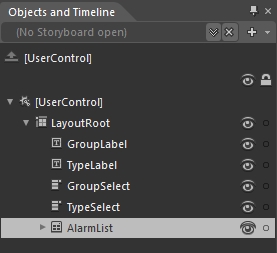
<ComboBox x:Name="TypeSelect"
            Grid.Row="1"
            Grid.Column="1"
            HorizontalAlignment="Left"
            VerticalAlignment="Center"
            DisplayMemberPath="SymbolicTextTranslation"
            SelectedValuePath="SymbolicTextName" />
Finally, place the DataGrid control on the third row of the grid and make it stretch on both columns. Name the control AlarmList:
<data:DataGrid x:Name="AlarmList"
                Grid.Row="2"
                Grid.ColumnSpan="2" />
Using Microsoft Expression Blend
Because our application will list the alarms depending on their type and group, we will need to place the following controls on the MainPage:
two TextBlock controls that will display what each combo-box does;
two ComboBox controls that will list the alarm types and the alarm groups;
a DataGrid control that will list the alarms belonging to the selected group and type.
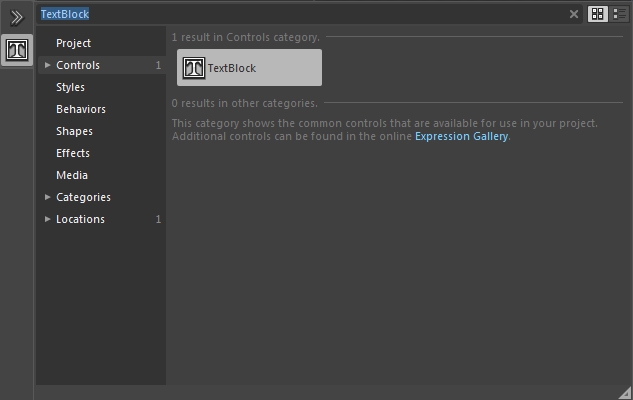
Using the Assets panel, search for the TextBlock control and place two of them on the MainPage:
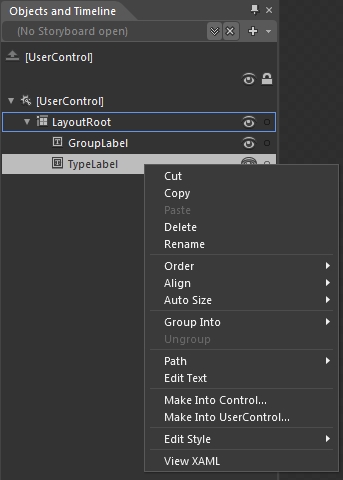
Right-click on the two TextBlock controls in the Objects and Timeline panel and rename them GroupLabel and TypeLabel:
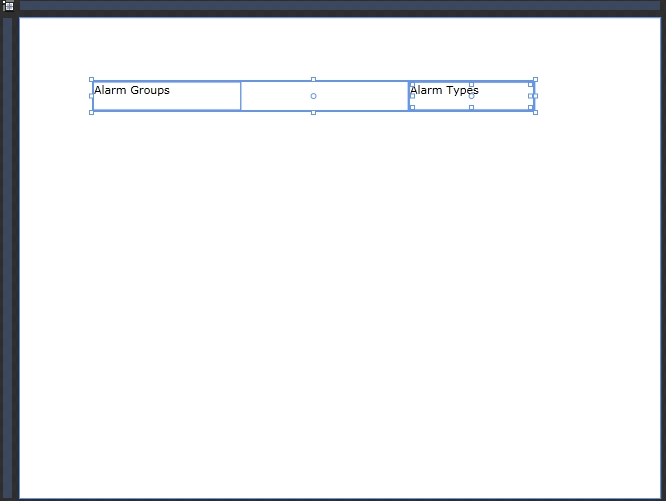
Double-click on the controls on the MainPage and change their text contents to Alarm Groups and Alarm Types (or use the Text property from the Common Properties category in the Properties panel):
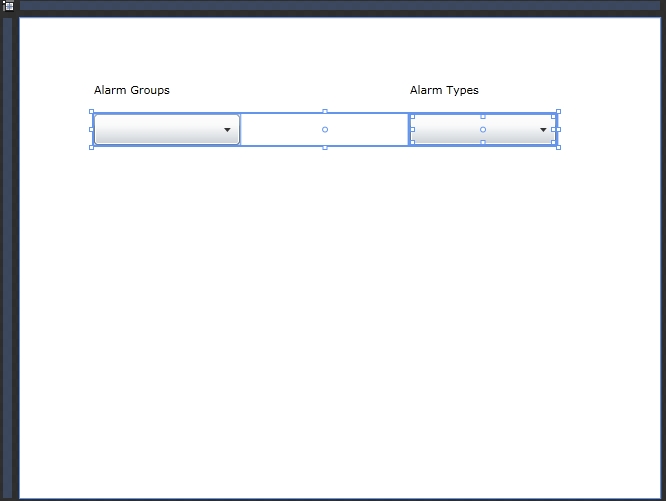
Using the Assets panel, search for the ComboBox control and place two of them on to the MainPage:
Right-click on the two ComboBox controls in the Objects and Timeline panel and rename them to GroupSelect and TypeSelect.
Using the Assets panel, search for the DataGrid control and place it on the MainPage:
Right-click on the DataGrid control in the Objects and Timeline panel and rename it to AlarmList.
Connecting to the AlarmsService Web Service
Check out this article and learn more details on the steps you need to do to connect to AlarmsService Web Service.
The tutorial is split in six key sections:
Setting up the Silverlight application (in Visual Studio and Expression Blend)
Creating the XAML structure (in Visual Studio and Expression Blend)
Connecting to the AlarmsService Web Service
Click the link below to download the complete Silverlight solution:
Make sure to unblock any downloaded file before using it. Windows automatically blocks the files coming from the internet for security reasons.
If downloading a Visual Studio solution, make sure to update all the references marked with the warning symbol before building it.
In order to be able to use the web services for getting our alarm groups, types and online alarms, we first need to connect the Silverlight project to the AlarmsService web service.
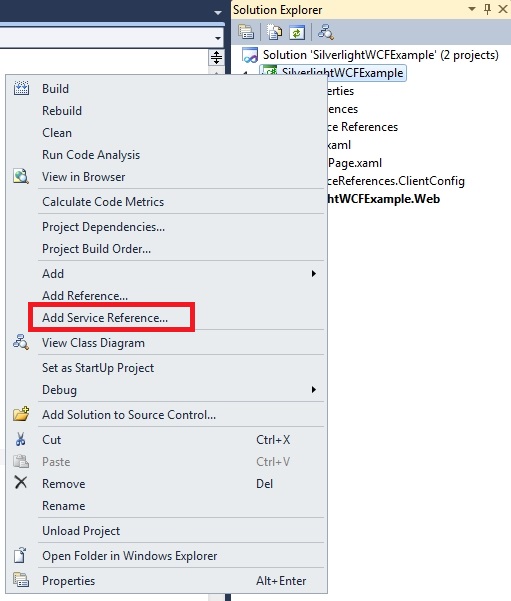
Right-click on the SilverlightWCFExample project from our solution. Select Add Service Reference....
In the Add Service Reference dialog, we need to place the AlarmsService web service address in the Address field.
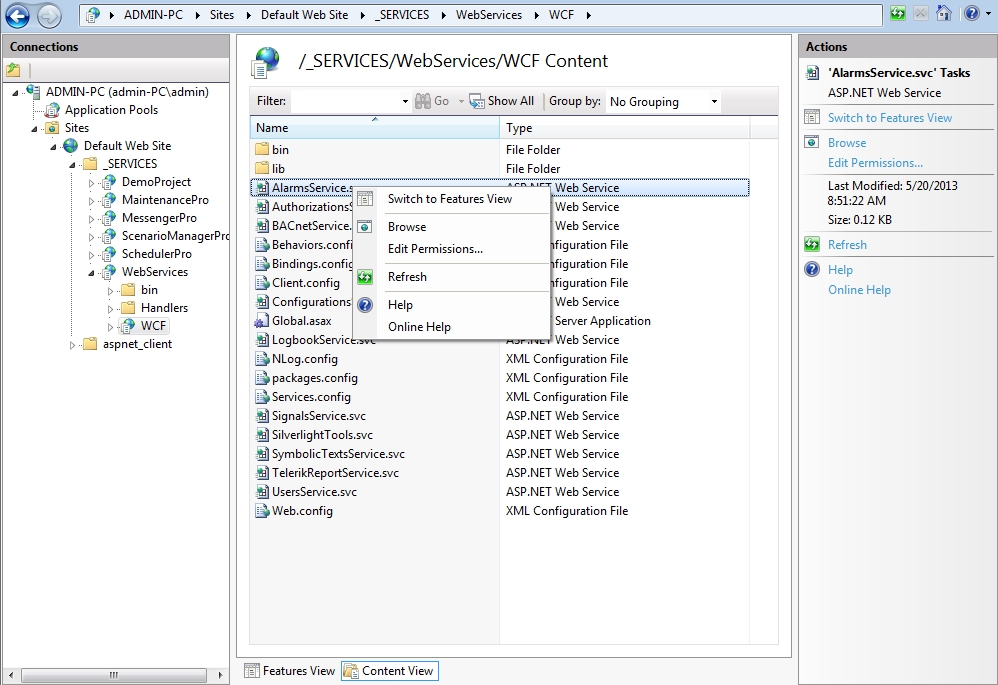
To obtain the web service address, open the Internet Information Services (IIS) Manager and go to the Default Web Site/_SERVICES/WebServices/WCF Content. In the Content View, right-click the AlarmsService.svc and select Browse.
Copy the address of the web service from the web browser's address bar and paste it in the Address field of the Add Service Reference dialog. Click Go to validate the address. Name the new Namespace AlarmsService.
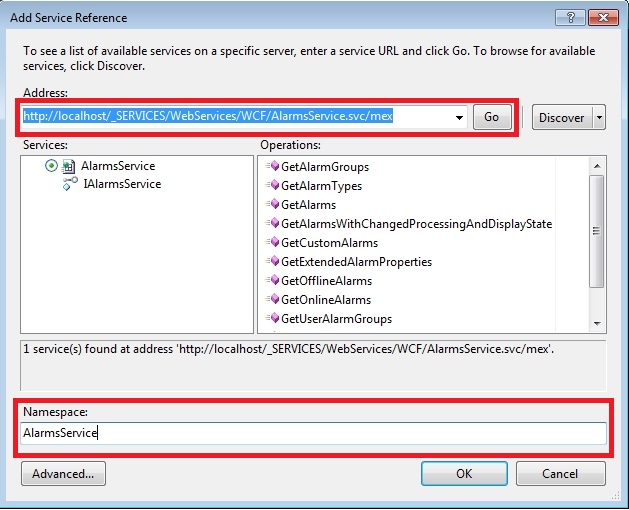
Notice the Add Service Reference dialog displays the IAlarmsService interface implemented by the web service and all it's available operations.
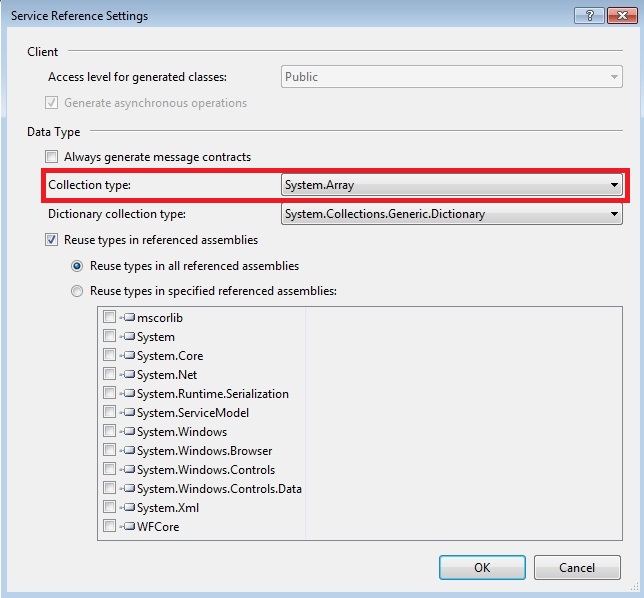
Click Advanced... to further configure the web service reference. In the Service Reference Settings, set the Collection type to System.Array. This setting will return all the collections from the web services as arrays. This step is needed only for this current demonstration. Other projects may require different collection types.
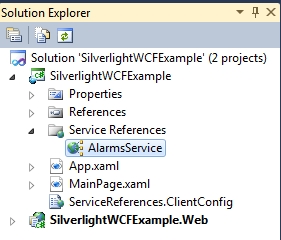
Confirm both Service Reference Settings and Add Service Reference dialogs. Notice that in the Solution Explorer, the AlarmService has been added under the Service References folder.
Getting the Alarm Groups and populating the ComboBox
Check out this article and learn more details on how to get the alarm groups and how to populate the combo box.
The tutorial is split in six key sections:
Setting up the Silverlight application (in Visual Studio and Expression Blend)
Creating the XAML structure (in Visual Studio and Expression Blend)
Getting the Alarm Groups and populating the ComboBox
Click the link below to download the complete Silverlight solution:
Make sure to unblock any downloaded file before using it. Windows automatically blocks the files coming from the internet for security reasons.
If downloading a Visual Studio solution, make sure to update all the references marked with the warning symbol before building it.
In order to get the Alarm Groups, we will use the AlarmsService web service and register a new client that will handle the web service request and response.
Open the MainPage.xaml.cs. Add the following usings to the end of the usings list:
using WFSilverlight.Core;
using System.ComponentModel;
using SilverlightWCFExample.AlarmsService;
Before the public MainPage() method, create the WFConnector field and AlarmsServiceClient field inside a region called Fields:
#region Fields
private WFConnector wfConnector;
private AlarmsServiceClient client;
#endregion
We need to use the Loaded event of the UserControl to register to the required events and call our methods. In the MainPage constructor, register to the Loaded event of the UserControl:
public MainPage()
{
    InitializeComponent();

    Loaded += UserControl_Loaded;
}
We also need to register to the Unloaded event of the UserControl in order to call the Dispose method (that will unregister the events and the connector to avoid memory leaks)
public MainPage()
{
    InitializeComponent();

    Loaded += UserControl_Loaded;
    Unloaded += UserControl_Unloaded;
}
Now let's handle the UserControl_Loaded event: we need to create a new instance of the WFConnector and make sure it is created only at run time:
private void UserControl_Loaded(object sender, RoutedEventArgs e)
{
    if (DesignerProperties.IsInDesignTool) return;

    wfConnector = new WFConnector(false);
}
Still on the UserControl_Loaded event, we will need to create a new instance of the AlarmServiceClient and register to the GetAlarmGroupsCompleted event:
private void UserControl_Loaded(object sender, RoutedEventArgs e)
{
    if (DesignerProperties.IsInDesignTool) return;

    wfConnector = new WFConnector(false);

    client = new AlarmsServiceClient();

    client.GetAlarmGroupsCompleted += client_GetAlarmGroupsCompleted;
}
Next we need to request the alarms groups using the GetAlarmGroupsAsync() method. This method requires information about the current session and user besides the language ID and a timeout value. To get this information and pass it as parameters, we need to call the connector's GetUserCommunicationKeys() method and bring everything in a new variable.
The GetAlarmGroupsAsync() method requires the user communication data as parameters but does not implicitly require that the user is logged in, unless the Enforce User Authentication option is enabled in WEBfactory 2010Studio.
private void UserControl_Loaded(object sender, RoutedEventArgs e)
{
    if (DesignerProperties.IsInDesignTool) return;

    wfConnector = new WFConnector(false);

    client = new AlarmsServiceClient();

    client.GetAlarmGroupsCompleted += client_GetAlarmGroupsCompleted;

    var userCommunicationKeys = wfConnector.GetUserCommunicationKeys(string.Empty);

    client.GetAlarmGroupsAsync(userCommunicationKeys.CommunicationKeys.SessionGuid, userCommunicationKeys.CommunicationKeys.ClientId, userCommunicationKeys.UserProperties.UserName, userCommunicationKeys.UserProperties.UserIsDomain, wfConnector.GetLanguageId(), 5400);

}
On the client_GetAlarmGroupsCompleted event, we will receive the array of results and call the method that will populate the GroupSelect ComboBox with it. In case the web service request was canceled or an error has occurred, we will call a method to display an error message:
private void client_GetAlarmGroupsCompleted(object sender, GetAlarmGroupsCompletedEventArgs e)
{
    if (e.Error == null && e.Cancelled == false)
    {
        PopulateGroupSelectComboBox(e.Result);
    }
    else
    {
        HasAsyncError();
    }
}
Now we need to populate the GroupSelect ComboBox with a list containing the resulted array and an All item.
In the PopulateGroupSelectComboBox method, create a new list:
private void PopulateGroupSelectComboBox(AlarmGroupDTO[] alarmGroupDTOs)
{
    var items = new List<AlarmGroupDTO>();
}
Add an All item to the list and append the results array. The All item will use the wildcard (*) as SymbolicTextName, in order to use all the alarm groups. This way, we will have the option to select all alarm groups:
private void PopulateGroupSelectComboBox(AlarmGroupDTO[] alarmGroupDTOs)
{
    var items = new List<AlarmGroupDTO>();
    items.Add(new AlarmGroupDTO() { SymbolicTextTranslation = "All", SymbolicTextName = "*" });
    items.AddRange(alarmGroupDTOs);
}
Now we need to feed the new list to the GroupSelect ComboBox and make the All item (the first item of the list) the default selection:
private void PopulateGroupSelectComboBox(AlarmGroupDTO[] alarmGroupDTOs)
{
    var items = new List<AlarmGroupDTO>();
    items.Add(new AlarmGroupDTO() { SymbolicTextTranslation = "All", SymbolicTextName = "*" });
    items.AddRange(alarmGroupDTOs);

    GroupSelect.ItemsSource = items;
    GroupSelect.SelectedIndex = 0;
}
Create the HasAsyncError method to display the error message:
private void HasAsyncError()
{
    MessageBox.Show("The web service request has encountered an error or has been cancelled");
}
In order to call the Dispose method, we need to treat the Unload event of the UserControl. We will handle the Unloaded event after the Loaded event handler:
private void UserControl_Unloaded(object sender, RoutedEventArgs e)
{
    Dispose();
}
Next we need to dispose the used resources:
Create a Dispose region and a public Dispose method inside (will be called on the UserControl_Unloaded event). The Dispose method will call the two methods that will dispose the web service client and the connector:
#region Dispose
public void Dispose()
{
    DisposeServiceClient();
    DisposeConnector();
}
#endregion
Define the DisposeServiceClient method that will unregister from the GetAlarmGroupsCompleted event:
private void DisposeServiceClient()
{
    client.GetAlarmGroupsCompleted -= client_GetAlarmGroupsCompleted;
}
Define the DisposeConnector method that will dispose the connector if the connector has not already been disposed:
private void DisposeConnector()
{
    if (wfConnector == null) return;

    wfConnector.Dispose();
}
Testing the code
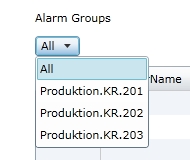
Press F5 to build and run the application from Visual Studio. The Alarm Groups ComboBox should be populated with the existing alarm groups and the first item should be the default selection:
Getting the Alarm Types and populating the ComboBox
Check out this article and learn more details on how to get the Alarm Types and how to populate the Combo Box.
The tutorial is split in six key sections:
Setting up the Silverlight application (in Visual Studio and Expression Blend)
Creating the XAML structure (in Visual Studio and Expression Blend)
Getting the Alarm Types and populating the ComboBox
Click the link below to download the complete Silverlight solution:
Make sure to unblock any downloaded file before using it. Windows automatically blocks the files coming from the internet for security reasons.
If downloading a Visual Studio solution, make sure to update all the references marked with the warning symbol before building it.
Because we already got the Alarm Groups in the previous step of the tutorial, getting the Alarm Types will be easier as we will work on the same code structure. Similar with getting the Alarm Groups, we will need to register a new client service event, send the request and handle the completed event of that request:
In the UserControl_Loaded event handler, register to the AlarmServiceClient's GetAlarmTypesCompleted event and create a new asynchronous request for the alarm types. We will pass the user communication keys previously stored in the userCommunicationKeys variable.
The GetAlarmTypesAsync() method requires the user communication data as parameters but does not implicitly require that the user is logged in, unless the Enforce User Authentication option is enabled in WEBfactory 2010Studio.
private void UserControl_Loaded(object sender, RoutedEventArgs e)
{
    if (DesignerProperties.IsInDesignTool) return;

    wfConnector = new WFConnector(false);

    client = new AlarmsServiceClient();

    client.GetAlarmGroupsCompleted += client_GetAlarmGroupsCompleted;

    client.GetAlarmTypesCompleted += client_GetAlarmTypesCompleted;

    var userCommunicationKeys = wfConnector.GetUserCommunicationKeys(string.Empty);

    client.GetAlarmGroupsAsync(userCommunicationKeys.CommunicationKeys.SessionGuid, userCommunicationKeys.CommunicationKeys.ClientId, userCommunicationKeys.UserProperties.UserName, userCommunicationKeys.UserProperties.UserIsDomain, wfConnector.GetLanguageId(), 5400);

    client.GetAlarmTypesAsync(userCommunicationKeys.CommunicationKeys.SessionGuid, userCommunicationKeys.CommunicationKeys.ClientId, userCommunicationKeys.UserProperties.UserName, userCommunicationKeys.UserProperties.UserIsDomain, wfConnector.GetLanguageId(), 5400);
}
Next we need to treat the client_GetAlarmTypesCompleted event. Before that, we will wrap the existing client_GetAlarmGroupsCompleted event in a new region called Events. Like the client_GetAlarmGroupsCompleted event, client_GetAlarmTypesCompleted will call a method that will populate the proper ComboBox with the results and, in case of error, will call the HasAsyncError method (defined in the previous step) to display an error message:
private void client_GetAlarmTypesCompleted(object sender, GetAlarmTypesCompletedEventArgs e)
{
    if (e.Error == null && e.Cancelled == false)
    {
        PopulateTypeSelectComboBox(e.Result);
    }
    else
    {
        HasAsyncError();
    }
}
Now we need to populate the TypeSelect ComboBox with a list containing the resulted array and an All item. Both PopulateGroupSelectComboBox and PopulateTypeSelectComboBox methods will be wrapped inside a Methods region.
In the PopulateTypeSelectComboBox method, create a new list:
private void PopulateTypeSelectComboBox(AlarmTypeDTO[] alarmTypeDTOs)
{
    var items = new List<AlarmTypeDTO>();
}
Add an All item to the list and append the results array. The All item will use the wildcard (*) as SymbolicTextName, in order to use all the alarm groups. This way, we will have the option to select all alarm groups:
private void PopulateTypeSelectComboBox(AlarmTypeDTO[] alarmTypeDTOs)
{
    var items = new List<AlarmTypeDTO>();
    items.Add(new AlarmTypeDTO() { SymbolicTextTranslation = "All", SymbolicTextName = "*" });
    items.AddRange(alarmTypeDTOs);
}
Now we need to feed the new list to the TypeSelect ComboBox and make the All item (the first item of the list) the default selection:
private void PopulateTypeSelectComboBox(AlarmTypeDTO[] alarmTypeDTOs)
{
    var items = new List<AlarmTypeDTO>();
    items.Add(new AlarmTypeDTO() { SymbolicTextTranslation = "All", SymbolicTextName = "*" });
    items.AddRange(alarmTypeDTOs);

    TypeSelect.ItemsSource = items;
    TypeSelect.SelectedIndex = 0;
}
Next, we need to unregister the new GetAlarmTypesCompleted event registration in the DisposeServiceClient method from the Dispose region or our code:
private void DisposeServiceClient()
{
    client.GetAlarmGroupsCompleted -= client_GetAlarmGroupsCompleted;
    client.GetAlarmTypesCompleted -= client_GetAlarmTypesCompleted;
}
Testing the code
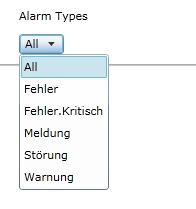
Press F5 to build and run the application from Visual Studio. The Alarm Types ComboBox should be populated with the existing alarm types and the first item should be the default selection:
Getting the Online Alarms and populating the DataGrid
Check out this article and learn how to get online alarms in the WCF web services and populate the dataGrid.
The tutorial is split in 6 key sections:
Setting up the Silverlight application (in Visual Studio and Expression Blend)
Creating the XAML structure (in Visual Studio and Expression Blend)
Getting the Online Alarms and populating the DataGrid
Click the link below to download the complete Silverlight solution:
Make sure to unblock any downloaded file before using it. Windows automatically blocks the files coming from the internet for security reasons.
If downloading a Visual Studio solution, make sure to update all the references marked with the warning symbol before building it.
By now, we have set up out GroupSelect and TypeSelect ComboBox controls. Next, we need to use the values selected in the two ComboBox controls in order to request the online alarms from the AlarmsService web service.
To obtain the online alarms, we need to call the GetOnlineAlarmsAsync method from the AlarmsServiceClient web service with the configured filters. Because we need to obtain the online alarms considering the selections made in both GroupSelect and TypeSelect ComboBox controls, we will first need to register to the SelectionChanged events of the two ComboBox controls (on the UserControl_Loaded event):
private void UserControl_Loaded(object sender, RoutedEventArgs e)
{
    if (DesignerProperties.IsInDesignTool) return;

    wfConnector = new WFConnector(false);

    client = new AlarmsServiceClient();

    client.GetAlarmGroupsCompleted += client_GetAlarmGroupsCompleted;

    client.GetAlarmTypesCompleted += client_GetAlarmTypesCompleted;

    GroupSelect.SelectionChanged += GroupSelect_SelectionChanged;
    TypeSelect.SelectionChanged += TypeSelect_SelectionChanged;

    var userCommunicationKeys = wfConnector.GetUserCommunicationKeys(string.Empty);

    client.GetAlarmGroupsAsync(userCommunicationKeys.CommunicationKeys.SessionGuid, userCommunicationKeys.CommunicationKeys.ClientId, userCommunicationKeys.UserProperties.UserName, userCommunicationKeys.UserProperties.UserIsDomain, wfConnector.GetLanguageId(), 5400);

    client.GetAlarmTypesAsync(userCommunicationKeys.CommunicationKeys.SessionGuid, userCommunicationKeys.CommunicationKeys.ClientId, userCommunicationKeys.UserProperties.UserName, userCommunicationKeys.UserProperties.UserIsDomain, wfConnector.GetLanguageId(), 5400);
}
While on the UserControl_Loaded event, we will also register to the GetOnlineAlarmsCompleted event of the AlarmsServiceClient:
private void UserControl_Loaded(object sender, RoutedEventArgs e)
{
    if (DesignerProperties.IsInDesignTool) return;

    wfConnector = new WFConnector(false);

    client = new AlarmsServiceClient();

    client.GetAlarmGroupsCompleted += client_GetAlarmGroupsCompleted;

    client.GetAlarmTypesCompleted += client_GetAlarmTypesCompleted;

    GroupSelect.SelectionChanged += GroupSelect_SelectionChanged;
    TypeSelect.SelectionChanged += TypeSelect_SelectionChanged;

    client.GetOnlineAlarmsCompleted += client_GetOnlineAlarmsCompleted;

    var userCommunicationKeys = wfConnector.GetUserCommunicationKeys(string.Empty);

    client.GetAlarmGroupsAsync(userCommunicationKeys.CommunicationKeys.SessionGuid, userCommunicationKeys.CommunicationKeys.ClientId, userCommunicationKeys.UserProperties.UserName, userCommunicationKeys.UserProperties.UserIsDomain, wfConnector.GetLanguageId(), 5400);

    client.GetAlarmTypesAsync(userCommunicationKeys.CommunicationKeys.SessionGuid, userCommunicationKeys.CommunicationKeys.ClientId, userCommunicationKeys.UserProperties.UserName, userCommunicationKeys.UserProperties.UserIsDomain, wfConnector.GetLanguageId(), 5400);
}
Next, we need to treat the GroupSelect_SelectionChanged and TypeSelect_SelectionChanged events, inside the Events region. Both events will call the same CallGetOnlineAlarms method:
private void GroupSelect_SelectionChanged(object sender, SelectionChangedEventArgs e)
{
    CallGetOnlineAlarms();
}

private void TypeSelect_SelectionChanged(object sender, SelectionChangedEventArgs e)
{
    CallGetOnlineAlarms();
}
In the Methods region, let's define the CallGetOnlineAlarms method.
We first need to make sure that we have selected the desired values in both GroupSelect and TypeSelect ComboBox controls in order to pass the selections as filters for the GetOnlineAlarmsAsync method:
private void CallGetOnlineAlarms()
{
    if (TypeSelect.SelectedValue == null || GroupSelect.SelectedValue == null) return;
}
If the selections from both ComboBox controls are made, we will create a filter object that will be sent on the GetOnlineAlarmsAsync method:
private void CallGetOnlineAlarms()
{
    if (TypeSelect.SelectedValue == null || GroupSelect.SelectedValue == null) return;

    var filter = new AlarmFilterDTO();
}
Next, we need to define the filters. The following filters are needed in order to complete the call successfully and override the default values:
LanguageID - provided by the WFConnector; we will use the GetLanguageId of the WFConnector to get the language ID.
AlarmTypes - The selected value from the TypeSelect ComboBox control;
AlarmGroups - The selected value from the GroupSelect ComboBox control;
SortOrder - the ServerSortOrder must be specified; we will use the DateDescending sort order.
MaxRowCount - the maximum number of rows to get;
MaximumPriority - the maximum priority of the alarms;
StartTime - the start time of the alarms; we will use the minimum value in order to get all the alarms.
EndTime - the end time of the alarms; we will use the maximum value in order to get all the alarms.
private void CallGetOnlineAlarms()
{
    if (TypeSelect.SelectedValue == null || GroupSelect.SelectedValue == null) return;

    var filter = new AlarmFilterDTO();


    filter.LanguageID = wfConnector.GetLanguageId();
    filter.AlarmTypes = new string[] { TypeSelect.SelectedValue.ToString() };
    filter.AlarmGroups = new string[] { GroupSelect.SelectedValue.ToString() };
    filter.SortOrder = ServerSortOrder.DateDescending;
    filter.MaxRowCount = 100;
    filter.MaximumPriority = 100;
    filter.StartTime = DateTimeOffset.MinValue;
    filter.EndTime = DateTimeOffset.MaxValue;
}
Now we need to call the GetOnlineAlarmsAsync method from the AlarmsServiceClient. This method requires information about the current session and user besides the alarm filter and a timeout value. To get this information and pass it as parameters, we need to call the connector's GetUserCommunicationKeys() method and bring everything in a new variable.
The GetAlarmGroupsAsync() method requires the user communication data as parameters but does not implicitly require that the user is logged in, unless the Enforce User Authentication option is enabled in WEBfactory 2010Studio.
private void CallGetOnlineAlarms()
{
    if (TypeSelect.SelectedValue == null || GroupSelect.SelectedValue == null) return;

    var filter = new AlarmFilterDTO();
    filter.LanguageID = wfConnector.GetLanguageId();
    filter.AlarmTypes = new string[] { TypeSelect.SelectedValue.ToString() };
    filter.AlarmGroups = new string[] { GroupSelect.SelectedValue.ToString() };
    filter.SortOrder = ServerSortOrder.DateDescending;
    filter.MaxRowCount = 100;
    filter.MaximumPriority = 100;
    filter.StartTime = DateTimeOffset.MinValue;
    filter.EndTime = DateTimeOffset.MaxValue;

    var userCommunicationKeys = wfConnector.GetUserCommunicationKeys(string.Empty);

    client.GetOnlineAlarmsAsync(userCommunicationKeys.CommunicationKeys.SessionGuid, userCommunicationKeys.CommunicationKeys.ClientId, userCommunicationKeys.UserProperties.UserName, userCommunicationKeys.UserProperties.UserIsDomain, filter, 5400);
}
The online alarms request has been properly sent, now we need to treat the client_GetOnlineAlarmsCompleted event in the Events region of our code. Similar to the client_GetAlarmGroupsCompleted and client_GetAlarmTypesCompleted events, we will write the resulted online alarms array to our AlarmList DataGrid and, in case of failure, we will call the HasAsyncError method to display the error message:
private void client_GetOnlineAlarmsCompleted(object sender, GetOnlineAlarmsCompletedEventArgs e)
{
    if (e.Error == null && e.Cancelled == false)
    {
        AlarmList.ItemsSource = e.Result.Alarms;
    }
    else
    {
        HasAsyncError();
    }
}
Now we need to unregister from the events we have registered above: GroupSelect_SelectionChanged, TypeSelect_SelectionChanged and client_GetOnlineAlarmsCompleted:
In the Dispose method (from the Dispose region), call a new method named DisposeSelectionChanged:
public void Dispose()
{
    DisposeSelectionChanged();
    DisposeServiceClient();
    DisposeConnector();
}
Create the DisposeSelectionChanged method and unregister the two SelectionChanged events:
private void DisposeSelectionChanged()
{
    GroupSelect.SelectionChanged -= GroupSelect_SelectionChanged;
    TypeSelect.SelectionChanged -= TypeSelect_SelectionChanged;
}
In the existing DisposeServiceClient method, unregister the client_GetOnlineAlarmsCompleted event:
private void DisposeServiceClient()
{
    client.GetAlarmGroupsCompleted -= client_GetAlarmGroupsCompleted;
    client.GetAlarmTypesCompleted -= client_GetAlarmTypesCompleted;
    client.GetOnlineAlarmsCompleted -= client_GetOnlineAlarmsCompleted;
}
Testing the code
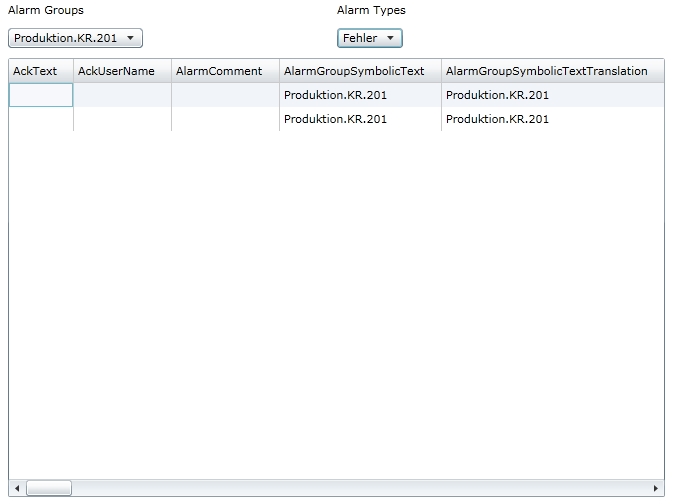
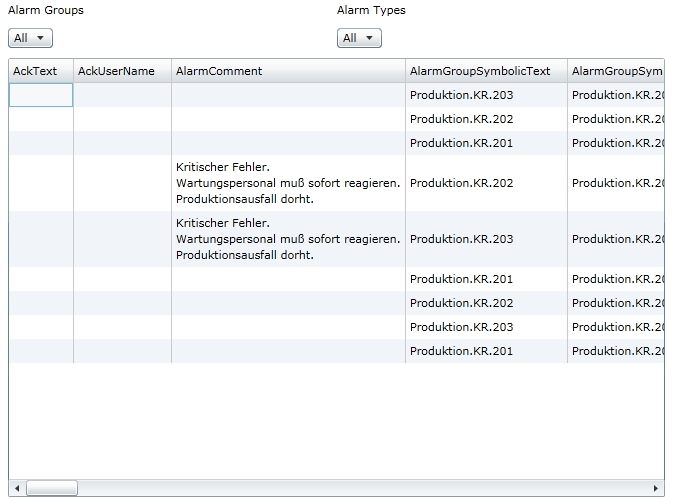
Press F5 to build and run the application from Visual Studio. The AlarmList DataGrid should be populated with the online alarms, depending on the selected filters from the two ComboBox controls: